2022 TOYOTA 86 brake
[x] Cancel search: brakePage 310 of 449

3106-3. Do-it-yourself maintenance
■Checking battery fluid
Check that the level is between
the “UPPER LEVEL” and
“LOWER LEVEL” lines.
“UPPER LEVEL” line
“LOWER LEVEL” line
If the fluid level is at or below the
“LOWER LEVEL” line, add distilled
water.
■Adding distilled water
1 Remove the vent plug.
2 Add distilled water.
If the “UPPER LEVEL ” line cannot
be seen, check the fluid level by
looking directly at the cell.
3 Put the vent plug back on
and close it securely.
■Before recharging
When recharging, t he battery pro-
duces hydrogen ga s which is flam-
mable and explosive. Therefore, observe the following before
recharging:
●If recharging with the battery
installed on the vehicle, be sure to
disconnect the ground cable.
●Make sure the power switch on
the charger is off when connecting
and disconnecting the charger
cables to the battery.
■After recharging/reconnecting
the battery
The engine may not start. Follow the
procedure below to initialize the sys-
tem.
1 Shift the shift lever to P (auto-
matic transmission) or depress
the brake pedal with the shift
lever in N (manual transmission).
2 Open and close either door.
3 Restart the engine.
●Unlocking the doors using the
smart key system may not be pos-
sible immediately after reconnect-
ing the battery. If this happens,
use the wireless remote control or
the mechanical key to lock/unlock
the doors.
●Start the engine with the engine
switch in ACC. T he engine may
not start with th e engine switch
turned off. However, the engine
will operate normally from the sec-
ond attempt.
●The engine switch mode is
recorded by the vehicle. If the bat-
tery is disconnected and recon-
nected, the vehi cle will return the
engine switch mode to the status it
was in before the battery was dis-
connected. Make sure to turn off
the engine before disconnecting
the battery. Take extra care when
connecting the battery if the
engine switch mode prior to the
battery being disconnected is
unknown.
If the system will not start even after
multiple attempts, contact your Toy-
ota dealer.
A
Page 319 of 449

3196-3. Do-it-yourself maintenance
6
Maintenance and care
When 2 sets of ID codes have been
registered, either ID code set can be
selected.
1Park the vehicle in a safe
place and turn the engine
switch to ON.
2 Press the tire pressure warn-
ing reset switch 3 times
within 3 seconds.
3 The tire pressure warning
light will illuminate for 3 sec-
onds and then blink 3 times.
4 The tire pressure warning
light will blink for 1 minute
and then illuminate.
5 When the ID code change
has completed, the tire pres-
sure warning light will turn off.
Check that tire pressures are dis-
played on the multi-information dis-
play.
Stop the vehicle in a safe
place on a hard, flat surface.
Set the parking brake.
Shift the shift lever to P (auto-
matic transmission) or R
(manual transmission).
Stop the engine.
■Jack and Jack handle
As your vehicle is equipped with an
emergency tire puncture repair kit, a
jack and jack handle for replacing a
tire are not include d with your vehi-
cle. To purchase a jack and jack
handle, contact your Toyota dealer.
●Jack
●Jack handle
Changing the ID code set
Replacing the tire
When raising your vehicle
with a jack, position the jack
correctly.
Improper placement may
damage your vehicle or
cause injury.
If necessary tire replace-
ment seems difficult to per-
form, contact your Toyota
dealer.
Before jacking up the
vehicle
Page 322 of 449
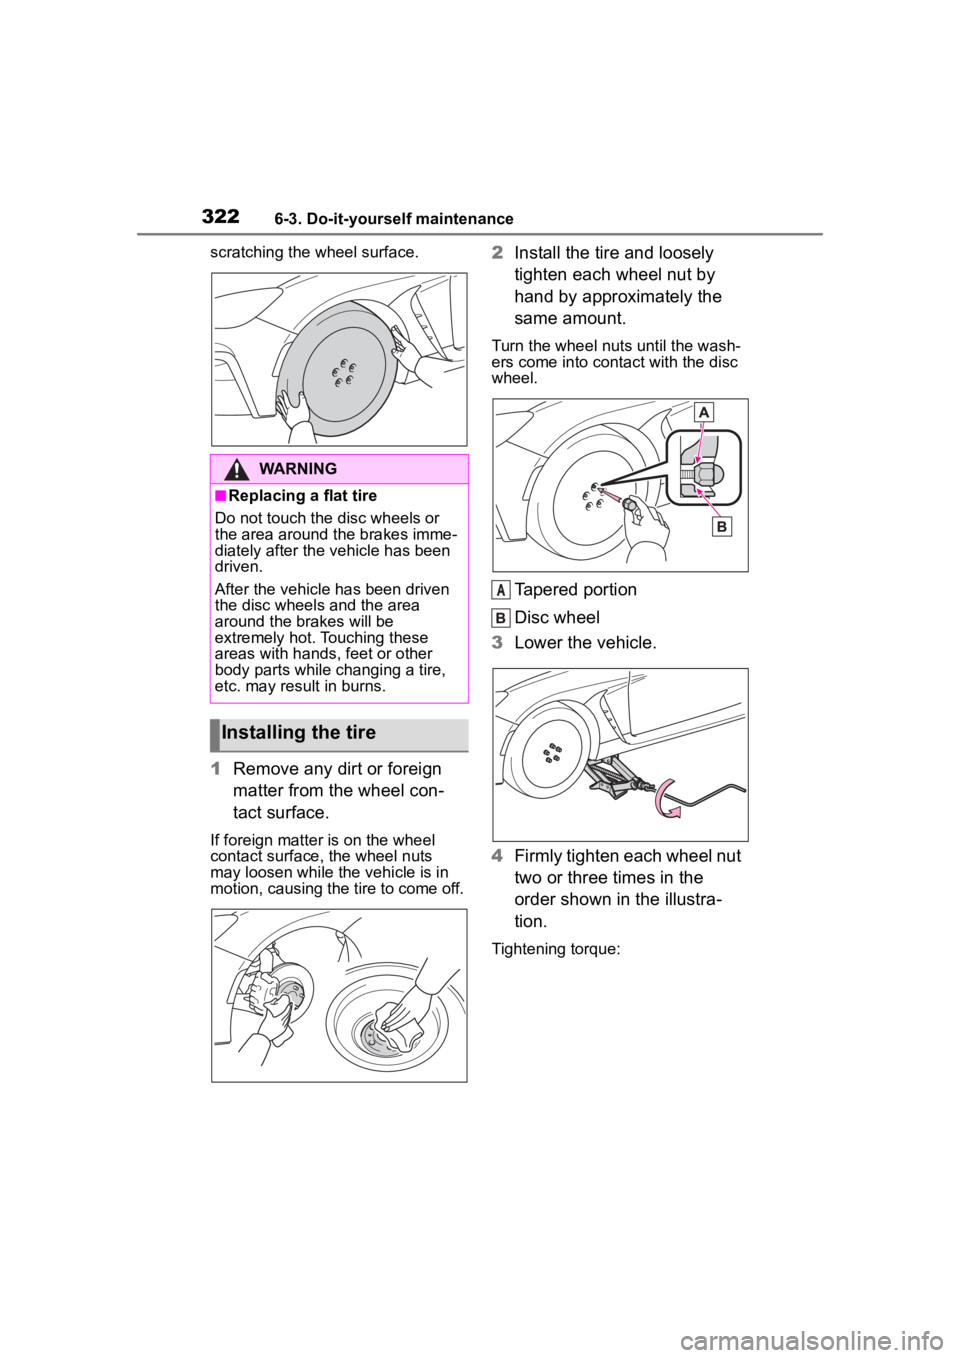
3226-3. Do-it-yourself maintenance
scratching the wheel surface.
1Remove any dirt or foreign
matter from the wheel con-
tact surface.
If foreign matter is on the wheel
contact surface, the wheel nuts
may loosen while the vehicle is in
motion, causing the tire to come off.
2Install the tire and loosely
tighten each wheel nut by
hand by approximately the
same amount.
Turn the wheel nuts until the wash-
ers come into contact with the disc
wheel.
Tapered portion
Disc wheel
3 Lower the vehicle.
4 Firmly tighten each wheel nut
two or three times in the
order shown in the illustra-
tion.
Tightening torque:
WARNING
■Replacing a flat tire
Do not touch the disc wheels or
the area around the brakes imme-
diately after the vehicle has been
driven.
After the vehicle has been driven
the disc wheels and the area
around the brakes will be
extremely hot. Touching these
areas with hands, feet or other
body parts while changing a tire,
etc. may result in burns.
Installing the tire
A
Page 338 of 449

3387-1. Essential information
7-1.Essential information
Press the switch.
All the turn signal lights will flash.
To turn them off, press the switch
once again.
■Emergency flashers
If the emergency fl ashers are used
for a long time while the engine is
not operating, the battery may dis-
charge.
1 Steadily step on the brake
pedal with both feet and
firmly depress it.
Do not pump the brake pedal
repeatedly as this will increase the
effort required to slow the vehicle.
2Shift the shift lever to N.
If the shift lever is shifted to N
3 After slowing down, stop the
vehicle in a safe place by the
road.
4 Stop the engine.
If the shift lever cannot be
shifted to N
3 Keep depressing the brake
pedal with both feet to reduce
vehicle speed as much as
possible.
4 To stop the engine, press and
hold the engine switch for 2
consecutive seconds or
Emergency flashers
The emergency flashers are
used to warn other drivers
when the vehicle has to be
stopped on the road due to
a breakdown, etc.
Operating instructions
If your vehicle has to
be stopped in an emer-
gency
Only in an emergency, such
as if it becomes impossible
to stop the vehicle in the
normal way, stop the vehicle
using the following proce-
dure:
Stopping the vehicle
Page 339 of 449

3397-1. Essential information
7
When trouble arises
more, or press it briefly 3
times or more in succession.
5 Stop the vehicle in a safe
place by the road.
If the door can be opened,
open the door and exit the
vehicle.
If the door cannot be opened,
open the window using the
power window switch and
ensure an escape route.
If the window can be opened,
exit the vehicle through the
window.
If the door and window cannot
be opened due to the rising
water, remain calm, wait until
the water level inside the
vehicle rises to the point that
the water pressure inside of
the vehicle equals the water
pressure outside of the vehi-
cle and then open the door
after waiting for the rising
water to enter the vehicle, and
exit the vehicle. When the
WARNING
■If the engine has to be turned
off while driving
Power assist for the brakes and
steering wheel will be lost, making
the brake pedal harder to depress
and the steering wheel heavier to
turn. Decelerate as much as pos-
sible before turning off the engine.
If the vehicle is sub-
merged or water on
the road is rising
This vehicle is not designed
to be able to drive on roads
that are deeply flooded with
water. Do not drive on roads
where the roads may be
submerged or the water
may be rising. It is danger-
ous to remain in the vehicle,
if it anticipated that the vehi-
cle will be flooded or set a
drift. Remain calm and fol-
low the following.
Page 342 of 449

3427-2. Steps to take in an emergency
The following may indicate a
problem with your transmission.
Contact your Toyota dealer or
commercial towing service
before towing.
The engine is running but the
vehicle does not move.
The vehicle makes an abnor-
mal sound.
From the front
Use a towing dolly under the
rear wheels.
From the rear
WARNING
■After towing
Make sure to remove the towing
eyelet.
If not removed, the SRS airbags
may not deploy correctly if the
vehicle is involved in a frontal col-
lision, or the fuel pump shutoff
system may not operate correctly
if involved in a rear collision.
NOTICE
■To prevent damage to the
vehicle when towing using a
wheel-lift type truck
●Do not tow the vehicle from the
rear when the engine switch is
off. The steering lock mecha-
nism is not strong enough to
hold the front wheels straight.
●When raising the vehicle,
ensure adequate ground clear-
ance for towing at the opposite
end of the raised vehicle. With-
out adequate clearance, the
vehicle could be damaged while
being towed.
■To prevent damage to the
vehicle when towing with a
sling-type truck
Do not tow with a sling-type truck,
either from the front or rear.
■To prevent damage to the
vehicle during emergency
towing
Do not secure cables or chains to
the suspension components.
■When towing down a long
slope
Use a wheel lift-type or flat bed
truck.
If a wheel lift-type or flat bed truck
is not used, the brakes may over-
heat, leading to poor brake perfor-
mance.
Situations when it is nec-
essary to contact dealers
before towing
Towing with a wheel-lift
type truck
Page 343 of 449

3437-2. Steps to take in an emergency
7
When trouble arises
Use a towing dolly under the
front wheels.
When using a flat-bed truck to
transport the vehicle, use tire
strapping belts. Refer to the
owner’s manual of the flat-bed
truck for the tire strapping
method.
In order to suppress vehicle
movement during transporta-
tion, set the parking brake and
turn the engine switch off.
If a tow truck is not available in
an emergency, your vehicle may
be temporarily towed using
cables or chains secured to the
emergency towing eyelets. This
should only be attempted on
hard surfaced roads for at most
19 miles (30 km) at under 18
mph (30 km/h).
A driver must be in the vehicle to steer and operate the brakes.
The vehicle’s wheels, drive train,
axles, steering and brakes must
be in good condition.
For vehicles with an automatic
transmission, only the front tow-
ing eyelets may be used.
To have your vehicle towed by
another vehicle, the towing eye-
let must be installed to your
vehicle. Install the towing eyelet
using the following procedure.
1
Take out the wheel nut
wrench, flathead screwdriver
and towing eyelet. ( P.359)
2 Remove the eyelet cover
using a flathead screwdriver.
To protect the b odywork, place a
rag between the screwdriver and
the vehicle body as shown in the
NOTICE
■Towing with a sling-type truck
Do not tow with a sling-type truck
to prevent body damage.
Using a flatbed truck
Emergency towing
Emergency towing proce-
dure
Page 345 of 449

3457-2. Steps to take in an emergency
7
When trouble arises
engine switch to ON.
9Shift the shift lever to N and
release the parking brake.
Vehicles with an automatic trans-
mission: When the shift lever can-
not be shifted: P. 1 5 0
■Towing eyelet purpose
The towing eyelet i s to be used to
tow your vehicle, not to tow other
vehicles.
■While towing
If the engine is not running, the
power assist for the brakes and
steering will not function, making
steering and braking more difficult.
■Wheel nut wrench
Wheel nut wrench is installed in
trunk. ( P.359)
■Rear towing eyelet
If the towing eyelet is installed to the
rear, it can be used in an emergency
to tow a vehicle lig hter than your
vehicle on a norma l road, using a
rope.
■When towing another vehicle
For vehicles with BSD/RCTA, make
sure to turn BSD/RCTA off.
As the radar wave s will be blocked
by the towed vehicle, this system
will not operat e properly.
■When installing a towing eyelet
to the rear
When installing a towing eyelet to
the rear, install it using the following
procedure. 1
Take out the wheel nut wrench,
flathead screwdriver and towing
eyelet. ( P.359)
2 Remove the eyelet cover using a
flathead screwdriver.
To protect the bodywork, place a rag
between the screwdriver and the
vehicle body as shown in the illus-
tration.
3 Remove the cover from the
bumper.
4 Insert the towing eyelet into the
hole and tighten partially by
hand.
5 Tighten down the towing eyelet
securely using a wheel nut
wrench or hard metal bar.