Page 6 of 250
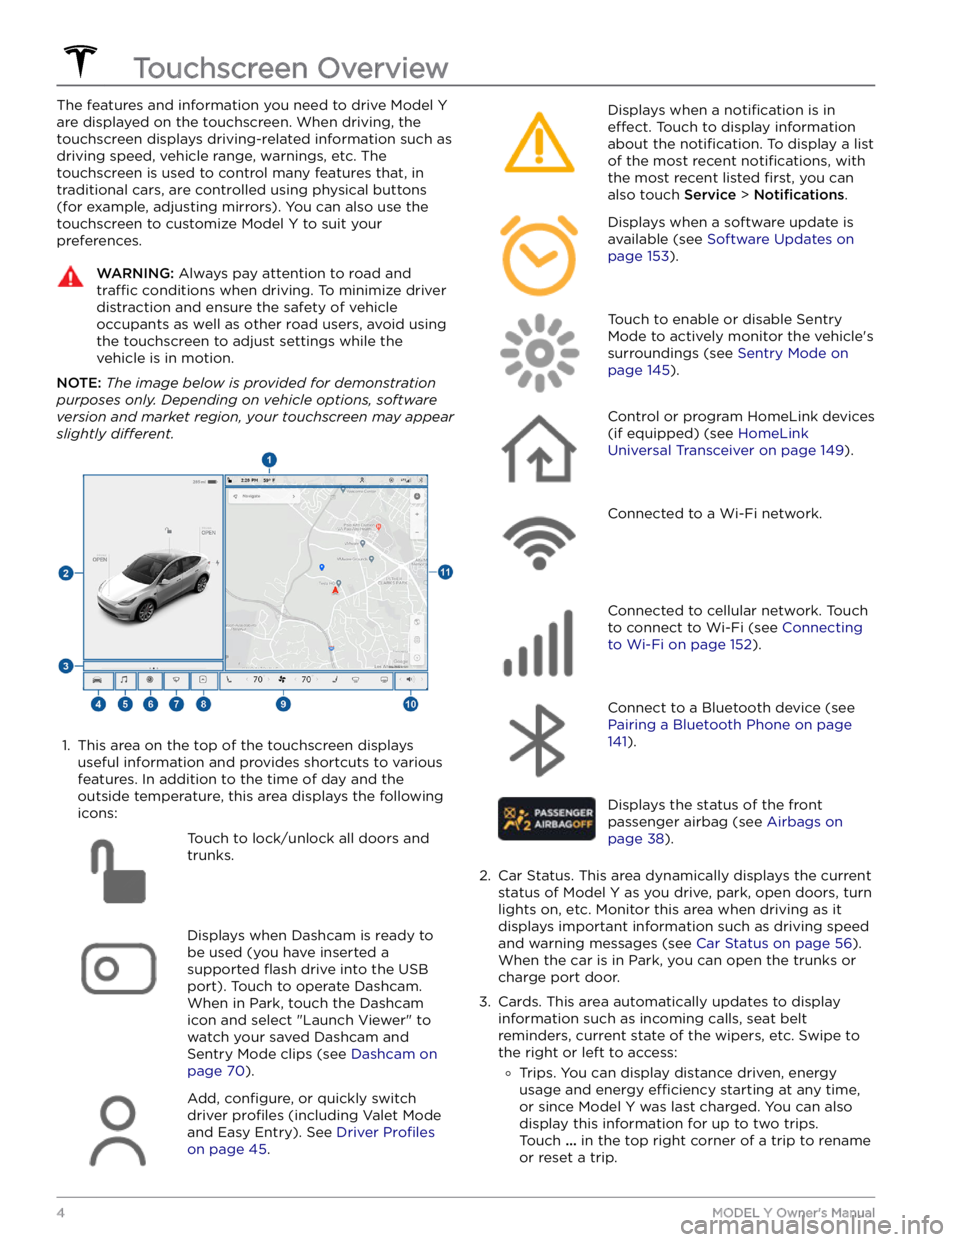
The features and information you need to drive Model Y
are displayed on the touchscreen. When driving, the
touchscreen displays driving-related information such as driving speed, vehicle range, warnings, etc. The touchscreen is used to control many features that, in traditional cars, are controlled using physical buttons (for example, adjusting mirrors). You can also use the touchscreen to customize
Model Y to suit your
preferences.
WARNING: Always pay attention to road and
traffic conditions when driving. To minimize driver
distraction and ensure the safety of vehicle
occupants as well as other road users, avoid using
the touchscreen to adjust settings while the
vehicle is in motion.
NOTE: The image below is provided for demonstration
purposes only. Depending on vehicle options, software
version and market region, your touchscreen may appear
slightly different.
1.
This area on the top of the touchscreen displays useful information and provides shortcuts to various
features. In addition to the time of day
and the
outside temperature, this area displays the following
icons:
Touch to lock/unlock all doors and
trunks.Displays when Dashcam is ready to be used (you have inserted a supported
flash drive into the USB
port). Touch to operate Dashcam
.
When in Park, touch the Dashcam
icon and select "Launch Viewer" to
watch your saved Dashcam and
Sentry Mode clips (see Dashcam on
page 70).
Add, configure, or quickly switch
driver
profiles (including Valet Mode
and Easy Entry). See
Driver Profiles
on page 45.
Displays when a notification is in
effect. Touch to display information
about the
notification. To display a list
of the most recent
notifications, with
the most recent listed
first, you can
also touch
Service > Notifications.
Displays when a software update is
available (see
Software Updates on
page 153).
Touch to enable or disable Sentry
Mode to actively monitor the vehicle
Page 9 of 250
NOTE: Although Bluetooth typically communicates over
distances of up to approximately
30 feet (9 meters),
performance can vary based on the phone you are
using, environmental interference, etc.
NOTE: If multiple vehicles are linked to your Tesla
account, you must ensure that the vehicle you want the
mobile app to access is currently selected on the mobile app.
Key Card
Tesla provides you with two Model Y key cards, designed
to
fit in your wallet.
To use a key card to unlock or lock Model Y, position the
card as shown and tap it against the card reader located
approximately one third the way up of the driver
Page 10 of 250
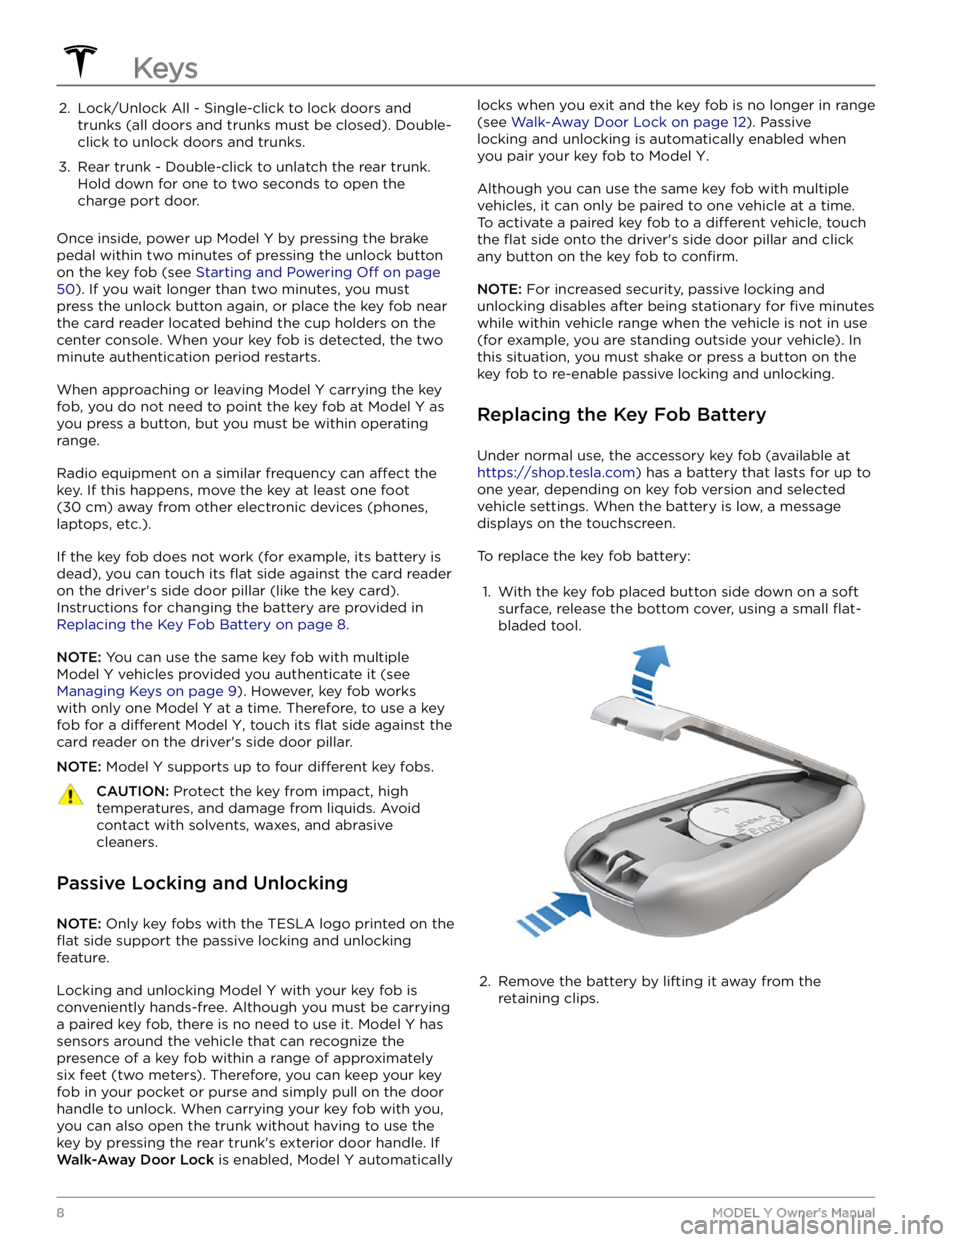
2. Lock/Unlock All - Single-click to lock doors and trunks (all doors and trunks must be closed). Double-
click to unlock doors and trunks.3.
Rear trunk - Double-click to unlatch the rear trunk. Hold down for one to two seconds to open the
charge port door.
Once inside, power up Model Y by pressing the brake
pedal within two minutes of pressing the unlock button
on the key fob (see
Starting and Powering Off on page
50). If you wait longer than two minutes, you must
press the unlock button again, or place the key fob near
the card reader located
behind the cup holders on the
center console. When your key fob is detected, the two
minute authentication period restarts.
When approaching or leaving Model Y carrying the key
fob, you do not need to point the key fob at
Model Y as
you press a button, but you must be within operating range.
Radio equipment on a similar frequency can affect the
key. If this happens, move the key at least
one foot
(30 cm) away from other electronic devices (phones,
laptops, etc.).
If the key fob does not work (for example, its battery is dead), you can touch its
flat side against the card reader
on the driver
Page 13 of 250
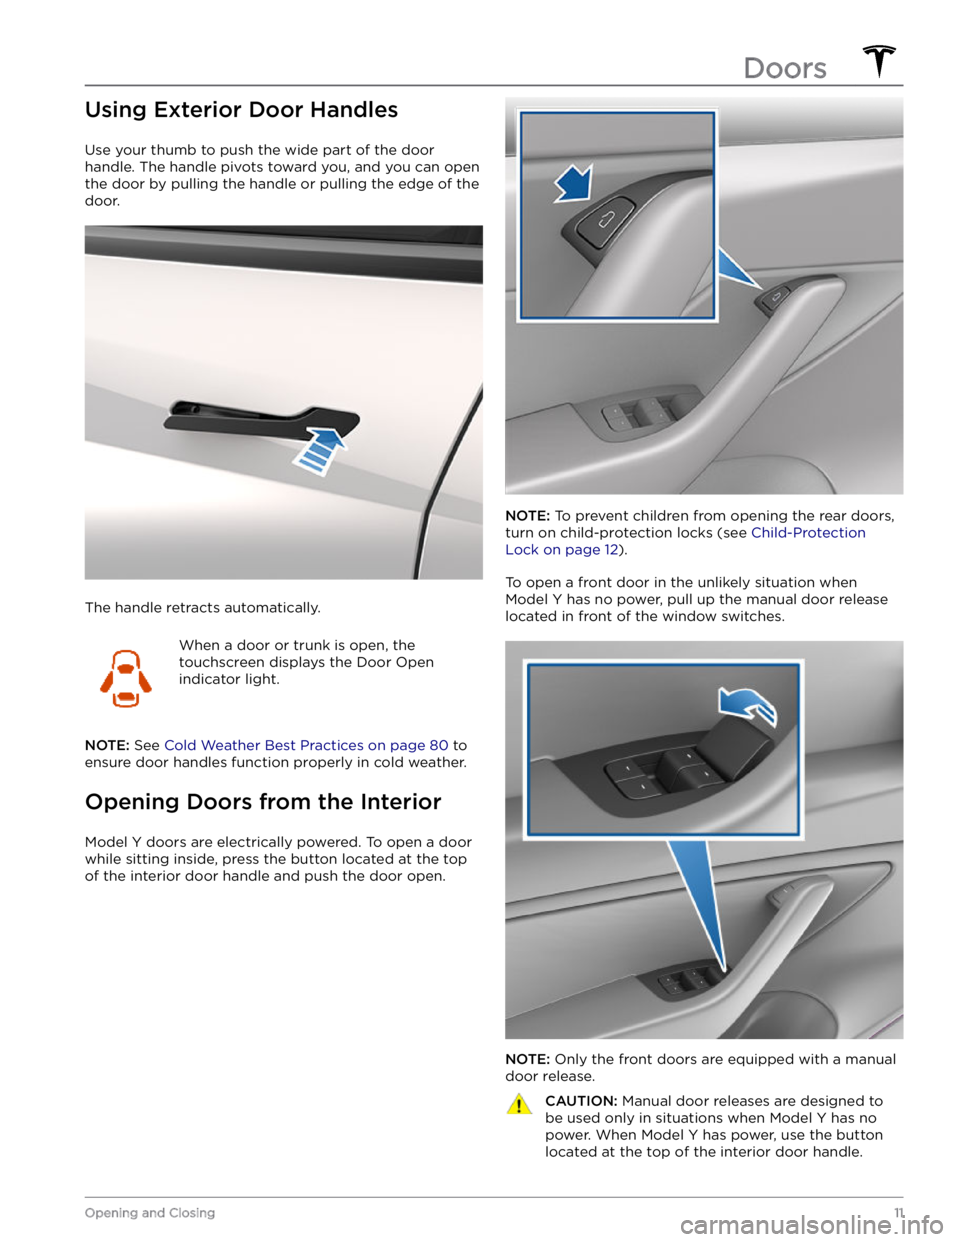
Using Exterior Door Handles
Use your thumb to push the wide part of the door
handle. The handle pivots toward you, and you can open
the door by pulling the handle or pulling the edge of the door.
The handle retracts automatically.
When a door or trunk is open, the
touchscreen displays the Door Open
indicator light.
NOTE: See Cold Weather Best Practices on page 80 to
ensure door handles function properly in cold weather.
Opening Doors from the Interior
Model Y doors are electrically powered. To open a door
while sitting inside, press the button located at the top of the interior door handle and push the door open.
NOTE: To prevent children from opening the rear doors,
turn on child-protection locks (see
Child-Protection
Lock on page 12).
To open a front door in the unlikely situation when
Model Y has no power, pull up the manual door release
located in front of the window switches.
NOTE: Only the front doors are equipped with a manual
door release.
CAUTION: Manual door releases are designed to
be used only in situations when Model Y has no
power. When Model Y has power, use the button
located at the top of the interior door handle.Doors
11Opening and Closing
Page 14 of 250
Interior Locking and Unlocking
While sitting inside Model Y, you can lock and unlock all
doors and trunks by touching the lock icon
on the
touchscreen.
The icon changes to indicate whether
doors are locked or unlocked.
You can also unlock the doors by pressing the Park
button on the end of the drive stalk a second time.
Pressing this button once engages the Park gear and pressing it again unlocks the doors.
Walk-Away Door Lock
Doors and trunks can automatically lock when you walk away carrying your phone key or paired key fob. To turn
this feature on or
off, touch Controls > Locks > Walk-
Away Door Lock.
When the doors lock, the exterior lights flash once and
the mirrors fold (if
Fold Mirrors is on). To also hear a
confirmation sound when Model Y locks, touch Controls
> Locks > Lock Confirmation Sound > ON.
Model Y does not automatically lock if:
Page 19 of 250
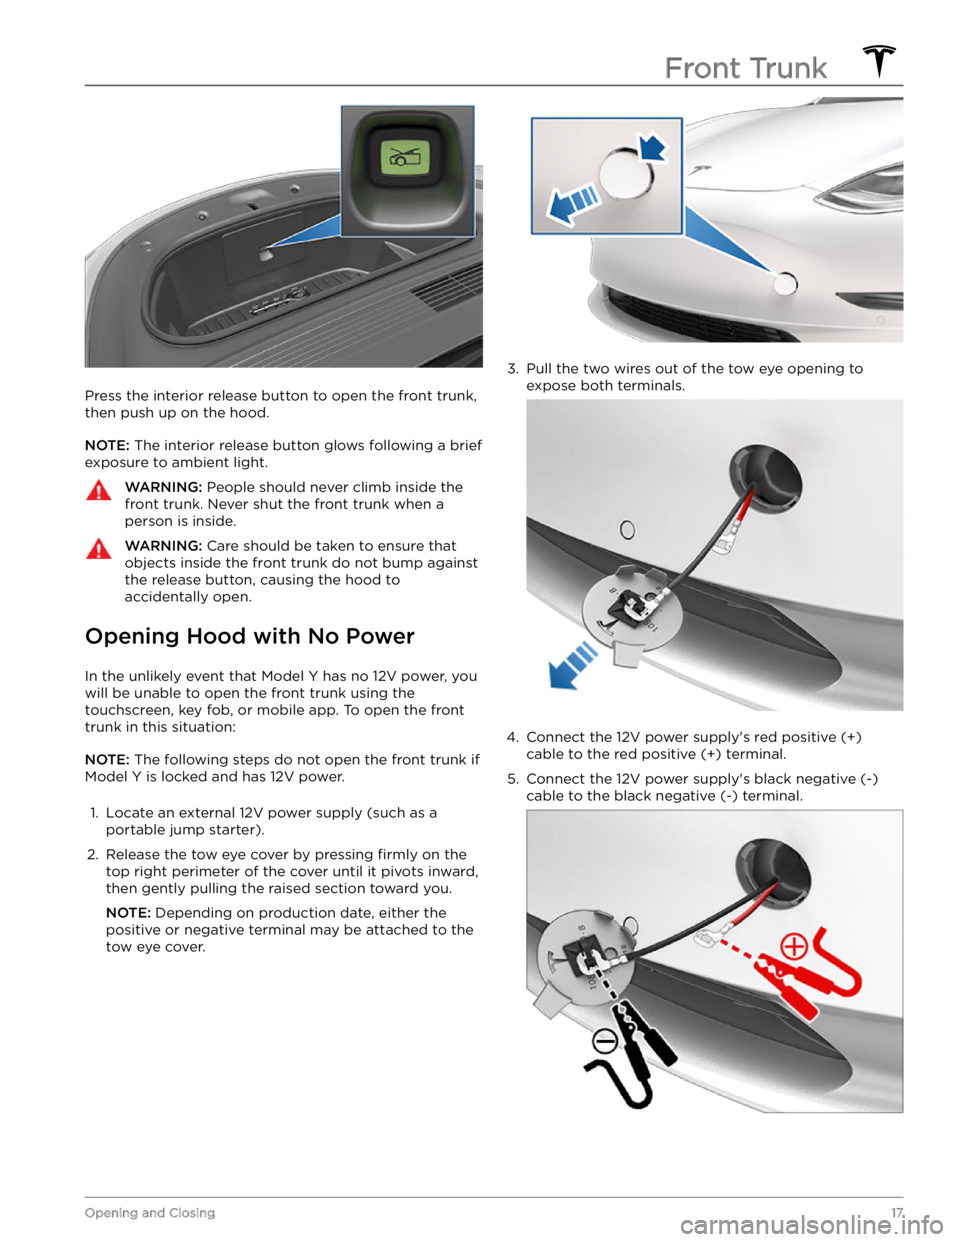
Press the interior release button to open the front trunk, then push up on the hood.
NOTE: The interior release button glows following a brief
exposure to ambient light.
WARNING: People should never climb inside the
front trunk. Never shut the front trunk when a
person is inside.
WARNING: Care should be taken to ensure that
objects inside the front trunk do not bump against
the release button, causing the hood to
accidentally open.
Opening Hood with No Power
In the unlikely event that Model Y has no 12V power, you
will be unable to open the front trunk using the touchscreen, key fob, or mobile app. To open the front
trunk in this situation:
NOTE: The following steps do not open the front trunk if
Model Y is locked and has 12V power.
1.
Locate an external 12V power supply (such as a
portable jump starter).
2.
Release the tow eye cover by pressing firmly on the
top right perimeter of the cover until it pivots inward,
then gently pulling the raised section toward you.
NOTE: Depending on production date, either the
positive or negative terminal may be attached to the tow eye cover.
3.
Pull the two wires out of the tow eye opening to
expose both terminals.
4.
Connect the 12V power supply
Page 22 of 250
NOTE: The glovebox locks whenever closed and you
lock
Model Y using the mobile app, key card, you leave
Model Y carrying your phone key (if Walk-Away Door
Lock is turned on), or if Valet mode is active (see
Valet
Mode on page 45). It does not lock when Model Y is
locked by touching the lock icon on the touchscreen.
WARNING: When driving, keep the glovebox
closed to prevent injury to a passenger if a
collision or sudden stop occurs.
USB Ports
Model Y has two USB ports located in the front
compartment of the center console. These ports can be used to:
Page 27 of 250
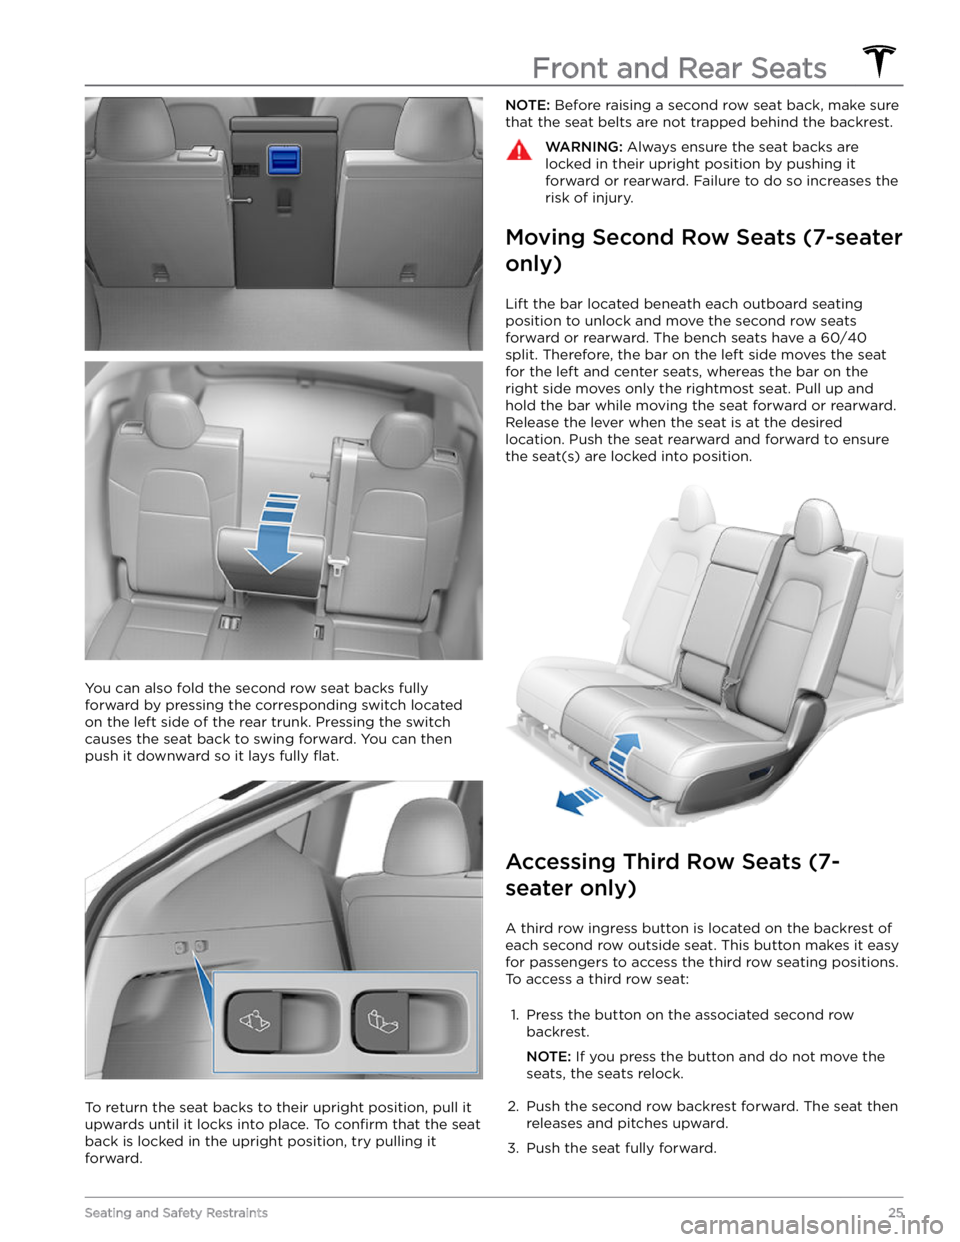
You can also fold the second row seat backs fully
forward by pressing the corresponding switch located on the left side of the rear trunk. Pressing the switch causes the seat back to swing forward. You can then push it downward so it lays fully
flat.
To return the seat backs to their upright position, pull it upwards until it locks into place. To
confirm that the seat
back is locked in the upright position, try pulling it forward.
NOTE: Before raising a second row seat back, make sure
that the seat belts are not trapped behind the backrest.WARNING: Always ensure the seat backs are
locked in their upright position by pushing it
forward or rearward. Failure to do so increases the
risk of injury.
Moving Second Row Seats (7-seater
only)
Lift the bar located beneath each outboard seating position to unlock and move the second row seats
forward or rearward. The bench seats have a 60/40 split. Therefore, the bar on the left side moves the seat for the left and center seats, whereas the bar on the
right side moves only the rightmost seat. Pull up and
hold the bar while moving the seat forward or rearward. Release the lever when the seat is at the desired location. Push the seat rearward and forward to ensure the seat(s) are locked into position.
Accessing Third Row Seats (7-
seater only)
A third row ingress button is located on the backrest of each second row outside seat. This button makes it easy for passengers to access the third row seating positions.
To access a third row seat:
1.
Press the button on the associated second row backrest.
NOTE: If you press the button and do not move the
seats, the seats relock.
2.
Push the second row backrest forward. The seat then releases and pitches upward.
3.
Push the seat fully forward.
Front and Rear Seats
25Seating and Safety Restraints