2022 SUBARU OUTBACK X mode
[x] Cancel search: X modePage 2 of 172

© 2021 Subaru of America, Inc. Printed in USA. All rights reserved. Contents may not be
reproduced in whole or in part without prior written permission of publisher\
. Specifications
in this Guide are based on the latest product information available at the time of
publication. Some images shown are for illustration purposes only. Some equipment shown
in photography within this Guide is optional at extra cost. Specific o\
ptions may be available
only in combination with other options. Specific combinations of equip\
ment or features may
vary from time to time, and by geographic area. Subaru of America, Inc. reserves the right
to change or discontinue at any time, without notice: Prices, colors, ma\
terials, equipment,
accessories, specifications, models and packages, without incurring an\
y obligation to
make the same or similar changes on vehicles previously sold. Colors shown may vary
due to reproduction and printing processes. Subaru of America, Inc. is not responsible for
typographical errors.
Aha
™ is a trademark of Harman International Industries, Incorporated. Alcantara® is a
registered trademark of Alcantara S.p.A., and Alcantara is produced by the Toray Group.
App Store
® is a registered trademark of Apple, Inc. Apple® is a registered trademark of
Apple, Inc. Apple CarPlay® is a registered trademark of Apple, Inc. Android Auto™ is a
trademark of Google, LLC. BBS® is a registered trademark of BBS Kraftahrzeugtechnik,
AG. Bluetooth® is a registered trademark of Bluetooth SIG, Inc. BRIN NAUB® is a registered
trademark of TB Kawashima Co., Ltd. Brembo® is a registered trademark of Freni
Brembo, S.p.A. GreenEdge® is a registered trademark of Harman International Industries,
Incorporated. Glympse® is a registered trademark of Glympse, Inc. Grand Luxe® is a
registered trademark of Seiren Co., Ltd. HARMAN® is a registered trademark of HARMAN
International Industries, Incorporated. Harman Kardon® is a registered trademark of
Harman International Industries, Incorporated. Quantum logic™ is a trademark of Harman
International Industries, Incorporated. HD Radio® is a registered trademark of iBiquity
Digital Corporation. HomeLink® and the HomeLink® house icon are registered trademarks
of Gentex Corporation. iHeartRadio® is a registered trademark of iHeartMedia, Inc.
iPod® is a registered trademark of Apple, Inc. iTunes® is a registered trademark of Apple,
Inc. Magellan® is a registered trademark of MiTAC International Corporation. Michelin®
is a registered trademark of Compagnie Générale des Etablissments Michelin. Met\
al-
Matrix Diaphragm (MMD
®) is a registered trademark of Harman International Industries,
Incorporated. MirrorLink™ is a trademark of Car Connectivity Consortium, LLC. Pandora®
is a registered trademark of Pandora Media, Inc. SACHS® is a registered trademark of ZF
Friedrichshafen AG. Siri® is a registered trademark of Apple, Inc. Smart Way® is a registered
trademark of the U.S. Environmental Protection Agency. StitcherTM is a trademark of
Stitcher
TM, Inc. TomTom® is a registered trademark of TomTom International BV. TORSEN
LSD® is a registered trademark of JTEKT TORSEN North America, Inc. SiriusXM® All Access
Radio is a registered trademark of Sirius XM Radio, Inc. SiriusXM Traffic® is a registered
trademark of Sirius XM Radio, Inc. SiriusXM Travel Link® is a registered trademark of Sirius
XM Radio, Inc. Ultrasuede® is a registered trademark of Toray Industries, Inc. Yelp® is a
registered trademark of Yelp, Inc. Ascent is a trademark of Subaru of America, Inc. Added
Security, DriverFocus, Crosstrek, Forester, Outback, StarTex and StarDrive are registered
trademarks of Subaru of America, Inc. Forester Wilderness and Outback Wilderness are
trademarks of Subaru of America, Inc. BRZ, EyeSight, Impreza, Lineartronic, Legacy,
S209, Subaru, SUBARU STARLINK, Starlink, SUBARU BOXER, tS (Design), WRX, STI and
X-MODE are registered trademarks of Subaru Corporation.
Page 3 of 172

PURPOSE OF THIS GUIDE
WELCOME................. 4
IMPORTANT SAFETY
INFORMATION.............. 4
OWNER’S RESOURCES....... 4
IN CASE OF EMERGENCY..... 5
TOWING YOUR ALL-WHEEL
DRIVE SUBARU............. 6
ENTRY AND EXIT
KEYLESS ENTRY............ 7
KEYLESS ACCESS WITH
PUSH BUTTON START....... 8
POWER REAR GATE (PRG)....10
INSTRUMENT PANEL........14
GETTING COMFORTABLE
SEATING...................16
TILT AND TELESCOPIC
STEERING COLUMN.........19
POWER EXTERIOR MIRRORS . . . 20
REAR VIEW MIRROR.........22
POWER WINDOWS..........23
CENTER CONSOLE
STORAGE..................23
POWER MOONROOF........24
CLIMATE CONTROL..........25
ACCESSORY CONNECTIONS . . . 33
CONTROLS
INSTRUMENT PANEL SWITCHES
(LOWER LEFT)..............34
AUDIO CONTROLS...........34
ADVANCED ADAPTIVE CRUISE
CONTROL..................35
I SWITCH...................35
LIGHT CONTROLS...........36
TURN SIGNALS.............37
WINDSHIELD WIPERS........37
REAR WINDOW WIPER.......38
OVERHEAD CONSOLE........39
GAUGES AND WARNING
LIGHTS
COMBINATION METER.......40
WARNING AND INDICATOR
LIGHTS....................41
OPERATING THE VEHICLE
IGNITION SWITCH...........42
PUSH-BUTTON IGNITION
SWITCH...................42
STARTING THE VEHICLE......42
DRIVING THE VEHICLE.......43
AUTO START–STOP..........44
ELECTRONIC PARKING BRAKE
(EPB).....................46
X-MODE
®..................48
TURNING OFF THE VEHICLE...50
TABLE OF CONTENTS
Page 27 of 172

CLIMATE CONTROL
Dual 7–Inch Automatic Climate Control
The climate control buttons appear on the lower portion of the bottom display and are
similar to the 11.6 inch display.
1Climate Control On/Off Button
2Climate Control Mode Indicator
3Set Temperature Indicator4Customizable Icon
5Fan Speed Indicator
Select the Climate Control Mode Indicator to display the climate control screen. On this
screen, you can adjust the climate control mode, airflow mode, and fan speed.
1
23
54
GETTING COMFORTABLE
25
Page 28 of 172

Select the Set Temperature Indicator to display the temperature control screen. On this
screen, you can adjust the temperature using the red and blue arrow buttons or the
temperature control slider bar. The temperature displays at the top of the screen.
11.6–Inch Automatic Climate Control
The climate control system is equipped with
convenient and customizable features. In
automatic control mode, set your desired
temperature and let the system make the
adjustments for you. At any time, you can
manually take control of the climate settings.
You can also set separate temperatures for the
driver and front passenger.
1Climate Control On/Off Button:This
button turns the climate control on and
off.
2
Temperature Control Buttons:Push the
red arrow button to increase the
temperature or the blue arrow button
to decrease the temperature. The
temperature appears on the screen.
You can also adjust the setting via
touchscreen by selecting the temperature displayed on the screen and using the arrows
or sliding the temperature control bar. You can set separate temperatures for the driver’s
side and passenger’s side.
GETTING COMFORTABLE
26
Page 29 of 172

3Rear Window Defogger Button:Press this button to turn on the rear window defogger.
If equipped, the outside mirror defogger and windshield wiper deicer will also activate.
It will automatically turn off after about 15 minutes. If the window clears before then,
press the button again to turn it off. You can customize this function for continuous
operation through the STARLINK
®touchscreen by selecting “Settings”, then “Car”.
4Defroster Button:This button turns on the front defroster. It also turns on the climate
control system if it is off.
NOTE: When the defrost mode is selected, the air conditioning compressor operates to
defrost the windshield more quickly. However, the indicator on the air conditioner button
may not illuminate.
5Customizable Button:This button can be customized to be one of four different
modes: A/C, Max A/C, Auto or Recirculation. On the Home Screen, select "Settings",
"General", and then "Climate Control" to customize.
6Climate Control Mode Indicator:Select the Climate Control Mode Indicator to
control fan speed, air flow, Max A/C, auto and recirculation modes.
7Fan Speed Button:
On the main screen,
push the “Fan Up” button to increase fan
speed or “Fan Down” button to decrease
fan speed . You can also select the Climate
Control Mode Indicator to open the climate
control window and adjust fan speed by
selecting (or dragging the setting to) your
preferred speed from 1 to 7.
8MAX A/C Button:Press this button for
quickest cooling.
9Automatic Control Button:
Select the
"AUTO" button to activate full auto mode.
"FULL AUTO" displays on the button and
Climate Control Indicator. When full auto
mode is activated, the fan speed, airflow
distribution, and air conditioner compressor
operation are automatically controlled.
10Air Inlet Selection Button:Select this
button to activate recirculation mode and
recirculate the interior air inside the vehicle.
Recirculation mode is helpful when driving
on a dusty road or when you want cooling performance to increase. Select the button again
to return to outside air circulation mode and allow outside air to be drawn into your Subaru.
NOTE: To prevent windshield fogging, do not remain in the recirculated mode for an
extended period of time.
11Airflow Mode Selection Buttons:Press the button to select the desired airflow
mode. The selected mode air flow mode is shown on the display.
GETTING COMFORTABLE
27
Page 30 of 172

ICON MODE FUNCTION
Ventilation
Instrument panel outlets
Ventilation 2Instrument panel outlets and less foot outlets than
bi-level
Bi-Level
Instrument panel outlets and foot outlets
FeetFoot outlets, both side outlets of the instrument panel
and some through windshield defroster outlets
Feet-DefrostWindshield defroster outlets, foot outlets and both
side outlets of the instrument panel
DefrostWindshield defroster outlets and both side outlets of
the instrument panel
NOTE: The defroster button is used to activate the defrost airflow mode.
GETTING COMFORTABLE
28
Page 31 of 172
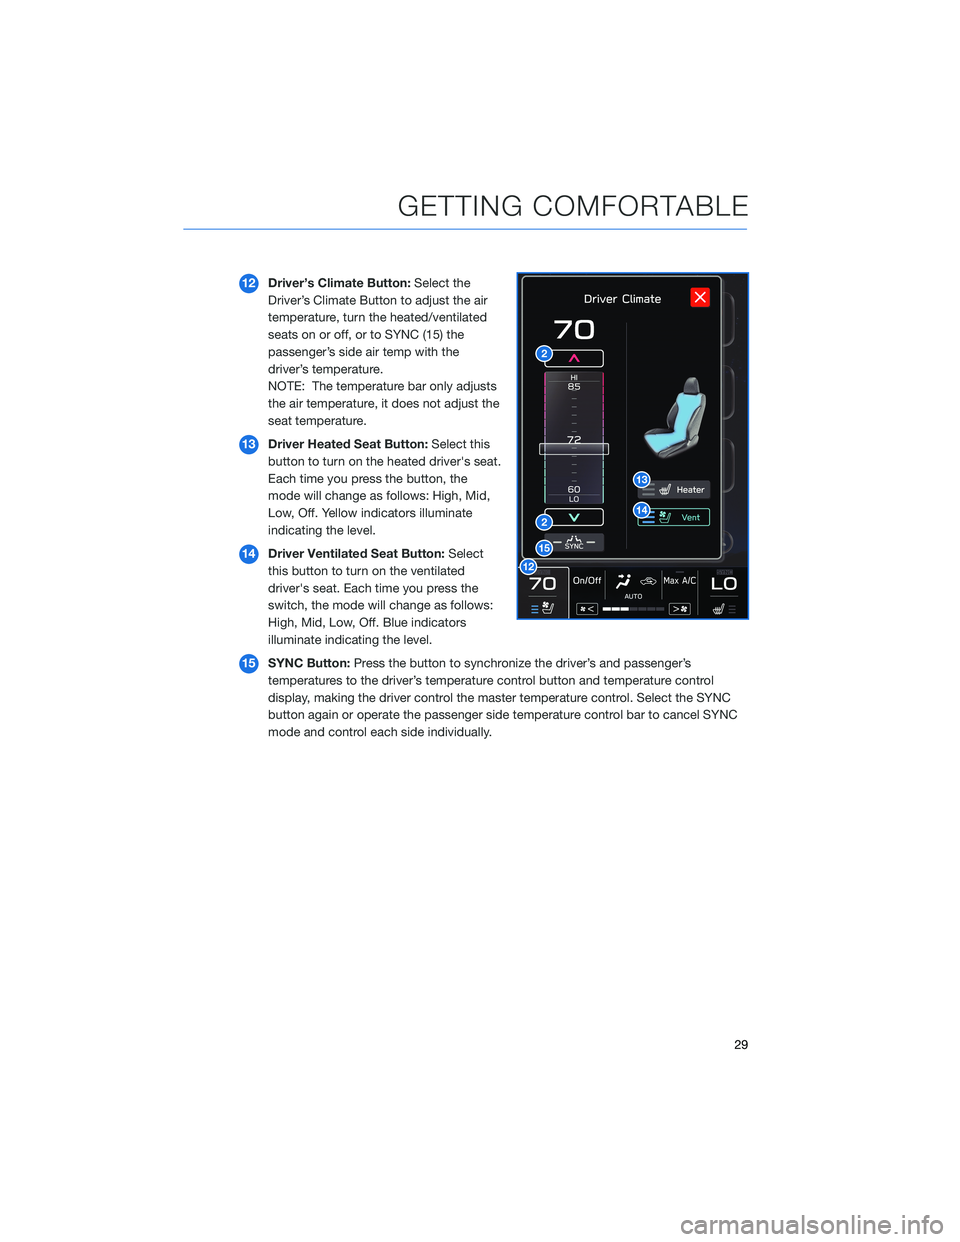
12Driver’s Climate Button:Select the
Driver’s Climate Button to adjust the air
temperature, turn the heated/ventilated
seats on or off, or to SYNC (15) the
passenger’s side air temp with the
driver’s temperature.
NOTE: The temperature bar only adjusts
the air temperature, it does not adjust the
seat temperature.
13Driver Heated Seat Button:Select this
button to turn on the heated driver's seat.
Each time you press the button, the
mode will change as follows: High, Mid,
Low, Off. Yellow indicators illuminate
indicating the level.
14Driver Ventilated Seat Button:Select
this button to turn on the ventilated
driver's seat. Each time you press the
switch, the mode will change as follows:
High, Mid, Low, Off. Blue indicators
illuminate indicating the level.
15SYNC Button:Press the button to synchronize the driver’s and passenger’s
temperatures to the driver’s temperature control button and temperature control
display, making the driver control the master temperature control. Select the SYNC
button again or operate the passenger side temperature control bar to cancel SYNC
mode and control each side individually.
GETTING COMFORTABLE
29
Page 32 of 172

16Passengers’s Climate Button:Select
the Passenger’s Climate Button to
adjust the air temperature, turn the
heated/cooled seats on or off, or to
SYNC (15) the passenger’s side air temp
with the driver’s temperature.
17Passenger Heated Seat Button:Select
this button to turn on the heated
passenger's seat. Each time you press
the button, the mode will change as
follows: High, Mid, Low, Off. Yellow
indicators illuminate indicating the level.
18Passenger Ventilated Seat Button:
Select this button to turn on the
ventilated passenger's seat. Each time
you press the switch, the mode will
change as follows: High, Mid, Low, Off.
Blue indicators illuminate indicating the
level.
Operation in Automatic Mode
When using automatic mode, the fan speed, airflow distribution, air-inlet control and air
conditioning compressor are controlled automatically. To activate:
1. Press the “AUTO” button. The “FULL AUTO” indicator light illuminates on the climate
control display.
2. Set the preferred temperature using the temperature control arrows, or select the
climate control button and use the touch buttons or slide bar to adjust the temperature.
If you operate any of the buttons other than “ON/OFF”, rear window defogger, front
defroster, “SYNC”, or the temperature buttons, the “FULL” indicator light will turn off, the
"Auto" will display in the screen button. You can then manually control the system as
desired. Press the “AUTO” button to change back to “FULL AUTO” mode.
GETTING COMFORTABLE
30