Page 96 of 172
SUBARU STARLINK®WI-FI HOTSPOT
SUBARU STARLINK®in-vehicle Wi-Fi Hotspot* keeps you and your
family connected using AT&T’s 4G LTE nationwide cellular network.
Whether watching movies, playing games or even listening to
music, your family won’t miss a beat with SUBARU STARLINK
®
in-vehicle Wi-Fi Hotspot. Set up is quick and easy.
For more information on a subscription and step by step
enrollment instructions, please refer to page 143 in this Getting
Started Guide or visit:
https://www.att.com/plans/connected-car/subaru.html
* Internet access is purchased separately through AT&T with monthly, per
gigabyte, and unlimited data options available. Existing AT&T customers
have the option to add an additional line to their AT&T Mobile Share plan. Available on select models.
STARLINK SAFETY AND SECURITY
94
Page 129 of 172
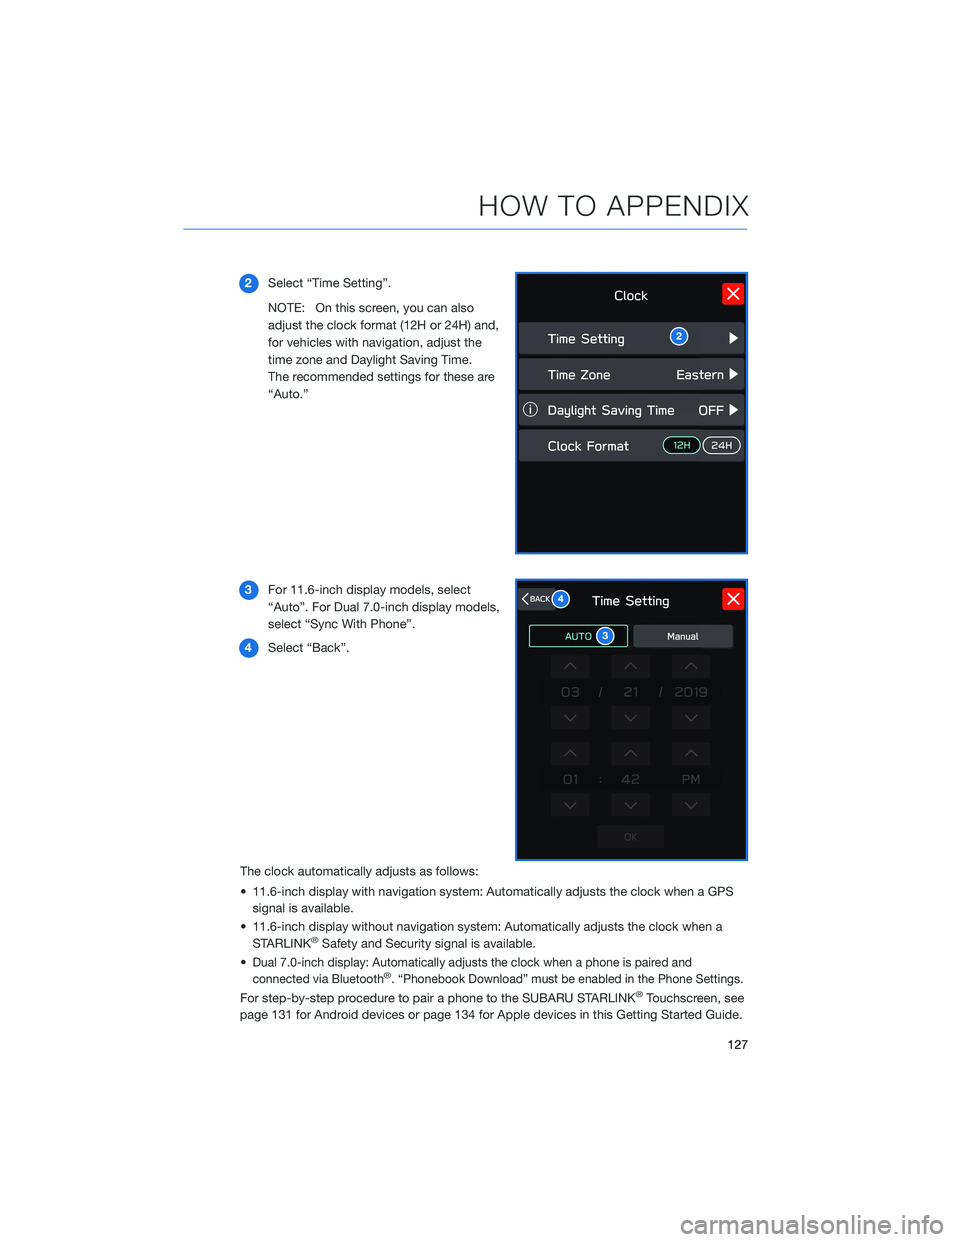
2Select “Time Setting”.
NOTE: On this screen, you can also
adjust the clock format (12H or 24H) and,
for vehicles with navigation, adjust the
time zone and Daylight Saving Time.
The recommended settings for these are
“Auto.”
3For 11.6-inch display models, select
“Auto”. For Dual 7.0-inch display models,
select “Sync With Phone”.
4Select “Back”.
The clock automatically adjusts as follows:
• 11.6-inch display with navigation system: Automatically adjusts the clock when a GPS
signal is available.
• 11.6-inch display without navigation system: Automatically adjusts the clock when a
STARLINK
®Safety and Security signal is available.
•
Dual 7.0-inch display: Automatically adjusts the clock when a phone is paired and
connected via Bluetooth®. “Phonebook Download” must be enabled in the Phone Settings.
For step-by-step procedure to pair a phone to the SUBARU STARLINK®Touchscreen, see
page 131 for Android devices or page 134 for Apple devices in this Getting Started Guide.
2
3
4
HOW TO APPENDIX
127
Page 133 of 172
BLUETOOTH®PAIRING
Pairing an Android Device
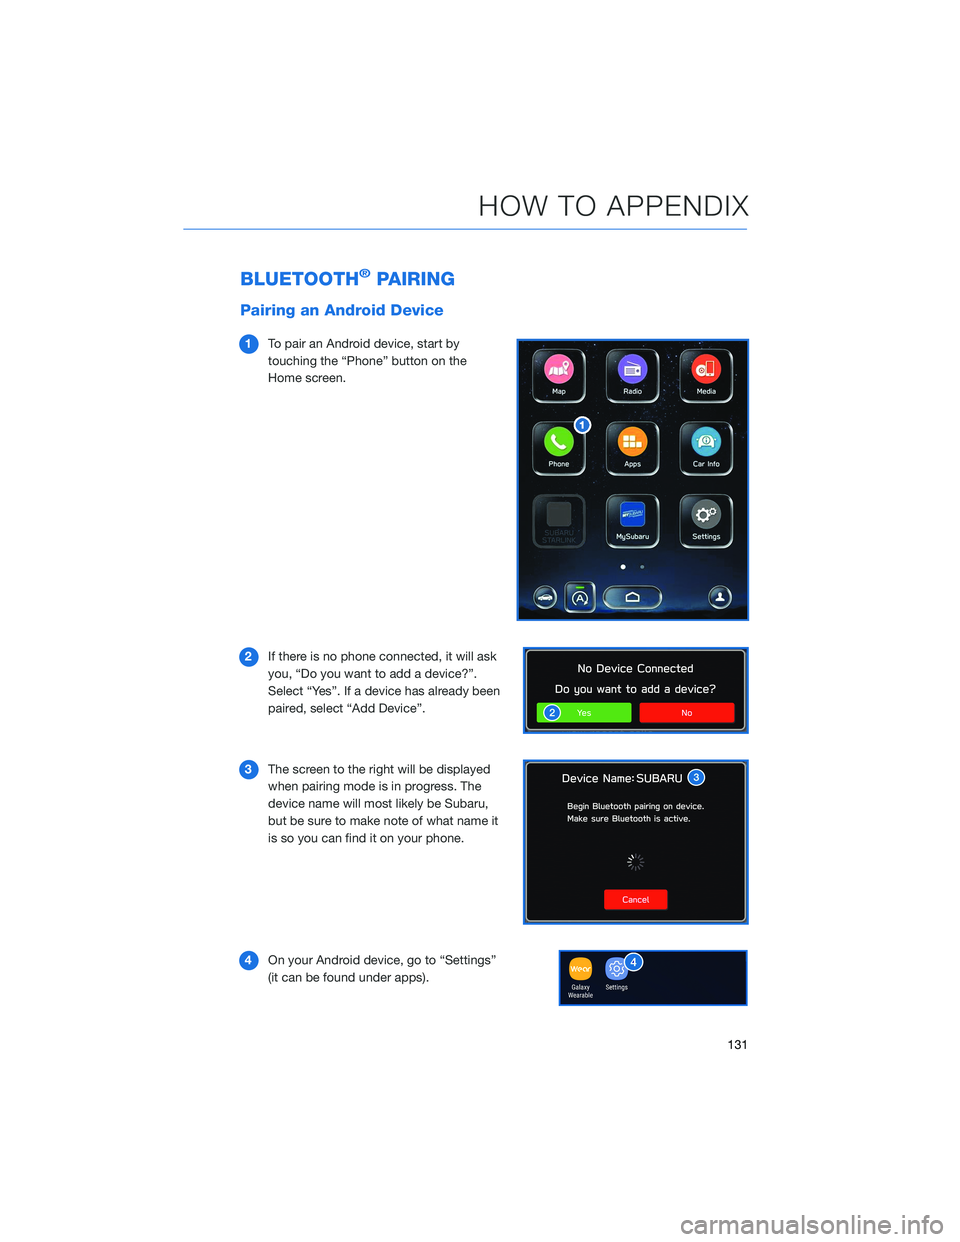
1To pair an Android device, start by
touching the “Phone” button on the
Home screen.
2If there is no phone connected, it will ask
you, “Do you want to add a device?”.
Select “Yes”. If a device has already been
paired, select “Add Device”.
3The screen to the right will be displayed
when pairing mode is in progress. The
device name will most likely be Subaru,
but be sure to make note of what name it
is so you can find it on your phone.
4On your Android device, go to “Settings”
(it can be found under apps).
HOW TO APPENDIX
131
Page 136 of 172
Pairing an iOS/Apple Device
1To pair an Apple device, start by touching
the “Phone” button on the Home screen.
2If there is no phone connected, it will ask
you, “Do you want to add a device?”.
Select “Yes”. If a device has already been
paired, select “Add Device”.
3When this screen is displayed, it is in
pairing mode. Note the “Device Name”;
it will most likely be “Subaru”.
4On your iOS/Apple device, select “Settings”.
The location on the Home screen will vary.
HOW TO APPENDIX
134
Page 141 of 172
Compatible Models
Android Auto™ is available on Android phones. To see if your phone
is compatible, please refer to the Android Auto™ website:
https://www.android.com/phones/
APPLE CARPLAY®
Cables
Apple CarPlay®requires compatible iPhones to be connected via
your Subaru’s USB port. Cables must be an 8-Pin Lightning MFi
Certified cable (made for iPod/iPhone). Look for the “Works with
Apple CarPlay
®” or “Made for iPod, iPhone, iPad” icons when
selecting a cable.
For more information, visit: www.apple.com/ios/carplay/
HOW TO APPENDIX
139
Page 143 of 172
Compatible Models
For a list of all the Apple phones that are compatible with Apple
CarPlay®, visit: www.apple.com/ios/carplay/
WI-FI
Connecting to a Wi-Fi Network
1On the Home Screen, select “Settings”.
2In the “General” settings menu, select
“Wi-Fi”.
HOW TO APPENDIX
141
Page 145 of 172

Wi-Fi Hotspot Subscription
Internet access is purchased separately through AT&T with monthly,
per gigabyte, and unlimited data options available. Existing AT&T
customers have the option to add an additional line to their AT&T
Mobile Share plan. Available on select models.
Shortly after you take delivery of your new Subaru, you will receive
an email from AT&T for a one month free trial and how to activate
your free trial. To set up and enroll:
1. Select “Settings” on the Home screen.
2. Select “Wi-Fi Hotspot” to turn it on (if the Wi-Fi Hotpot is already
on then proceed to the next step).
3. Select Wi-Fi Hotspot Settings to view or update the following settings:
• Wi-Fi Network Name (SSID)
• SSID Broadcast (Network ON / OFF)
• Security Type (WPA / WPA2)
• Password
• Connected Devices (Maximum of 8 devices)
• Broadcast Frequency
How to enroll:
1. Connect your tablet, smartphone or laptop to the SUBARU STARLINK
®Wi-Fi Hotspot
network listed in the settings menu and open your preferred web browser on the device
connected.
2. Once the SUBARU STARLINK
®Wi-Fi Hotspot homepage loads, follow the on-screen
instructions to create a new account or to add your vehicle to an already existing AT&T
Wireless account. You can also subscribe to the Wi-Fi Hotspot from the MySubaru
website or Mobile App.
You can also visit an AT&T store or their website for more information at:
https://www.att.com/plans/connected-car/subaru.html
HOW TO APPENDIX
143
Page 163 of 172
Map View/Perspectives
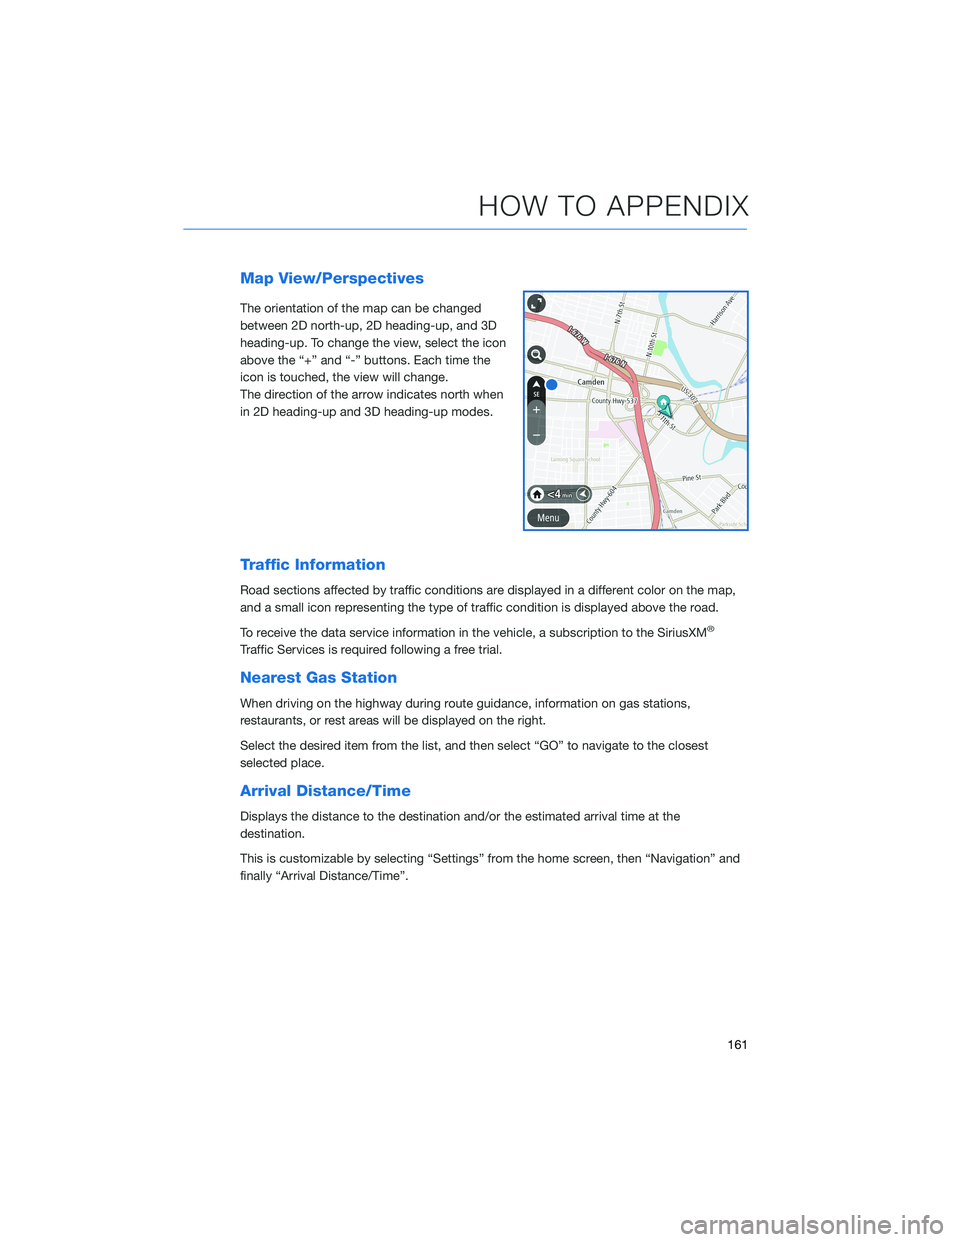
The orientation of the map can be changed
between 2D north-up, 2D heading-up, and 3D
heading-up. To change the view, select the icon
above the “+” and “-” buttons. Each time the
icon is touched, the view will change.
The direction of the arrow indicates north when
in 2D heading-up and 3D heading-up modes.
Traffic Information
Road sections affected by traffic conditions are displayed in a different color on the map,
and a small icon representing the type of traffic condition is displayed above the road.
To receive the data service information in the vehicle, a subscription to the SiriusXM
®
Traffic Services is required following a free trial.
Nearest Gas Station
When driving on the highway during route guidance, information on gas stations,
restaurants, or rest areas will be displayed on the right.
Select the desired item from the list, and then select “GO” to navigate to the closest
selected place.
Arrival Distance/Time
Displays the distance to the destination and/or the estimated arrival time at the
destination.
This is customizable by selecting “Settings” from the home screen, then “Navigation” and
finally “Arrival Distance/Time”.
HOW TO APPENDIX
161