Page 33 of 172
Remote Engine Start with Climate Control
You can remotely start your Subaru and adjust the temperature using the STARLINK®
Safety and Security features through theMySubaruApp (subscription required). Please
refer to “SUBARU STARLINK Features” in your STARLINK®Safety and Security Owner's
Manual for a list of required vehicle conditions for this feature.
Heated Seats(if equipped)
There are separate controls for the driver and
passenger heated seats. Select the driver or
passenger climate button, then select the heated
seat button located on the climate control screen.
Each time you press the button, the mode will
change as follows: High, Mid, Low, Off. Yellow
indicators illuminate indicating the level.
Heated Seat Button
GETTING COMFORTABLE
31
Page 34 of 172
Ventilated Seats(if equipped)
There are separate controls for the driver and
passenger ventilated seats. Select the driver or
passenger climate button, then select the ventilated
seat button located on the climate control screen.
Each time you press the button, the mode will
change as follows: High, Mid, Low, Off. Blue
indicators illuminate indicating the level.
Rear Heated Seats(if equipped)
There are separate heated seat
switches for each side on the rear
center console. Press the switch
to activate the heated seat.
The heating mode changes to
High, Low, and Off each time you
press the switch, and yellow
indictors illuminate indicating the
level.
Heated Steering Wheel(if equipped)
To activate, pull the heated steering wheel switch with
the ignition in “ON” or “ACC”. The indicator light on the
switch illuminates. To deactivate, pull the switch again.
The heater will stay on for approximately 30 minutes.
Ventilated Seat Button
GETTING COMFORTABLE
32
Page 35 of 172
ACCESSORY CONNECTIONS
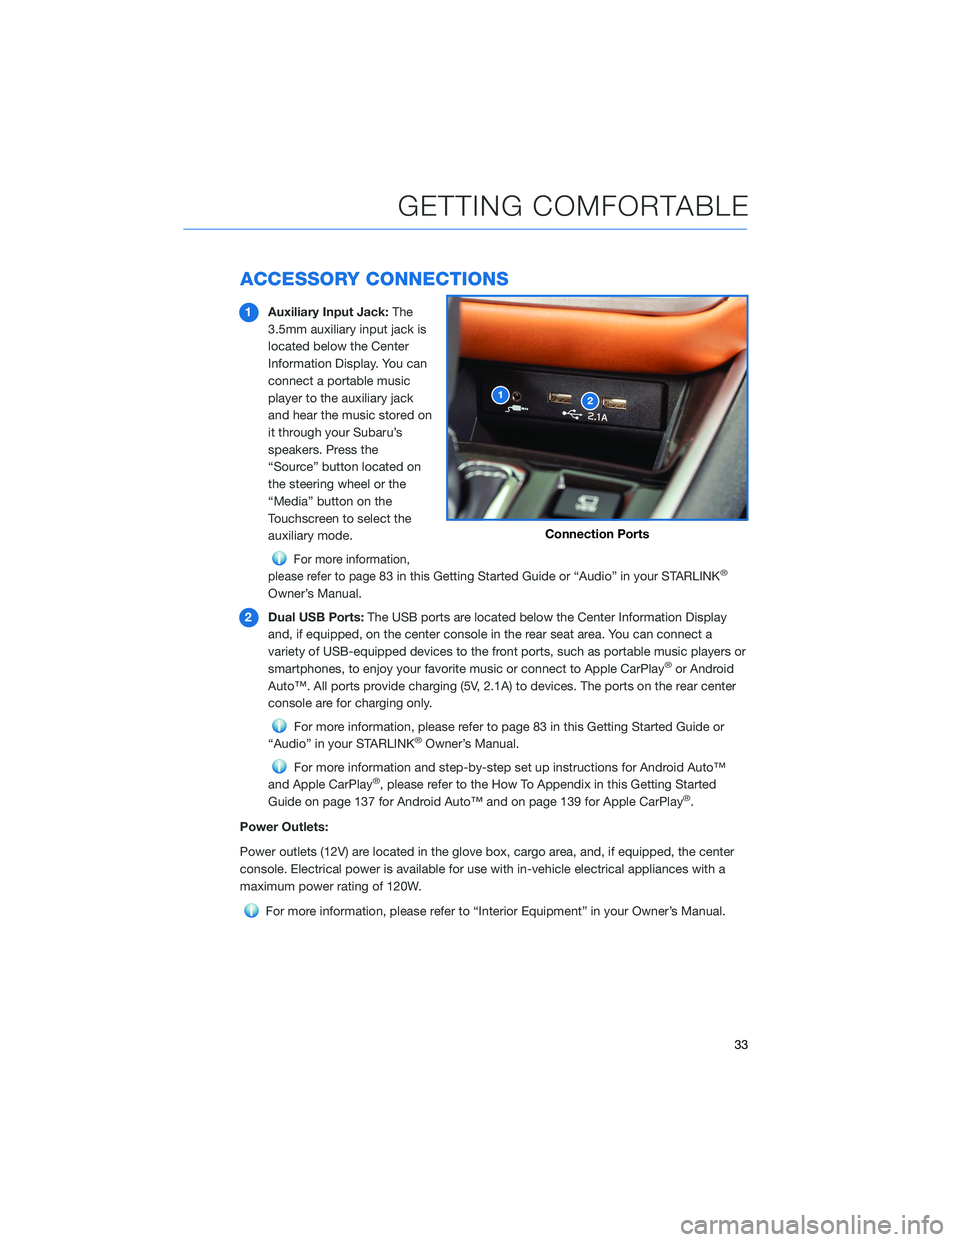
1Auxiliary Input Jack:The
3.5mm auxiliary input jack is
located below the Center
Information Display. You can
connect a portable music
player to the auxiliary jack
and hear the music stored on
it through your Subaru’s
speakers. Press the
“Source” button located on
the steering wheel or the
“Media” button on the
Touchscreen to select the
auxiliary mode.
For more information,
please refer to page
83 in this Getting Started Guide or “Audio” in your STARLINK®
Owner’s Manual.
2Dual USB Ports:The USB ports are located below the Center Information Display
and, if equipped, on the center console in the rear seat area. You can connect a
variety of USB-equipped devices to the front ports, such as portable music players or
smartphones, to enjoy your favorite music or connect to Apple CarPlay
®or Android
Auto™. All ports provide charging (5V, 2.1A) to devices. The ports on the rear center
console are for charging only.
For more information, please refer to page 83 in this Getting Started Guide or
“Audio” in your STARLINK®Owner’s Manual.
For more information and step-by-step set up instructions for Android Auto™
and Apple CarPlay®, please refer to the How To Appendix in this Getting Started
Guide on page 137 for Android Auto™ and on page 139 for Apple CarPlay®.
Power Outlets:
Power outlets (12V) are located in the glove box, cargo area, and, if equipped, the center
console. Electrical power is available for use with in-vehicle electrical appliances with a
maximum power rating of 120W.
For more information, please refer to “Interior Equipment” in your Owner’s Manual.
12
Connection Ports
GETTING COMFORTABLE
33
Page 45 of 172

DRIVING THE VEHICLE
Automatic Transmission Shift Mode
The Continuously Variable Transmission (CVT)
is electronically controlled and provides two
different driving modes: normal and manual.
Normal Mode
When the select lever is in the “D” (Drive)
position, the transmission is in normal shift
mode. The select lever position indicator in the
Combination Meter Display (CMD) shows “D”
and the transmission automatically shifts into a
suitable forward gear.
Manual Mode
In manual mode, you select the desired gear
position to obtain necessary acceleration and
engine braking. Move the select lever left from
the “D” position into the “M” position to select manual mode. The gear position indicator in
the Combination Meter Display (CMD) shows the currently selected gear. Arrow-shaped
indicators show when upshifting or downshifting is available. To shift gears, use the paddle
shift control switches behind the steering wheel.
Paddle Shift Control Switches
You can shift gears using the
paddle shift control switches.
To upshift to the next higher gear,
pull the “+” paddle on the right
toward you. To downshift to the
next lower gear, pull the “–”
paddle on the left toward you.
You can temporarily shift gears
even when the select lever is in
the “D” position by pulling either
the “+” or “–” paddle toward you.
Once vehicle speed stabilizes, the
transmission will switch back to
normal mode.
OPERATING THE VEHICLE
43
Page 49 of 172
Auto Vehicle Hold (AVH)
Auto Vehicle Hold gives your feet a break by
automatically holding your Subaru in place
when at a complete stop, such as at a traffic
signal, even after you release the brake pedal.
To turn on Auto Vehicle Hold:
1On the Home screen select the “Car
Settings” icon.
2In the “Vehicle Control” menu, select
“Auto Vehicle Hold”. The AVH indicator
will illuminate in the combination meter.
While your Subaru is being held by this
function, the operation indicator in the
combination meter will illuminate. The function
is canceled when you depress the accelerator
pedal or the brake pedal.
Select “Auto Vehicle Hold” again to turn it off.
The function works with the select lever in
either the “D” or “R” position.
NOTE:
• For this system to work your seatbelt must
be fastened.
• Make sure to turn off this function before
entering an automatic car wash.
2
1
ICON MODE
Auto Vehicle Hold
ON
Auto Vehicle Hold
IN OPERATION
OPERATING THE VEHICLE
47
Page 50 of 172
X-MODE®
X-MODE®is the integrated control system of
the engine, All Wheel Drive, and Vehicle
Dynamics Control (VDC) systems for driving
with bad road conditions. Using X-MODE,
®
you can drive more comfortably even in
slippery road conditions, such as mud or
snow, including uphill and downhill.
You can activate the system when the vehicle
speed is less than 12 mph. Display the Driving
Statistics Screen (select the Car Info button on
the home screen) to show steering angle,
running condition, and vehicle posture. If the
vehicle speed reaches 25 mph while
X-MODE
®is active, the system is cancelled.
The X-MODE
®Indicator appears in the Combination Meter Display
when X-MODE®is activated.
Activating X-MODE
®
X-MODE®can be quickly turned on or off in
the Information Bar. Use the arrow button to
navigate to X-MODE
®and select the setting.
X-Mode Indicator
OPERATING THE VEHICLE
48
Page 51 of 172
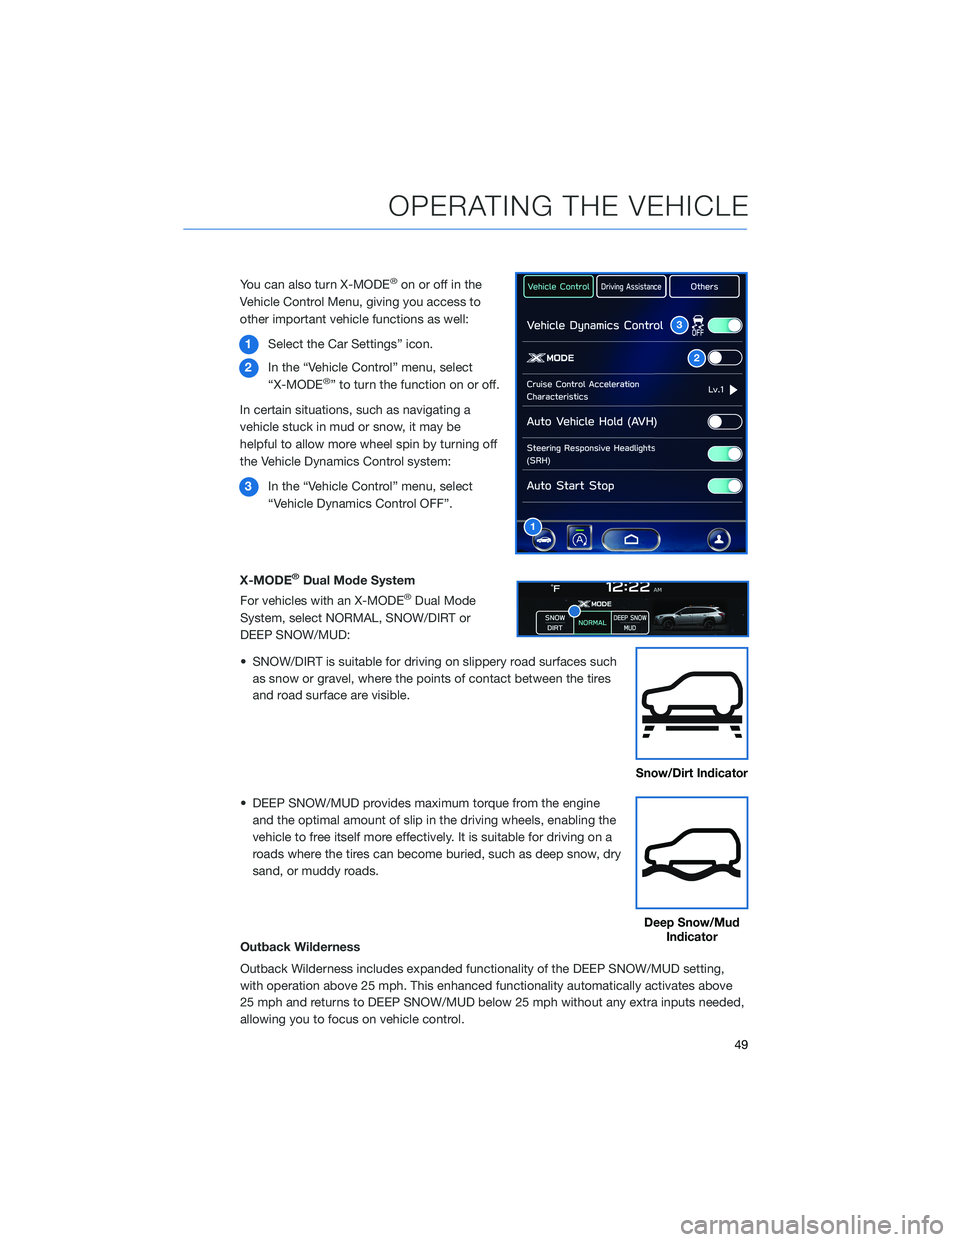
You can also turn X-MODE®on or off in the
Vehicle Control Menu, giving you access to
other important vehicle functions as well:
1Select the Car Settings” icon.
2In the “Vehicle Control” menu, select
“X-MODE
®” to turn the function on or off.
In certain situations, such as navigating a
vehicle stuck in mud or snow, it may be
helpful to allow more wheel spin by turning off
the Vehicle Dynamics Control system:
3In the “Vehicle Control” menu, select
“Vehicle Dynamics Control OFF”.
X-MODE
®Dual Mode System
For vehicles with an X-MODE®Dual Mode
System, select NORMAL, SNOW/DIRT or
DEEP SNOW/MUD:
• SNOW/DIRT is suitable for driving on slippery road surfaces such
as snow or gravel, where the points of contact between the tires
and road surface are visible.
• DEEP SNOW/MUD provides maximum torque from the engine
and the optimal amount of slip in the driving wheels, enabling the
vehicle to free itself more effectively. It is suitable for driving on a
roads where the tires can become buried, such as deep snow, dry
sand, or muddy roads.
Outback Wilderness
Outback Wilderness includes expanded functionality of the DEEP SNOW/MUD setting,
with operation above 25 mph. This enhanced functionality automatically activates above
25 mph and returns to DEEP SNOW/MUD below 25 mph without any extra inputs needed,
allowing you to focus on vehicle control.
2
3
1
Snow/Dirt Indicator
Deep Snow/Mud
Indicator
OPERATING THE VEHICLE
49
Page 52 of 172

Hill Descent Control (HDC)
The Hill Descent Control function helps maintain a consistent
vehicle speed when driving down steep hills or declines. HDC is
automatically activated and set in standby mode when X-MODE
®is
activated. The Hill Descent Control Indicator appears when in
standby mode, and the indicator will flash when HDC is operating.
TURNING OFF THE VEHICLE
Without Push-button Ignition
To stop the engine:
1. Stop your Subaru completely.
2. Move the select lever to the “P” position.
3. Turn the ignition switch to “OFF”.
NOTE: The front windows will remain active for about 40 seconds and the SUBARU
STARLINK
®Multimedia System will remain on for about three minutes or until a door is
opened, whichever occurs first.
With Push-button Ignition
To stop the engine:
1. Stop your Subaru completely.
2. Move the select lever to the “P” position.
3. Press the ignition switch to stop the engine.
NOTE: The front windows will remain active for about 40 seconds and the SUBARU
STARLINK
®Multimedia System will remain on for about three minutes or until a door is
opened, whichever occurs first.
Hill Descent
Control Indicator
OPERATING THE VEHICLE
50


