Page 17 of 132
CRUISE CONTROL
1Cruise Control On/Off
2Resume (RES)/Increase Speed and Set
(SET)/Decrease Speed
3CANCEL Button
For more information, please refer to
“Starting and Operating” in your Owner’s
Manual.
ADVANCED ADAPTIVE CRUISE CONTROL(if equipped)
1Adaptive Cruise Control On/Off
2Lane Keep Assist
3Increase Distance
4Decrease Distance
5Resume (RES)/Increase Speed and Set
(SET)/Decrease Speed
6SI-Drive (if equipped)
For more information on SI-Drive, please
refer to page 32 in this Getting Started Guide
or “Starting and Operating” in your Owner’s
Manual.
For more information on Advanced
Adaptive Cruise Control, please refer to page
86 in this Getting Started Guide or “Advanced
Adaptive Cruise Control” in your EyeSight
®
Owner’s Manual.
CONTROLS
15
Page 18 of 132
i/SET SWITCH
The “i/Set” switch allows you to cycle through
useful driving information in the Combination
Meter Display such as fuel consumption, driving
time, speed, and tire pressure. You can change
the information displayed using the up and
down arrows.
When the Menu Entering Screen is displayed,
pull and hold the “i/Set” switch to enter the
Menu Screen for the ability to modify a number
of settings.
For more information about the Combination Meter Display, please refer to
“Instruments and Controls” in your Owner’s Manual.
INFO SWITCH
Press the INFO switch to cycle through useful
information in the Multi-Function Display
(MFD). Navigate to the guidance screen and
hold the INFO switch to access the settings
menu and adjust a number of settings.
For more information about the
Multi-Function Display, please refer to
“Instruments and Controls” in your Owner’s
Manual.
CONTROLS
16
Page 19 of 132

LIGHT CONTROLS
1AUTO:If equipped, rotate the end of the
lever to set your headlights to
automatically turn on or off, depending
on the level of light outside. When in the
“AUTO” position, the headlights will
automatically turn on when the
windshield wipers operate several times.
NOTE: The sensitivity of the automatic
headlights can be adjusted through the
STARLINK
®multimedia display.
2Parking Lights:Rotate the end of the lever to turn on the instrument panel
illumination, parking lights, side marker lights, tail lights, and license plate lights.
3Headlights:Rotate the end of the lever to turn on the headlights, instrument panel
illumination, parking lights, side marker lights, tail lights, and license plate lights. To
flash the headlights, pull the lever toward you, then release. The high beams will stay
on as long as you hold the lever.
4High Beams:Push the lever forward to change from low beam to high beam. When
set to the “AUTO” position, pushing the lever forward also activates the High Beam
Assist (HBA) system, if equipped. Pull the lever back to center to return to low beam.
5Fog Lights:If equipped, rotate the dial to turn on the fog lights when the headlights
are on low beams in the “
” or “AUTO” position.
CONTROLS
17
Page 20 of 132
, and ambient light is low,
rotating the illumination
brightness dial on the instrument
panel upward will make")
Illumination Brightness
When the light controls are on (in
the
,, or “AUTO”
position), and ambient light is low,
rotating the illumination
brightness dial on the instrument
panel upward will make the
instrument panel illumination
brighter. When the dial is fully
rotated upward (dots aligned), the
instrument panel illumination
stays at full brightness. Rotating
the dial downward dims the
instrument panel illumination.
When the ambient light is bright,
the illumination brightness is set
to the maximum regardless of the position of the control dial.
For more information, please refer to “Instruments and Controls” in your Owner’s
Manual.
Daytime Running Lights
The daytime running lights automatically turn on when the engine is running, the parking
brake is fully released, the select lever is out of the “P” position (CVT models), and the light
switch is set to Off, “AUTO” (if equipped), or “
”. Always turn on the headlights when
it’s dark outside by rotating the dial to the “
” or “AUTO” position.
TURN SIGNALS
Push fully up for the right turn signal and fully
down for the left turn signal. Your Subaru also
has a one-touch lane changer feature: push
slightly up and release to signal a right lane
change or push slightly down and release to
signal a left lane change.
Illumination Brightness Dial
CONTROLS
18
Page 21 of 132

WINDSHIELD WIPERS
1Intermittent:Push the wiper control lever
down one position for intermittent
operation. When the lever is in the
intermittent position, you can rotate the
dial to adjust the operating interval of the
wipers.
2Low Speed:Push the wiper control lever
down two positions for low speed wiper
operation.
3High Speed:Push the wiper control lever
down three positions for high speed wiper operation.
4Mist:Push the wiper up from the OFF position for a single wipe.
5Windshield Washer:Pull the lever toward you to wash the windshield. The washer
will spray and the wipers will operate while you pull the lever.
REAR WINDOW WIPER
Rotate the end of the lever up one position for
intermittent, or two positions for continuous
operation.
When the lever in is the intermittent position,
the wiper operates at intervals corresponding
with vehicle speed. When you move the select
lever/shift lever to the “R” (reverse) position,
the wiper will switch to continuous operation.
When you move the select lever/shift lever out
of the “R” (reverse) position, the wiper will
return to intermittent operation.
Rotate the dial up from the continuous operation position or down from the off position to
spray washer fluid. The washer sprays and wiper operates until you release the dial, and
then returns to the previous position.
CONTROLS
19
Page 22 of 132
. Press
and hold the button for about
two s")
OVERHEAD CONSOLE
1SOS Emergency
Assistance:
Press the red
“SOS” button to connect with
a SUBARU STARLINK
®
Customer Care Advisor
(subscription required). Press
and hold the button for about
two seconds to cancel the call.
For more information,
please refer to page 70 in
this Getting Started Guide or
“Introduction” in your
SUBARU STARLINK
®Safety
and Security Owner’s
Manual.
2Enhanced Roadside Assistance:Press the blue “i” button to connect with a
SUBARU STARLINK
®Roadside Assistance Provider (subscription required). Press
and hold the button for about two seconds to cancel the call.
For more information, please refer to page 70 in this Getting Started Guide or
“Introduction” in your SUBARU STARLINK®Safety and Security Owner’s Manual.
3Automatic Illumination:When the switch is in the “DOOR” position, the map lights
illuminate when any door is opened, the doors are unlocked using the remote keyless
entry system or keyless access function, or the ignition is turned from “ON” or “ACC”
to “LOCK”/“OFF”.
4Lane Departure Warning OFF Switch:Press and hold this switch for two seconds to
turn off Lane Departure Warning and Lane Sway Warning. Press and hold the switch
again for two seconds to turn the systems back on.
For more information, please refer to page 87 in this Getting Started Guide or
“Lane Departure Warning” in your EyeSight®Owner’s Manual.
5Pre-Collision Braking System OFF Switch:Press and hold this switch for two
seconds to turn off the Pre-Collision Braking System (including Pre-Collision Braking
Assist) and Pre-Collision Throttle Management. Press and hold the switch again for
two seconds to turn the systems back on.
For more information, please refer to page 87 in this Getting Started Guide or
“Pre-Collision Braking System” in your EyeSight®Owner’s Manual.
6Map Lights:Press a map light to turn it on or off.
7Power Moonroof Switch:Operate these switches to tilt and slide the moonroof.
For more information, please refer to page 25 in this Getting Started Guide or
“Keys and Doors” in your Owner’s Manual.
CONTROLS
20
Page 23 of 132
SEATING
Manual Seats
1Forward/Backward:Pull
the lever below the seat up
and slide the seat forward or
backward. Release the lever
and make sure the seat is
locked into place.
2Seat Height (Driver’s Seat):
Pulling up or pushing down
on the lever will raise or
lower the seat cushion.
3Recline Seatback:Pull the
lever up to adjust the
seatback. Release the lever
and make sure the seatback
is locked into place.
Power Driver’s Seat(if equipped)
1Seat Position:Moving the
switch forward or backward
will adjust the seat in that
direction. Pulling up or
pushing down on the back
of the switch will adjust the
seat height up or down.
2Recline Seatback:Moving
the top of the switch forward
or backward will adjust the
angle of the seatback.
Manual Seat Levers
Power Seat Controls
GETTING COMFORTABLE
21
Page 24 of 132
Head Restraint Adjustment
Pull the head restraint up to raise
it. To lower the head restraint,
push it down while pressing the
release button on the top of the
seatback. Each head restraint
should be adjusted so that the
center of the head restraint is
closest to the top of the
occupant’s ears.
The angle of the front head
restraints can be adjusted by
tilting them forward. You will hear
a click when the restraint locks in
place. Pulling the head restraint
as far forward as it will go allows it
to return to the fully upright position.
Seatbelt Adjuster
To keep yourself comfortable and
safe, always position the seatbelt
adjuster so the shoulder belt
passes over the middle of your
shoulder without touching your
neck. Pull the tab out and slide
the adjuster up or down to set the
position. Release the tab and
make sure the adjuster is locked
in place.
Release Button and Head Restraint Adjustment
Seatbelt Adjustment Tab
GETTING COMFORTABLE
22
 1
1 2
2 3
3 4
4 5
5 6
6 7
7 8
8 9
9 10
10 11
11 12
12 13
13 14
14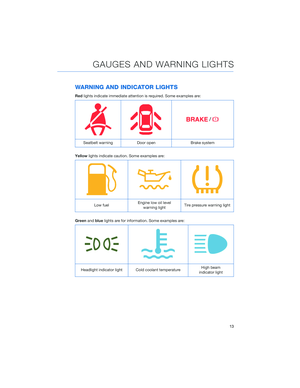 15
15 16
16 17
17 18
18 19
19 20
20 21
21 22
22 23
23 24
24 25
25 26
26 27
27 28
28 29
29 30
30 31
31 32
32 33
33 34
34 35
35 36
36 37
37 38
38 39
39 40
40 41
41 42
42 43
43 44
44 45
45 46
46 47
47 48
48 49
49 50
50 51
51 52
52 53
53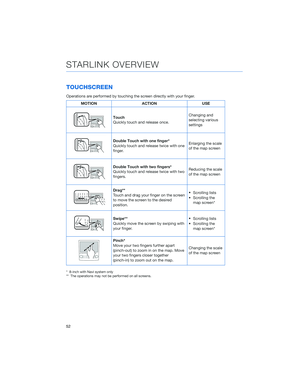 54
54 55
55 56
56 57
57 58
58 59
59 60
60 61
61 62
62 63
63 64
64 65
65 66
66 67
67 68
68 69
69 70
70 71
71 72
72 73
73 74
74 75
75 76
76 77
77 78
78 79
79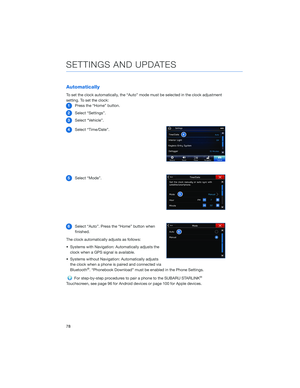 80
80 81
81 82
82 83
83 84
84 85
85 86
86 87
87 88
88 89
89 90
90 91
91 92
92 93
93 94
94 95
95 96
96 97
97 98
98 99
99 100
100 101
101 102
102 103
103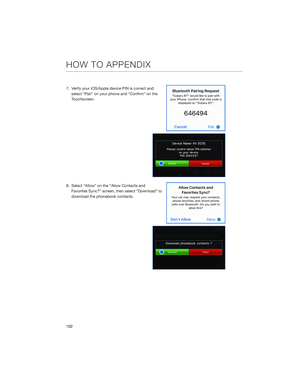 104
104 105
105 106
106 107
107 108
108 109
109 110
110 111
111 112
112 113
113 114
114 115
115 116
116 117
117 118
118 119
119 120
120 121
121 122
122 123
123 124
124 125
125 126
126 127
127 128
128 129
129 130
130 131
131/Increase Speed and Set
(SET)/Decrease Speed
3CANCEL Button
For more information, please refer to
“Starting and Operating” in your Owner’s
Manu")


