Page 73 of 132

ENROLLMENT
To enroll in SUBARU STARLINK®and access remote services, a MySubaru account is
required. MySubaru is the Subaru owner website that allows you to access vehicle remote
services, user preferences, diagnostic alerts and other useful features enabled by your
STARLINK
®Safety Plus, STARLINK®Security Plus and STARLINK®Concierge
subscription.
Your retailer may have created an account for you during the delivery process. However,
you can also create a MySubaru account atwww.mysubaru.com.
Enrollment in SUBARU STARLINK
®can be done online at MySubaru.com, through the
MySubaru Mobile App, at your Subaru retailer or by calling a STARLINK®Customer Care
Representative at: 1-855-753-2495
NOTE: Please have your Vehicle Identification Number (VIN) available, as you will need it
to complete this step. After the enrollment process, you will learn more about the features
in detail at MySubaru.com.
MYSUBARU INTEGRATION
The connection between you and your Subaru has never been simpler, and the MySubaru
website (MySubaru.com) and MySubaru Mobile Application are the best ways to stay in
touch with your Subaru vehicle. From MySubaru, you can access the following information
and STARLINK
®Safety and Security services*:
• Remote Services
• Vehicle Health
• Usage Reports
• Service Appointment Scheduler
• Vehicle Maintenance Schedules
• Destination to Vehicle
• Service History
• Support Resources
* Activation with subscription required. Features and availability vary by vehicle and trim level.
See your retailer for details.
STARLINK SAFETY AND SECURITY
71
Page 74 of 132
SUBARU STARLINK®WI-FI HOTSPOT
SUBARU STARLINK®in-vehicle Wi-Fi Hotspot* keeps you and your
family connected using AT&T’s 4G LTE nationwide cellular network.
Whether watching movies, playing games or even listening to
music, your family won’t miss a beat with SUBARU STARLINK
®
in-vehicle Wi-Fi Hotspot. Set up is quick and easy.
For more information on a subscription and step by step
enrollment instructions, please refer to page 110 in this Getting
Started Guide or visit:
https://www.att.com/plans/connected-car/subaru.html
* Internet access is purchased separately through AT&T with monthly, per
gigabyte, and unlimited data options available. Existing AT&T customers
have the option to add an additional line to their AT&T Mobile Share plan. Available on select models.
STARLINK SAFETY AND SECURITY
72
Page 75 of 132

SETTINGS AND UPDATES OVERVIEW
Many settings can be customized for different features in your Subaru. In this section you
will find examples and instructions for some of the settings you can tailor to fit your
preferences, as well as ways to keep your system updated.
Connect to Home Wi-Fi
Connecting to your Wi-Fi network can allow
you to update the software and maps. To
connect to Wi-Fi, first go to the “Settings”
screen, select “General”, and then select
“Wi-Fi Settings”.
For step by step instructions on
connecting to Wi-Fi, please refer to page 108
in this Getting Started Guide or “Settings” in
your STARLINK
®Owner’s Manual.
Performing Software Updates
Software updates provide enhancements to the system such as new features, added
security, and upgraded functions.
You can ask your preferred Subaru retailer to update the system software. For the 8.0-inch
Multimedia Plus and the 8.0-inch Multimedia Navigation systems, the system software can
be updated via a Wi-Fi network or using the aha
®application on your smartphone
(depending on your smartphone communication and transfer speed). The update process
involves downloading and installing the software update.
NOTE: System functionality will be restricted during installation.
For step-by-step instructions and more information, please refer to page 120 in this
Getting Started Guide or “Settings” in your STARLINK®Owner’s Manual.
SETTINGS AND UPDATES
73
Page 76 of 132

SOUND
To change the sound settings, press the “Home” button, then select “Settings”, and then
select “Sound”. Choose the setting you want to change.
SETTING FUNCTION
EQ and Sound Position Select to set sound settings.
Entertainment Volume Select to set audio volume.
Aux Volume Gain Select to set AUX volume gain.
Microphone Volume Select to adjust the mic sensitivity. This adjusts the
speaker’s voice during hands-free communication.
Navigation Volume Select to set the navigation prompt volume.
(Navigation-equipped vehicles only).
Phone Volume Select to adjust the default volume of the other party’s
voice.
Ringtone Volume Select to adjust the ringtone volume.
Speech/VR Volume Select to set the voice recognition prompts volume.
Alert Sounds Select to turn the Alert Sound on/off for traffic,
weather, or SXM game information updates.
Beep Sounds Select to turn the sound beeps on/off.
Speed Volume Select to set the speed volume. The system adjusts to
the optimum volume and tone quality according to
vehicle speed to compensate for increased vehicle
noise.
PHONE
This system supports Bluetooth®, a wireless data system. The hands-free system lets you
make and receive calls without taking your hands off the steering wheel.
In the sound settings menu, you can adjust the microphone, ringtone, and phone volume.
On the Home Screen, select "Settings", then select the "Phone" menu to manage
connected devices and access other phone settings.
SETTINGS AND UPDATES
74
Page 77 of 132

MAPS/NAVIGATION
There are many programmable map/navigation features that can be customized. These
settings are located under the "Settings" menu and then "Navigation". Listed in the table
below are some common settings you can customize for your convenience.
SETTING FUNCTION
Route Setting Allows you to select Fastest, Shortest or Economic.
Avoid Allows you to avoid things like highways, tolls, ferries,
carpool lanes and unpaved roads.
Map Display Allows you to change the brightness by selecting auto,
day or night.
Save as Home Allows you to register or edit your home address.
Save as Work Allows you to register or edit your work address.
POI Icons Allows you to turn the icons on/off.
Arrival Time Allows you to select arrival time to be displayed in
12 hour format or 24 hour format.
Auto Zoom Allows you to turn on/off.
Rest Stop Guidance Function Allows you to turn on/off.
Low Fuel Warning Allows you to turn on/off.
Checking for Map Updates
You can update the maps to the latest information. The maps should be checked and
updated regularly for the best possible navigation experience.
Atwww.subaru-maps.com, you can update the entire USA map at once via USB. The
maps can also be updated over the air. When updating over the air, you can update eight
regions at a time. This allows you to update your home state without having to download
the entire map program for the United States. This option is great if you normally stay in
your home state and/or surrounding states.
Updating Maps Over-the-Air
To update your maps over the air, first Connect to a Wi-Fi network (see page 108). Map
updates can be found by selecting “Settings”, then “Navigation” on the Touchscreen.
For more step by step directions for updating your maps through Wi-Fi, please refer to
page 118.
SETTINGS AND UPDATES
75
Page 78 of 132
Updating Maps Using Your PC/MAC
Maps can also be updated using a USB memory device, which will
allow the entire map program to be updated at one time. This is a
great option if you are going to take a cross-country trip and your
maps have not been updated in a while.
To update the map using a USB memory device, start by going to
www.subaru-maps.com.
CLOCK
You can adjust the clock manually or set the clock to update
automatically. When set to “Auto,” the clock automatically adjusts
when a Bluetooth
®connected phone is paired (vehicles without
navigation), or through the GPS signal (vehicles with navigation
system).
The following sections contain step-by-step instructions for setting
the clock, and you can scan the QR codes for a helpful “how to”
video. Choose the appropriate QR code based on your
Multi-Function Display (Color LCD or Black and White LCD).
SETTINGS AND UPDATES
76
Page 79 of 132
Manually
Use the STARLINK®Touchscreen to set the clock:
1Press the “Home” button.
2Select “Settings”.
3Select “Vehicle”.
4Select “Time/Date”.
5Select “Mode”.
6Select “Manual”.
7Now adjust the time and date using the “+” and
“-” buttons. Select the check mark when finished.
For black-and-white Multi-Function Display
(MFD), use the “+” and “-” buttons next to the
clock.
SETTINGS AND UPDATES
77
Page 80 of 132
Automatically
To set the clock automatically, the “Auto” mode must be selected in the clock adjustment
setting. To set the clock:
1Press the “Home” button.
2Select “Settings”.
3Select “Vehicle”.
4Select “Time/Date”.
5Select “Mode”.
6Select “Auto”. Press the “Home” button when
finished.
The clock automatically adjusts as follows:
• Systems with Navigation: Automatically adjusts the
clock when a GPS signal is available.
• Systems without Navigation: Automatically adjusts
the clock when a phone is paired and connected via
Bluetooth
®. “Phonebook Download” must be enabled in the Phone Settings.
For step-by-step procedures to pair a phone to the SUBARU STARLINK®
Touchscreen, see page 96 for Android devices or page 100 for Apple devices.
SETTINGS AND UPDATES
78
 1
1 2
2 3
3 4
4 5
5 6
6 7
7 8
8 9
9 10
10 11
11 12
12 13
13 14
14 15
15 16
16 17
17 18
18 19
19 20
20 21
21 22
22 23
23 24
24 25
25 26
26 27
27 28
28 29
29 30
30 31
31 32
32 33
33 34
34 35
35 36
36 37
37 38
38 39
39 40
40 41
41 42
42 43
43 44
44 45
45 46
46 47
47 48
48 49
49 50
50 51
51 52
52 53
53 54
54 55
55 56
56 57
57 58
58 59
59 60
60 61
61 62
62 63
63 64
64 65
65 66
66 67
67 68
68 69
69 70
70 71
71 72
72 73
73 74
74 75
75 76
76 77
77 78
78 79
79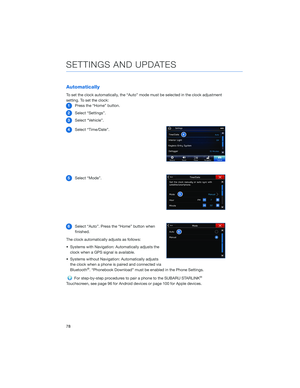 80
80 81
81 82
82 83
83 84
84 85
85 86
86 87
87 88
88 89
89 90
90 91
91 92
92 93
93 94
94 95
95 96
96 97
97 98
98 99
99 100
100 101
101 102
102 103
103 104
104 105
105 106
106 107
107 108
108 109
109 110
110 111
111 112
112 113
113 114
114 115
115 116
116 117
117 118
118 119
119 120
120 121
121 122
122 123
123 124
124 125
125 126
126 127
127 128
128 129
129 130
130 131
131


