2022 RAM PROMASTER CITY tow
[x] Cancel search: towPage 141 of 260

SAFETY139
(Continued)
The outboard front passenger seat BeltAlert is not
active when the outboard front passenger seat is
unoccupied. BeltAlert may be triggered when an
animal or other items are placed on the outboard
front passenger seat or when the seat is folded flat
(if equipped). It is recommended that pets be
restrained in the rear seat (if equipped) in pet
harnesses or pet carriers that are secured by seat
belts, and cargo is properly stowed.
BeltAlert can be activated or deactivated by an
authorized dealer. FCA US LLC does not
recommend deactivating BeltAlert.
NOTE:If BeltAlert has been deactivated and the driver or
outboard front seat passenger (if equipped with
outboard front passenger seat BeltAlert) is
unbuckled the Seat Belt Reminder Light will turn
on and remain on until the driver and outboard
front seat passenger seat belts are buckled.
Lap/Shoulder Belts
All seating positions in your vehicle are equipped
with lap/shoulder belts.
The seat belt webbing retractor will lock only during
very sudden stops or collisions. This feature allows
the shoulder part of the seat belt to move freely
with you under normal conditions. However, in a
collision the seat belt will lock and reduce your risk
of striking the inside of the vehicle or being thrown
out of the vehicle.
WARNING!
Relying on the air bags alone could lead to
more severe injuries in a collision. The air
bags work with your seat belt to restrain you
properly. In some collisions, the air bags won’t
deploy at all. Always wear your seat belt even
though you have air bags.
In a collision, you and your passengers can
suffer much greater injuries if you are not
properly buckled up. You can strike the inte
-
rior of your vehicle or other passengers, or you
can be thrown out of the vehicle. Always be
sure you and others in your vehicle are
buckled up properly.
It is dangerous to ride in a cargo area, inside
or outside of a vehicle. In a collision, people
riding in these areas are more likely to be seri -
ously injured or killed.
Do not allow people to ride in any area of your
vehicle that is not equipped with seats and
seat belts.
Be sure everyone in your vehicle is in a seat
and using a seat belt properly. Occupants,
including the driver, should always wear their
seat belts whether or not an air bag is also
provided at their seating position to minimize
the risk of severe injury or death in the event
of a crash.
Wearing your seat belt incorrectly could make
your injuries in a collision much worse. You
might suffer internal injuries, or you could
even slide out of the seat belt. Follow these
instructions to wear your seat belt safely and
to keep your passengers safe, too.
Two people should never be belted into a
single seat belt. People belted together can
crash into one another in a collision, hurting
one another badly. Never use a lap/shoulder
belt or a lap belt for more than one person, no
matter what their size.
WARNING!
6
22_VM_OM_EN_USC_t.book Page 139
Page 143 of 260

SAFETY141
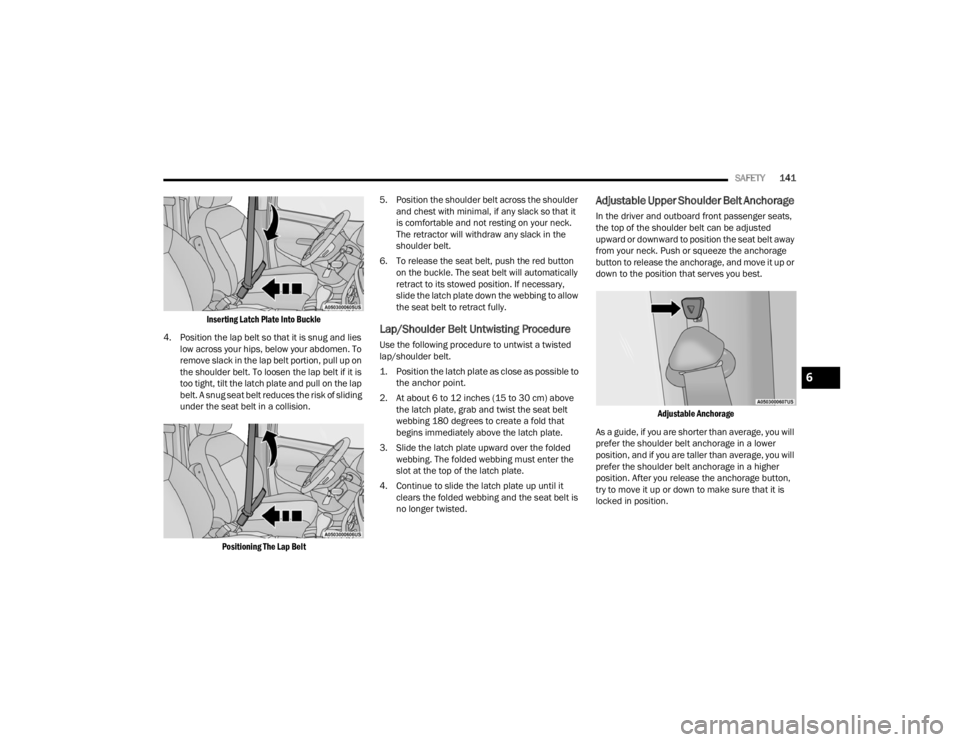
Inserting Latch Plate Into Buckle
4. Position the lap belt so that it is snug and lies low across your hips, below your abdomen. To
remove slack in the lap belt portion, pull up on
the shoulder belt. To loosen the lap belt if it is
too tight, tilt the latch plate and pull on the lap
belt. A snug seat belt reduces the risk of sliding
under the seat belt in a collision.
Positioning The Lap Belt
5. Position the shoulder belt across the shoulder
and chest with minimal, if any slack so that it
is comfortable and not resting on your neck.
The retractor will withdraw any slack in the
shoulder belt.
6. To release the seat belt, push the red button on the buckle. The seat belt will automatically
retract to its stowed position. If necessary,
slide the latch plate down the webbing to allow
the seat belt to retract fully.
Lap/Shoulder Belt Untwisting Procedure
Use the following procedure to untwist a twisted
lap/shoulder belt.
1. Position the latch plate as close as possible to the anchor point.
2. At about 6 to 12 inches (15 to 30 cm) above the latch plate, grab and twist the seat belt
webbing 180 degrees to create a fold that
begins immediately above the latch plate.
3. Slide the latch plate upward over the folded webbing. The folded webbing must enter the
slot at the top of the latch plate.
4. Continue to slide the latch plate up until it clears the folded webbing and the seat belt is
no longer twisted.
Adjustable Upper Shoulder Belt Anchorage
In the driver and outboard front passenger seats,
the top of the shoulder belt can be adjusted
upward or downward to position the seat belt away
from your neck. Push or squeeze the anchorage
button to release the anchorage, and move it up or
down to the position that serves you best.
Adjustable Anchorage
As a guide, if you are shorter than average, you will
prefer the shoulder belt anchorage in a lower
position, and if you are taller than average, you will
prefer the shoulder belt anchorage in a higher
position. After you release the anchorage button,
try to move it up or down to make sure that it is
locked in position.
6
22_VM_OM_EN_USC_t.book Page 141
Page 152 of 260

150SAFETY
NOTE:
Air bag covers may not be obvious in the interior
trim, but they will open during air bag deploy -
ment.
After any collision, the vehicle should be taken
to an authorized dealer immediately.
Enhanced Accident Response System
In the event of an impact, if the communication
network remains intact, and the power remains
intact, depending on the nature of the event, the
Occupant Restraint Controller (ORC) will determine
whether to have the Enhanced Accident Response
System perform the following functions:
Cut off fuel to the engine (if equipped)
Cut off battery power to the electric motor
(if equipped)
Flash hazard lights as long as the battery has
power
Turn on the interior lights, which remain on as
long as the battery has power or for 15 minutes
from the intervention of the Enhanced Accident
Response System
Unlock the power door locks
Your vehicle may also be designed to perform any
of these other functions in response to the
Enhanced Accident Response System:
Turn off the Fuel Filter Heater, Turn off the HVAC
Blower Motor, Close the HVAC Circulation Door
Cut off battery power to the:
Engine
Electric Motor (if equipped)
Electric Power Steering
Brake booster
Electric park brake
Automatic transmission gear selector
Horn
Front wiper
Headlamp washer pump (if equipped)
NOTE:After an accident, remember to cycle the ignition to
the STOP/OFF position and remove the key from
the ignition switch to avoid draining the battery.
Carefully check the vehicle for fuel leaks in the
engine compartment and on the ground near the
engine compartment and fuel tank before
resetting the system and starting the engine. If
there are no fuel leaks or damage to the vehicle
electrical devices (e.g. headlights) after an
accident, reset the system by following the
procedure described below. If you have any doubt,
contact an authorized dealer.
Enhanced Accident Response System
Reset Procedure
In order to reset the Enhanced Accident Response
System functions after an event, the ignition switch
must be changed from ignition AVV/START or
MAR/RUN to ignition STOP/OFF. Carefully check
the vehicle for fuel leaks in the engine
compartment and on the ground near the engine
compartment and fuel tank before resetting the
system and starting the engine. After an accident,
if the vehicle will not start after performing the
reset procedure, the vehicle must be towed to an
authorized dealer to be inspected and to have the
Enhanced Accident Response System reset.
WARNING!
Deployed air bags and seat belt pretensioners
cannot protect you in another collision. Have the
air bags, seat belt pretensioners, and the seat
belt retractor assemblies replaced by an
authorized dealer immediately. Also, have the
Occupant Restraint Controller System serviced
as well.
22_VM_OM_EN_USC_t.book Page 150
Page 163 of 260

SAFETY161
To Install A LATCH-Compatible Child
Restraint
If the selected seating position has a Switchable
Automatic Locking Retractor (ALR) seat belt, stow
the seat belt, following the instructions below. See
Úpage 162 to check what type of seat belt each
seating position has.
1. Loosen the adjusters on the lower straps and on the tether strap of the child seat so that
you can more easily attach the hooks or
connectors to the vehicle anchorages.
2. Place the child seat between the lower anchorages for that seating position. If the
second row seat can be reclined, you may
recline the seat and/or raise the head restraint
(if adjustable) to get a better fit. If the rear seat
can be moved forward and rearward in the
vehicle, you may wish to move it to its
rear-most position to make room for the child
seat. You may also move the front seat forward
to allow more room for the child seat. 3. Attach the lower hooks or connectors of the
child restraint to the lower anchorages in the
selected seating position.
4. If the child restraint has a tether strap, connect it to the top tether anchorage. See
Úpage 164 for directions to attach a tether
anchor.
5. Tighten all of the straps as you push the child restraint rearward and downward into the
seat. Remove slack in the straps according to
the child restraint manufacturer’s instructions.
6. Test that the child restraint is installed tightly by pulling back and forth on the child seat at
the belt path. It should not move more than
1 inch (25.4 mm) in any direction.
How To Stow An Unused Switchable-ALR
(ALR) Seat Belt:
When using the LATCH attaching system to install
a child restraint, stow all ALR seat belts that are not
being used by other occupants or being used to
secure child restraints. An unused belt could injure
a child if they play with it and accidentally lock the
seat belt retractor. Before installing a child
restraint using the LATCH system, buckle the seat
belt behind the child restraint and out of the child’s
reach. If the buckled seat belt interferes with the
child restraint installation, instead of buckling it
behind the child restraint, route the seat belt
through the child restraint belt path and then
buckle it. Do not lock the seat belt. Remind all
children in the vehicle that the seat belts are not
toys and that they should not play with them.
6
22_VM_OM_EN_USC_t.book Page 161
Page 171 of 260

SAFETY169
(Continued)
(Continued)
PERIODIC SAFETY CHECKS YOU SHOULD
M
AKE OUTSIDE THE VEHICLE
Tires
Examine tires for excessive tread wear and uneven
wear patterns. Check for stones, nails, glass, or
other objects lodged in the tread or sidewall.
Inspect the tread for cuts and cracks. Inspect
sidewalls for cuts, cracks, and bulges. Check the
lug nut/bold torque for tightness. Check the tires
(including spare) for proper cold inflation pressure.
WARNING!
An improperly attached, damaged, folded, or
stacked floor mat, or damaged floor mat
fasteners may cause your floor mat to interfere
with the accelerator, brake, or clutch pedals and
cause a loss of vehicle control. To prevent
SERIOUS INJURY or DEATH:
ALWAYS securely attach your floor
mat using the floor mat fasteners. DO
NOT install your floor mat upside down
or turn your floor mat over. Lightly pull
to confirm mat is secured using the floor mat
fasteners on a regular basis.
ALWAYS REMOVE THE EXISTING
FLOOR MAT FROM THE VEHICLE
before installing any other floor mat.
NEVER install or stack an additional
floor mat on top of an existing floor mat.
ONLY install floor mats designed to fit your
vehicle. NEVER install a floor mat that cannot
be properly attached and secured to your
vehicle. If a floor mat needs to be replaced,
only use a FCA approved floor mat for the
specific make, model, and year of your
vehicle.
ONLY use the driver’s side floor mat on the
driver’s side floor area. To check for interfer -
ence, with the vehicle properly parked with the
engine off, fully depress the accelerator, the
brake, and the clutch pedal (if present) to
check for interference. If your floor mat inter -
feres with the operation of any pedal, or is not
secure to the floor, remove the floor mat from
the vehicle and place the floor mat in your
trunk.
ONLY use the passenger’s side floor mat on
the passenger’s side floor area.
ALWAYS make sure objects cannot fall or slide
into the driver’s side floor area when the
vehicle is moving. Objects can become
trapped under accelerator, brake, or clutch
pedals and could cause a loss of vehicle
control.
NEVER place any objects under the floor mat
(e.g., towels, keys, etc.). These objects could
change the position of the floor mat and may
cause interference with the accelerator,
brake, or clutch pedals.
WARNING!
If the vehicle carpet has been removed and
re-installed, always properly attach carpet to
the floor and check the floor mat fasteners are
secure to the vehicle carpet. Fully depress
each pedal to check for interference with the
accelerator, brake, or clutch pedals then
re-install the floor mats.
It is recommended to only use mild soap and
water to clean your floor mats. After cleaning,
always check your floor mat has been properly
installed and is secured to your vehicle using
the floor mat fasteners by lightly pulling mat.
WARNING!
6
22_VM_OM_EN_USC_t.book Page 169
Page 176 of 260

174IN CASE OF EMERGENCY
(Continued)
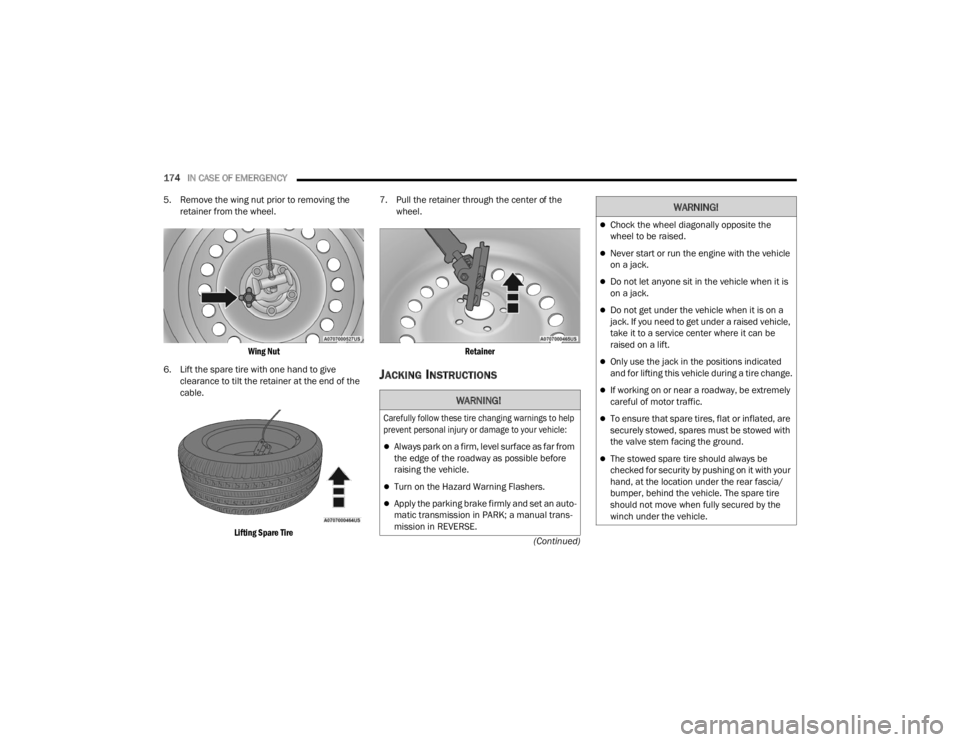
5. Remove the wing nut prior to removing the
retainer from the wheel.
Wing Nut
6. Lift the spare tire with one hand to give clearance to tilt the retainer at the end of the
cable.
Lifting Spare Tire
7. Pull the retainer through the center of the
wheel.
Retainer
JACKING INSTRUCTIONS
WARNING!
Carefully follow these tire changing warnings to help
prevent personal injury or damage to your vehicle:
Always park on a firm, level surface as far from
the edge of the roadway as possible before
raising the vehicle.
Turn on the Hazard Warning Flashers.
Apply the parking brake firmly and set an auto -
matic transmission in PARK; a manual trans -
mission in REVERSE.
Chock the wheel diagonally opposite the
wheel to be raised.
Never start or run the engine with the vehicle
on a jack.
Do not let anyone sit in the vehicle when it is
on a jack.
Do not get under the vehicle when it is on a
jack. If you need to get under a raised vehicle,
take it to a service center where it can be
raised on a lift.
Only use the jack in the positions indicated
and for lifting this vehicle during a tire change.
If working on or near a roadway, be extremely
careful of motor traffic.
To ensure that spare tires, flat or inflated, are
securely stowed, spares must be stowed with
the valve stem facing the ground.
The stowed spare tire should always be
checked for security by pushing on it with your
hand, at the location under the rear fascia/
bumper, behind the vehicle. The spare tire
should not move when fully secured by the
winch under the vehicle.
WARNING!
22_VM_OM_EN_USC_t.book Page 174
Page 179 of 260

IN CASE OF EMERGENCY177
7. Lower the vehicle by turning the jack screw to the left Ú page 236.
8. Lower the jack to its fully-closed position.
9. Stow the cable and wheel spacer before driving the vehicle Ú page 177.
10. Stow the jack and tools under the driver’s seat.
11. Check the spare tire pressure as soon as possible. Correct the tire pressure, as
required.
12. When you place the spare tire back on the winch or if you carry the tire in need of repair
on the winch, always check that the tire is
properly secured under the vehicle by pushing
on the stowed tire under the rear fascia/
bumper at the back of the vehicle. If the tire
has motion when pushed, use the tools to
re-tighten the winch until a loud click is heard.
VEHICLES WITH ALLOY WHEELS
For stowing a damaged tire on vehicles with alloy
wheels, remove the adapter bracket and bolts
from the storage bag in the glove compartment
and follow the steps below:
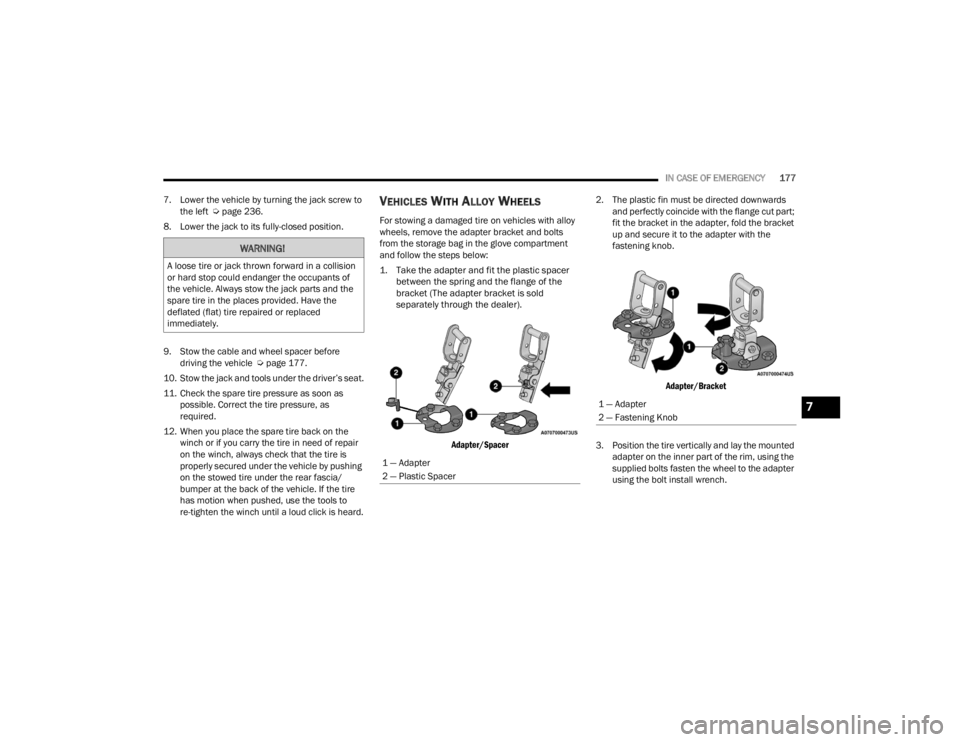
1. Take the adapter and fit the plastic spacer between the spring and the flange of the
bracket (The adapter bracket is sold
separately through the dealer).
Adapter/Spacer
2. The plastic fin must be directed downwards
and perfectly coincide with the flange cut part;
fit the bracket in the adapter, fold the bracket
up and secure it to the adapter with the
fastening knob.
Adapter/Bracket
3. Position the tire vertically and lay the mounted adapter on the inner part of the rim, using the
supplied bolts fasten the wheel to the adapter
using the bolt install wrench.
WARNING!
A loose tire or jack thrown forward in a collision
or hard stop could endanger the occupants of
the vehicle. Always stow the jack parts and the
spare tire in the places provided. Have the
deflated (flat) tire repaired or replaced
immediately.
1 — Adapter
2 — Plastic Spacer
1 — Adapter
2 — Fastening Knob7
22_VM_OM_EN_USC_t.book Page 177
Page 180 of 260

178IN CASE OF EMERGENCY
Alloy Wheel Mounting
4. Tighten the bolts with the wrench handle.
5. Rotate the winch mechanism clockwise until the wheel is properly stowed under the vehicle
and until the wench makes three audible
noises.
6. Reach underneath and shake tire by hand to confirm that it is secure. The tire should not
move. If the tire is still loose and/or three
audible noises are not heard, place and secure
damaged wheel into the vehicle and seek
dealer assistance for the winch mechanism.
VEHICLES EQUIPPED WITH WHEEL
C
OVERS
1. Mount the road tire on the axle.
2. To ease the installation process for steel
wheels with wheel covers, install two wheel
bolts on the wheel. Install the wheel bolts with
the threaded end of the bolt toward the wheel.
Lightly tighten the wheel bolts.
Tire And Wheel Cover Or Center Cap
3. Align the valve notch in the wheel cover with
the valve stem on the wheel. Install the cover
by hand, snapping the cover over the two
wheel bolts. Do not use a hammer or excessive
force to install the cover.
4. Install the remaining wheel bolts with the threaded end of the wheel bolt toward the
wheel. Lightly tighten the wheel bolts.
5. Lower the vehicle to the ground by turning the jack handle counterclockwise.
6. Finish tightening the wheel bolts. Push down on the wrench while holding at the end of the
handle for increased leverage. Tighten the
wheel bolts in a star pattern until each wheel
bolt has been tightened twice Ú page 236.
7. After 25 miles (40 km) check the wheel bolt torque with a torque wrench to ensure that all
wheel bolts are properly seated against the
wheel.
1 — Valve Stem
2 — Valve Notch
3 — Road Tire
4 — Wheel Cover
5 — Wheel Lug Nut
WARNING!
To avoid the risk of forcing the vehicle off the
jack, do not fully tighten the wheel bolts until the
vehicle has been lowered. Failure to follow this
warning may result in serious injury.
22_VM_OM_EN_USC_t.book Page 178