2022 RAM PROMASTER CITY service
[x] Cancel search: servicePage 173 of 260
171
(Continued)
IN CASE OF EMERGENCY
HAZARD WARNING FLASHERS
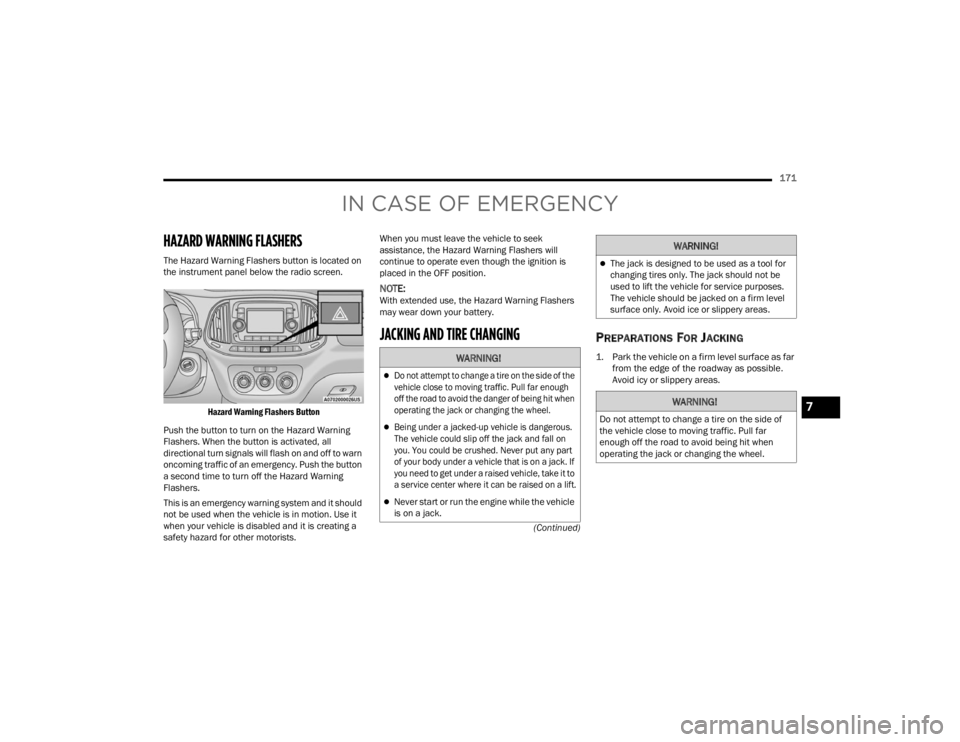
The Hazard Warning Flashers button is located on
the instrument panel below the radio screen.
Hazard Warning Flashers Button
Push the button to turn on the Hazard Warning
Flashers. When the button is activated, all
directional turn signals will flash on and off to warn
oncoming traffic of an emergency. Push the button
a second time to turn off the Hazard Warning
Flashers.
This is an emergency warning system and it should
not be used when the vehicle is in motion. Use it
when your vehicle is disabled and it is creating a
safety hazard for other motorists. When you must leave the vehicle to seek
assistance, the Hazard Warning Flashers will
continue to operate even though the ignition is
placed in the OFF position.
NOTE:With extended use, the Hazard Warning Flashers
may wear down your battery.
JACKING AND TIRE CHANGING PREPARATIONS FOR JACKING
1. Park the vehicle on a firm level surface as far
from the edge of the roadway as possible.
Avoid icy or slippery areas.
WARNING!
Do not attempt to change a tire on the side of the
vehicle close to moving traffic. Pull far enough
off the road to avoid the danger of being hit when
operating the jack or changing the wheel.
Being under a jacked-up vehicle is dangerous.
The vehicle could slip off the jack and fall on
you. You could be crushed. Never put any part
of your body under a vehicle that is on a jack. If
you need to get under a raised vehicle, take it to
a service center where it can be raised on a lift.
Never start or run the engine while the vehicle
is on a jack.
The jack is designed to be used as a tool for
changing tires only. The jack should not be
used to lift the vehicle for service purposes.
The vehicle should be jacked on a firm level
surface only. Avoid ice or slippery areas.
WARNING!
Do not attempt to change a tire on the side of
the vehicle close to moving traffic. Pull far
enough off the road to avoid being hit when
operating the jack or changing the wheel.
WARNING!
7
22_VM_OM_EN_USC_t.book Page 171
Page 176 of 260
174IN CASE OF EMERGENCY
(Continued)
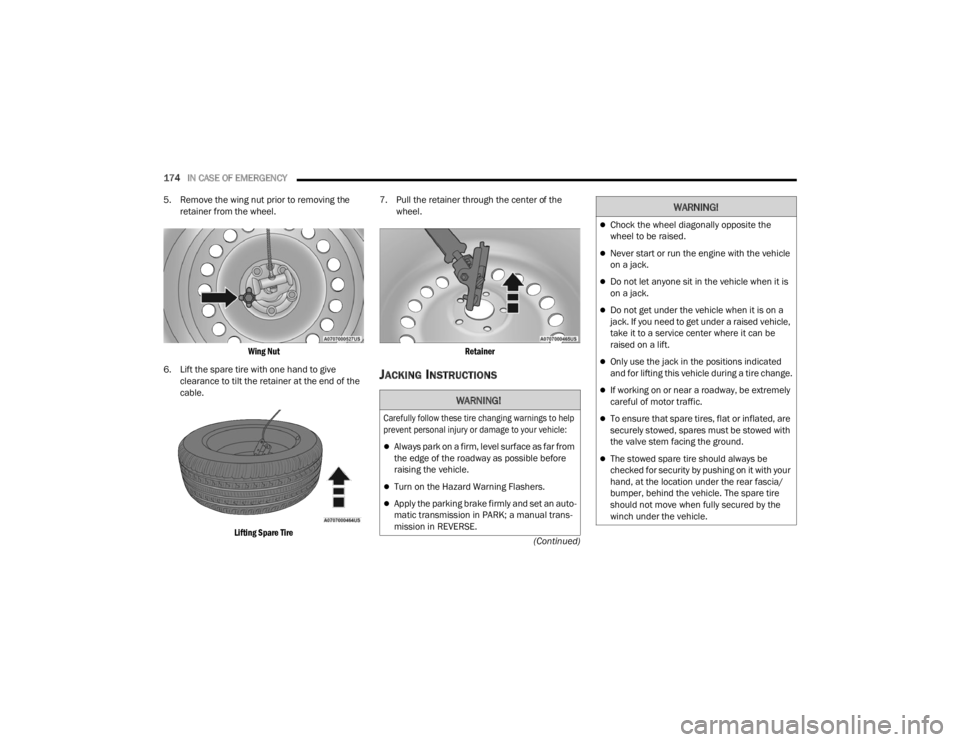
5. Remove the wing nut prior to removing the
retainer from the wheel.
Wing Nut
6. Lift the spare tire with one hand to give clearance to tilt the retainer at the end of the
cable.
Lifting Spare Tire
7. Pull the retainer through the center of the
wheel.
Retainer
JACKING INSTRUCTIONS
WARNING!
Carefully follow these tire changing warnings to help
prevent personal injury or damage to your vehicle:
Always park on a firm, level surface as far from
the edge of the roadway as possible before
raising the vehicle.
Turn on the Hazard Warning Flashers.
Apply the parking brake firmly and set an auto -
matic transmission in PARK; a manual trans -
mission in REVERSE.
Chock the wheel diagonally opposite the
wheel to be raised.
Never start or run the engine with the vehicle
on a jack.
Do not let anyone sit in the vehicle when it is
on a jack.
Do not get under the vehicle when it is on a
jack. If you need to get under a raised vehicle,
take it to a service center where it can be
raised on a lift.
Only use the jack in the positions indicated
and for lifting this vehicle during a tire change.
If working on or near a roadway, be extremely
careful of motor traffic.
To ensure that spare tires, flat or inflated, are
securely stowed, spares must be stowed with
the valve stem facing the ground.
The stowed spare tire should always be
checked for security by pushing on it with your
hand, at the location under the rear fascia/
bumper, behind the vehicle. The spare tire
should not move when fully secured by the
winch under the vehicle.
WARNING!
22_VM_OM_EN_USC_t.book Page 174
Page 178 of 260
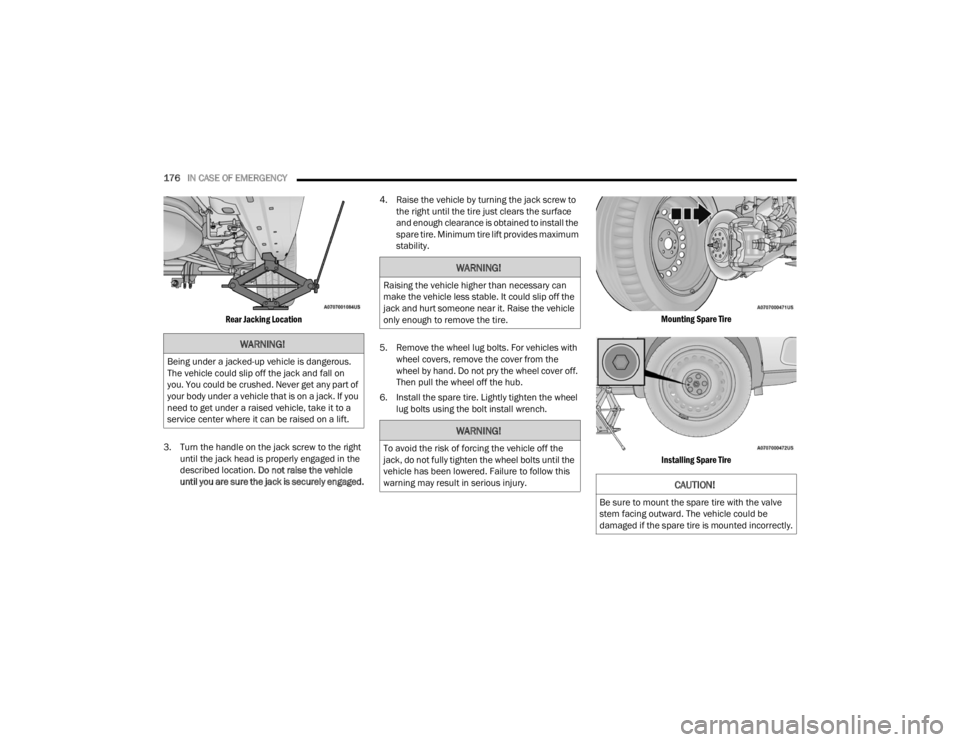
176IN CASE OF EMERGENCY
Rear Jacking Location
3. Turn the handle on the jack screw to the right until the jack head is properly engaged in the
described location. Do not raise the vehicle
until you are sure the jack is securely engaged. 4. Raise the vehicle by turning the jack screw to
the right until the tire just clears the surface
and enough clearance is obtained to install the
spare tire. Minimum tire lift provides maximum
stability.
5. Remove the wheel lug bolts. For vehicles with wheel covers, remove the cover from the
wheel by hand. Do not pry the wheel cover off.
Then pull the wheel off the hub.
6. Install the spare tire. Lightly tighten the wheel lug bolts using the bolt install wrench.
Mounting Spare Tire
Installing Spare Tire
WARNING!
Being under a jacked-up vehicle is dangerous.
The vehicle could slip off the jack and fall on
you. You could be crushed. Never get any part of
your body under a vehicle that is on a jack. If you
need to get under a raised vehicle, take it to a
service center where it can be raised on a lift.
WARNING!
Raising the vehicle higher than necessary can
make the vehicle less stable. It could slip off the
jack and hurt someone near it. Raise the vehicle
only enough to remove the tire.
WARNING!
To avoid the risk of forcing the vehicle off the
jack, do not fully tighten the wheel bolts until the
vehicle has been lowered. Failure to follow this
warning may result in serious injury.
CAUTION!
Be sure to mount the spare tire with the valve
stem facing outward. The vehicle could be
damaged if the spare tire is mounted incorrectly.
22_VM_OM_EN_USC_t.book Page 176
Page 181 of 260
IN CASE OF EMERGENCY179
(Continued)
TIRE SERVICE KIT — IF EQUIPPED
Small punctures up to ¼ inch (6 mm) in the tire
tread can be sealed with Tire Service Kit. Foreign
objects (e.g., screws or nails) should not be
removed from the tire. Tire Service Kit can be used
in outside temperatures down to approximately
-4°F (-20°C).
This kit will provide a temporary tire seal, allowing
you to drive your vehicle up to 100 miles (160 km)
with a maximum speed of 50 mph (80 km/h).
TIRE SERVICE KIT STORAGE
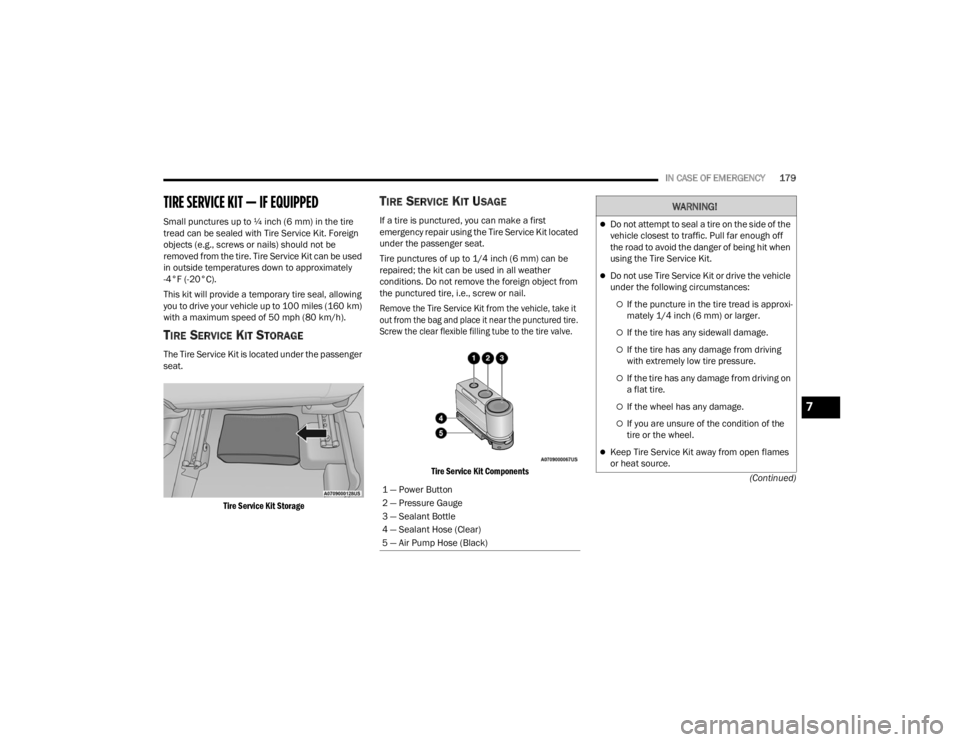
The Tire Service Kit is located under the passenger
seat.
Tire Service Kit Storage
TIRE SERVICE KIT USAGE
If a tire is punctured, you can make a first
emergency repair using the Tire Service Kit located
under the passenger seat.
Tire punctures of up to 1/4 inch (6 mm) can be
repaired; the kit can be used in all weather
conditions. Do not remove the foreign object from
the punctured tire, i.e., screw or nail.
Remove the Tire Service Kit from the vehicle, take it
out from the bag and place it near the punctured tire.
Screw the clear flexible filling tube to the tire valve.
Tire Service Kit Components
1 — Power Button
2 — Pressure Gauge
3 — Sealant Bottle
4 — Sealant Hose (Clear)
5 — Air Pump Hose (Black)
WARNING!
Do not attempt to seal a tire on the side of the
vehicle closest to traffic. Pull far enough off
the road to avoid the danger of being hit when
using the Tire Service Kit.
Do not use Tire Service Kit or drive the vehicle
under the following circumstances:
If the puncture in the tire tread is approxi -
mately 1/4 inch (6 mm) or larger.
If the tire has any sidewall damage.
If the tire has any damage from driving
with extremely low tire pressure.
If the tire has any damage from driving on
a flat tire.
If the wheel has any damage.
If you are unsure of the condition of the
tire or the wheel.
Keep Tire Service Kit away from open flames
or heat source.
7
22_VM_OM_EN_USC_t.book Page 179
Page 182 of 260

180IN CASE OF EMERGENCY
Insert the power plug into the vehicle power outlet
socket. Start the vehicle engine. Push the Tire Service Kit power button on. The
electric compressor will be turned on, sealant and
air will inflate the tire.
Minimum 26 psi (1.8 bar) of pressure should be
reached within 20 minutes. If the pressure has not
been reached, turn off and remove the Tire Service
Kit, drive the vehicle 30 feet (10 meters) back and
forth, to better distribute the sealant inside the
tire.
Attach the clear flexible filling tube of the
compressor directly to the tire valve and repeat the
inflation process.
When the correct pressure has been reached,
start driving the vehicle to uniformly distribute the
sealant inside the tire. After 10 minutes, stop and
check the tire pressure. If the pressure is below
19 psi (1.3 bar), do not drive the vehicle, as the
tire is too damaged, contact the nearest
authorized dealer.
If the pressure is at 19 psi (1.3 bar) or above
repeat the inflation process to reach the correct
tire pressure and continue driving.
Peel off the warning label from the bottle and place
it on the dashboard as a reminder to the driver that
a tire has been treated with Tire Service Kit.
NOTE:Replace the sealant canister prior to the expiration
date at an authorized dealer.
Tire Service Kit Sealant Canister
A loose Tire Service Kit thrown forward in a colli -
sion or hard stop could endanger the occupants of
the vehicle. Always stow the Tire Service Kit in the
place provided. Failure to follow these warnings
can result in injuries that are serious or fatal to
you, your passengers, and others around you.
Take care not to allow the contents of Tire
Service Kit to come in contact with hair, eyes,
or clothing. Tire Service Kit sealant is harmful
if inhaled, swallowed, or absorbed through the
skin. It causes skin, eye, and respiratory irrita -
tion. Flush immediately with plenty of water if
there is any contact with eyes or skin. Change
clothing as soon as possible, if there is any
contact with clothing.
Tire Service Kit Sealant solution contains
latex. In case of an allergic reaction or rash,
consult a physician immediately. Keep Tire
Service Kit out of reach of children. If swal -
lowed, rinse mouth immediately with plenty of
water and drink plenty of water. Do not induce
vomiting! Consult a physician immediately.
WARNING!
WARNING!
Tire Service Kit is not a permanent flat tire
repair. Have the tire inspected and repaired or
replaced after using Tire Service Kit. Do not
exceed 50 mph (80 km/h) until the tire is
repaired or replaced. Failure to follow this
warning can result in injuries that are serious or
fatal to you, your passengers, and others around
you. Have the tire checked as soon as possible
at an authorized dealer.
WARNING!
The metal end fitting from Power Plug may get
hot after use, so it should be handled carefully.
22_VM_OM_EN_USC_t.book Page 180
Page 185 of 260

IN CASE OF EMERGENCY183
Disconnecting The Jumper Cables
1. Disconnect the negative
(-)
end of the jumper
cable from the engine ground of the vehicle
with the discharged battery.
2. Disconnect the opposite end of the negative (-)
jumper cable from the negative (-) post of the
booster battery.
3. Disconnect the positive (+) end of the jumper
cable from the positive (+) post of the booster
battery.
4. Disconnect the opposite end of the positive (+)
jumper cable from the positive (+) post of the
vehicle with the discharged battery, and
reinstall the protective cap.
If frequent jump starting is required to start your
vehicle you should have the battery and charging
system inspected at an authorized dealer.
IF YOUR ENGINE OVERHEATS
If the vehicle is overheating, it will need to be
serviced by an authorized dealer.
In any of the following situations, you can reduce
the potential for overheating by taking the
appropriate action.
On the highways — slow down.
In city traffic — while stopped, place the trans -
mission in NEUTRAL (N), but do not increase the
engine idle speed while preventing vehicle
motion with the brakes.
NOTE:There are steps that you can take to slow down an
impending overheat condition:
If your Air Conditioner (A/C) is on, turn it off. The
A/C system adds heat to the engine cooling
system and turning the A/C off can help remove
this heat.
You can also turn the temperature control to
maximum heat, the mode control to floor and
the blower control to high. This allows the heater
core to act as a supplement to the radiator and
aids in removing heat from the engine cooling
system.CAUTION!
Accessories plugged into the vehicle power
outlets draw power from the vehicle’s battery,
even when not in use (i.e., cellular devices, etc.).
Eventually, if plugged in long enough without
engine operation, the vehicle’s battery will
discharge sufficiently to degrade battery life
and/or prevent the engine from starting.
WARNING!
You or others can be badly burned by hot engine
coolant (antifreeze) or steam from your radiator.
If you see or hear steam coming from under the
hood, do not open the hood until the radiator
has had time to cool. Never try to open a cooling
system pressure cap when the radiator or
coolant bottle is hot.
CAUTION!
Driving with a hot cooling system could damage
your vehicle. If the temperature gauge reads
HOT (H), pull over and stop the vehicle. Idle the
vehicle with the air conditioner turned off until
the pointer drops back into the normal range. If
the pointer remains on HOT (H), and you hear
continuous chimes, turn the engine off
immediately and call for service.
7
22_VM_OM_EN_USC_t.book Page 183
Page 189 of 260
IN CASE OF EMERGENCY187
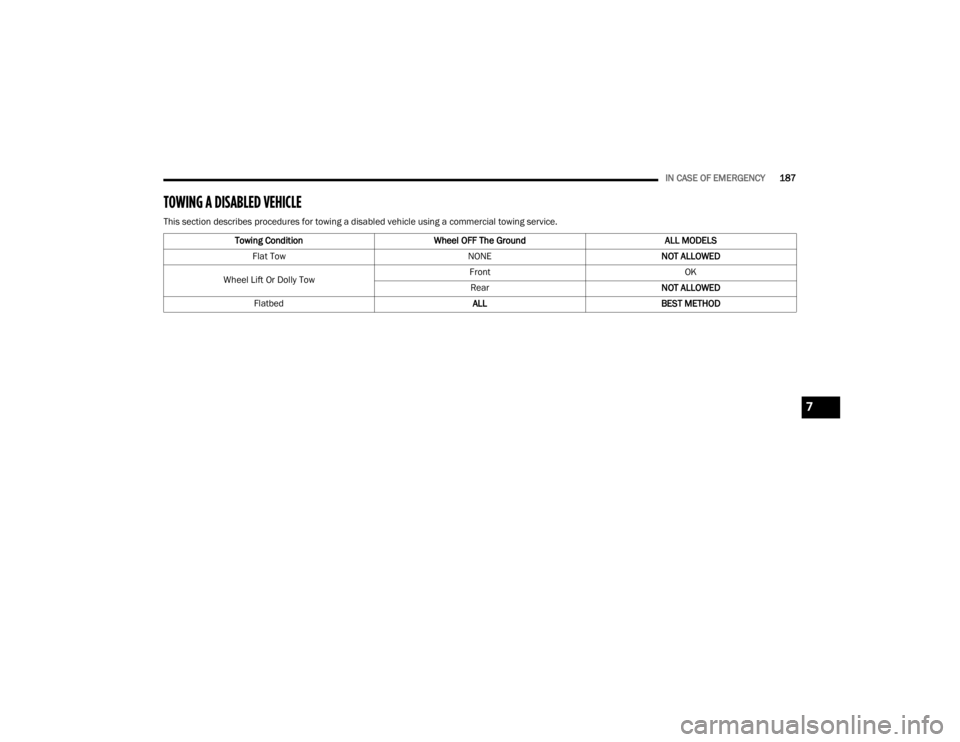
TOWING A DISABLED VEHICLE
This section describes procedures for towing a disabled vehicle using a commercial towing service.
Towing Condition Wheel OFF The Ground ALL MODELS
Flat Tow NONENOT ALLOWED
Wheel Lift Or Dolly Tow Front
OK
Rear NOT ALLOWED
Flatbed ALLBEST METHOD
7
22_VM_OM_EN_USC_t.book Page 187
Page 191 of 260

189
SERVICING AND MAINTENANCE
SCHEDULED SERVICING
Your vehicle is equipped with an automatic oil
change indicator system. The oil change indicator
system will remind you that it is time to take your
vehicle in for scheduled maintenance.
Based on engine operation conditions, the oil
change indicator message will illuminate. This
means that service is required for your vehicle.
Operating conditions such as frequent short-trips,
trailer tow, extended engine idle time, extremely
hot or cold ambient temperatures will influence
when the “Oil Change Required” message is
displayed. Have your vehicle serviced as soon as
possible, within the next 500 miles (805 km).An authorized dealer will reset the oil change
indicator message after completing the scheduled
oil change. If a scheduled oil change is performed
by someone other than an authorized dealer, to
reset the message Ú
page 41.
NOTE:Under no circumstances should oil change
intervals exceed 10,000 miles (16,000 km), 350
hours of engine run time or 12 months, whichever
comes first. The 350 hours of engine run or idle
time is generally only a concern for fleet
customers. Once A Month Or Before A Long Trip:
Check engine oil level.
Check windshield washer fluid level.
Check tire pressure and look for unusual wear
or damage. Rotate tires at the first sign of irreg
-
ular wear, even if it occurs before the oil indi -
cator system turns on.
Check the fluid levels of the coolant reservoir
and brake master cylinder, fill as needed.
Check function of all interior and exterior lights.
8
22_VM_OM_EN_USC_t.book Page 189