2022 RAM PROMASTER CITY service
[x] Cancel search: servicePage 209 of 260

SERVICING AND MAINTENANCE207
FUSES
General Information
The fuses protect electrical systems against
excessive current.
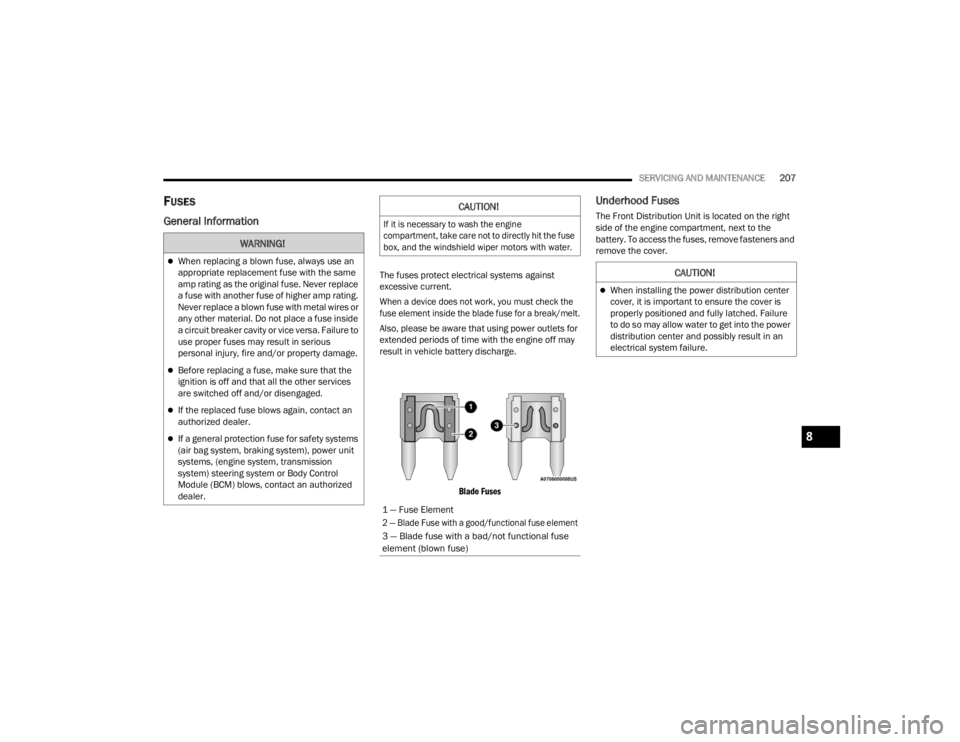
When a device does not work, you must check the
fuse element inside the blade fuse for a break/melt.
Also, please be aware that using power outlets for
extended periods of time with the engine off may
result in vehicle battery discharge.
Blade Fuses
Underhood Fuses
The Front Distribution Unit is located on the right
side of the engine compartment, next to the
battery. To access the fuses, remove fasteners and
remove the cover.
WARNING!
When replacing a blown fuse, always use an
appropriate replacement fuse with the same
amp rating as the original fuse. Never replace
a fuse with another fuse of higher amp rating.
Never replace a blown fuse with metal wires or
any other material. Do not place a fuse inside
a circuit breaker cavity or vice versa. Failure to
use proper fuses may result in serious
personal injury, fire and/or property damage.
Before replacing a fuse, make sure that the
ignition is off and that all the other services
are switched off and/or disengaged.
If the replaced fuse blows again, contact an
authorized dealer.
If a general protection fuse for safety systems
(air bag system, braking system), power unit
systems, (engine system, transmission
system) steering system or Body Control
Module (BCM) blows, contact an authorized
dealer.
CAUTION!
If it is necessary to wash the engine
compartment, take care not to directly hit the fuse
box, and the windshield wiper motors with water.
1 — Fuse Element
2 — Blade Fuse with a good/functional fuse element
3 — Blade fuse with a bad/not functional fuse
element (blown fuse)
CAUTION!
When installing the power distribution center
cover, it is important to ensure the cover is
properly positioned and fully latched. Failure
to do so may allow water to get into the power
distribution center and possibly result in an
electrical system failure.
8
22_VM_OM_EN_USC_t.book Page 207
Page 215 of 260

SERVICING AND MAINTENANCE213
BULB REPLACEMENT
Replacement Bulbs, Names, And Part Numbers
In the instance a bulb needs to be replaced, this section includes bulb description and replacement part numbers. All of the inside bulbs are brass or glass-wedge
base. Aluminum base bulbs are not approved.
NOTE:See an authorized dealer for LED bulb replacement.
Interior Bulbs
Lamps Bulb Number
Front Courtesy Lamps C10W
Rear Courtesy Lamps C10W
Luggage Lamp C5W
Exterior Bulbs
Lamps Bulb Number
Front Low Beam Headlamp H11
Front High Beam Headlamps HB3
Front Side Marker Lamps LED (Serviced at an authorized dealer)
Front Parking/Daytime Running Lamps W21W
Front Turn Signal Lamps WY21W8
22_VM_OM_EN_USC_t.book Page 213
Page 216 of 260

214SERVICING AND MAINTENANCE
Replacing Exterior Bulbs
HEADLAMPS
See below steps to replace:
1. Remove the plastic cap from the back of the
headlamp housing.
2. Rotate the bulb counterclockwise.
3. Remove the bulb and replace as needed.
4. Install the bulb and rotate clockwise to lock in place.
5. Reinstall the plastic cap.
FRONT TURN SIGNAL LAMPS
See below steps to replace:
1. Remove the cap from the back of the outer upper headlamp housing.
2. Rotate the bulb counterclockwise and remove.
3. Install the bulb into socket.
4. Rotate the bulb/socket clockwise into the lamp locking it in place.
5. Reinstall the plastic cap.
PARKING AND DAYTIME RUNNING LIGHTS
See below steps to replace:
1. Remove the cap from the back of the outer lower headlamp housing.
2. Rotate the bulb counterclockwise and remove.
3. Install the bulb into socket, and rotate bulb/ socket clockwise into lamp locking it in place.
4. Reinstall the plastic cap.
Rear Stop Lamp
P21W
Rear Turn Signal Lamps PY21W
Rear Tail Lamps P21/5W
Rear Side Marker Lamps LED (Serviced at an authorized adealer)
Center Mount Brake Lamp W5W
Reverse Light W16W
Front Fog Lamps H11
NOTE:Numbers refer to commercial bulb types that can be purchased from an authorized dealer. If a bulb needs to be replaced visit an authorized dealer or refer to
the applicable Service Manual.
Exterior Bulbs
Lamps Bulb Number
22_VM_OM_EN_USC_t.book Page 214
Page 217 of 260

SERVICING AND MAINTENANCE215
FRONT/REAR SIDE MARKER LAMPS
The front/rear side marker lamps are LED and not
serviced separately. See an authorized dealer for
replacement of these lights.
REAR TAIL, STOP, BACKUP AND TURN SIGNAL
LAMPS
The rear light cluster contains taillight, brake light,
direction indicator and reverse/rear fog light bulbs.
To access the light clusters, see below steps to
replace:
1. Open the rear doors.
2. Remove the screws and remove the tail lamp
assembly.
3. Remove the screws and separate the backplate from the lamp housing.
4. Remove the tail, stop, or turn signal bulbs by pushing them slightly and turning counter -
clockwise.
5. Remove the backup lamp bulb by pulling straight out.
6. Replace lamps as required and reinstall lamp.
The bulbs are arranged inside the light cluster as
follows:
THIRD BRAKE LIGHT (CENTER MOUNT)
See below steps to replace:
1. For versions with tailgate, loosen the two fastening screws and extract the cluster.
2. For versions with swing doors, remove rubber plugs, remove retaining tabs and extract the
cluster.
3. For versions with high roof and swing doors, remove the pressure-fit plastic guard and
rubber cap using a screwdriver, release the
retaining tags as shown in the figure and
remove the unit.
4. Remove the appropriate tabs and remove the bulb holder.
5. Remove the snap-fitted bulb and replace it.
LICENSE PLATE LIGHTS
See below steps to replace:
1. Disengage the holding tabs and remove the lens by lifting to the left.
2. Remove the bulbs by releasing them from the side contacts; insert the new bulbs and make
sure they are correctly clamped between these
contacts.
Replacing Interior Bulbs
DOME LAMP WITH SPOT LIGHTS
See below steps to replace:
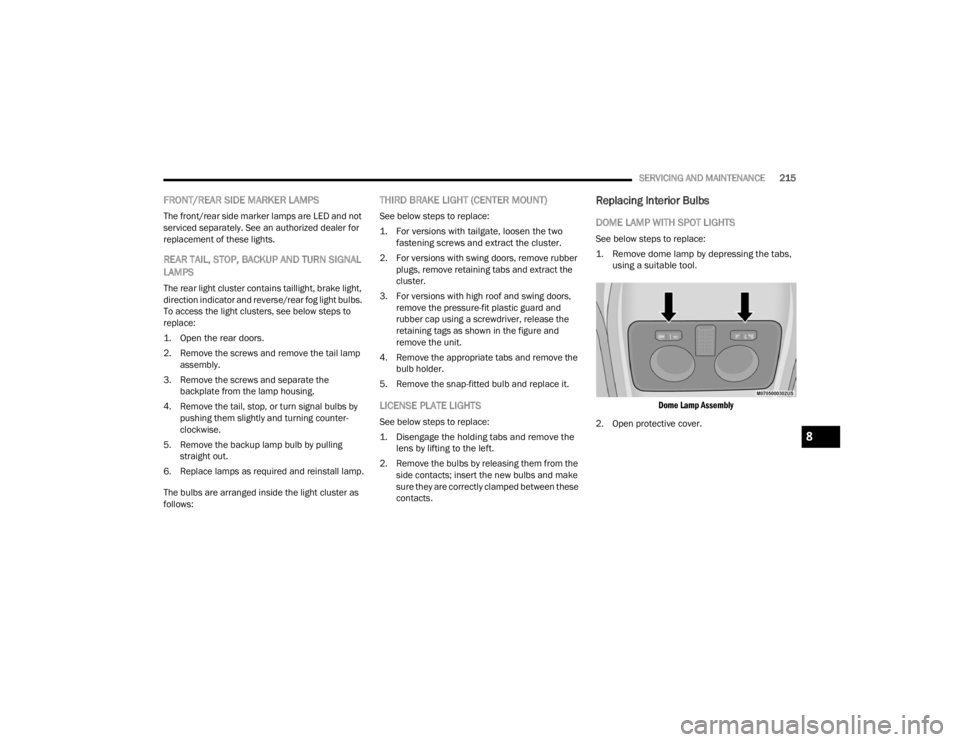
1. Remove dome lamp by depressing the tabs, using a suitable tool.
Dome Lamp Assembly
2. Open protective cover.
8
22_VM_OM_EN_USC_t.book Page 215
Page 219 of 260

SERVICING AND MAINTENANCE217
Roof Lamp (Reverse Side)
4. Close the protective cover and reposition it back into its housing, making sure that it locks
into place.
TIRES
TIRE SAFETY INFORMATION
Tire safety information will cover aspects of the
following information: Tire Markings, Tire
Identification Numbers, Tire Terminology and
Definitions, Tire Pressures, and Tire Loading.
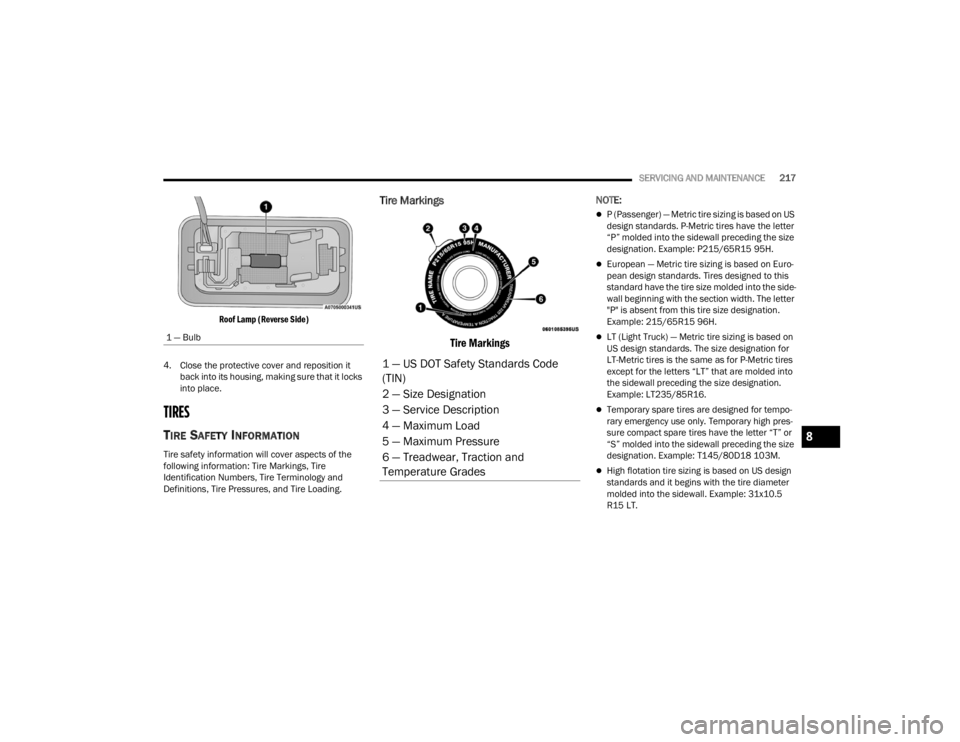
Tire Markings
Tire Markings
NOTE:
P (Passenger) — Metric tire sizing is based on US
design standards. P-Metric tires have the letter
“P” molded into the sidewall preceding the size
designation. Example: P215/65R15 95H.
European — Metric tire sizing is based on Euro -
pean design standards. Tires designed to this
standard have the tire size molded into the side -
wall beginning with the section width. The letter
"P" is absent from this tire size designation.
Example: 215/65R15 96H.
LT (Light Truck) — Metric tire sizing is based on
US design standards. The size designation for
LT-Metric tires is the same as for P-Metric tires
except for the letters “LT” that are molded into
the sidewall preceding the size designation.
Example: LT235/85R16.
Temporary spare tires are designed for tempo -
rary emergency use only. Temporary high pres -
sure compact spare tires have the letter “T” or
“S” molded into the sidewall preceding the size
designation. Example: T145/80D18 103M.
High flotation tire sizing is based on US design
standards and it begins with the tire diameter
molded into the sidewall. Example: 31x10.5
R15 LT.
1 — Bulb
1 — US DOT Safety Standards Code
(TIN)
2 — Size Designation
3 — Service Description
4 — Maximum Load
5 — Maximum Pressure
6 — Treadwear, Traction and
Temperature Grades
8
22_VM_OM_EN_USC_t.book Page 217
Page 221 of 260

SERVICING AND MAINTENANCE219
Service Description:
95 = Load Index
A numerical code associated with the maximum load a tire can carry
H = Speed Symbol
A symbol indicating the range of speeds at which a tire can carry a load corresponding to its load index under certain operating conditions
The maximum speed corresponding to the speed symbol should only be achieved under specified operating conditions (i.e., tire pressure, vehicle loading,
road conditions, and posted speed limits)
Load Identification:
Absence of the following load identification symbols on the sidewall of the tire indicates a Standard Load (SL) tire:
XL = Extra load (or reinforced) tire, or
LL = Light load tire or
C, D, E, F, G = Load range associated with the maximum load a tire can carry at a specified pressure
Maximum Load – Maximum load indicates the maximum load this tire is designed to carry
Maximum Pressure – Maximum pressure indicates the maximum permissible cold tire inflation pressure for this tire
EXAMPLE:
8
22_VM_OM_EN_USC_t.book Page 219
Page 228 of 260

226SERVICING AND MAINTENANCE
Inflation pressures specified on the placard are
always “cold tire inflation pressure”. Cold tire
inflation pressure is defined as the tire pressure
after the vehicle has not been driven for at least
three hours, or driven less than 1 mile (1.6 km)
after sitting for a minimum of three hours. The cold
tire inflation pressure must not exceed the
maximum inflation pressure molded into the tire
sidewall.
Check tire pressures more often if subject to a
wide range of outdoor temperatures, as tire
pressures vary with temperature changes.
Tire pressures change by approximately 1 psi
(7 kPa) per 12°F (7°C) of air temperature change.
Keep this in mind when checking tire pressure
inside a garage, especially in the Winter.
Example: If garage temperature = 68°F (20°C)
and the outside temperature = 32°F (0°C) then
the cold tire inflation pressure should be increased
by 3 psi (21 kPa), which equals 1 psi (7 kPa) for
every 12°F (7°C) for this outside temperature
condition.
Tire pressure may increase from 2 to 6 psi (13 to
40 kPa) during operation. DO NOT reduce this
normal pressure build up or your tire pressure will
be too low.
Tire Pressures For High Speed Operation
The manufacturer advocates driving at safe
speeds and within posted speed limits. Where
speed limits or conditions are such that the vehicle
can be driven at high speeds, maintaining correct
tire inflation pressure is very important. Increased
tire pressure and reduced vehicle loading may be
required for high-speed vehicle operation. Refer to
an authorized tire dealer or original equipment
vehicle dealer for recommended safe operating
speeds, loading and cold tire inflation pressures.
Radial Ply Tires
Tire Repair
If your tire becomes damaged, it may be repaired if
it meets the following criteria:
The tire has not been driven on when flat.
The damage is only on the tread section of your
tire (sidewall damage is not repairable).
The puncture is no greater than a ¼ of an inch
(6 mm).
Consult an authorized tire dealer for tire repairs
and additional information.
Damaged Run Flat tires, or Run Flat tires that have
experienced a loss of pressure should be replaced
immediately with another Run Flat tire of identical
size and service description (Load Index and
Speed Symbol). Replace the tire pressure sensor
as well as it is not designed to be reused.
WARNING!
High speed driving with your vehicle under
maximum load is dangerous. The added strain
on your tires could cause them to fail. You could
have a serious collision. Do not drive a vehicle
loaded to the maximum capacity at continuous
speeds above 75 mph (120 km/h).
WARNING!
Combining radial ply tires with other types of
tires on your vehicle will cause your vehicle to
handle poorly. The instability could cause a
collision. Always use radial ply tires in sets of
four. Never combine them with other types of
tires.
22_VM_OM_EN_USC_t.book Page 226
Page 229 of 260

SERVICING AND MAINTENANCE227
Run Flat Tires — If Equipped
Run Flat tires allow you the capability to drive
50 miles (80 km) at 50 mph (80 km/h) after a
rapid loss of inflation pressure. This rapid loss of
inflation is referred to as the Run Flat mode. A Run
Flat mode occurs when the tire inflation pressure is
of/or below 14 psi (96 kPa). Once a Run Flat tire
reaches the Run Flat mode it has limited driving
capabilities and needs to be replaced immediately.
A Run Flat tire is not repairable. When a Run Flat
tire is changed after driving with under inflated tire
condition, please replace the TPMS sensor as it is
not designed to be reused when driven under Run
Flat mode 14 psi (96 kPa) condition.
NOTE:TPMS Sensor must be replaced after driving the
vehicle on a flat tire condition.
It is not recommended driving a vehicle loaded at
full capacity or to tow a trailer while a tire is in the
Run Flat mode.
For more information Úpage 135.
Tire Spinning
When stuck in mud, sand, snow, or ice conditions,
do not spin your vehicle's wheels above 30 mph
(48 km/h) or for longer than 30 seconds
continuously without stopping.
For further information Ú page 185.
Tread Wear Indicators
Tread wear indicators are in the original equipment
tires to help you in determining when your tires
should be replaced.
These indicators are molded into the bottom of the
tread grooves. They will appear as bands when the
tread depth becomes a 1/16 of an inch (1.6 mm).
When the tread is worn to the tread wear
indicators, the tire should be replaced.
For further information Úpage 228.
Life Of Tire
The service life of a tire is dependent upon varying
factors including, but not limited to:
Driving style.
Tire pressure - Improper cold tire inflation pres -
sures can cause uneven wear patterns to
develop across the tire tread. These abnormal
wear patterns will reduce tread life, resulting in
the need for earlier tire replacement.
Distance driven.
Performance tires, tires with a speed rating of V
or higher, and Summer tires typically have a
reduced tread life. Rotation of these tires per
the vehicle scheduled maintenance is highly
recommended.
WARNING!
Fast spinning tires can be dangerous. Forces
generated by excessive wheel speeds may
cause tire damage or failure. A tire could
explode and injure someone. Do not spin your
vehicle's wheels faster than 30 mph (48 km/h)
for more than 30 seconds continuously when
you are stuck, and do not let anyone near a
spinning wheel, no matter what the speed.
WARNING!
Tires and the spare tire should be replaced after
six years, regardless of the remaining tread.
Failure to follow this warning can result in
sudden tire failure. You could lose control and
have a collision resulting in serious injury or
death.
8
22_VM_OM_EN_USC_t.book Page 227