2022 RAM PROMASTER CITY steering wheel
[x] Cancel search: steering wheelPage 151 of 260

SAFETY149
NOTE:Air bag covers may not be obvious in the interior
trim, but they will open during air bag deployment.
Rollover Events
Side Air Bags and seat belt pretensioners are
designed to activate in certain rollover events. The
Occupant Restraint Controller (ORC) determines
whether deployment in a particular rollover event
is appropriate, based on the severity and type of
collision. Vehicle damage by itself is not a good
indicator of whether or not Side Air Bags and seat
belt pretensioners should have deployed.
The Side Air Bags and seat belt pretensioners will
not deploy in all rollover events. The rollover
sensing system determines if a rollover event may
be in progress and whether deployment is
appropriate. In the event the vehicle experiences a
rollover or near rollover event, and deployment is
appropriate, the rollover sensing system will deploy
the side air bags and seat belt pretensioners on
both sides of the vehicle.
The SABICs may help reduce the risk of partial or
complete ejection of vehicle occupants through
side windows in certain rollover or side impact
events.Air Bag System Components
NOTE:The Occupant Restraint Controller (ORC) monitors
the internal circuits and interconnecting wiring
associated with electrical Air Bag System Compo -
nents listed below:
Occupant Restraint Controller (ORC)
Air Bag Warning Light
Steering Wheel and Column
Instrument Panel
Knee Impact Bolsters
Driver and Front Passenger Air Bags
Seat Belt Buckle Switch
Supplemental Side Air Bags
Supplemental Knee Air Bags
Front and Side Impact Sensors
Seat Belt Pretensioners
If A Deployment Occurs
The front air bags are designed to deflate
immediately after deployment.
NOTE:Front and/or side air bags will not deploy in all colli -
sions. This does not mean something is wrong with
the air bag system. If you do have a collision which deploys the air
bags, any or all of the following may occur:
The air bag material may sometimes cause
abrasions and/or skin reddening to the occu
-
pants as the air bags deploy and unfold. The
abrasions are similar to friction rope burns or
those you might get sliding along a carpet or
gymnasium floor. They are not caused by
contact with chemicals. They are not perma-
nent and normally heal quickly. However, if you
haven’t healed significantly within a few days,
or if you have any blistering, see your doctor
immediately.
As the air bags deflate, you may see some
smoke-like particles. The particles are a normal
by-product of the process that generates the
non-toxic gas used for air bag inflation. These
airborne particles may irritate the skin, eyes,
nose, or throat. If you have skin or eye irritation,
rinse the area with cool water. For nose or throat
irritation, move to fresh air. If the irritation
continues, see your doctor. If these particles
settle on your clothing, follow the garment
manufacturer’s instructions for cleaning.
Do not drive your vehicle after the air bags have
deployed. If you are involved in another collision,
the air bags will not be in place to protect you.
6
22_VM_OM_EN_USC_t.book Page 149
Page 153 of 260

SAFETY151
Maintaining Your Air Bag System Event Data Recorder (EDR)
This vehicle is equipped with an event data
recorder (EDR). The main purpose of an EDR is to
record, in certain crash or near crash-like
situations, such as an air bag deployment or hitting
a road obstacle, data that will assist in
understanding how a vehicle’s systems performed.
The EDR is designed to record data related to
vehicle dynamics and safety systems for a short
period of time, typically 30 seconds or less. The
EDR in this vehicle is designed to record such data
as:
How various systems in your vehicle were oper -
ating;
Whether or not the driver and passenger safety
belts were buckled/fastened;
How far (if at all) the driver was depressing the
accelerator and/or brake pedal; and,
How fast the vehicle was traveling.
This data can help provide a better understanding
of the circumstances in which crashes and injuries
occur.
NOTE:EDR data are recorded by your vehicle only if a
non-trivial crash situation occurs; no data are
recorded by the EDR under normal driving condi -
tions and no personal data (e.g., name, gender,
age, and crash location) are recorded. However,
other parties, such as law enforcement, could
combine the EDR data with the type of personally
identifying data routinely acquired during a crash
investigation.
To read data recorded by an EDR, special
equipment is required, and access to the vehicle or
the EDR is needed. In addition to the vehicle
manufacturer, other parties, such as law
enforcement, that have the special equipment,
can read the information if they have access to the
vehicle or the EDR.WARNING!
Modifications to any part of the air bag system
could cause it to fail when you need it. You
could be injured if the air bag system is not
there to protect you. Do not modify the compo -
nents or wiring, including adding any kind of
badges or stickers to the steering wheel hub
trim cover or the upper passenger side of the
instrument panel. Do not modify the front
fascia/bumper, vehicle body structure, or add
aftermarket side steps or running boards.
It is dangerous to try to repair any part of the air
bag system yourself. Be sure to tell anyone who
works on your vehicle that it has an air bag system.
Do not attempt to modify any part of your air
bag system. The air bag may inflate accidentally
or may not function properly if modifications are
made. Take your vehicle to an authorized dealer
for any air bag system service. If your seat,
including your trim cover and cushion, needs to
be serviced in any way (including removal or
loosening/tightening of seat attachment bolts),
take the vehicle to an authorized dealer. Only
manufacturer approved seat accessories may
be used. If it is necessary to modify the air bag
system for persons with disabilities, contact an
authorized dealer.
6
22_VM_OM_EN_USC_t.book Page 151
Page 186 of 260

184IN CASE OF EMERGENCY
IGNITION KEY REMOVAL OVERRIDE
This vehicle is equipped with a Key Ignition Park
Interlock which requires the transmission to be in
PARK (P) before the ignition switch can be turned
to the STOP (key removal) position.
To remove the key manually, proceed as follows:
1. Firmly apply the parking brake.
2. Remove the Allen Key located in the rear cargo
area, in the tool bag (if equipped) or on the left
side in the cargo box.
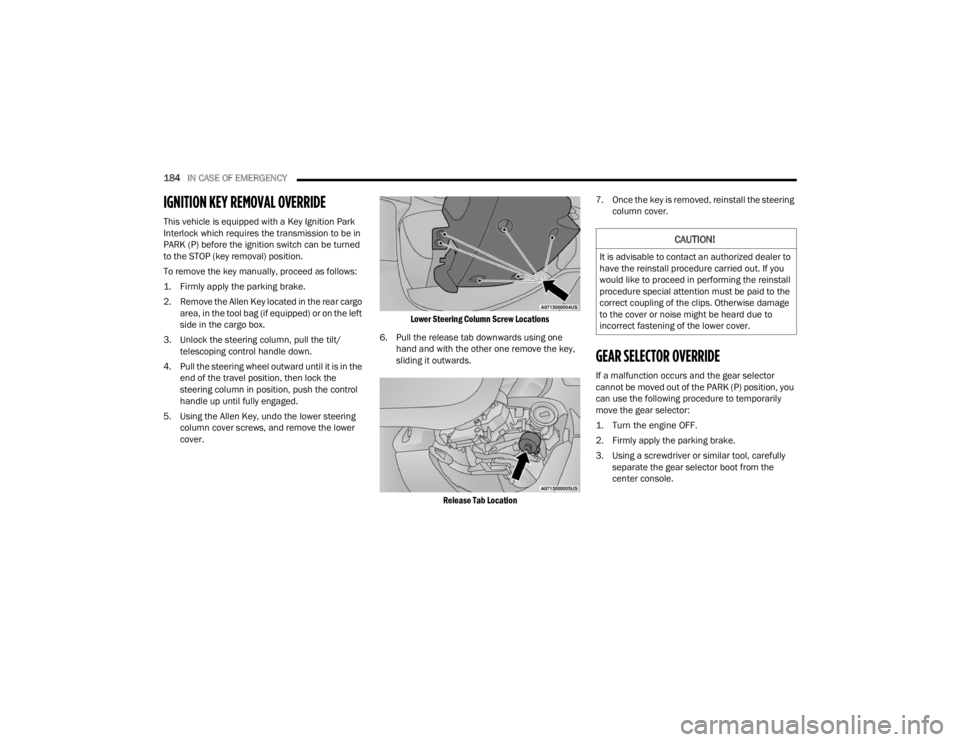
3. Unlock the steering column, pull the tilt/ telescoping control handle down.
4. Pull the steering wheel outward until it is in the end of the travel position, then lock the
steering column in position, push the control
handle up until fully engaged.
5. Using the Allen Key, undo the lower steering column cover screws, and remove the lower
cover.
Lower Steering Column Screw Locations
6. Pull the release tab downwards using one hand and with the other one remove the key,
sliding it outwards.
Release Tab Location
7. Once the key is removed, reinstall the steering
column cover.
GEAR SELECTOR OVERRIDE
If a malfunction occurs and the gear selector
cannot be moved out of the PARK (P) position, you
can use the following procedure to temporarily
move the gear selector:
1. Turn the engine OFF.
2. Firmly apply the parking brake.
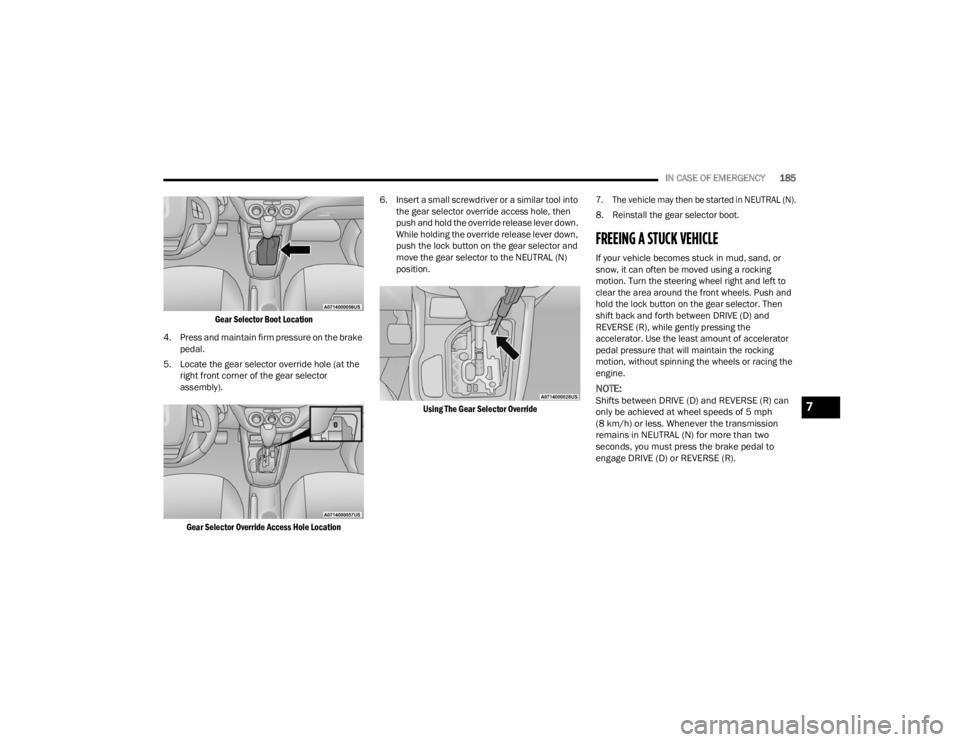
3. Using a screwdriver or similar tool, carefully separate the gear selector boot from the
center console.
CAUTION!
It is advisable to contact an authorized dealer to
have the reinstall procedure carried out. If you
would like to proceed in performing the reinstall
procedure special attention must be paid to the
correct coupling of the clips. Otherwise damage
to the cover or noise might be heard due to
incorrect fastening of the lower cover.
22_VM_OM_EN_USC_t.book Page 184
Page 187 of 260

IN CASE OF EMERGENCY185
Gear Selector Boot Location
4. Press and maintain firm pressure on the brake pedal.
5. Locate the gear selector override hole (at the right front corner of the gear selector
assembly).
Gear Selector Override Access Hole Location
6. Insert a small screwdriver or a similar tool into
the gear selector override access hole, then
push and hold the override release lever down.
While holding the override release lever down,
push the lock button on the gear selector and
move the gear selector to the NEUTRAL (N)
position.
Using The Gear Selector Override 7. The vehicle may then be started in NEUTRAL (N).
8. Reinstall the gear selector boot.
FREEING A STUCK VEHICLE
If your vehicle becomes stuck in mud, sand, or
snow, it can often be moved using a rocking
motion. Turn the steering wheel right and left to
clear the area around the front wheels. Push and
hold the lock button on the gear selector. Then
shift back and forth between DRIVE (D) and
REVERSE (R), while gently pressing the
accelerator. Use the least amount of accelerator
pedal pressure that will maintain the rocking
motion, without spinning the wheels or racing the
engine.
NOTE:
Shifts between DRIVE (D) and REVERSE (R) can
only be achieved at wheel speeds of 5 mph
(8 km/h) or less. Whenever the transmission
remains in NEUTRAL (N) for more than two
seconds, you must press the brake pedal to
engage DRIVE (D) or REVERSE (R).
7
22_VM_OM_EN_USC_t.book Page 185
Page 230 of 260

228SERVICING AND MAINTENANCE
NOTE:Wheel valve stem must be replaced as well when
installing new tires due to wear and tear in existing
tires.
Keep dismounted tires in a cool, dry place with as
little exposure to light as possible. Protect tires
from contact with oil, grease, and gasoline.
Replacement Tires
The tires on your new vehicle provide a balance of
many characteristics. They should be inspected
regularly for wear and correct cold tire inflation
pressures. The manufacturer strongly
recommends that you use tires equivalent to the
originals in size, quality and performance when
replacement is needed Úpage 227. Refer to the
Tire and Loading Information placard or the
Vehicle Certification Label for the size designation
of your tire. The Load Index and Speed Symbol for
your tire will be found on the original equipment
tire sidewall.
For more information relating to the Load Index
and Speed Symbol of a tire Ú page 218.
It is recommended to replace the two front tires or
two rear tires as a pair. Replacing just one tire can
seriously affect your vehicle’s handling. If you ever
replace a wheel, make sure that the wheel’s
specifications match those of the original wheels.
It is recommended you contact an authorized tire
dealer or original equipment dealer with any questions you may have on tire specifications or
capability. Failure to use equivalent replacement
tires may adversely affect the safety, handling, and
ride of your vehicle.
TIRE TYPES
All Season Tires — If Equipped
All Season tires provide traction for all seasons
(Spring, Summer, Autumn, and Winter). Traction
levels may vary between different all season tires.
All season tires can be identified by the M+S, M&S,
M/S or MS designation on the tire sidewall. Use all
season tires only in sets of four; failure to do so
may adversely affect the safety and handling of
your vehicle.
Summer Or Three Season Tires —
If Equipped
Summer tires provide traction in both wet and dry
conditions, and are not intended to be driven in
snow or on ice. If your vehicle is equipped with
Summer tires, be aware these tires are not
designed for Winter or cold driving conditions.
Install Winter tires on your vehicle when ambient
temperatures are less than 40°F (5°C) or if roads
are covered with ice or snow. For more
information, contact an authorized dealer.
WARNING!
Do not use a tire, wheel size, load rating, or
speed rating other than that specified for your
vehicle. Some combinations of unapproved
tires and wheels may change suspension
dimensions and performance characteristics,
resulting in changes to steering, handling, and
braking of your vehicle. This can cause unpre
-
dictable handling and stress to steering and
suspension components. You could lose
control and have a collision resulting in
serious injury or death. Use only the tire and
wheel sizes with load ratings approved for
your vehicle.
Never use a tire with a smaller load index or
capacity, other than what was originally
equipped on your vehicle. Using a tire with a
smaller load index could result in tire over -
loading and failure. You could lose control and
have a collision.
Failure to equip your vehicle with tires having
adequate speed capability can result in
sudden tire failure and loss of vehicle control.
CAUTION!
Replacing original tires with tires of a different
size may result in false speedometer and
odometer readings.
22_VM_OM_EN_USC_t.book Page 228
Page 234 of 260

232SERVICING AND MAINTENANCE
Dark Vapor Chrome, Black Satin Chrome, or Low
Gloss Clear Coat Wheels
TIRE CHAINS AND TRACTION DEVICES
Due to limited clearance, tire chains or traction
devices are not recommended.
TIRE ROTATION RECOMMENDATIONS
The tires on the front and rear of your vehicle
operate at different loads and perform different
steering, driving, and braking functions. For these
reasons, they wear at unequal rates. These effects can be reduced by timely rotation of
tires. The benefits of rotation are especially
worthwhile with aggressive tread designs such as
those on all season type tires. Rotation will
increase tread life, help to maintain mud, snow
and wet traction levels, and contribute to a
smooth, quiet ride.
For the proper maintenance intervals
Úpage 190.
The reasons for any rapid or unusual wear should
be corrected prior to rotation being performed.
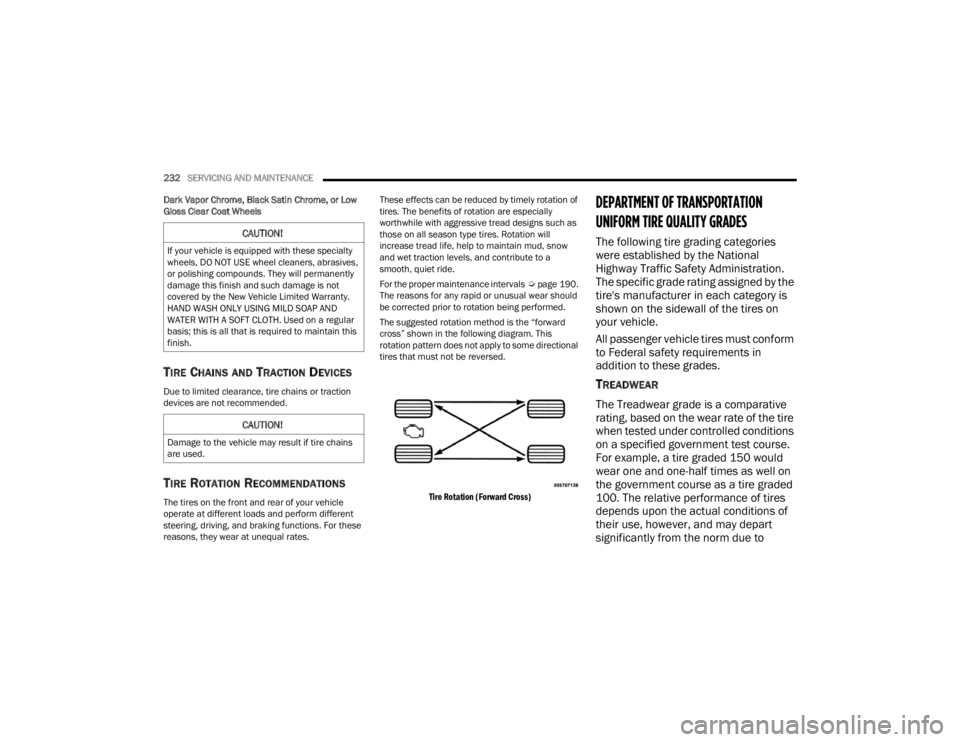
The suggested rotation method is the “forward
cross” shown in the following diagram. This
rotation pattern does not apply to some directional
tires that must not be reversed.
Tire Rotation (Forward Cross)
DEPARTMENT OF TRANSPORTATION
UNIFORM TIRE QUALITY GRADES
The following tire grading categories
were established by the National
Highway Traffic Safety Administration.
The specific grade rating assigned by the
tire's manufacturer in each category is
shown on the sidewall of the tires on
your vehicle.
All passenger vehicle tires must conform
to Federal safety requirements in
addition to these grades.
TREADWEAR
The Treadwear grade is a comparative
rating, based on the wear rate of the tire
when tested under controlled conditions
on a specified government test course.
For example, a tire graded 150 would
wear one and one-half times as well on
the government course as a tire graded
100. The relative performance of tires
depends upon the actual conditions of
their use, however, and may depart
significantly from the norm due to
CAUTION!
If your vehicle is equipped with these specialty
wheels, DO NOT USE wheel cleaners, abrasives,
or polishing compounds. They will permanently
damage this finish and such damage is not
covered by the New Vehicle Limited Warranty.
HAND WASH ONLY USING MILD SOAP AND
WATER WITH A SOFT CLOTH. Used on a regular
basis; this is all that is required to maintain this
finish.
CAUTION!
Damage to the vehicle may result if tire chains
are used.
22_VM_OM_EN_USC_t.book Page 232
Page 249 of 260

247
C
Camera, Rear
.................................................. 65Capacities, Fluid............................................ 240Caps, Filler Fuel............................................................. 66Oil (Engine)................................................ 193Power Steering............................................ 60Radiator (Coolant Pressure)...................... 201Car Washes................................................... 234Carbon Monoxide Warning............................ 170Cargo Area Cover............................................. 37Cargo Compartment........................................ 37Cargo Tie-Downs.............................................. 37Certification Label........................................... 67Chains, Tire.................................................... 232Changing A Flat Tire....................................... 171Chart, Tire Sizing............................................ 218Check Engine Light (Malfunction
Indicator Light)................................................ 51Checking Your Vehicle For Safety.................. 168Checks, Safety............................................... 168Child Restraint............................................... 152Child RestraintsBooster Seats............................................ 155Child Seat Installation..................... 164, 166How To Stow An unused ALR Seat Belt..... 161Infant And Child Restraints....................... 154
Locating The LATCH Anchorages.............. 160Lower Anchors And Tethers For Children.. 157Older Children And Child Restraints......... 154Seating Positions...................................... 156Clean Air Gasoline......................................... 238CleaningWheels..................................................... 231Climate Control................................................ 28Cold Weather Operation.................................. 52Compact Spare Tire...................................... 229Contract, Service.......................................... 243Cooling Pressure Cap (Radiator Cap)............ 201Cooling System............................................. 199Adding Coolant (Antifreeze)...................... 200Coolant Level............................................ 201Cooling Capacity....................................... 240Disposal Of Used Coolant......................... 201Drain, Flush, And Refill............................. 200Inspection........................................ 199, 201Points To Remember................................ 202Pressure Cap............................................ 201Radiator Cap............................................ 201Selection Of Coolant (Antifreeze)..... 200, 240Corrosion Protection..................................... 233Cruise Light...................................................... 50Customer Assistance.................................... 242Customer Programmable Features.................. 79Cybersecurity................................................... 78
D
Defroster, Windshield................................... 168Deleting A Phone........................................... 104Diagnostic System, Onboard............................50DipsticksOil (Engine)............................................... 194Power Steering............................................60Disable Vehicle Towing................................. 187Disconnecting............................................... 104DisplayedValues..........................................................44DisposalAntifreeze (Engine Coolant)...................... 201Door Ajar..........................................................45Door Ajar Light.................................................45Door Locks.......................................................13Doors...............................................................13Driver’s Seat Back Tilt......................................16DrivingThrough Flowing, Rising, Or Shallow Standing Water
.......................................76
E
Electric Brake Control System....................... 132Electric Remote Mirrors...................................23Electrical Outlet, Auxiliary (Power Outlet).........32Electronic Range Select (ERS).........................5911
22_VM_OM_EN_USC_t.book Page 247
Page 254 of 260

252 Speed Control Cancel
......................................................... 62Speed Control (Cruise Control)........................ 60Starting............................................................ 52Automatic Transmission.............................. 52Cold Weather.............................................. 52Engine Fails To Start................................... 53Steering........................................................... 16Power.......................................................... 60Tilt Column.................................................. 16Wheel, Tilt................................................... 16Steering Wheel Audio Controls...................... 128Steering Wheel Mounted Sound
System Controls............................................ 128Storage............................................................ 31Storage, Vehicle...................................... 30, 233Storing Your Vehicle...................................... 233Sun Visor Extension......................................... 22Sway Control, Trailer...................................... 134Symbol Glossary................................................ 8Synthetic Engine Oil....................................... 196
T
Telescoping Steering Column.......................... 16Tie Down Hooks, Cargo.................................... 37Tilt Steering Column........................................ 16Tire And Loading Information Placard........... 221Tire Markings................................................. 217Tire Safety Information.................................. 217Tire Service Kit.............................................. 179
Tires...................................169, 225, 229, 232Aging (Life Of Tires).................................. 227Air Pressure.............................................. 225Chains...................................................... 232Changing.................................................. 171Compact Spare......................................... 229General Information........................ 225, 229High Speed............................................... 226Inflation Pressure..................................... 225Jacking..................................................... 171Life Of Tires.............................................. 227Load Capacity.................................. 221, 222Pressure Monitoring System (TPMS)..47, 135Quality Grading......................................... 232Radial....................................................... 226Replacement............................................ 228Rotation.................................................... 232Safety.............................................. 217, 225Sizes......................................................... 218Snow Tires................................................ 229Spare Tires...................................... 229, 230Spinning................................................... 227Trailer Towing.............................................. 72Tread Wear Indicators.............................. 227Wheel Nut Torque..................................... 236To Open Hood.................................................. 36Tongue Weight/Trailer Weight......................... 71
Towing..............................................................68Disabled Vehicle....................................... 187Guide...........................................................71Recreational................................................75Weight.........................................................71Towing Behind A Motorhome...........................75Traction............................................................76Traction Control............................................ 134Trailer Sway Control (TSC)............................. 134Trailer Towing...................................................68Hitches........................................................70Minimum Requirements..............................71Tips..............................................................74Trailer And Tongue Weight...........................71Wiring..........................................................73Trailer Towing Guide........................................71Trailer Weight...................................................71Transmission....................................................56Automatic................................... 55, 56, 203Fluid.......................................................... 241Maintenance............................................ 203Transporting Pets.......................................... 168Tread Wear Indicators................................... 227Trip Computer..................................................43Turn Signals.....................................................49
22_VM_OM_EN_USC_t.book Page 252