2022 RAM PROMASTER CITY radio
[x] Cancel search: radioPage 86 of 260
84MULTIMEDIA
Doors & Locks
Key Off/Engine Off Options
When the Doors & Locks button is pressed on the touchscreen, the system displays the options related to locking and unlocking the vehicle’s doors.
NOTE:Depending on the vehicle’s options, feature settings may vary.
Setting Name Description
Sound Horn With Lock This setting will sound the horn when the key fob’s Lock button is pushed. The
“Off” setting will not sound the horn. The “1st Press” setting will sound the
horn when the Lock button is pushed once. The “2nd Press” setting will sound
the horn when the Lock button is pushed twice.
Auto Door Locks This setting will allow you to change if the doors lock automatically when the
vehicle reaches 12 mph (20 km/h).
When the Key Off/Engine Off Options button is pressed on the touchscreen, the system displays the option related to vehicle shut off. These settings will only
activate when the ignition is set to OFF.
NOTE:Depending on the vehicle’s options, feature settings may vary.
Setting Name
Description
Radio Off Delay This setting will allow you to set the amount of time the radio remains on after
the vehicle has been turned off. The “0 min” setting will shut the radio off the
moment the vehicle is turned off. The “20 min” setting will leave the radio on
for 20 minutes after the vehicle has been turned off or until one of the doors
has been opened.
22_VM_OM_EN_USC_t.book Page 84
Page 87 of 260
MULTIMEDIA85
Audio
When the Audio button is pressed on the touchscreen, the system displays options related to the vehicle’s sound system. These settings can change the audio
location within the vehicle, adjust the bass or treble levels, and auto-play music from an audio device or smartphone.
NOTE:Depending on the vehicle’s options, feature settings may vary.
Setting Name Description
Equalizer This setting will adjust the “Bass”, “Mid”, and “Treble” ranges of the audio.
Balance
This setting will adjust audio levels from specific speakers in the front/back and
left/right of the vehicle. The Speaker icon can be moved to set audio location.
Speed Adjusted Volume This setting will adjust audio volume as speeds increase. At a higher setting,
the volume will increase more as the vehicle speeds up. The available settings
are “Off”, “1”, “2”, and “3”.
Surround Sound This setting will turn the Surround Sound system on or off.
Auto Play This setting will automatically begin playing audio from a connected device.
Loudness This setting will improve audio quality at lower volumes.
Auto-On Radio This setting will set how the radio behaves when the ignition is switched to
ON/RUN. The available settings are “On”, “Off”, and “Recall Last”.
5
22_VM_OM_EN_USC_t.book Page 85
Page 88 of 260
86MULTIMEDIA
Phone/Bluetooth®
SiriusXM® Setup
When the Phone/Bluetooth® button is pressed on the touchscreen, the system displays the option related to Bluetooth® connectivity from an external audio
device or smartphone. The list of paired audio devices or smartphones can be accessed from this menu.
NOTE:Depending on the vehicle’s options, feature settings may vary.
Setting Name Description
Paired Phones/Devices This setting will show which phones are paired to the Uconnect system.
When the SiriusXM® Setup button is pressed on the touchscreen, the system displays options related to SiriusXM® Satellite Radio. These settings can be
used to skip specific radio channels and restart favorite songs from the beginning.
NOTE:
A subscription to SiriusXM® Satellite Radio is required for these settings to be functional.
Depending on the vehicle’s options, feature settings may vary.
Setting NameDescription
Tune Start This setting will play the current song from the beginning when you tune to a
music channel using one of the 12 presets.
Channel Skip This setting allows you to set channels that you wish to skip. A channel list will
display of the skipped channels.
Subscription Information This menu provides SiriusXM® subscription information. SiriusXM® Travel
Link is a separate subscription.
22_VM_OM_EN_USC_t.book Page 86
Page 90 of 260
88MULTIMEDIA
UCONNECT INTRODUCTION
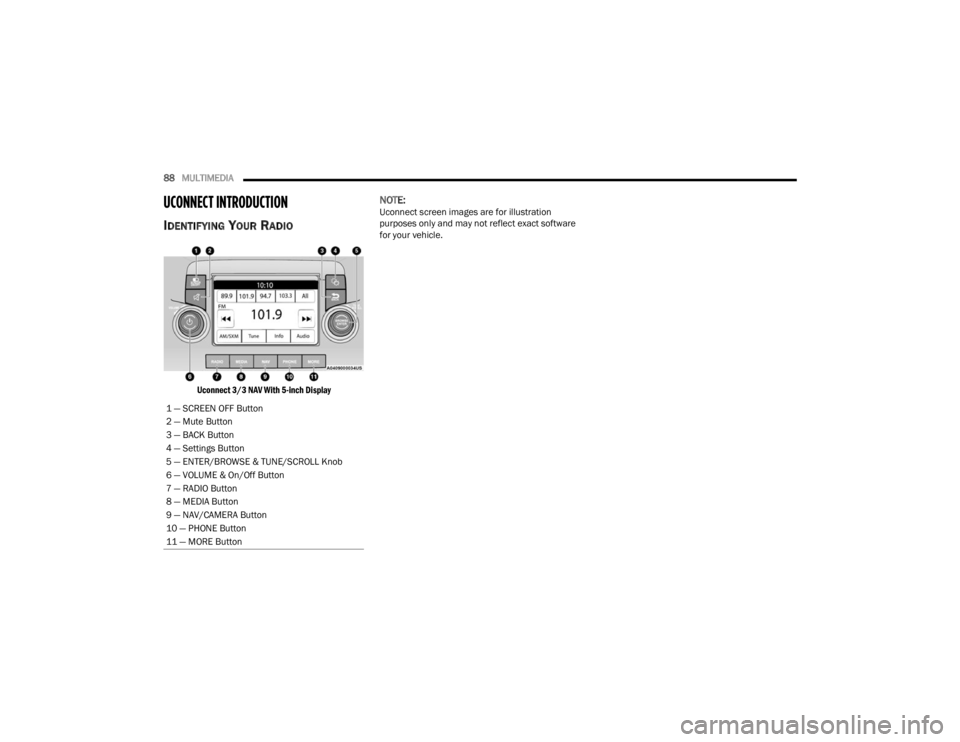
IDENTIFYING YOUR RADIO
Uconnect 3/3 NAV With 5-inch Display
NOTE:Uconnect screen images are for illustration
purposes only and may not reflect exact software
for your vehicle.
1 — SCREEN OFF Button
2 — Mute Button
3 — BACK Button
4 — Settings Button
5 — ENTER/BROWSE & TUNE/SCROLL Knob
6 — VOLUME & On/Off Button
7 — RADIO Button
8 — MEDIA Button
9 — NAV/CAMERA Button
10 — PHONE Button
11 — MORE Button
22_VM_OM_EN_USC_t.book Page 88
Page 91 of 260
MULTIMEDIA89
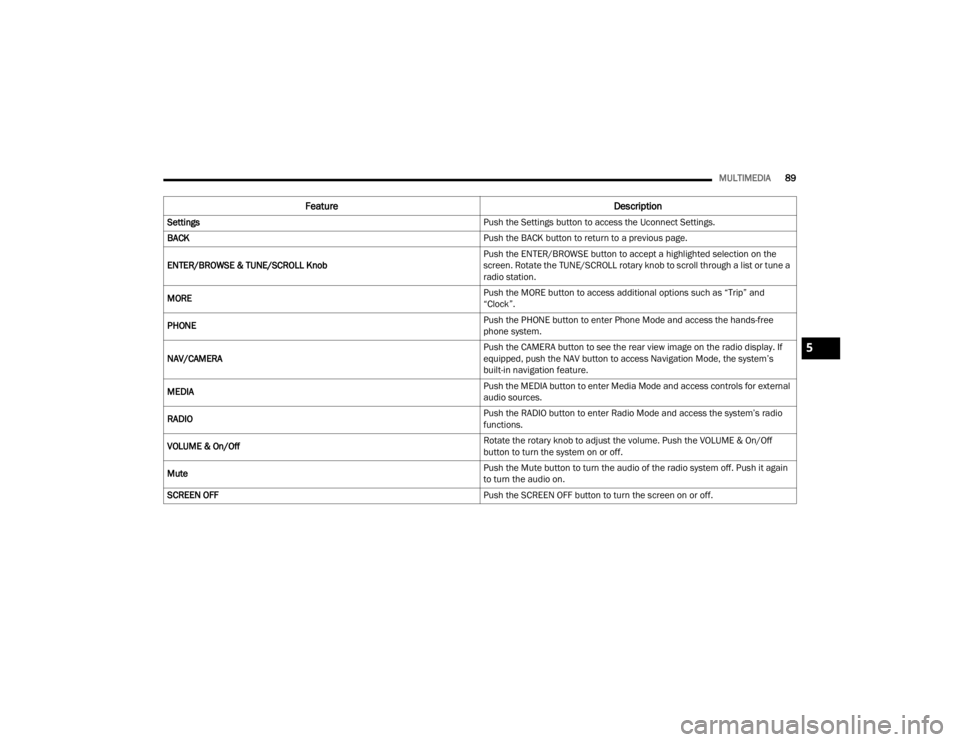
Feature Description
Settings Push the Settings button to access the Uconnect Settings.
BACK Push the BACK button to return to a previous page.
ENTER/BROWSE & TUNE/SCROLL Knob Push the ENTER/BROWSE button to accept a highlighted selection on the
screen. Rotate the TUNE/SCROLL rotary knob to scroll through a list or tune a
radio station.
MORE Push the MORE button to access additional options such as “Trip” and
“Clock”.
PHONE Push the PHONE button to enter Phone Mode and access the hands-free
phone system.
NAV/CAMERA Push the CAMERA button to see the rear view image on the radio display. If
equipped, push the NAV button to access Navigation Mode, the system’s
built-in navigation feature.
MEDIA Push the MEDIA button to enter Media Mode and access controls for external
audio sources.
RADIO Push the RADIO button to enter Radio Mode and access the system’s radio
functions.
VOLUME & On/Off Rotate the rotary knob to adjust the volume. Push the VOLUME & On/Off
button to turn the system on or off.
Mute Push the Mute button to turn the audio of the radio system off. Push it again
to turn the audio on.
SCREEN OFF Push the SCREEN OFF button to turn the screen on or off.
5
22_VM_OM_EN_USC_t.book Page 89
Page 93 of 260

MULTIMEDIA91
UCONNECT MODES
RADIO MODE
Operating Radio Mode
Uconnect 3/3 NAV With 5-inch Display Radio Mode
The radio is equipped with the following modes:
FM
AM
SiriusXM® Radio
Push the Radio button on the faceplate to enter
the Radio Mode. The different tuner modes, FM/
AM/SXM, can then be selected by pressing the
corresponding buttons on the touchscreen in the
Radio mode.
SWITCHING THE SYSTEM ON/OFF
The screen will switch on/off when the Volume &
On/Off button is pushed.
VOLUME/POWER
Rotate the Volume knob to adjust the volume.
When the audio system is turned on, the sound will
be set at the same volume level as last played.
Push the On/Off button to turn the system on or
off.
ENTER/BROWSE AND TUNE/SCROLL
CONTROL
Turn the rotary Tune/Scroll knob clockwise to
increase or counterclockwise to decrease the radio
station frequency.
SEEK FUNCTIONS
Seek Up And Seek Down
Press and release the Seek Up or Seek Down
button on the touchscreen to tune the radio to the
next available station or channel. If the radio
reaches the starting station after passing through
the entire band two times, the radio will stop at the
station where it began.
Fast Seek Up And Fast Seek Down
Press, hold, and then release the Seek Up or
Seek Down button on the touchscreen to
advance the radio through the available stations or
channels at a faster rate. The radio stops at the
next available station or channel when the button
on the touchscreen is released.
NOTE:
Pressing and holding either the Seek Up or
Seek Down button will scan the different
frequency bands at a slower rate.
1 — Preset Buttons
2 — All Presets Button
3 — Seek Down Button
4 — Radio Band Button (FM/AM/SXM)
5 — Direct Tune Button
6 — Info Button
7 — Audio Settings Button
8 — Seek Up Button
5
22_VM_OM_EN_USC_t.book Page 91
Page 94 of 260
92MULTIMEDIA
DIRECT TUNE
Press the Tune button located at the bottom of the
radio screen to directly tune to a desired radio
station or channel.
Press the available number button on the
touchscreen to begin selecting a desired station.
Once a number has been entered, any numbers
that are no longer possible (stations that cannot be
reached) will become deactivated/grayed out.
INFO
Press the Info button to display the current track
information. Press the X button to cancel this
feature.
SETTING THE PRESETS
The Presets are available for all Radio Modes, and
are activated by pressing any of the four Preset
buttons, located at the top of the screen.
When you are receiving a station that you wish to
commit into memory, press and hold the desired
numbered button for more that two seconds or
until you hear a confirmation beep.
The Radio stores up to 12 presets in each of the
Radio modes. Four presets are visible at the top of
the radio screen.
Pressing the All button on the radio home screen
will display all of the preset stations for that mode.
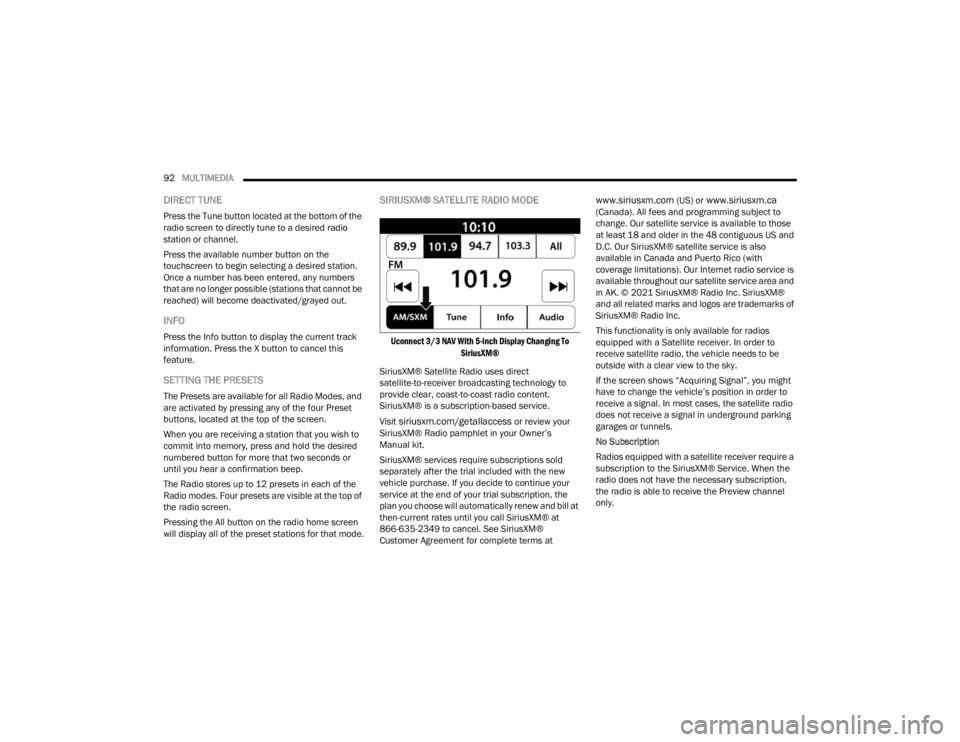
SIRIUSXM® SATELLITE RADIO MODE
Uconnect 3/3 NAV With 5-inch Display Changing To
SiriusXM®
SiriusXM® Satellite Radio uses direct
satellite-to-receiver broadcasting technology to
provide clear, coast-to-coast radio content.
SiriusXM® is a subscription-based service.
Visit
siriusxm.com/getallaccess or review your
SiriusXM® Radio pamphlet in your Owner’s
Manual kit.
SiriusXM® services require subscriptions sold
separately after the trial included with the new
vehicle purchase. If you decide to continue your
service at the end of your trial subscription, the
plan you choose will automatically renew and bill at
then-current rates until you call SiriusXM® at
866-635-2349 to cancel. See SiriusXM®
Customer Agreement for complete terms at
www.siriusxm.com (US) or www.siriusxm.ca
(Canada). All fees and programming subject to
change. Our satellite service is available to those
at least 18 and older in the 48 contiguous US and
D.C. Our SiriusXM® satellite service is also
available in Canada and Puerto Rico (with
coverage limitations). Our Internet radio service is
available throughout our satellite service area and
in AK. © 2021 SiriusXM® Radio Inc. SiriusXM®
and all related marks and logos are trademarks of
SiriusXM® Radio Inc.
This functionality is only available for radios
equipped with a Satellite receiver. In order to
receive satellite radio, the vehicle needs to be
outside with a clear view to the sky.
If the screen shows “Acquiring Signal”, you might
have to change the vehicle’s position in order to
receive a signal. In most cases, the satellite radio
does not receive a signal in underground parking
garages or tunnels.
No Subscription
Radios equipped with a satellite receiver require a
subscription to the SiriusXM® Service. When the
radio does not have the necessary subscription,
the radio is able to receive the Preview channel
only.
22_VM_OM_EN_USC_t.book Page 92
Page 95 of 260
MULTIMEDIA93
Acquiring SiriusXM® Subscription
To activate the SiriusXM® Satellite Radio
subscription, US visit
www.UconnectPhone.com
or call: 1-800-643-2112
Canada visit
www.UconnectPhone.com or call:
1-800-465-2001 (English)or 1-800-387-9983
(French)
NOTE:You will need to provide the SiriusXM® ID (RID)
located at the bottom of the Channel 0 screen.
The Satellite Mode is activated by a press of the
SXM button on the touchscreen.
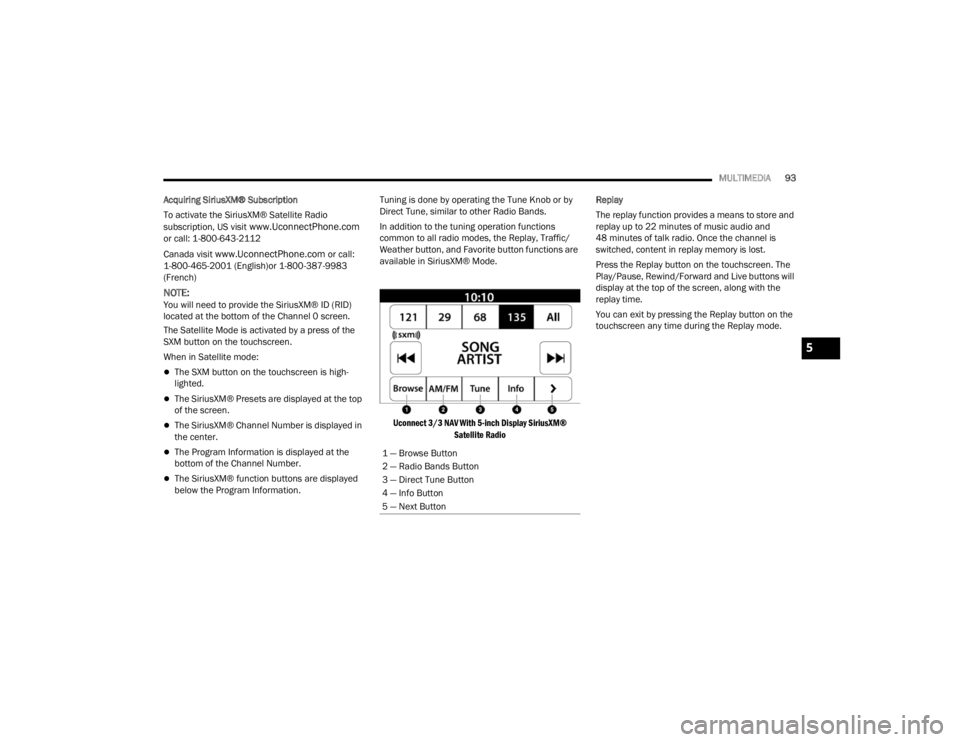
When in Satellite mode:
The SXM button on the touchscreen is high -
lighted.
The SiriusXM® Presets are displayed at the top
of the screen.
The SiriusXM® Channel Number is displayed in
the center.
The Program Information is displayed at the
bottom of the Channel Number.
The SiriusXM® function buttons are displayed
below the Program Information. Tuning is done by operating the Tune Knob or by
Direct Tune, similar to other Radio Bands.
In addition to the tuning operation functions
common to all radio modes, the Replay, Traffic/
Weather button, and Favorite button functions are
available in SiriusXM® Mode.
Uconnect 3/3 NAV With 5-inch Display SiriusXM® Satellite Radio
Replay
The replay function provides a means to store and
replay up to 22 minutes of music audio and
48 minutes of talk radio. Once the channel is
switched, content in replay memory is lost.
Press the Replay button on the touchscreen. The
Play/Pause, Rewind/Forward and Live buttons will
display at the top of the screen, along with the
replay time.
You can exit by pressing the Replay button on the
touchscreen any time during the Replay mode.
1 — Browse Button
2 — Radio Bands Button
3 — Direct Tune Button
4 — Info Button
5 — Next Button
5
22_VM_OM_EN_USC_t.book Page 93