2022 PEUGEOT LANDTREK deactivate passenger airbag
[x] Cancel search: deactivate passenger airbagPage 6 of 164

4
Overview
Instruments and controls
These illustrations and descriptions are intended
as a guide. The presence and location of some
elements vary depending on the version or trim
level.
1.Electric windows
Central locking/unlocking
2. Side control bar
3. Horn
Driver front airbag
4. Instrument panel
5. Front courtesy/map reading lamps
6. Glasses holder
7. Interior rear view mirror
8. Monochrome screen or touch screen
9. Heating/air conditioning controls
10. Central control bar (lower and upper)
11 . Audio USB socket/Charger USB socket
12. Key ignition switch or START/STOP button
13. 2H, 4H and 4L transmission mode selector
14. Gearbox
15. Sport/Eco button
16. Parking brake
Cigarette lighter/12
V (120 W) accessory
socket
17. Front passenger airbag
18. Glove box
19. Deactivate front passenger airbag (on the
side of the dashboard)
20. Fuel filler flap opening control
Steering-mounted controls
Depending on the vehicle’s equipment, the
function and location of the controls may vary.1.External lighting/Direction indicator controls
2. Wiper/Screenwash controls
3. Audio system settings
4. Speed limiter/Cruise control
A. Speed limiter/Cruise control pause
Page 7 of 164

5
Overview
B.Activate Cruise control
C. Decrease/Increase Speed limiter/Cruise
control speed setting
Memorising speeds function (SET) or
reactivation of the programmed speed
function (RES)
D. Voice recognition/Media
E. Activate Speed limiter
F. Select menus on the instrument panel and
validate
G. Decrease/Increase volume
H. Select the instrument panel display mode
and navigate in the menus
I. Access the Telephone menu
/Answer a call
Select next media
J. Access the Telephone menu/End a call
Select previous media
Side control bar
1.Door mirror controls 2.
Deactivate the Lane departure warning
system function
3. Headlamp beam height adjustment
4. Activate loading zone external lighting
(available only when stationary)
5. Deactivate parking sensors
Central control bar (lower and upper)
1.Rear differential locking
2. Hill Assist Descent Control
3. Deactivate the DSC/ASR system
4. Central locking
5. Central unlocking
6. Hazard warning lamps
7. Passenger airbag deactivation/activation
indicator lamp
8. Activate camera functions (360° Camera or
Off Road Camera)
9. Audio system on/off (long press)
Volume adjustment/Mute (short press)
Page 12 of 164
10
Instruments
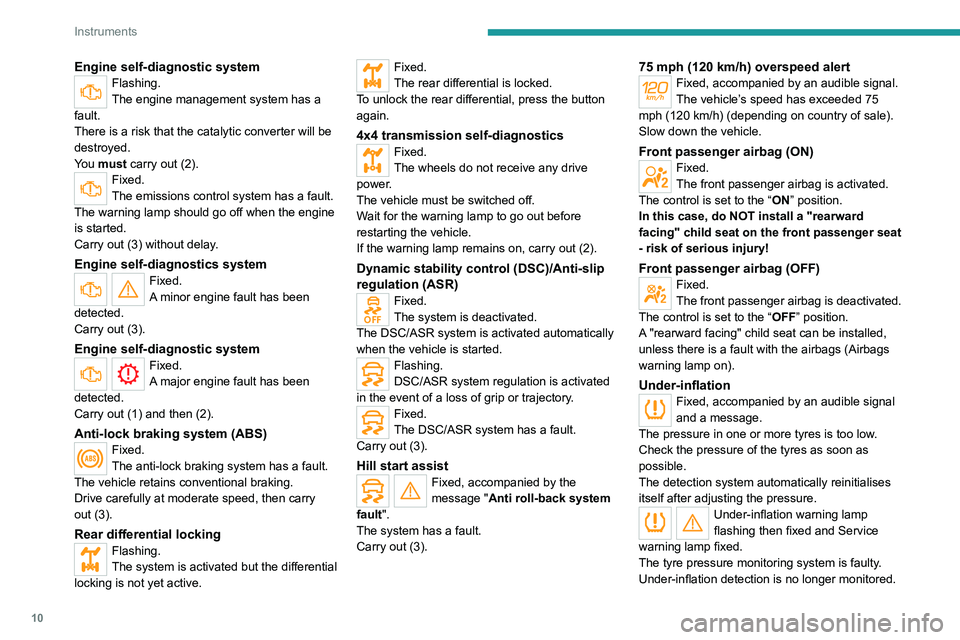
Engine self-diagnostic systemFlashing.
The engine management system has a
fault.
There is a risk that the catalytic converter will be
destroyed.
You must carry out (2).
Fixed.
The emissions control system has a fault.
The warning lamp should go off when the engine
is started.
Carry out (3) without delay.
Engine self-diagnostics systemFixed.
A minor engine fault has been
detected.
Carry out (3).
Engine self-diagnostic systemFixed.
A major engine fault has been
detected.
Carry out (1) and then (2).
Anti-lock braking system (ABS)Fixed.
The anti-lock braking system has a fault.
The vehicle retains conventional braking.
Drive carefully at moderate speed, then carry
out (3).
Rear differential lockingFlashing.
The system is activated but the differential
locking is not yet active.
Fixed.
The rear differential is locked.
To unlock the rear differential, press the button
again.
4x4 transmission self-diagnosticsFixed.
The wheels do not receive any drive
power.
The vehicle must be switched off.
Wait for the warning lamp to go out before
restarting the vehicle.
If the warning lamp remains on, carry out (2).
Dynamic stability control (DSC)/Anti-slip
regulation (ASR)
Fixed.
The system is deactivated.
The DSC/ASR system is activated automatically
when the vehicle is started.
Flashing.
DSC/ASR system regulation is activated
in the event of a loss of grip or trajectory.
Fixed.
The DSC/ASR system has a fault.
Carry out (3).
Hill start assistFixed, accompanied by the
message "Anti roll-back system
fault".
The system has a fault.
Carry out (3).
75 mph (120 km/h) overspeed alertFixed, accompanied by an audible signal.
The vehicle’s speed has exceeded 75
mph (120 km/h) (depending on country of sale).
Slow down the vehicle.
Front passenger airbag (ON)Fixed.
The front passenger airbag is activated.
The control is set to the “ON” position.
In this case, do NOT install a "rearward
facing" child seat on the front passenger seat
- risk of serious injury!
Front passenger airbag (OFF)Fixed.
The front passenger airbag is deactivated.
The control is set to the “OFF ” position.
A "rearward facing" child seat can be installed,
unless there is a fault with the airbags (Airbags
warning lamp on).
Under-inflationFixed, accompanied by an audible signal
and a message.
The pressure in one or more tyres is too low.
Check the pressure of the tyres as soon as
possible.
The detection system automatically reinitialises
itself
after adjusting the pressure.
Under-inflation warning lamp
flashing then fixed and Service
warning lamp fixed.
The tyre pressure monitoring system is faulty.
Under-inflation detection is no longer monitored.
Page 18 of 164
16
Access
Electronic key with
remote control function
and built-in key,
Remote control function
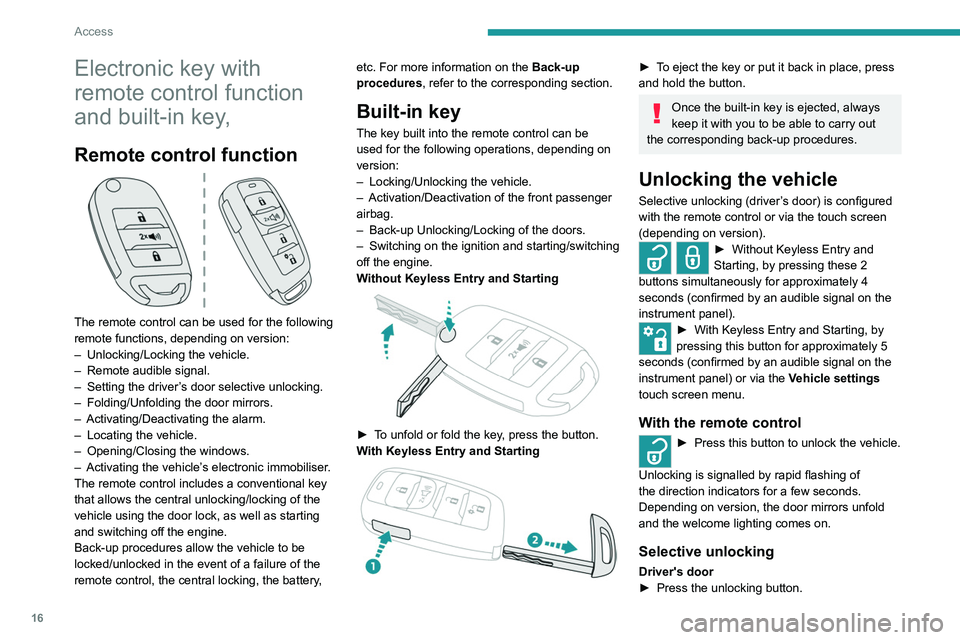
The remote control can be used for the following
remote functions, depending on version:
–
Unlocking/Locking the vehicle.
–
Remote audible signal.
–
Setting the driver
’s door selective unlocking.
–
Folding/Unfolding the door mirrors.
–
Activating/Deactivating the alarm.
–
Locating the vehicle.
–
Opening/Closing the windows.
–
Activating the vehicle’
s electronic immobiliser.
The remote control includes a conventional key
that allows the central unlocking/locking of the
vehicle using the door lock, as well as starting
and switching off the engine.
Back-up procedures allow the vehicle to be
locked/unlocked in the event of a failure of the
remote control, the central locking, the battery, etc. For more information on the Back-up
procedures, refer to the corresponding section.
Built-in key
The key built into the remote control can be
used for the following operations, depending on
version:
–
Locking/Unlocking the vehicle.
–
Activation/Deactivation of the front passenger
airbag.
–
Back-up Unlocking/Locking of the doors.
–
Switching on the ignition and starting/switching
off the engine.
W
ithout Keyless Entry and Starting
► To unfold or fold the key, press the button.
With Keyless Entry and Starting
► To eject the key or put it back in place, press
and hold the button.
Once the built-in key is ejected, always
keep it with you to be able to carry out
the corresponding back-up procedures.
Unlocking the vehicle
Selective unlocking (driver’s door) is configured
with the remote control or via the touch screen
(depending on version).
► Without Keyless Entry and
Starting, by pressing these 2
buttons simultaneously for approximately 4
seconds (confirmed by an audible signal on the
instrument panel).
► With Keyless Entry and Starting, by
pressing this button for approximately 5
seconds (confirmed by an audible signal on the
instrument panel) or via the Vehicle settings
touch screen menu.
With the remote control
► Press this button to unlock the vehicle.
Unlocking is signalled by rapid flashing of
the direction indicators for a few seconds.
Depending on version, the door mirrors unfold
and the welcome lighting comes on.
Selective unlocking
Driver's door
► Press the unlocking button.
► Press it again to unlock the other doors.
Complete or selective unlocking, and alarm
deactivation (depending on version), is confirmed
by the flashing of the direction indicators.
Depending on version, the door mirrors unfold.
Opening the windows
Depending on version, holding the
unlocking button pressed for more than 3
seconds opens the windows.
The windows stop when the button is released.
With the key
Driver's door
► Turn the key in the driver's door lock towards
the front of the vehicle to unlock it.
If the vehicle has an alarm, it will not be
deactivated. Opening a door will trigger the
alarm, which can be stopped by pressing the
remote control unlocking button.
Tailgate (depending on version)
► Turn the dedicated key in the tailgate lock to
the left to unlock.
Locking the vehicle
With the remote control
► Press this button to lock the vehicle.
Locking and alarm activation is confirmed by the
lighting of the direction indicators.
Page 58 of 164
56
Safety
Deployment
It deploys simultaneously with the corresponding
lateral airbag in the event of a serious side
impact applied to all or part of the side impact
zone B.
The curtain airbag inflates between the front
and rear occupants of the vehicle and the
corresponding windows.
Malfunction
In the event of a malfunction, this warning
lamp lights up on the instrument panel.
Contact a PEUGEOT dealer or a qualified
workshop to have the system checked.
The airbags may not be deployed in the event of
a serious impact.
In the event of a minor impact or bump at
the side of the vehicle or if the vehicle
rolls over, the airbags may not be deployed.
In the event of a rear or front collision, none of
the lateral airbags are deployed.
Advice
For the airbags to be fully effective,
observe the safety recommendations
below.
Adopt a normal and upright sitting position.
Fasten your seat belt and position it correctly.
Do not place anything between the occupants
and the airbags (e.g. child, animal, object), do
not fix or attach anything near or in the path of
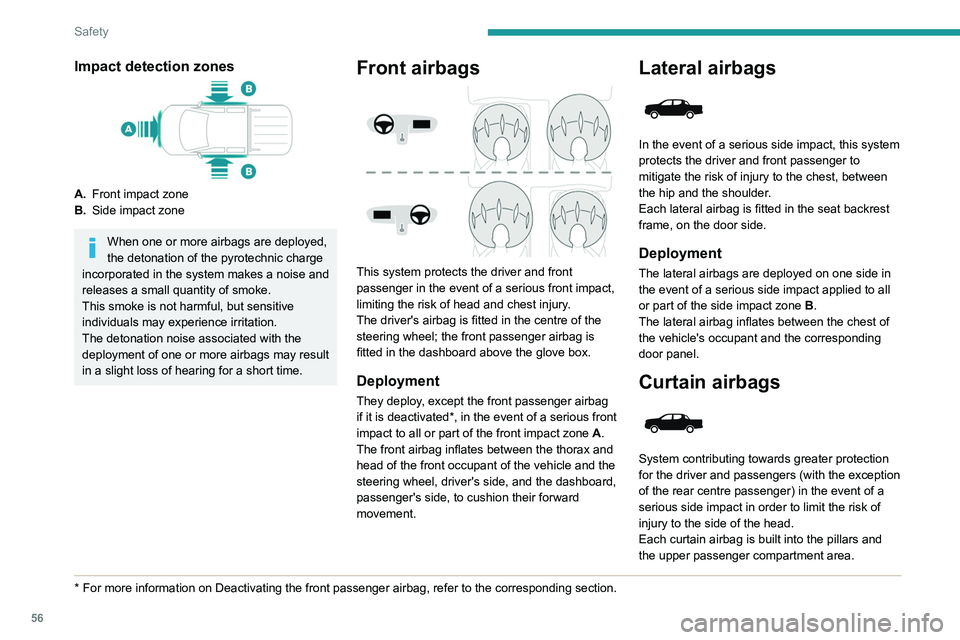
Impact detection zones
A. Front impact zone
B. Side impact zone
When one or more airbags are deployed,
the detonation of the pyrotechnic charge
incorporated in the system makes a noise and
releases a small quantity of smoke.
This smoke is not harmful, but sensitive
individuals may experience irritation.
The detonation noise associated with the
deployment of one or more airbags may result
in a slight loss of hearing for a short time.
* For more information on Deactivating the front passenger airbag, refer t\
o the corresponding section.
Front airbags
This system protects the driver and front
passenger in the event of a serious front impact,
limiting the risk of head and chest injury.
The driver's airbag is fitted in the centre of the
steering wheel; the front passenger airbag is
fitted in the dashboard above the glove box.
Deployment
They deploy, except the front passenger airbag
if it is deactivated*, in the event of a serious front
impact to all or part of the front impact zone A.
The front airbag inflates between the thorax and
head of the front occupant of the vehicle and the
steering wheel, driver's side, and the dashboard,
passenger's side, to cushion their forward
movement.
Lateral airbags
In the event of a serious side impact, this system
protects the driver and front passenger to
mitigate the risk of injury to the chest, between
the hip and the shoulder.
Each lateral airbag is fitted in the seat backrest
frame, on the door side.
Deployment
The lateral airbags are deployed on one side in
the event of a serious side impact applied to all
or part of the side impact zone B.
The lateral airbag inflates between the chest of
the vehicle's occupant and the corresponding
door panel.
Curtain airbags
System contributing towards greater protection
for the driver and passengers (with the exception
of the rear centre passenger) in the event of a
serious side impact in order to limit the risk of
injury to the side of the head.
Each curtain airbag is built into the pillars and
the upper passenger compartment area.
Page 61 of 164
59
Safety
5
► Move the vehicle's front seat forward and
straighten the backrest so that the legs of the
child in the forward-facing or rearward-facing
child seat itself do not touch the vehicle's front
seat.
►
Check that the backrest of the forward-facing
child seat is as close as possible to the backrest
of the vehicle's rear seat, and ideally in contact
with it.
Centre rear seat
A child seat with a support leg must never be
installed on the centre rear passenger seat .
Child seat at the front
► Adjust the front passenger seat to the
highest and fully back longitudinal position ,
with the backrest straightened.
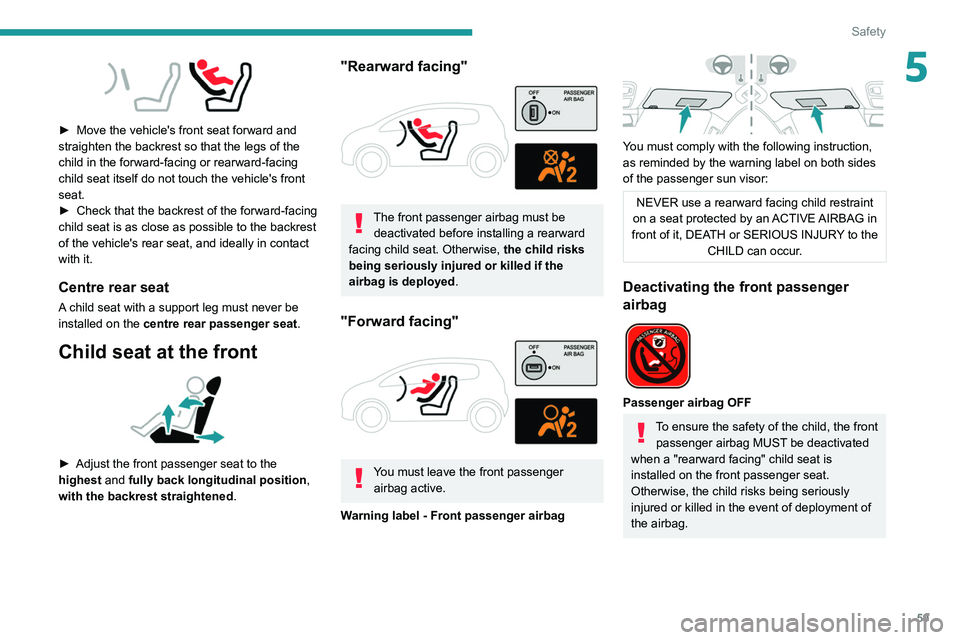
"Rearward facing"
The front passenger airbag must be deactivated before installing a rearward
facing child seat. Otherwise, the child risks
being seriously injured or killed if the
airbag is deployed .
"Forward facing"
You must leave the front passenger
airbag active.
Warning label - Front passenger airbag
You must comply with the following instruction,
as reminded by the warning label on both sides
of the passenger sun visor:
NEVER use a rearward facing child restraint
on a seat protected by an ACTIVE AIRBAG in
front of it, DEATH or SERIOUS INJURY to the CHILD can occur.
Deactivating the front passenger
airbag
Passenger airbag OFF
To ensure the safety of the child, the front passenger airbag MUST be deactivated
when a "rearward facing" child seat is
installed on the front passenger seat.
Otherwise, the child risks being seriously
injured or killed in the event of deployment of
the
airbag.
Page 62 of 164
60
Safety
An incorrectly installed child seat in a vehicle compromises the child's safety in
the event of an accident.
Strictly observe the fitting instructions
provided in the user guide supplied with the
child seat.
Manual child lock
The system prevents a rear door from being
opened using its interior handle.
The control is located on the edge of each rear
door (marked by a label).
Locking/Unlocking
► To lock, push the black control as far as it
will go: • to the left on the left-hand rear door,
• to the right on the right-hand rear door.
► To unlock, push the control in the opposite
direction.
Vehicles not equipped with a
deactivation/reactivation control
Installing a "rearward
facing" child seat on
the front passenger seat is strictly prohibited
- risk of death or serious injury in the event of
airbag deployment!
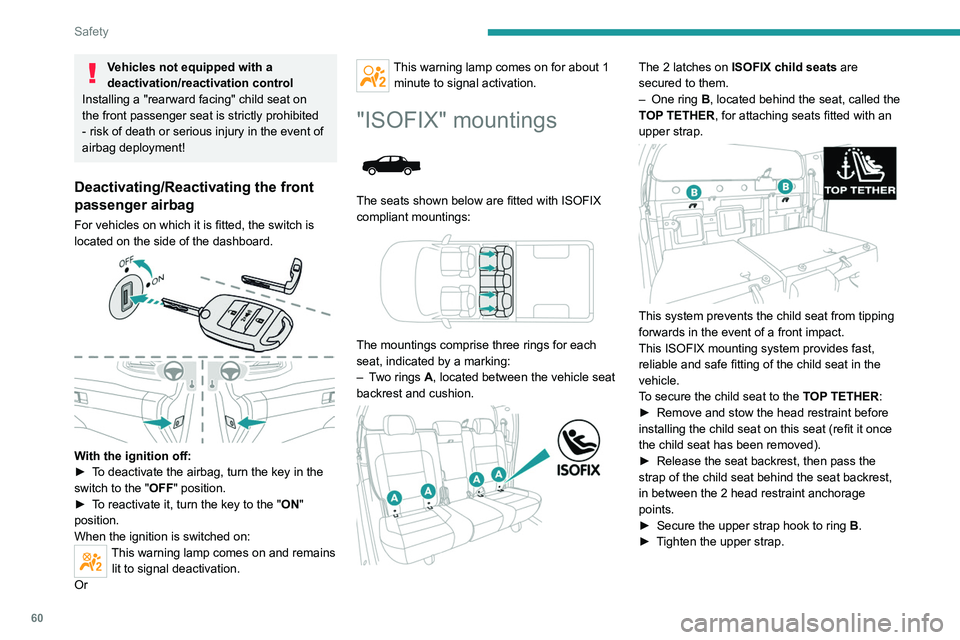
Deactivating/Reactivating the front
passenger airbag
For vehicles on which it is fitted, the switch is
located on the side of the dashboard.
With the ignition off:
► T o deactivate the airbag, turn the key in the
switch to the "OFF " position.
►
T
o reactivate it, turn the key to the "ON"
position.
When the ignition is switched on:
This warning lamp comes on and remains lit to signal deactivation.
Or
This warning lamp comes on for about 1 minute to signal activation.
"ISOFIX" mountings
The seats shown below are fitted with ISOFIX
compliant mountings:
The mountings comprise three rings for each
seat, indicated by a marking:
–
T
wo rings A, located between the vehicle seat
backrest and cushion.
The 2 latches on ISOFIX child seats are
secured to them.
–
One ring
B, located behind the seat, called the
TOP TETHER, for attaching seats fitted with an
upper strap.
This system prevents the child seat from tipping
forwards in the event of a front impact.
This ISOFIX mounting system provides fast,
reliable and safe fitting of the child seat in the
vehicle.
To secure the child seat to the TOP TETHER:
►
Remove and stow the head restraint before
installing the child seat on this seat (refit it once
the child seat has been removed).
►
Release the seat backrest, then pass the
strap of the child seat behind the seat backrest,
in between the 2 head restraint anchorage
points.
►
Secure the upper strap hook to ring
B
.
►
T
ighten the upper strap.