2022 PEUGEOT LANDTREK seats
[x] Cancel search: seatsPage 60 of 164
58
Safety
► Move the vehicle's front seat forward and
straighten the backrest so that the legs of the
child in the forward-facing or rearward-facing
child seat itself do not touch the vehicle's front
seat.
► Check that the backrest of the forward-facing
child seat is as close as possible to the backrest
of the vehicle's rear seat, and ideally in contact
with it.
Centre rear seat
A child seat with a support leg must never be
installed on the centre rear passenger seat .
Child seat at the front
► Adjust the front passenger seat to the
highest and fully back longitudinal position ,
with the backrest straightened.
Child seats
The regulations on carrying children are specific to each country. Refer to the
legislation in force in your country.
For maximum safety, please observe the
following recommendations:
–
All children under the age of 12 or less
than 1.5 metres tall must travel in approved
child seats suited to their weight , on seats
fitted with a seat belt or ISOFIX mountings.
–
Statistically
, the safest seats in your
vehicle for carrying children are the rear
seats.
–
Children weighing less than 9 kg must
travel in the "rearward facing" position,
whether in the front or rear of the vehicle.
It is recommended that children travel
on the rear seats of the vehicle:
–
‘rearward facing’ up to the age of 3,
–
‘forward facing’ over the age of 3.
Make sure that the seat belt is correctly
positioned and tightened.
For child seats with a support leg, ensure that
the support leg is in firm and steady contact
with the floor.
Recommended child seats and
installation possibilities
For the recommended child seats and
installation possibilities in the vehicle, refer to
the seat manufacturer's instructions or contact
a PEUGEOT dealer.
Advice
An incorrectly installed child seat in a vehicle compromises the child's safety in
the event of an accident.
Ensure that there is no seat belt or seat belt
buckle under the child seat, as this could
destabilise it.
Remember to fasten the seat belts or the
child seat harness keeping the slack relative
to the child's body to a minimum, even for
short journeys.
When installing a child seat using the seat
belt, ensure that the seat belt is tightened
correctly on the child seat and that it secures
the child seat firmly on the vehicle seat. If
the passenger seat is adjustable, move it
forwards if necessary.
Remove the head restraint before
installing a child seat with a backrest on a
passenger seat.
Ensure that the head restraint is stored or
attached securely to prevent it from being
thrown around the vehicle in the event of
sharp braking. Refit the head restraint once
the child seat has been removed.
Installing a booster seat
The chest part of the seat belt must be
positioned on the child's shoulder without
touching the neck.
Ensure that the lap part of the seat belt
passes correctly over the child's thighs.
Use a booster seat with a backrest, equipped
with a belt guide at shoulder level.
Additional protections
To prevent accidental opening of the
doors and rear windows, use the "Child lock".
Take care not to open the rear windows by
more than one third.
To protect young children from the rays of the
sun, fit side blinds on the rear windows.
As a safety measure, do not leave:
–
a child alone and unsupervised inside a
vehicle,
–
a child or an animal in a vehicle which is
exposed to the sun, with the windows closed,
–
the keys within reach of children inside the
vehicle.
Child seat at the rear
Forward-facing or rearward-facing
Page 62 of 164
60
Safety
An incorrectly installed child seat in a vehicle compromises the child's safety in
the event of an accident.
Strictly observe the fitting instructions
provided in the user guide supplied with the
child seat.
Manual child lock
The system prevents a rear door from being
opened using its interior handle.
The control is located on the edge of each rear
door (marked by a label).
Locking/Unlocking
► To lock, push the black control as far as it
will go: • to the left on the left-hand rear door,
• to the right on the right-hand rear door.
► To unlock, push the control in the opposite
direction.
Vehicles not equipped with a
deactivation/reactivation control
Installing a "rearward
facing" child seat on
the front passenger seat is strictly prohibited
- risk of death or serious injury in the event of
airbag deployment!
Deactivating/Reactivating the front
passenger airbag
For vehicles on which it is fitted, the switch is
located on the side of the dashboard.
With the ignition off:
► T o deactivate the airbag, turn the key in the
switch to the "OFF " position.
►
T
o reactivate it, turn the key to the "ON"
position.
When the ignition is switched on:
This warning lamp comes on and remains lit to signal deactivation.
Or
This warning lamp comes on for about 1 minute to signal activation.
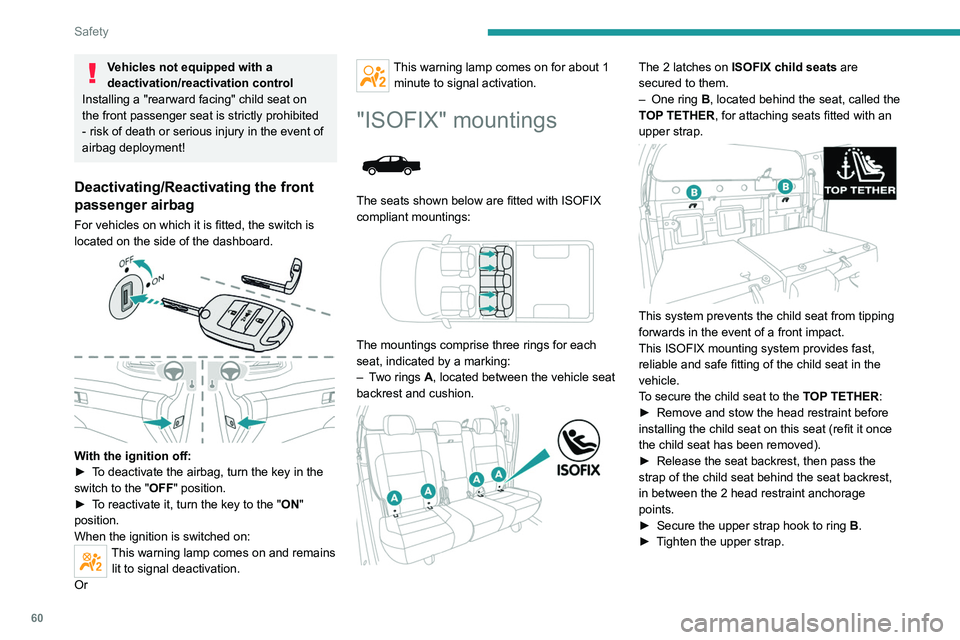
"ISOFIX" mountings
The seats shown below are fitted with ISOFIX
compliant mountings:
The mountings comprise three rings for each
seat, indicated by a marking:
–
T
wo rings A, located between the vehicle seat
backrest and cushion.
The 2 latches on ISOFIX child seats are
secured to them.
–
One ring
B, located behind the seat, called the
TOP TETHER, for attaching seats fitted with an
upper strap.
This system prevents the child seat from tipping
forwards in the event of a front impact.
This ISOFIX mounting system provides fast,
reliable and safe fitting of the child seat in the
vehicle.
To secure the child seat to the TOP TETHER:
►
Remove and stow the head restraint before
installing the child seat on this seat (refit it once
the child seat has been removed).
►
Release the seat backrest, then pass the
strap of the child seat behind the seat backrest,
in between the 2 head restraint anchorage
points.
►
Secure the upper strap hook to ring
B
.
►
T
ighten the upper strap.
Page 105 of 164
103
Practical information
7of the throttle body against any projection of
liquid (oil, water, detergent or solvent).
►
Remove grease and carbon deposits from
the surface of the main duct with a specific
"carburettor" type cleaner
.
►
Rotate the throttle valve inside the duct to
clean the seats on each side.
►
Wipe and dry the throttle body with a soft,
lint-free cloth.
If no cleaning has been done for a long
time, deposits may be difficult to remove.
Clean and wipe the throttle body
several
times with a soft, lint-free cloth.
Never immerse the throttle body in a
cleaning liquid or in an ultrasonic tank.
Never use:
–
detergents containing methyl ketone or
other highly corrosive substances as well as
household cleaning detergent;
–
cleaning products directly on the throttle
bearings as well as on the body's connector;
–
hard, sharp or abrasive tools to remove
difficult deposits. Use a soft cloth with a
suitable detergent.
Refitting the throttle body
Before refitting the throttle body, check
the condition of the seal. If it is damaged,
replace it with a new one. ►
Install the seal on the intake manifold and fit
the throttle body
B, making sure that the seal
does not fall.
For reassembly, carry out the operations in the
reverse order to those for removal. Tighten the
screws to the correct tightening torque.
Free-wheeling
In certain situations, you must allow the vehicle
to free-wheel (while being towed, on a rolling
road, in an automatic car wash, or being
transported by rail or sea freight, etc.).
The procedure differs depending on the type of
gearbox and transmission.
/
To release them
► With the vehicle stationary and the engine
running, depress the brake pedal and release
the parking brake.
►
With a manual gearbox, move the gear lever
into neutral.
►
With an automatic gearbox, select position N
.
►
For 4-wheel drive vehicles (4x4), put the
transmission selector in 2H
mode.
►
Switch the ignition off.
Advice on care and maintenance
General recommendations
Observe the following recommendations to avoid
damaging the vehicle.
Exterior
Never use a high-pressure jet wash in
the engine compartment - risk of
damaging the electrical components!
Do not wash the vehicle in bright sunshine or
extremely cold conditions.
When washing the vehicle in an
automatic roller-brush car wash, be sure
to lock the doors and, depending on version,
move the electronic key away.
When using a high-pressure washer, keep
the jet nozzle at a minimum distance of 30
cm from the vehicle (particularly on any stone
chip impacts, sensors or seals).
Promptly clean up any stains containing
chemicals liable to damage the vehicle's
paintwork (including tree resin, bird
droppings, insect secretions, pollen and tar).
Depending on the environment, clean the
vehicle frequently to remove salty deposits
(in coastal areas), soot (in industrial areas)
and mud/salts (in wet or cold areas). These
substances can be highly corrosive.
Page 108 of 164
106
In the event of a breakdown
Warning triangle
This reflective and dismantlable device is to be
installed on the side of the road when a vehicle
is broken down or damaged.
Before getting out of the vehicle
Turn on the hazard warning lamps, then
put on the safety vest to assemble and install
the triangle.
Storage
Storage compartments located under each rear
bench seat cushion can store a folded triangle or
its storage box. For more information on the
Rear bench seat,
and especially on the storage compartments
under the seat cushions, refer to the
corresponding section.
Storage compartments located behind the
passenger seat or passenger bench seat
(depending on version) can store a folded
triangle or its storage box.
For more information on the Front seats or on
the Front bench seat, and in particular their
use, refer to the corresponding section.
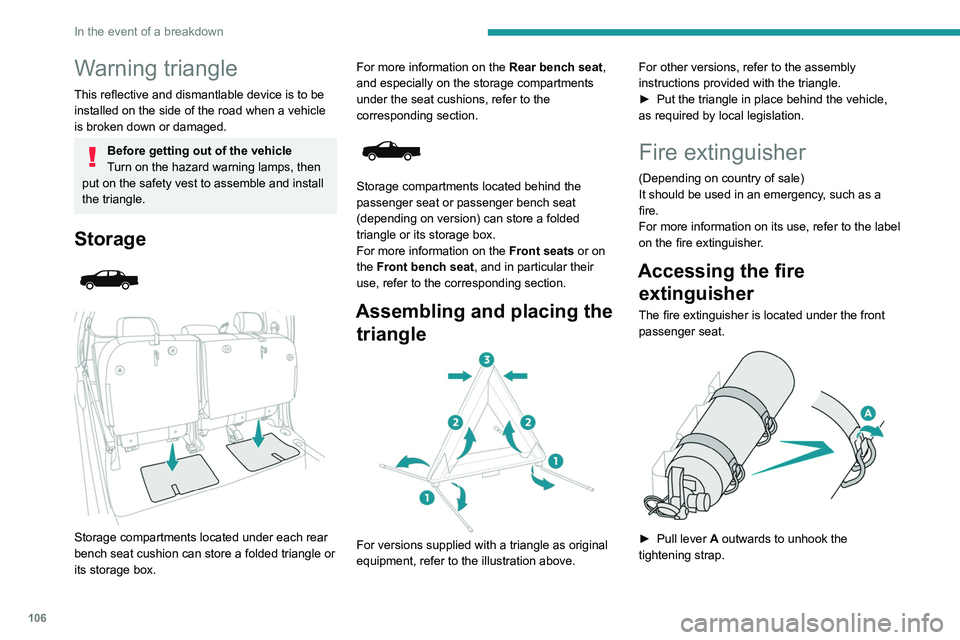
Assembling and placing the triangle
For versions supplied with a triangle as original
equipment, refer to the illustration above. For other versions, refer to the assembly
instructions provided with the triangle.
►
Put the triangle in place behind the vehicle,
as required by local legislation.
Fire extinguisher
(Depending on country of sale)
It should be used in an emergency, such as a
fire.
For more information on its use, refer to the label
on the fire extinguisher.
Accessing the fire extinguisher
The fire extinguisher is located under the front
passenger seat.
► Pull lever A outwards to unhook the
tightening strap.
After using the fire extinguisher, store it in a safe
place, then replace it with a new extinguisher as
soon as possible.
Never keep a fire extinguisher that has
already been used or that does not bear
its seal.
When the fire extinguisher is not used, attach
it to its support. There is a risk of movement
in the event of sudden braking or an accident.
The fire extinguisher must be replaced
approximately every 5 years; the expiry date
is written on its label.
Contact a PEUGEOT dealer or a
qualified workshop to replace the fire
extinguisher with one that has the same
specifications as the original.
Running out of fuel
(Diesel)
With Diesel engines, the fuel system must be
primed if you run out of fuel.
Before starting to prime the system, it is
essential to put at least 5 litres of Diesel into the
fuel tank.
For more information on Refuelling and
on the Engine compartment (in
particular the location of the priming pump),
refer to the corresponding section.
Page 109 of 164
107
In the event of a breakdown
8After using the fire extinguisher, store it in a safe
place, then replace it with a new extinguisher as
soon as possible.
Never keep a fire extinguisher that has
already been used or that does not bear
its seal.
When the fire extinguisher is not used, attach
it to its support. There is a risk of movement
in the event of sudden braking or an accident.
The fire extinguisher must be replaced
approximately every 5 years; the expiry date
is written on its label.
Contact a PEUGEOT dealer or a
qualified workshop to replace the fire
extinguisher with one that has the same
specifications as the original.
Running out of fuel
(Diesel)
With Diesel engines, the fuel system must be
primed if you run out of fuel.
Before starting to prime the system, it is
essential to put at least 5 litres of Diesel into the
fuel tank.
For more information on Refuelling and
on the Engine compartment (in
particular the location of the priming pump),
refer to the corresponding section. ►
Open the bonnet.
►
Loosen the degassing bolt about 2 to 3 turns.
► Activate the priming pump until fuel
(without air) appears through the
degassing bolt.
►
Retighten the degassing bolt.
►
Operate the starter motor until the engine
starts (if the engine does not start at the first
attempt, wait around 15 seconds before trying
again).
►
If the engine does not start after a few
attempts, operate the priming pump again, then
start the engine.
►
Close the bonnet.
Tool kit
Set of tools supplied with the vehicle.
Accessing the tools
Depending on version, the tools are stored under
the rear passenger seat cushion or behind the
front passenger seat or bench seat.
To access the tools under the rear passenger
seat:
►
Open the rear passenger door
.
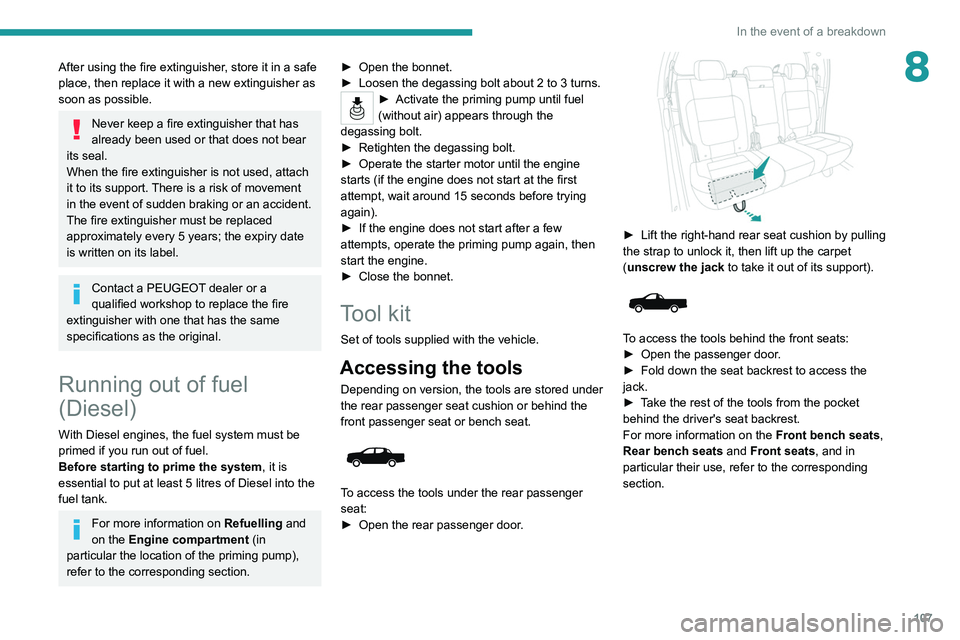
► Lift the right-hand rear seat cushion by pulling
the strap to unlock it, then lift up the carpet
(
unscrew the jack to take it out of its support).
To access the tools behind the front seats:
► Open the passenger door .
►
Fold down the seat backrest to access the
jack.
►
T
ake the rest of the tools from the pocket
behind the driver's seat backrest.
For more information on the Front bench seats,
Rear bench seats and Front seats, and in
particular their use, refer to the corresponding
section.
Page 143 of 164

141
Alphabetical index
4x4 transmission selector 69
360° camera
84
A
ABS 50
Accessories
49
Additive, Diesel
95
Adjusting headlamp beam height
45
Adjusting headlamps
45
Adjusting head restraints
26
Adjusting seat
26–27
Adjusting the air distribution
35
Adjusting the air flow
35
Adjusting the date
13, 137
Adjusting the height and reach
of the steering wheel
28
Adjusting the seat angle
27
Adjusting the seat belt height
54
Adjusting the temperature
35
Adjusting the time
13, 137
Advice on care and maintenance
103
Advice on driving
6, 62–63
Airbags
55–57, 59
Airbags, curtain
56–57
Airbags, front
56–57, 60
Airbags, lateral
56–57
Air conditioning
32, 34, 35
Air conditioning, automatic
36
Air conditioning, dual-zone automatic
34–36
Air conditioning, manual
33, 36
Air intake 35
Air vents
32
Alarm
23
Android Auto connection
136
Anti-lock braking system (ABS)
50
Antitheft / Immobiliser
17
Apple CarPlay connection
135
Area, loading
41
Armrest, front
38
Armrest, rear
39
Assistance, emergency braking
50
Audible warning
50
Audio streaming (Bluetooth)
129
B
Battery 99
Battery, 12 V
95, 99, 116–119
Battery, charging
118–119
Battery, remote control
20–21
Bluetooth (hands-free)
129–130
Bluetooth (telephone)
135
Bodywork
104
Bonnet
91–92
Brake discs
96
Brake lamps
11 5
Brakes
96
Braking assistance system
50
Bulbs
11 3
Bulbs (changing)
112, 115
C
Capacity, fuel tank 89
Cap, fuel filler
89
Care of the bodywork
104
Central locking
17, 19
Changing a bulb
112, 115
Changing a fuse
11 6
Changing a wheel
107–109
Changing a wiper blade
47
Changing the engine oil
101
Changing the remote control battery
20
Checking the levels
93–95
Checks
92, 95–97
Checks, routine
95–96, 98
Child lock
61
Children
55, 60
Children (safety)
61
Child seats
55, 58–59
Child seats, ISOFIX
60
Cigar lighter
37
Cleaning (advice)
102–104
Cleaning the engine throttle housing
102
Closing the boot
18, 23
Closing the doors
18–19, 22
Configuration, vehicle
13–15
Connection, Bluetooth
130, 135
Connection, MirrorLink
136
Connectivity
135
Control, emergency door
20
Control stalk, lighting
43, 45
Control stalk, wipers
46, 48
Page 144 of 164
142
Alphabetical index
Courtesy lamp, rear 39
Courtesy lamps
39
Cruise control
78–79
Cup holder
37
D
Date (setting) 13, 137
Daytime running lamps
44, 112
Deactivating the passenger airbag
56, 59–60
Defrosting
29, 36
Defrosting, front
36
Demisting
29, 36
Demisting, front
36
Demisting, rear
36
Demisting, rear screen
36
Dials and gauges
7
Dimensions
125
Dipstick
93
Direction indicators
45, 112, 114–115
Display screen, instrument panel
7
Door pockets
37
Doors
22
Driving
62–63
Driving aids camera (warnings)
76
Driving aids (recommendations)
76
Driving economically
6
Dynamic stability control (DSC)
50–51
E
EBFD 50
Eco-driving (advice)
6
ECO mode
73
Electric windows
24
Electronic brake force distribution (EBFD)
50
Emergency braking assistance (EBA)
50
Emergency switching off
67
Emergency warning lamps
49, 106
Engine
97
Engine compartment
92
Engine, Diesel
89, 92, 107, 124
Engine, petrol
92, 123
Engines
122–124
Environment
6, 21
ESC (electronic stability control)
50
Extinguisher
106
F
Filling the fuel tank 89
Filter, air
95, 100
Filter, Diesel fuel
102
Filter, oil
95, 101
Filter, particle
95
Filter, passenger compartment
32, 95, 99
Fitting a wheel
109, 111
Fitting roof bars
91
Fittings, front
37
Fittings, interior
37–38
Fittings, rear 39–40
Flap, fuel filler
89
Flashing indicators
45, 114
Floor storage compartment
31
Fluid, brake
94
Fluid, engine coolant
94
Fluid, power steering
94
Foglamps, front
43–44, 112, 115
Foglamps, rear
43
Folding bench seat
31
Folding the rear seat backrest
28
Folding the rear seats
30
Front map reading lights
39
Fuel
6, 89
Fuel consumption
6
Fuel tank
89
Fuses
11 6
G
Gauge, fuel 89
Gearbox, automatic
71, 74, 96, 118
Gearbox, manual
70–71, 74, 96
Gear lever, manual gearbox
70–71
Gear shift indicator ~
Gear efficiency indicator
74
Glove box
37
Grab handles
37
Page 146 of 164
144
Alphabetical index
N
Normal mode 73
O
Obstacle detection 81
Off-road camera
83
Oil change
93, 101
Oil consumption
93
OIl, engine
93, 101
On-board tools
107–108
Opening the bonnet
91
Opening the boot
18
Opening the doors
18, 22
Opening the windows
16
Over-speed buzzer
78
P
Pads, brake 96
Paint
104, 125
Paint colour code
125
Parking brake
68, 96
Parking sensors, audible and visual
81
Parking sensors, front
82
Parking sensors, rear
82
Plates, identification
125
Player, Apple®
129
Player, USB
129, 133–134
Port, USB 37, 129, 133–135
Pressures, tyres
96, 126
Pre-tensioning seat belts
55
Priming pump
107
Priming the fuel system
107
Protecting children
56, 58–60
Puncture
108
R
Radio 128, 133
Reading lamps
39
Rear differential locking
68
Rear screen, demisting
36
Recharging the battery
118–119
Recirculation, air
35
Recovery
119–121
Recovery of the vehicle
119
Regeneration of the particle filter
95
Reinitialisation of the under-inflation
detection system
75
Reinitialising the remote control
21
Reminder, key in ignition
66
Reminder, lighting on
44
Remote control
16–20
Removing a wheel
109, 111
Removing the mat
38
Replacing bulbs
112, 115
Replacing fuses
11 6
Replacing the air filter
95, 100
Replacing the battery
99
Replacing the Diesel filter 102
Replacing the oil filter
95, 101
Replacing the passenger
compartment filter
95, 99
Reservoir, screenwash
95
Reset trip
12
Rev counter
7
Reversing camera
76, 83
Reversing lamps
11 5
Roof bars
91
Running out of fuel (Diesel)
107
S
Safety, children 56, 58–60
Saturation of the particle filter (Diesel)
95
Screen, monochrome
13
Screenwash
47
Screenwash, front
47
Seat angle
27
Seat belts
53–55
Seat belts, rear
54
Seat, bench front, 2-seat
27–28, 54
Seat, rear bench
30–31
Seats, electric
27
Seats, front
26–27
Seats, rear
30, 58
Selector, gear
71
Sensors (warnings)
76
Serial number, vehicle
125
Servicing
95, 97