2022 PEUGEOT LANDTREK open bonnet
[x] Cancel search: open bonnetPage 115 of 164
11 3
In the event of a breakdown
8Halogen bulbs (Hx)
To ensure good quality lighting, check
that the bulb is correctly positioned in its
housing.
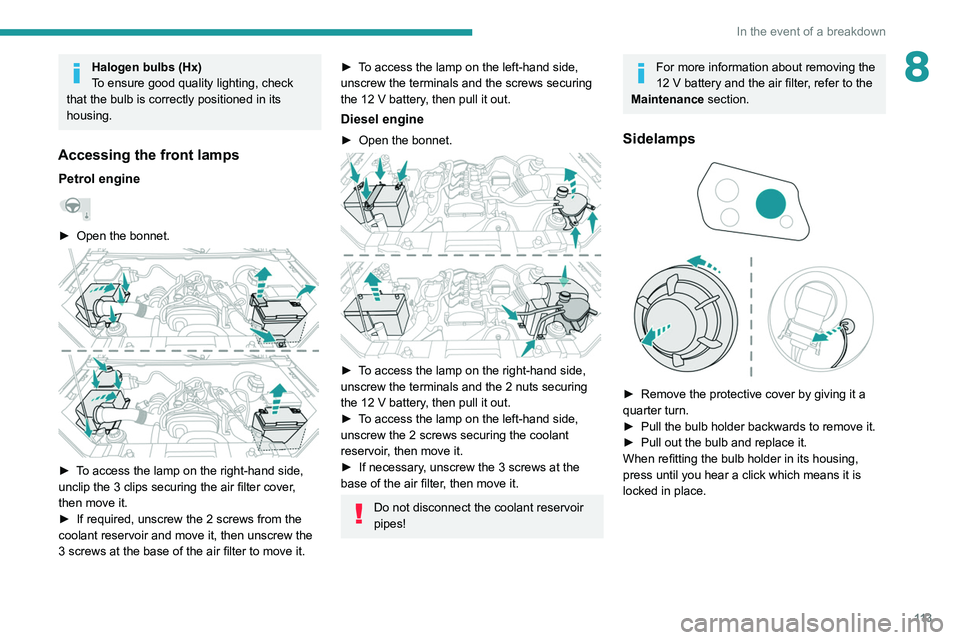
Accessing the front lamps
Petrol engine
► Open the bonnet.
► To access the lamp on the right-hand side,
unclip the 3 clips securing the air filter cover,
then move it.
►
If required, unscrew the 2 screws from the
coolant reservoir and move it, then unscrew the
3 screws at the base of the air filter to move it.
► To access the lamp on the left-hand side,
unscrew the terminals and the screws securing
the 12
V battery, then pull it out.
Diesel engine
► Open the bonnet.
► To access the lamp on the right-hand side,
unscrew the terminals and the 2 nuts securing
the 12 V battery, then pull it out.
►
T
o access the lamp on the left-hand side,
unscrew the 2 screws securing the coolant
reservoir, then move it.
►
If necessary
, unscrew the 3 screws at the
base of the air filter, then move it.
Do not disconnect the coolant reservoir
pipes!
For more information about removing the
12 V battery and the air filter, refer to the
Maintenance section.
Sidelamps
► Remove the protective cover by giving it a
quarter turn.
►
Pull the bulb holder backwards to remove it.
►
Pull out the bulb and replace it.
When refitting the bulb holder in its housing,
press until you hear a click which means it is
locked in place.
Page 116 of 164
11 4
In the event of a breakdown
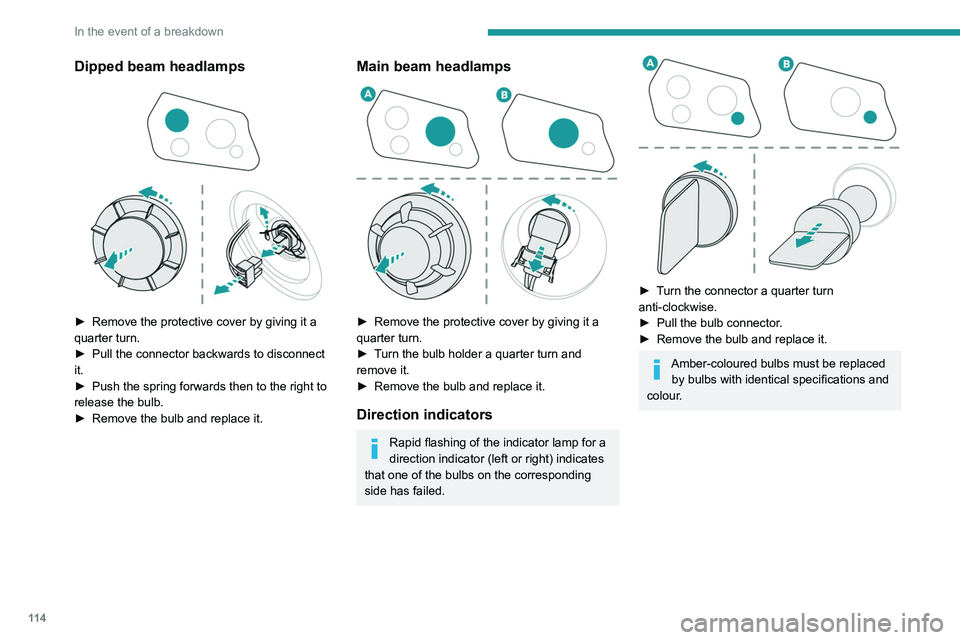
Dipped beam headlamps
► Remove the protective cover by giving it a
quarter turn.
►
Pull the connector backwards to disconnect
it.
►
Push the spring forwards then to the right to
release the bulb.
►
Remove the bulb and replace it.
Main beam headlamps
► Remove the protective cover by giving it a
quarter turn.
►
T
urn the bulb holder a quarter turn and
remove it.
►
Remove the bulb and replace it.
Direction indicators
Rapid flashing of the indicator lamp for a
direction indicator (left or right) indicates
that one of the bulbs on the corresponding
side has failed.
► Turn the connector a quarter turn
anti-clockwise.
►
Pull the bulb connector
.
►
Remove the bulb and replace it.
Amber-coloured bulbs must be replaced by bulbs with identical specifications and
colour.
Daytime running lamps
► Remove the protective cover by giving it a
quarter turn.
► Pull the bulb holder backwards to remove it.
► Pull out the bulb and replace it.
When refitting the bulb holder in its housing,
press until you hear a click which means it is
locked in place.
Foglamps
To access the foglamps:
► Open the bonnet.
Page 117 of 164
11 5
In the event of a breakdown
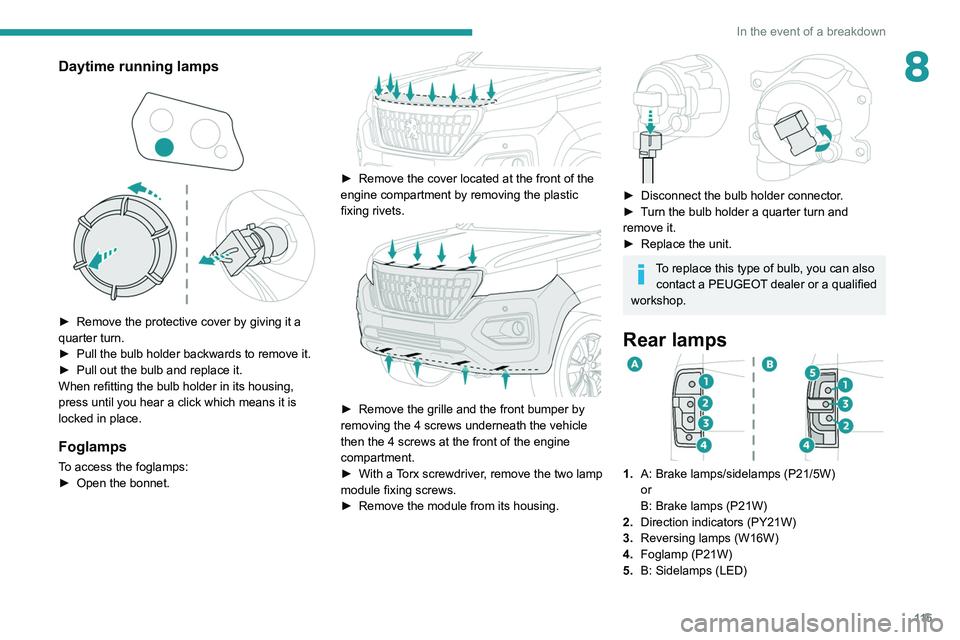
8Daytime running lamps
► Remove the protective cover by giving it a
quarter turn.
►
Pull the bulb holder backwards to remove it.
►
Pull out the bulb and replace it.
When refitting the bulb holder in its housing,
press until you hear a click which means it is
locked in place.
Foglamps
To access the foglamps:
► Open the bonnet.
► Remove the cover located at the front of the
engine compartment by removing the plastic
fixing rivets.
► Remove the grille and the front bumper by
removing the 4 screws underneath the vehicle
then the 4 screws at the front of the engine
compartment.
►
With a
Torx screwdriver, remove the two lamp
module fixing screws.
►
Remove the module from its housing.
► Disconnect the bulb holder connector .
► T urn the bulb holder a quarter turn and
remove it.
►
Replace the unit.
To replace this type of bulb, you can also contact a PEUGEOT dealer or a qualified
workshop.
Rear lamps
1. A: Brake lamps/sidelamps (P21/5W)
or
B: Brake lamps (P21W)
2. Direction indicators (PY21W)
3. Reversing lamps (W16W)
4. Foglamp (P21W)
5. B: Sidelamps
(LED)
Page 118 of 164
11 6
In the event of a breakdown
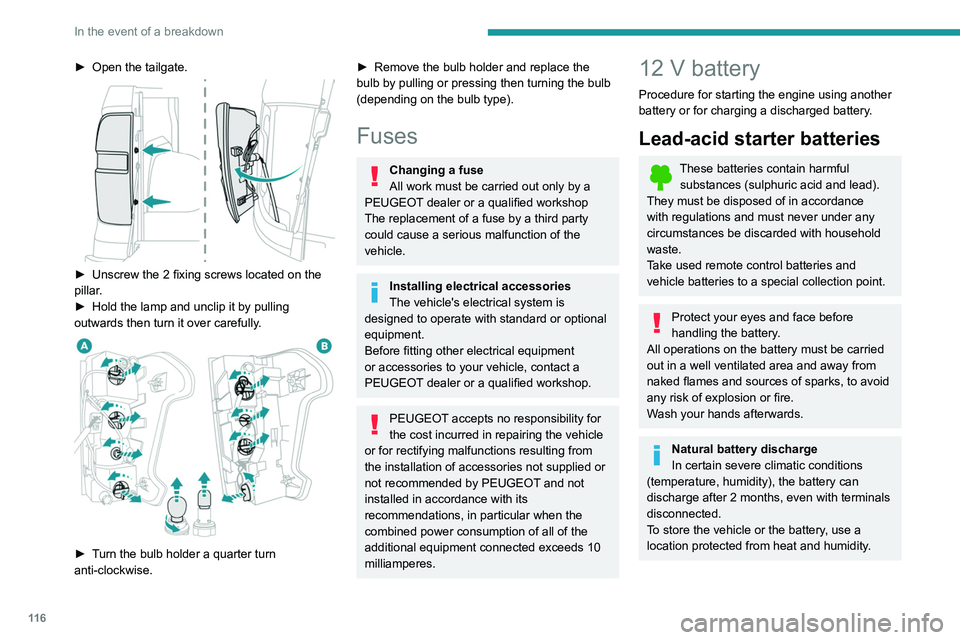
► Open the tailgate.
► Unscrew the 2 fixing screws located on the
pillar .
►
Hold the lamp and unclip it by pulling
outwards then turn it over carefully
.
► Turn the bulb holder a quarter turn
anti-clockwise.
► Remove the bulb holder and replace the
bulb by pulling or pressing then turning the bulb
(depending on the bulb type).
Fuses
Changing a fuse
All work must be carried out only by a
PEUGEOT dealer or a qualified workshop
The replacement of a fuse by a third party
could cause a serious malfunction of the
vehicle.
Installing electrical accessories
The vehicle's electrical system is
designed to operate with standard or optional
equipment.
Before fitting other electrical equipment
or accessories to your vehicle, contact a
PEUGEOT dealer or a qualified workshop.
PEUGEOT accepts no responsibility for
the cost incurred in repairing the vehicle
or for rectifying malfunctions resulting from
the installation of accessories not supplied or
not recommended by PEUGEOT and not
installed in accordance with its
recommendations, in particular when the
combined power consumption of all of the
additional equipment connected exceeds 10
milliamperes.
12 V battery
Procedure for starting the engine using another
battery or for charging a discharged battery.
Lead-acid starter batteries
These batteries contain harmful substances (sulphuric acid and lead).
They must be disposed of in accordance
with regulations and must never under any
circumstances be discarded with household
waste.
Take used remote control batteries and
vehicle batteries to a special collection point.
Protect your eyes and face before
handling the battery.
All operations on the battery must be carried
out in a well ventilated area and away from
naked flames and sources of sparks, to avoid
any risk of explosion or fire.
Wash your hands afterwards.
Natural battery discharge
In certain severe climatic conditions
(temperature, humidity), the battery can
discharge after 2 months, even with terminals
disconnected.
To store the vehicle or the battery, use a
location protected from heat and humidity.
Battery power loss
A battery can be discharged due to
power losses:
– Continuous electrical consumption of a
component (e.g. alarm, anti-theft device).
– Device powered up when the engine is off
(e.g. audio system, USB charger).
– Electrical leakage due to poor insulation of
electrical components.
If the power loss cannot be located, contact a
PEUGEOT dealer or a qualified workshop to
have the vehicle's electrical system checked.
Battery charge check
For batteries with a charge status
indicator, read the value indicated on the
battery directly.
For other types of batteries, the check can be
carried out with a voltmeter:
► Connect the voltmeter to the battery
terminals (respect the polarities).
► Read the voltage value.
► Turn the main beam headlamps on.
If the battery voltage remains at or above 10
V without rapidly decreasing, the charge is
correct.
If the battery voltage drops quickly or is less
than 10 V, the battery must be recharged or
replaced.
Accessing the battery
The battery is located under the bonnet.
Page 146 of 164
144
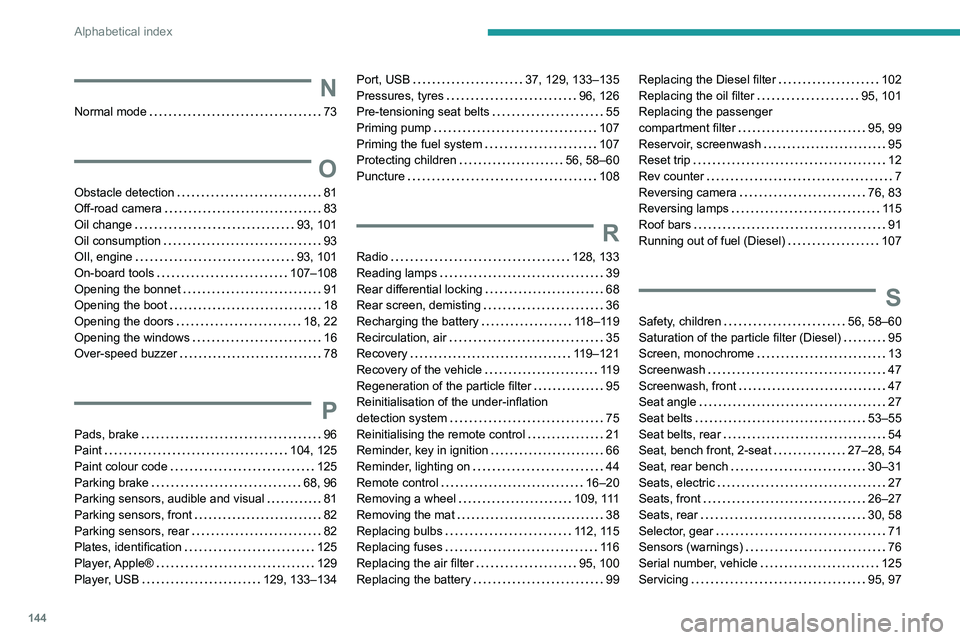
Alphabetical index
N
Normal mode 73
O
Obstacle detection 81
Off-road camera
83
Oil change
93, 101
Oil consumption
93
OIl, engine
93, 101
On-board tools
107–108
Opening the bonnet
91
Opening the boot
18
Opening the doors
18, 22
Opening the windows
16
Over-speed buzzer
78
P
Pads, brake 96
Paint
104, 125
Paint colour code
125
Parking brake
68, 96
Parking sensors, audible and visual
81
Parking sensors, front
82
Parking sensors, rear
82
Plates, identification
125
Player, Apple®
129
Player, USB
129, 133–134
Port, USB 37, 129, 133–135
Pressures, tyres
96, 126
Pre-tensioning seat belts
55
Priming pump
107
Priming the fuel system
107
Protecting children
56, 58–60
Puncture
108
R
Radio 128, 133
Reading lamps
39
Rear differential locking
68
Rear screen, demisting
36
Recharging the battery
118–119
Recirculation, air
35
Recovery
119–121
Recovery of the vehicle
119
Regeneration of the particle filter
95
Reinitialisation of the under-inflation
detection system
75
Reinitialising the remote control
21
Reminder, key in ignition
66
Reminder, lighting on
44
Remote control
16–20
Removing a wheel
109, 111
Removing the mat
38
Replacing bulbs
112, 115
Replacing fuses
11 6
Replacing the air filter
95, 100
Replacing the battery
99
Replacing the Diesel filter 102
Replacing the oil filter
95, 101
Replacing the passenger
compartment filter
95, 99
Reservoir, screenwash
95
Reset trip
12
Rev counter
7
Reversing camera
76, 83
Reversing lamps
11 5
Roof bars
91
Running out of fuel (Diesel)
107
S
Safety, children 56, 58–60
Saturation of the particle filter (Diesel)
95
Screen, monochrome
13
Screenwash
47
Screenwash, front
47
Seat angle
27
Seat belts
53–55
Seat belts, rear
54
Seat, bench front, 2-seat
27–28, 54
Seat, rear bench
30–31
Seats, electric
27
Seats, front
26–27
Seats, rear
30, 58
Selector, gear
71
Sensors (warnings)
76
Serial number, vehicle
125
Servicing
95, 97