Page 97 of 164

95
Practical information
7Screenwash fluid
Top up to the required level when necessary.
Tank capacity: 3 litres.
Fluid specification
The fluid must be topped up with a pre-mixed
product.
In winter (temperatures below zero), a fluid
containing an anti-freeze agent which is
appropriate for the temperature conditions
must be used in order to protect the system's
components (pump, tank, ducts, jets).
Filling with pure water is prohibited in all
circumstances (risk of freezing,
limescale, etc.).
Checks
Unless otherwise indicated, check these
components in accordance with the
manufacturer's service schedule and according
to your engine.
Otherwise, have them checked by a PEUGEOT
dealer or a qualified workshop.
Only use products recommended by
PEUGEOT or products of equivalent
quality and specification.
In order to optimise the operation of
components as important as those in the
braking system, PEUGEOT selects and offers
very specific products.
12 V battery
The battery does not require any maintenance.
Check regularly that the terminals are correctly
tightened (versions without quick-release
terminals) and that the connections are clean.
For more information on the precautions
to take before any work on the 12 V
battery, refer to the corresponding section.
Passenger compartment
filter
Depending on the environment and the
use of the vehicle (e.g. dusty atmosphere,
city driving), change it twice as often, if
necessary .
A clogged passenger compartment filter
can adversely affect air conditioning
system performance and generate
undesirable odours.
Air filter
Depending on the environment and the
use of the vehicle (e.g. dusty atmosphere,
city driving), change it twice as often, if
necessary .
Oil filter
Change the oil filter each time the engine
oil is changed.
Diesel fuel filter
Change the Diesel fuel filter according to
the schedule of operations in the
manufacturer's service schedule.
A clogged Diesel fuel filter can reduce engine performance and damage the
injection system.
Bleeding water from the Diesel fuel
filter
If this warning lamp comes on, bleed the
filter. Otherwise, bleed regularly at each
engine oil change.
–
T
o drain the water, unscrew the bleed screw
located under the filter.
–
Operate it until all the water in the transparent
tube has drained, then tighten the bleed screw
again.
For more information on the Engine
compartment, in particular the location
of the Diesel fuel filter, refer to the
corresponding section.
Particle filter (Diesel)
(Depending on version)
Page 98 of 164

96
Practical information
The start of clogging of the particle filter is indicated by the temporary lighting of this
warning lamp, accompanied by an alert
message.
As soon as the traffic conditions permit,
regenerate the filter by driving at a speed of at
least 37
mph (60 km/h) until the warning lamp
goes off.
If the warning lamp stays on, this
indicates a low Diesel additive level.
For more information on Checking levels,
refer to the corresponding section.
Following prolonged operation of the
vehicle at very low speed or at idle, you
may, in exceptional circumstances, notice
water vapour coming from the exhaust while
accelerating. These emissions have no
impact on the vehicle’s behaviour and the
environment.
New vehicle
During the first few particle filter
regeneration operations, you may notice a
"burning" smell. This is perfectly normal.
Manual gearbox
The gearbox does not require any maintenance (no oil change).
Automatic gearbox
For any information on gearbox
maintenance, contact a PEUGEOT dealer
or a qualified workshop.
Brake pads
Brake wear depends on the style of
driving, particularly in the case of vehicles
used in town, over short distances. It may be
necessary to have the condition of the brakes
checked, even between vehicle services.
Unless there is a leak in the circuit, a drop in the
brake fluid level indicates that the brake pads
are worn.
After washing the vehicle, moisture, or in wintry conditions, ice can form on the
brake discs and pads: braking efficiency may
be reduced. Gently dab the brakes to dry and
defrost them.
Brake disc wear
For information on checking brake disc
wear, contact a PEUGEOT dealer or a
qualified workshop.
Manual parking brake
If you notice excessive brake lever travel
or decreased effectiveness, the parking
brake must be adjusted, even between two
services.
This system must be checked by a PEUGEOT
dealer or a qualified workshop.
Steering wheel
Play or a loss of precision in the steering
means that this system needs to be
checked.
This system must be checked by a PEUGEOT
dealer or a qualified workshop.
Wheels and tyres
The inflation pressure of all tyres, including the spare wheel, must be
checked on "cold” tyres at least once a month.
The pressures indicated on the tyre pressure
label are valid for "cold" tyres. If you have driven
for more than 10 minutes or more than 6 miles
(10 kilometres) at over 31 mph (50
km/h), add
0.3 bar (30 kPa) to the values indicated on the
label.
The pressure difference between the left-hand
side and right-hand side tyres must not exceed
0.05 bar (5 kPa).
Under-inflation increases energy
consumption. Non-compliant tyre
pressures cause tyres to wear prematurely
and have an adverse effect on the vehicle's
road holding - risk of accident!
Driving with worn or damaged tyres reduces the
braking and road holding performance of the
vehicle. Regularly check the condition of the
Page 99 of 164
 and rims as well as
the presence of the valve caps.
When the wear indicators no longer appear set
back from the tread, the depth of the grooves")
97
Practical information
7tyres (tread and sidewalls) and rims as well as
the presence of the valve caps.
When the wear indicators no longer appear set
back from the tread, the depth of the grooves is
less than 1.6 mm; replace the tyres as soon as
possible.
Regularly remove foreign bodies trapped in the
tyre tread.
Using different size wheels and tyres from those
specified can affect the lifetime of tyres, wheel
rotation, ground clearance, the speedometer
reading and have an adverse effect on road
holding.
Fitting different tyres on the front and rear axles
can cause the ESC to mistime.
Fitting winter tyres to only one axle could cause
you to lose control of the vehicle. Fitting winter
tyres to both axles is recommended.
Always mark the direction of rotation on the tyres
that will be stored when fitting winter or summer
tyres. Store them in a cool, dry place and away
from direct exposure to the sun's rays.
Winter or 4-seasons tyres can be
identified by this symbol on their
sidewalls.
Tyres older than 6 years should always be replaced, even if no damage or wear
has been found.
When a rim is warped, cracked or corroded,
it is essential to replace it as it may cause the
tyre to come off. Do not use a wheel with a
rim that has been damaged (even if has been
straightened out).
Swapping tyres
To optimise wear and increase the lifetime of the tyres, swap the tyres
approximately every 3,100 to 6,200 miles
(5,000 to 10,000 km) .
In the event of irregular wear, bring the
swapping forward.
Shock absorbers
It is not easy for drivers to detect when
shock absorbers are worn. Nevertheless,
the shock absorbers have a major impact on
road holding and braking performance.
For your safety and driving comfort, it is
important to have them regularly checked by a
PEUGEOT dealer or a qualified workshop.
Timing and accessory kits
The timing and accessory kits are used
from the time the engine is started until it
is switched off. It is normal for them to wear over
time.
A faulty timing or accessory kit can damage
the engine, rendering it unusable. Observe the
recommended replacement frequency, stated in
distance travelled or time elapsed, whichever is
reached first.
Maintenance
For more information on the Engine
compartment, in particular the location of the
components under the bonnet, refer to the
corresponding section.
For the maintenance of your vehicle, you can
also contact a PEUGEOT dealer or a qualified
workshop.
Vehicle maintenance must always be
carried out with the engine switched off
and the ignition off.
Take care when working under the bonnet, as
certain areas of the engine may be extremely
hot (risk of burns) and the cooling fan could
start at any time (even with the ignition off).
Wait at least one hour after switching off the
engine before working on the vehicle - risk of
burns!
Take care with objects or clothing that could
be caught in the blades of the cooling fan -
risk of strangulation!
Page 100 of 164

98
Practical information
Always wear gloves, protective glasses and
suitable clothing to avoid direct contact with
liquids against the skin or eyes.
In the event of contact with the skin, wash
the affected area thoroughly with soap and
running water.
In the event of contact with the eyes,
immediately rinse the eyes with large
amounts of water or with an eye wash
solution for at least 15 minutes. Seek medical
attention if you feel a persistent burning
sensation or irritation.
Never go underneath the vehicle raised
using a jack; always use an axle
stand-type support.
When working on the vehicle's electrical
system, take care not to cause a short circuit -
risk of burns and fire.
Flammable products and all sources of heat
(sparks, for example) must be kept away from
the battery, the fuel tank and all components
of the fuel system.
Never run the engine in a closed space
without sufficient ventilation; always use a
ventilation system such as an exhaust gas
extractor, for example.
Never leave liquids (oil, coolant) unattended.
Keep these liquids out of the reach of children
and animals.
The liquids and components replaced must have the same characteristics and
comply with the manufacturer's
recommendations.
General checks
Check the following components to ensure
proper operation and longevity of the vehicle.
For more information on the components
to be
checked, refer to the Checking levels, Checks
and Advice on care
sections.
Daily checks
Check that all vehicle lamps (front and
rear) are working properly.
Check the condition of the door mirrors and
the adjustment controls.
Check that all the doors can be opened,
closed and locked correctly.
Regularly check all levels, the condition of the
tyres and the bodywork.
Monthly checks
Check:
–
The engine coolant level.
–
The absence of leaks on all the pipes and
hoses visible on the vehicle as well as the
tanks.
–
The proper functioning of the elements of
the: •
Heating and ventilation system.
•
Air conditioning system.
• Parking brake (application and release).
• Horn.
–
The tightening of the wheel nuts (if
necessary
, retighten them to the specific
tightening values).
–
The good condition of the wipers.
–
The absence of significant play in the
steering wheel and steering.
–
The correct travel of the brake pedal as
well as the clutch pedal.
General recommendations
related to maintenance
operations
Electronic engine management
computer
The electronic computer is not completely
waterproof. When performing maintenance
in the rain or washing the engine, it must be
protected from water.
Never remove or disconnect any part of the
electronic injection system to avoid the entry
of moisture, oil or any other foreign body.
Do not install a radio antenna or other
equipment likely to generate interference near
the electronic computer.
Do not expose the electronic computer to a
temperature higher than 105°C.
Before any welding operation on the vehicle,
it is essential to disconnect the electronic
computer - risk of damage to the electronic
system components.
Fuel system
All work on the fuel system must be
carried out only by a PEUGEOT dealer or a
qualified workshop.
Electrical system
Never:
– disconnect the battery cables or the
electrical wiring harness connectors when the
engine is running.
– reverse the polarities when reconnecting
the battery (risk of damage to electronic
components).
– pierce the insulation of the electrical wires
during an electrical check or diagnosis.
Changing the 12 V battery
Petrol engine
Page 101 of 164

99
Practical information
7computer - risk of damage to the electronic
system components.
Fuel system
All work on the fuel system must be
carried out only by a PEUGEOT dealer or a
qualified workshop.
Electrical system
Never:
–
disconnect the battery cables or the
electrical wiring harness connectors when the
engine is running.
–
reverse the polarities when reconnecting
the battery (risk of damage to electronic
components).
–
pierce the insulation of the electrical wires
during an electrical check or diagnosis.
Changing the 12 V battery
Petrol engine
Diesel engine
► Switch off the engine and the ignition.
In the engine compartment:
►
Loosen and disconnect the cable from the
negative terminal
1.
►
Lift the protective cover
, then loosen and
disconnect the cable from the positive terminal
2.
►
Loosen and remove the retaining clamp 3
.
►
Remove and change the battery
.
For more information on the 12 V battery
and in particular the precautionary measures
to be taken before any work, refer to the
corresponding section.
To reassemble, perform the operations in the reverse order to those for removal.
When connecting cables, always start with
the positive terminal.
Changing the passenger
compartment filter
► Switch off the engine and the ignition.
In the passenger compartment:
►
Open the glove box.
Page 102 of 164

100
Practical information
► Unclip the damper 1 on the side of the glove
box.
►
Press the walls
2 on each side of the glove
box 3, then tilt it downwards to release it
completely.
►
Pull the glove box 3
towards you to unclip
and remove it.
► Unclip and remove the protective cover 4
using a suitable tool.
►
Press the 2 clips located to the right of the
cover
5 of the heating unit and pull it out towards
you.
► Remove the passenger compartment filter 6
from the heating unit and change it.
To reassemble, perform the operations in the reverse order to those for removal.
Install the new passenger compartment
filter with the arrow pointing down.
When disassembling/reassembling, avoid
forcing the plastic parts.
Changing the air filter
Petrol engine
Diesel engine
► Switch off the engine and the ignition.
In the engine compartment:
►
Unclip the retaining clips 1
.
►
With a Diesel engine, disconnect the
connector
2 from the airflow meter.
►
Lift the upper part
A of the air unit and tilt it
to the side.
►
Remove the air filter from the lower section of
the air unit (note the direction of fitting).
►
Clean the 2 sections
of the air unit and place
the new air filter in the lower section (observe
the direction of fitting of the air filter to guarantee
sealing).
► Refit the upper section A on the filter, taking
care not to pinch the seal.
► Clip the retaining clips 1.
► With a Diesel engine, reconnect the
connector 2 to the airflow meter.
Never remove the air filter when the
engine is running - risk of injury and
damage!
When the upper section of the air unit is
removed, always make sure that no debris or
dust enters the engine air intake pipe - risk of
serious damage to the engine!
Always use an original air filter or one suitable
for the vehicle - risk of damage to the engine.
Changing the engine oil
► Switch off the engine and the ignition.
► Unscrew and remove the engine oil filler cap.
► Under the vehicle, place a container below
the drain plug.
Page 103 of 164
.
►
Refit the upper section
A
on the filter, taking
care not to pinch the seal.
►
Clip the reta")
101
Practical information
7the direction of fitting of the air filter to guarantee
sealing).
►
Refit the upper section
A
on the filter, taking
care not to pinch the seal.
►
Clip the retaining clips 1
.
►
With a Diesel engine, reconnect the
connector
2 to the airflow meter.
Never remove the air filter when the
engine is running - risk of injury and
damage!
When the upper section of the air unit is
removed, always make sure that no debris or
dust enters the engine air intake pipe - risk of
serious damage to the engine!
Always use an original air filter or one suitable
for the vehicle - risk of damage to the engine.
Changing the engine oil
► Switch off the engine and the ignition.
► Unscrew and remove the engine oil filler cap.
►
Under the vehicle, place a container below
the drain plug.
Do not remove the drain plug when the
engine is hot - risk of burns (hot oil)!
►
Loosen the drain plug with a suitable wrench
and remove it.
►
W
ait until the oil has completely drained into
the container.
►
Change the plug seal and screw the plug
back on the housing (tighten to a torque of 3.5 to
4 daN.m).
For more information on Engine oil and in
particular on oil filling and checking the level,
refer to the corresponding section.
Always change engine oil with an oil corresponding to the engine and in
accordance with the manufacturer's
recommendations.
Never start the engine without oil - risk of
serious damage to the engine!
Be careful, the oil is a petroleum-based
product. It is harmful if swallowed and
irritating to the skin and eyes.
Keep the drained oil out of the reach of
children and animals.
Changing the oil filter
Petrol engine
Diesel engine
► Switch off the engine and the ignition.
► Under the vehicle, place a container below
the oil filter
.
►
Loosen and remove the oil filter with a
suitable wrench.
►
Clean the seal face using a clean, lint-free
cloth.
►
Oil the seal of the new filter (use new oil).
►
Screw the new filter back on, making sure
that the seal is correctly positioned against the
seal face.
►
T
ighten the oil filter correctly with your hands,
without forcing it, to avoid leaks.
Page 104 of 164

102
Practical information
After the operation, check the engine oil level with the dipstick and top up if
necessary.
For more information on Engine oil and in
particular on checking the level, refer to the
corresponding section.
Never start the engine without the oil
filter - risk of splashing and serious
damage to the engine!
Changing the Diesel fuel
filter
► Switch off the engine and the ignition.
► Place a container below the Diesel fuel filter .
►
Remove the retaining clamp 1
, then unscrew
and remove the Diesel fuel filter 2 with a suitable
wrench.
►
Clean the seal face using a clean, lint-free
cloth.
► Screw the new filter back on, making sure
that the seal is correctly positioned against the
contact surface.
►
T
ighten the Diesel fuel filter correctly with
your hands, without forcing it, to avoid leaks.
►
Put the retaining clamp 1
back in place.
After the operation, bleed the air contained in the fuel system.
For more information on Running out of fuel
(Diesel) and in particular the procedure for
bleeding the Diesel
fuel system, refer to the
corresponding section.
Cleaning the throttle body
Removing the throttle body
Petrol engine
Diesel engine
► Switch off the engine and the ignition.
► Disconnect connector 1
from the throttle
body.
►
Loosen the clamp 2
on the air hose.
►
Disconnect the air hose A
from the throttle
body.
►
Unscrew and remove the screws 3
fixing the
throttle body to the air intake manifold.
►
Remove the throttle body B
, ensuring that the
seal does not fall.
When the throttle body is removed,
always make sure that no debris or dust
enters the engine air intake pipe or the intake
manifold - risk of serious damage to the
engine!
Never start the engine when the throttle body
is removed.
Cleaning the throttle body
Before cleaning, make sure that you
correctly protect the electrical connector
 1
1 2
2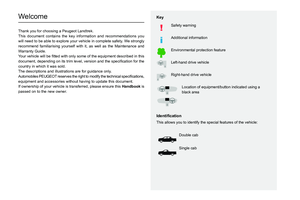 3
3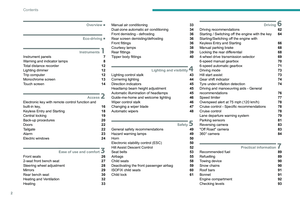 4
4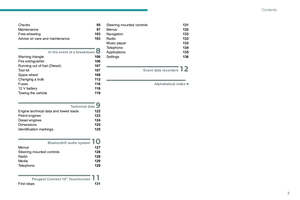 5
5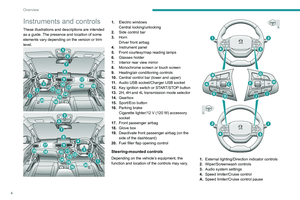 6
6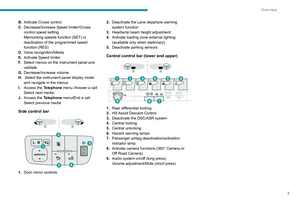 7
7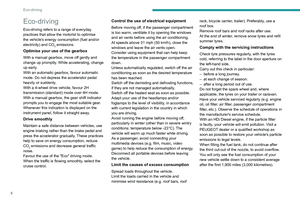 8
8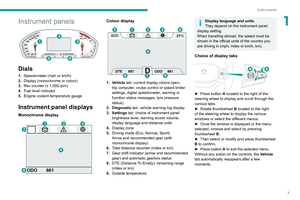 9
9 10
10 11
11 12
12 13
13 14
14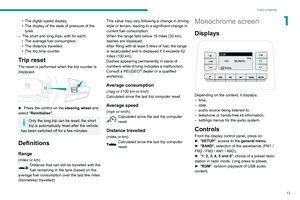 15
15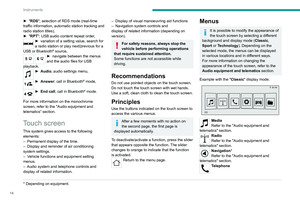 16
16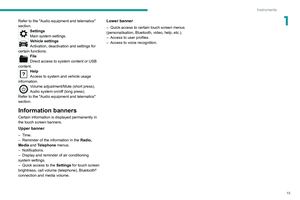 17
17 18
18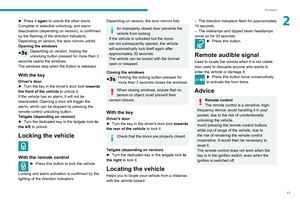 19
19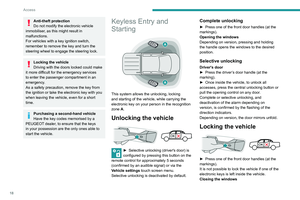 20
20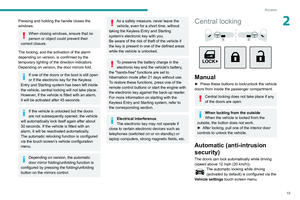 21
21 22
22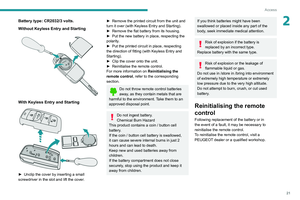 23
23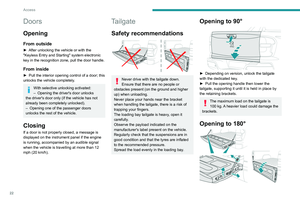 24
24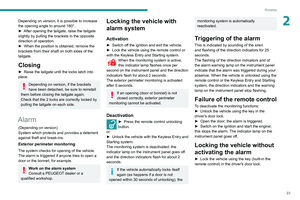 25
25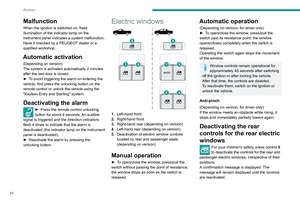 26
26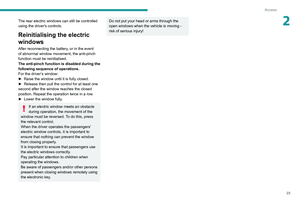 27
27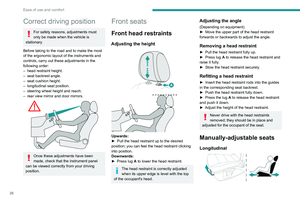 28
28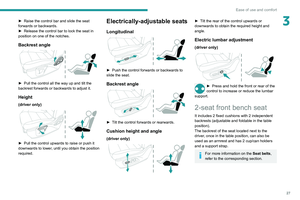 29
29 30
30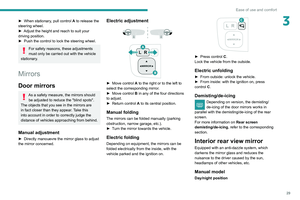 31
31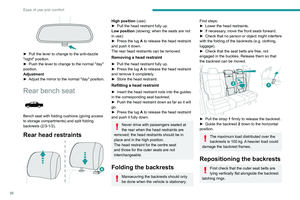 32
32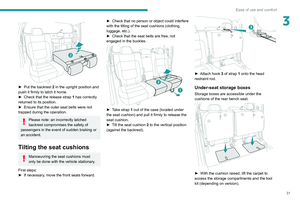 33
33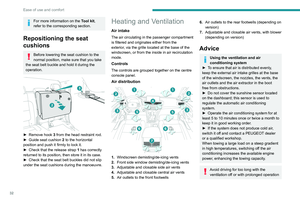 34
34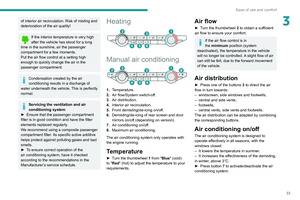 35
35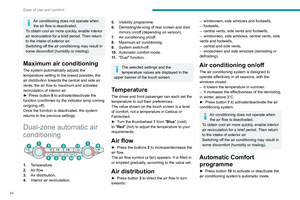 36
36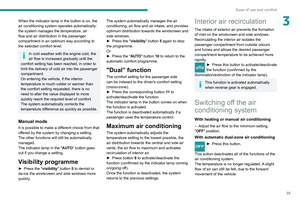 37
37 38
38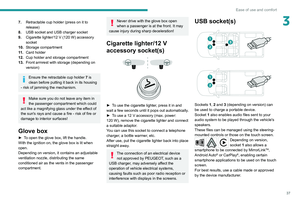 39
39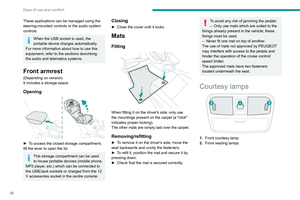 40
40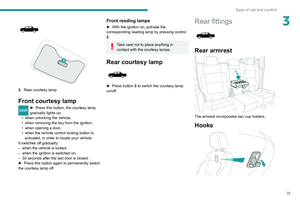 41
41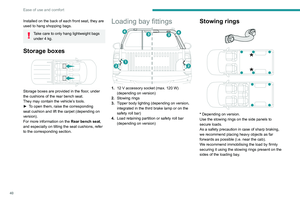 42
42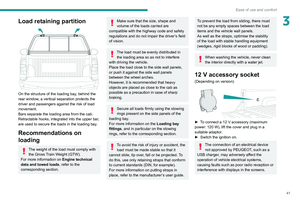 43
43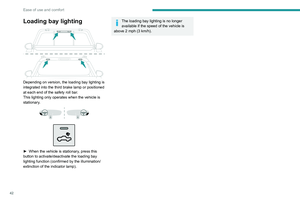 44
44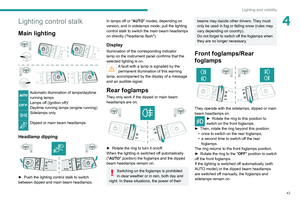 45
45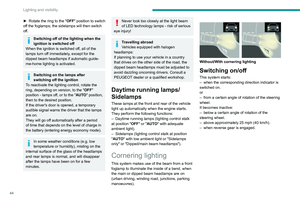 46
46 47
47 48
48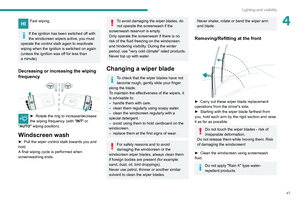 49
49 50
50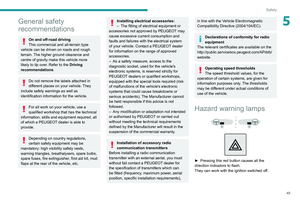 51
51 52
52 53
53 54
54 55
55 56
56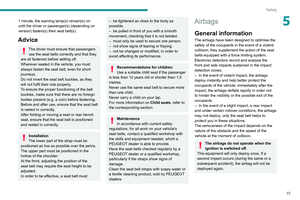 57
57 58
58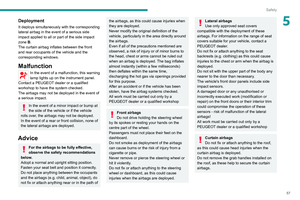 59
59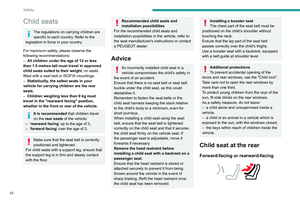 60
60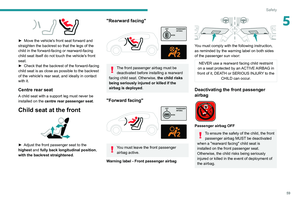 61
61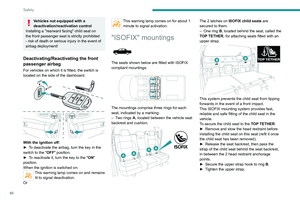 62
62 63
63 64
64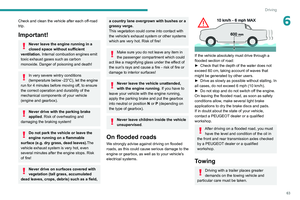 65
65 66
66 67
67 68
68 69
69 70
70 71
71 72
72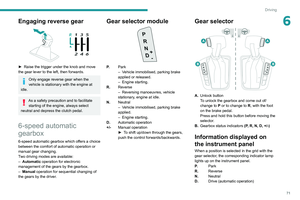 73
73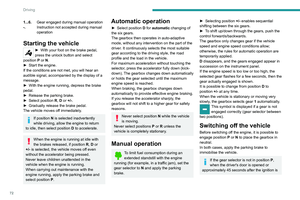 74
74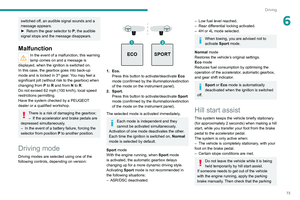 75
75 76
76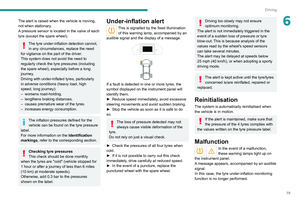 77
77 78
78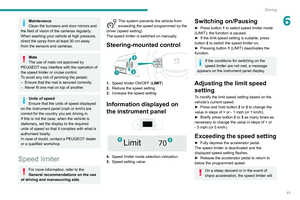 79
79 80
80 81
81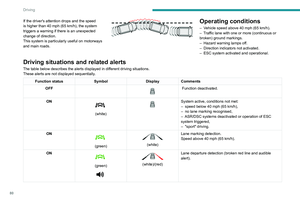 82
82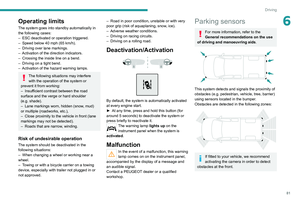 83
83 84
84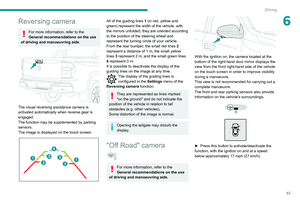 85
85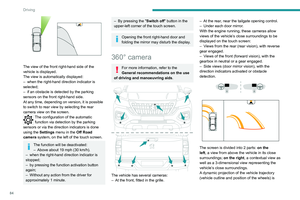 86
86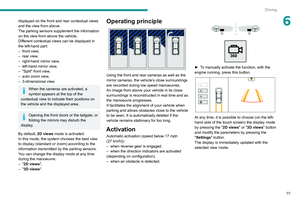 87
87 88
88 89
89 90
90 91
91 92
92 93
93 94
94 95
95 96
96 97
97 98
98 99
99 100
100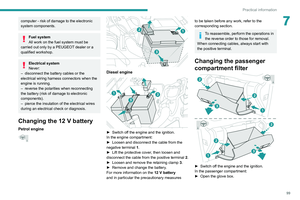 101
101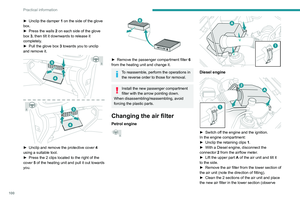 102
102 103
103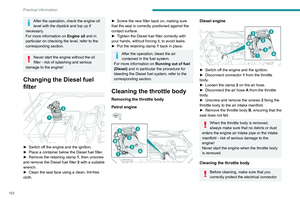 104
104 105
105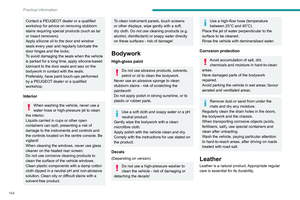 106
106 107
107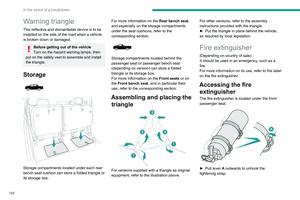 108
108 109
109 110
110 111
111 112
112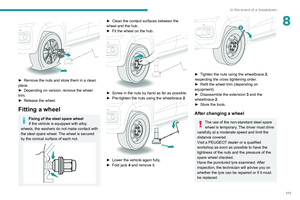 113
113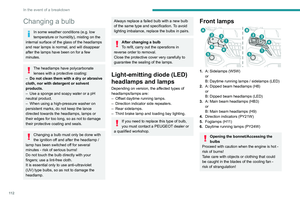 114
114 115
115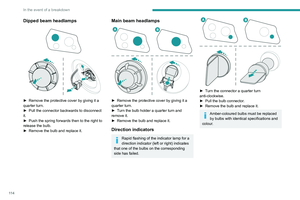 116
116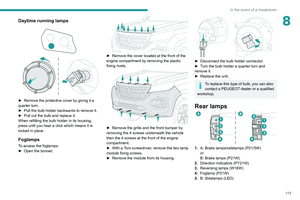 117
117 118
118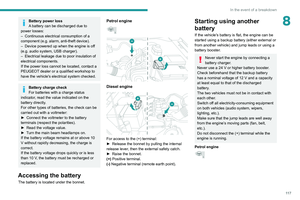 119
119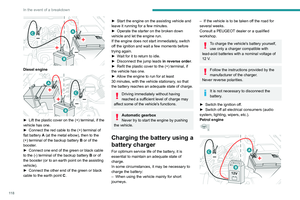 120
120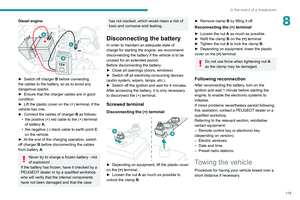 121
121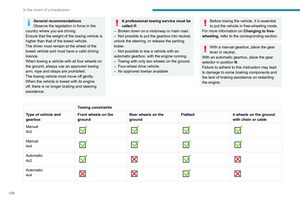 122
122 123
123 124
124 125
125 126
126 127
127 128
128 129
129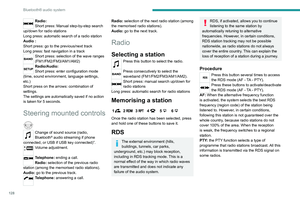 130
130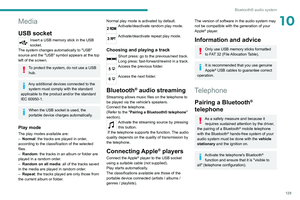 131
131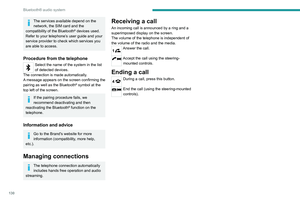 132
132 133
133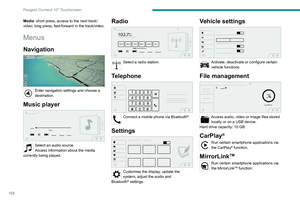 134
134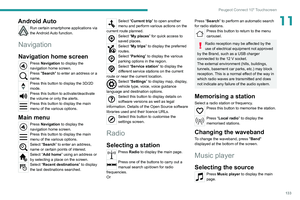 135
135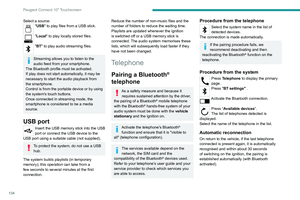 136
136 137
137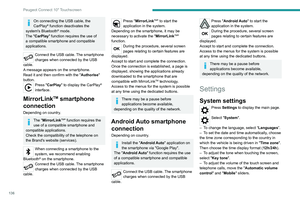 138
138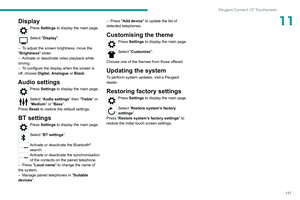 139
139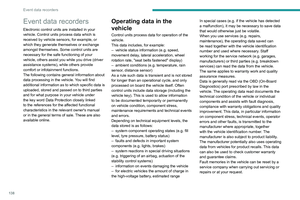 140
140 141
141 142
142 143
143 144
144 145
145 146
146 147
147 148
148 149
149 150
150 151
151 152
152 153
153 154
154 155
155 156
156 157
157 158
158 159
159 160
160 161
161 162
162 163
163