2022 NISSAN TITAN ECO mode
[x] Cancel search: ECO modePage 324 of 635
All other trademarks and their respective
logos cited herein are the property of their
respective owners.When installing a CB, ham radio or car
phone in your vehicle, be sure to observe
the following precautions; otherwise, the
new equipment may adversely affect the
engine control system and other electronic
parts.
WARNING
• A cellular phone should not be used
for any purpose while driving so full
attention may be given to vehicle op-
eration. Some jurisdictions prohibit
the use of cellular phones while
driving.
• If you must make a call while your
vehicle is in motion, the hands free
cellular phone operational mode (if
so equipped) is highly recom-
mended. Exercise extreme caution at
all times so full attention may be
given to vehicle operation.
• If you are unable to devote full atten-
tion to vehicle operation while talk-
ing on the phone, pull off the road to
a safe location and stop your vehicle.
CAUTION
• Keep the antenna as far away as pos-
sible from the electronic control
modules.
• Keep the antenna wire more than 8 in
(20 cm) away from the electronic
control system harnesses. Do not
route the antenna wire next to any
harness.
• Adjust the antenna standing-wave
ratio as recommended by the
manufacturer.
• Connect the ground wire from the CB
radio chassis to the body.
• For additional information, it is rec-
ommended that you visit a NISSAN
dealer for this service.
CAR PHONE OR CB RADIO
4-82Monitor, climate, audio, phone and voice recognition systems
Page 327 of 635
5 Starting and driving
Precautions when starting and driving..........5-4
Exhaust gas (carbon monoxide) ..............5-4
Three-way catalyst (if so equipped) ...........5-4
Tire Pressure Monitoring System
(TPMS) .......................................5-5
On-pavement and off-road driving
precautions ..................................5-8
Avoiding collision and rollover ................5-9
Off-roadrecovery ............................5-9
Rapid air pressure loss .......................5-9
Drinking alcohol/drugs and driving ..........5-10
Driving safety precautions ....................5-11
Push-button ignition switch ....................5-13
Operating range ............................ 5-14
Push-button ignition switch positions .......5-14
Emergency engine shut off ..................5-15
NISSAN Intelligent Key® battery
discharge ................................... 5-15
NISSAN Vehicle Immobilizer System .........5-16
Before starting the engine .....................5-16
Starting the engine ............................. 5-17
Remote Engine Start (if so equipped) ........5-18
Driving the vehicle .............................. 5-18
Engine protection mode ....................5-18
Automatic transmission (A/T) ...............5-19
Parking brake .................................. 5-23Traffic Sign Recognition (TSR) (if so equipped) . . . 5-24
System operation ........................... 5-25
Turning the Traffic Sign Recognition
(TSR) system on and off .....................5-26
System temporarily unavailable .............5-26
System malfunction ......................... 5-26
System maintenance .......................5-26
Lane Departure Warning (LDW) .................5-27
LDW system operation ......................5-28
How to enable/disable the LDW system .....5-29
LDW system limitations .....................5-30
System temporarily disabled ................5-31
System malfunction ......................... 5-31
System maintenance ....................... 5-31
Blind Spot Warning (BSW) .......................5-32
BSW system operation ......................5-34
How to enable/disable the BSW system .....5-34
BS
W system limitations .....................5-35
BSW driving situations .......................5-36
System temporarily disabled ................5-40
System maintenance ....................... 5-41
RearCrossTrafficAlert(RCTA) .................. 5-42
RCTA system operation .....................5-42
How to enable/disable the RCTA
system ...................................... 5-44
RCTA system limitations .....................5-45
Page 343 of 635
1. Apply the parking brake.
2. Move the shif t lever to P (Park) or N (Neu-tral). P (Park) is recommended.
The starter is designed not to operate
unless the shif t lever is in either P
(Park) or N (Neutral).
3. Push the ignition switch to the ON posi- tion. Depress the brake pedal and push
the ignition switch to start the engine.
To start the engine immediately, push
and release the ignition switch while de-
pressing the brake pedal with the igni-
tion switch in any position.
• If the engine is very hard to start in extremely cold weather or when re-
starting, depress the accelerator
pedal a little (approximately 1/3 to the
floor) and while holding, crank the en-
gine. Release the accelerator pedal
when the engine starts.
• If the engine is very hard to start be- cause it is flooded, depress the accel-
erator pedal all the way to the floor
and hold it. Push the ignition switch to
the ON position to start cranking the
engine. Af ter 5 or 6 seconds, stop
cranking by pushing the ignition
switch to the LOCK position. Af ter
cranking the engine, release the accel- erator pedal. Crank the engine with
your foot off the accelerator pedal by
depressing the brake pedal and push-
ing the ignition switch to start the en-
gine. If the engine starts, but fails to
run, repeat the above procedure.
CAUTION
Do not operate the starter for more
than 15 seconds at a time. If the engine
does not start, push the ignition switch
to the OFF position and wait 10 seconds
before cranking again, otherwise the
starter could be damaged.
4. Warm-up
Allow the engine to idle for at least 30
seconds af ter starting. Do not race the
engine while warming it up. Drive at a
moderate speed for a short distance
first, especially in cold weather. In cold
weather, keep the engine running for a
minimum of 2 to 3 minutes before shut-
ting it off. Starting and stopping the en-
gine over a short period of time may
make the vehicle more difficult to start.
5. To stop the engine, move the shif t lever to the P (Park) position and push the
ignition switch to the OFF position. In preparation for the next engine start, the
engine may have a slightly delayed shutoff
af ter placing the ignition switch in the OFF
position, depending on the driving
conditions.
NOTE:
Care should be taken to avoid situa-
tions that can lead to potential battery
discharge and potential no-start con-
ditions such as:
1. Installation or extended use of elec-
tronic accessories that consume bat-
tery power when the engine is not
running (phone chargers, GPS, DVD
players, etc.).
2. The vehicle is not driven regularly and/or only driven short distances.
In these cases, the battery may need to
be charged to maintain battery health.
STARTING THE ENGINE
Starting and driving5-17
Page 344 of 635
REMOTE ENGINE START (if so
equipped)
Vehicles started with the Remote Engine
Start require the ignition switch to be
placed in the ON position before the shif t
lever can be moved from the P (Park) posi-
tion. To place the ignition switch in the ON
position, follow these steps:
1. Make sure that the Intelligent Key is onyou.
2. Apply the brake.
3. Push the ignition switch once to the ON position.
For additional information, see “NISSAN In-
telligent Key®” (P. 3-2).
ENGINE PROTECTION MODE
The engine has an engine protection mode
to reduce the chance of damage if the
coolant temperature becomes too high
(for example, when climbing steep grades
in high temperatures with heavy loads,
such as when towing a trailer). When the
engine temperature reaches a certain
level:
• The engine coolant temperature gauge will move toward the H position.
• Engine power may be reduced.
• The air conditioning cooling function may be automatically turned off for a short
time (the blower will continue to operate).
Engine power and, under some conditions,
vehicle speed will decrease. Vehicle speed
can be controlled with the accelerator
pedal, but the vehicle may not accelerate at
the desired speed. The transmission will
downshif t or upshif t as it reaches pre-
scribed shif t points. You can also shif t
manually.
As driving conditions change and engine
coolant temperature is reduced, vehicle
speed can be increased using the accel-
erator pedal, and the air conditioning cool-
ing function will automatically be turned
back on. The Malfunction Indicator Light (MIL) may
also come on if the engine coolant tem-
perature is not reduced or the air condi-
tioning cooling function does not turn back
on. If
only it remains on, you do not need to
have your vehicle towed, but have it in-
spected soon. It is recommended that you
visit a NISSAN dealer for this service. For
additional information, see “Malfunction In-
dicator Light (MIL)” (P. 2-20).
WARNING
Overheating can result in reduced en-
gine power and vehicle speed. The re-
duced speed may be lower than other
traffic, which could increase the chance
of a collision. Be especially careful
when driving. If the vehicle cannot
maintain a safe driving speed, pull to
the side of the road in a safe area. Allow
the engine to cool and return to normal
operation. For additional information,
see “If your vehicle overheats” (P. 6-12).
DRIVING THE VEHICLE
5-18Starting and driving
Page 348 of 635
M6 (Sixth)
Use this position for all normal forward
driving at highway speeds.
M1↔M2 ↔M3 ↔M4 ↔M5 ↔M6
M6 will be displayed on the position indica-
tor in the meter
M5 (Fif th)
For driving up or down long slopes where
engine braking would be advantageous.
Shif t ranges up or down one by one as
follows:
M1 ↔M2 ↔M3 ↔M4 ↔M5
M5 will be displayed on the position indica-
tor in the meter.
M4 (Fourth)
Use for hill climbing or engine braking on
downhill grades.
Shif t ranges up or down one by one as
follows:
M1 ↔M2 ↔M3 ↔M4
M4 will be displayed on the position indica-
tor in the meter.
M3 (Third)
Use for hill climbing or engine braking on
downhill grades.
Shif t ranges up or down one by one as
follows:
M1 ↔M2 ↔M3
M3 will be displayed on the position indica-
tor in the meter.
M2 (Second)
Use for hill climbing or engine braking on
downhill grades.
Shif t ranges up or down one by one as
follows:
M1 ↔M2
M2 will be displayed on the position indica-
tor in the meter.
M1 (First)
Use this position when climbing steep hills
slowly or driving slowly through deep snow,
sand or mud, or for maximum engine brak-
ing on steep downhill grades.
M1 will be displayed on the position indica-
tor on the meter. • Remember not to drive at high speeds for
extended periods of time in lower than
M4 range. This reduces fuel economy.
When shif ting up
Push the shif t switch to the + (up) side.
(Shif ts to higher range.)
When shif ting down
Push the shif t switch to the − (down) side.
(Shif ts to lower range.)
• The transmission will automatically downshif t the gears. (For example, if you
select the 3rd range, the transmission will
shif t down between the 3rd and 1st
gears.)
• Pushing the shif t switch rapidly will shif t the ranges in succession.
When canceling the manual shif t mode
Press and hold the +(UP) button to return
the transmission to the normal driving
mode.
5-22Starting and driving
Page 349 of 635
•In the manual shif t mode, the trans-
mission may not shif t to the selected
gear immediately because of vehicle
speed. The transmission will upshif t or
downshif t when vehicle speed
matches the programmed transmis-
sion shif t points. This helps maintain
driving performance and reduces the
chance of vehicle damage or loss of
control.
• In the manual shif t mode, the trans-
mission will not upshif t to a higher
gear than is manually selected. When
the vehicle speed decreases, the trans-
mission automatically shif ts down and
shif ts to 1st gear before the vehicle
comes to a stop.
Accelerator downshif t
— in D (Drive) position —
For passing or hill climbing, depress the
accelerator pedal to the floor. This shif ts
the transmission down into a lower gear,
depending on the vehicle speed.
Fail-safe
When the fail-safe operation occurs, please
note that the transmission will be locked in
any of the forward gears according to the
condition.
If the vehicle is driven under extreme
conditions, such as excessive wheel
spinning and subsequent hard braking,
the fail-safe system may be activated.
This will occur even if all electrical cir-
cuits are functioning properly. In this
case, place the ignition switch in the OFF
position and wait for 3 seconds. Then
place the ignition switch back in the ON
position. The vehicle should return to its
normal operating condition. If it does not
return to its normal operating condition,
have the transmission checked and re-
paired, if necessary. It is recommended
that you visit a NISSAN dealer for this
service.
WARNING
• Be sure the parking brake is fully re-
leased before driving. Failure to do so
can cause brake failure and lead to
an accident.
• Do not release the parking brake
from outside the vehicle.
• Do not use the shif t lever in place of
the parking brake. When parking, be
sure the parking brake is fully
engaged.
• To help avoid risk of injury or death
through unintended operation of the
vehicle and/or its systems, do not
leave children, people who require
the assistance of others or pets unat-
tended in your vehicle. Additionally,
the temperature inside a closed ve-
hicle on a warm day can quickly be-
come high enough to cause a signifi-
cant risk of injury or death to people
and pets.
PARKING BRAKE
Starting and driving5-23
Page 384 of 635
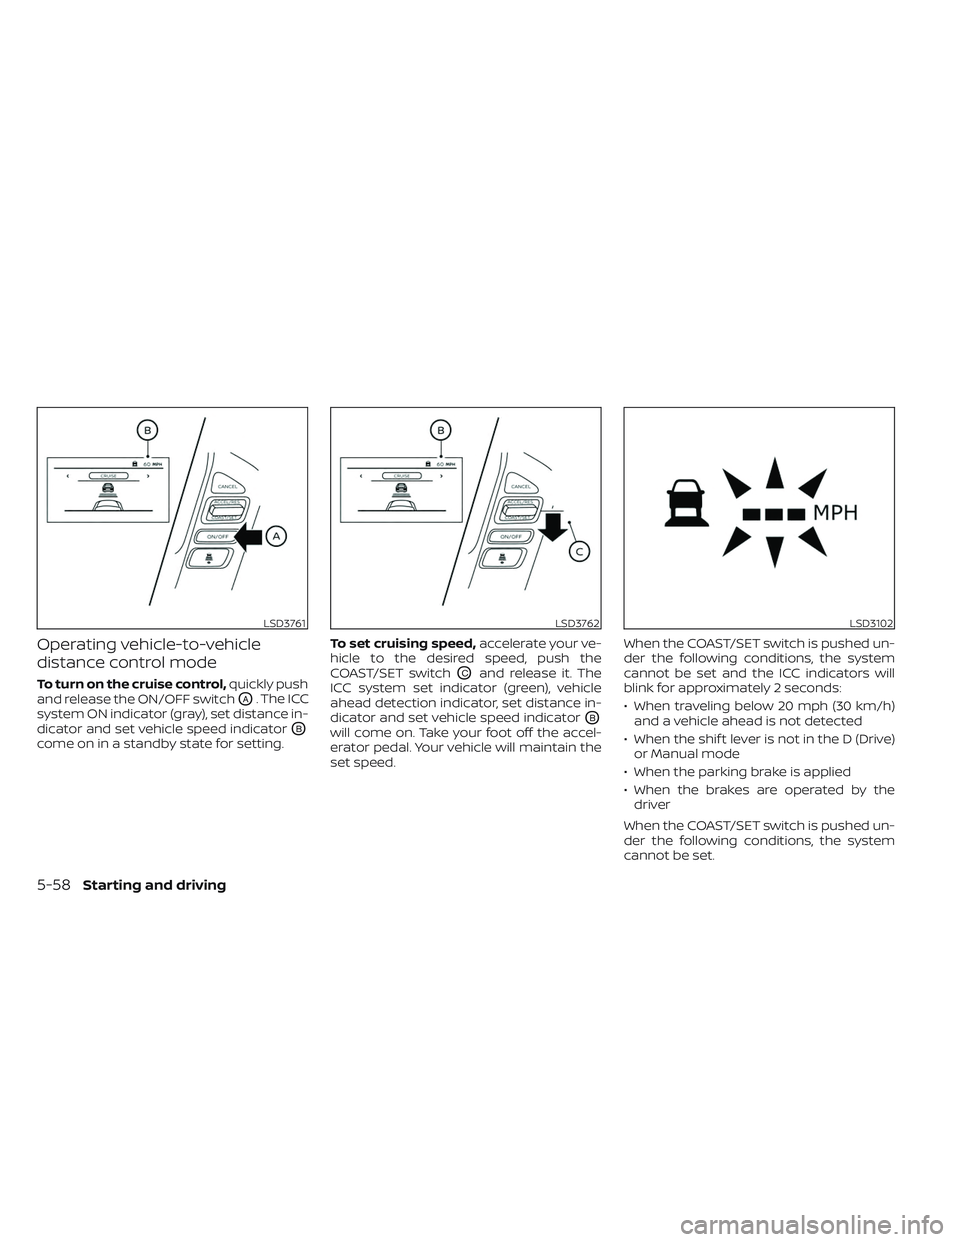
Operating vehicle-to-vehicle
distance control mode
To turn on the cruise control,quickly push
and release the ON/OFF switch
OA. The ICC
system ON indicator (gray), set distance in-
dicator and set vehicle speed indicator
OB
come on in a standby state for setting. To set cruising speed,
accelerate your ve-
hicle to the desired speed, push the
COAST/SET switch
OCand release it. The
ICC system set indicator (green), vehicle
ahead detection indicator, set distance in-
dicator and set vehicle speed indicator
OB
will come on. Take your foot off the accel-
erator pedal. Your vehicle will maintain the
set speed. When the COAST/SET switch is pushed un-
der the following conditions, the system
cannot be set and the ICC indicators will
blink for approximately 2 seconds:
• When traveling below 20 mph (30 km/h)
and a vehicle ahead is not detected
• When the shif t lever is not in the D (Drive) or Manual mode
• When the parking brake is applied
• When the brakes are operated by the driver
When the COAST/SET switch is pushed un-
der the following conditions, the system
cannot be set.
LSD3761LSD3762LSD3102
5-58Starting and driving
Page 388 of 635

Approach warning
If your vehicle comes closer to the vehicle
ahead due to rapid deceleration of that ve-
hicle or if another vehicle cuts in, the sys-
tem warns the driver with the chime and
ICC system display. Decelerate by depress-
ing the brake pedal to maintain a safe ve-
hicle distance if:
• The chime sounds.
• The vehicle ahead detection indicatorblinks.
The warning chime may not sound in
some cases when there is a short distance
between vehicles. Some examples are:
• When the vehicles are traveling at the same speed and the distance between
vehicles is not changing.
• When the vehicle ahead is traveling faster and the distance between vehicles is
increasing.
• When a vehicle cuts in near your vehicle.
The warning chime will not sound when:
• The vehicle approaches other vehicles that are parked or moving slowly.
• The accelerator pedal is depressed, over- riding the system.
NOTE:
The approach warning chime may sound
and the system display may blink when
the ICC sensor detects objects on the
side of the vehicle or on the side of the
road. This may cause the ICC system to
decelerate or accelerate the vehicle. The
ICC sensor may detect these objects
when the vehicle is driven on winding
roads, narrow roads, hilly roads, or when
entering or exiting a curve. In these
cases you will have to manually control
the proper distance ahead of your
vehicle.
Also, the sensor sensitivity can be affected
by vehicle operation (steering maneuver or
driving position in the lane) or traffic or ve-
hicle condition (for example, if a vehicle is
being driven with some damage).
Automatic cancellation
A chime sounds under the following condi-
tions and the control is automatically can-
celed:
• When the vehicle ahead is not detectedand your vehicle is traveling below the
speed of 15 mph (25 km/h)
• When the system judges the vehicle is at a standstill • When the shif t lever is not in the D (Drive)
position, Manual mode or L (Low) range.
• When the parking brake system is applied
• When the VDC system is turned off
• When VDC operates
• When distance measurement becomes impaired due to adhesion of dirt or ob-
struction to the sensor
• When a wheel slips
• When the radar signal is temporarily interrupted
VEHICLE-TO-VEHICLE DISTANCE
CONTROL MODE LIMITATIONS
WARNING
Listed below are the system limitations
for the ICC system. Failure to operate
the vehicle in accordance with these
system limitations could result in seri-
ous injury or death.
• The ICC system is primarily intended
for use on straight, dry, open roads
with light traffic. It is not advisable to
use the ICC system in city traffic or
congested areas.
5-62Starting and driving