Page 17 of 104
16
LS500_QG_U
When Driving
■Seat adjustment switches
Seat position adjustment
Seatback angle adjustment
Head restraint heigh t adjustment (if
equipped)
Seat cushion (front) angle adjustment
Vertical heig ht adjustment
Lumbar support adjustment
Seat cushion length adjustment (if
equipped)
■Center Display
1Press the seat switch.
2Using the Remote Touch pad, select “Driver Seat Adjustment” or “Passenger Seat
Adjustment”.
Front Seats
Adjustment procedure
A
B
C
D
E
F
G
Page 18 of 104

Shoulder bolster adjustment (if
equipped)
Lumbar support adjustment
Pelvic support adjustmen")
17
LS500_QG_U
3Select the button for the desired
adjustment.
Head restraint adjustment (if
equipped)
Shoulder bolster adjustment (if
equipped)
Lumbar support adjustment
Pelvic support adjustment
Seatback side bolster adjustment (if
equipped)
Seat cushion side bolster adjustment (if
equipped)
Hip support adjustment (if equipped)
4Perform adjustment usin g the displayed buttons.
The seat will move while a button is selected.
■Using the driver’s seat adjustment switches to adjust the front passenger’s seat
(front passenger mode)
The mode of the driver’s seat adjustment swit ches can be changed to adjust the front pas-
senger’s seat.
1Press the mode change button on the
driver’s side door.
The indicator will illuminate when
front passenger mode is selected.
2Using the seat adju stment switches on
the driver’s seat, adjust the front pas-
senger’s seat.
To cancel front passenger mode, press
the mode change button again.
Front passenger mode will be
canceled automatically if the driver’s
seat adjustment swit ches are not oper-
ated for approximately 30 seconds.
A
B
C
D
E
F
G
Operating the front passenger’s seat from the driver’s seat
A
Page 19 of 104

1Press the seat switch.
2Select the button for the desired operation.
“Full Front” of “Passenger”: Move")
18
LS500_QG_U
■Using the Center Display (vehicles with a foldable head restraint)
1Press the seat switch.
2Select the button for the desired operation.
“Full Front” of “Passenger”: Move the fr ont passenger’s seat forward and folds the
seatback and head restraint.
“Return” of “Passenger”: Move the front passenger’s seat rearward and the seatback
and head restraint to the upright position.
If the rear seat behind the front passenger’s seat is not in the upright position, it will move to
the upright position before the front passen ger’s seat moves to its upright position.
Vehicles with a rear seat entertainment system: If the front passenger’s seat is moved to the
upright position and then is selected agai n, the front passenger’s seat will move rear-
ward.
To stop the front passenger's seat while it is moving, select the or passenger’s seat
operation button or press the seat switch.
1Press the seat switch.
2Select “Return” of “Rear”.
The rear seat will move to the upright position.
Power Rear Seat (if equipped)
Returning the rear seat from the front seats
Page 20 of 104

19
LS500_QG_U
1Turn the engine switch to IGNITION ON mode.
2Check that the shift position is in P.
3Adjust the driver’s seat, steering wheel, outside rear view mirrors and head-up display
(if equipped) to the desired positions.
4While pressing the “SET” button, or
within 3 seconds after the “SET” button
is pressed, press button “1”, “2” or “3”
until the buzzer sounds.
If the selected button has already been
preset, the previously recorded posi-
tion will be overwritten.
When the driver’s seat adjustment
switches are in front passenger mode
( P.17), the position of the driver’s seat
cannot be registered.
To record the position of the front passenger’s seat, adjust the front passenger’s seat to the
desired position and perform step 4 using the buttons on th e front passenger’s side.
1Turn the engine switch to IGNITION ON mode.
2Check that the shift position is in P.
3Press one of the buttons for the driving
position you want to recall until the
buzzer sounds.
When the driver’s seat adjustment
switches are in front passenger mode
( P.17), a driving position cannot be
recalled.
Driving Position Memory
This feature automatically adjusts the positions of the front seats, steering wheel, outside
rear view mirrors and head-up display (if equipped) to make entering and exiting the vehi-
cle easier or to suit your preferences.
Up to 3 different driving positions can be recorded.
Recording a driving position into memory
Recalling a driving position
Page 21 of 104
20
LS500_QG_U
Each electronic key (including a card key) can be registered to recall your preferred driving
position.
■Registering procedure
Record your driving position to button “1”, “2” or “3” before performing the following:
Carry only the key you want to regist er, and then close the driver’s door.
If 2 or more keys are in the vehicle, the driving position cannot be recorded properly.
1Turn the engine switch to IGNITION ON mode.
2Check that the shift position is in P.
3Recall the driving position that you want to record.
4While pressing the recalled button,
press and hold the door lock switch
(either lock or unlock) until the buzzer
sounds.
If the button could not be registered,
the buzzer sounds continuously for
approximately 3 seconds.
Memory recall function (driver’s side only)
Page 22 of 104

21
LS500_QG_U
Camera indicator
Indicates that the camera is operating
normally.
Icon display area
Displays icons, adjusting gauge, etc.
Select button
Press to change the setting of the item
you want to adjust.
Menu button
Press to display the icon display area an d select the item you want to adjust.
Lever
Operate to change between digital mirror mode and optical mirror mode.
Operate the lever to change between digital mirror mode and optical mirror mode.
1Digital mirror mode
Displays an image of the area behind
the vehicle.
will illuminate in this mode.
2Optical mirror mode
Turns off the display of the Digital Rear-
view Mirror allows it to be used as an
optical mirror.
Digital Rearview Mirror (if equipped)
The Digital Rearview Mirror is a system that uses the camera on the rear of the vehicle
and displays its image on the disp lay of the Digital Rearview Mirror.
The Digital Rearview Mirror allows the driver to see the rear view despite obstructions,
such as the head restraints, lu ggage or rear sunshade ensuring rear visibility. Also, the rear
seats are not displayed and privacy of the passengers is enhanced.
System components
A
B
C
Changing modes
D
E
Page 23 of 104
22
LS500_QG_U
1Press the parking brake switch to check that the parking brake is set.
The parking brake indicator will come on.
2Firmly depress the brake pedal.
and a message will be displayed on the multi-information display.
If it is not displayed, th e engine cannot be started.
3Press the engine switch shortly and
firmly.
When operating the engine switch,
one short, firm press is enough. It is not
necessary to press an d hold the switch.
The engine will crank until it starts or
for up to 30 second s, whichever is less.
Continue depressing the brake pedal
until the engine is completely started.
The engine can be started from any
engine switch mode.
Engine (Ignition) Switch
Performing the following operations when carrying the electronic key on your person
starts the engine or changes engine switch modes.
Starting the engine
Page 24 of 104
23
LS500_QG_U
1Stop the vehicle completely.
2If the parking brake is in manual mode, set the parking brake.
3Press the P position switch. (P.25)
Check that the shift position indicator shows P and the parking brake indicator is illumi-
nated.
4Press the engine switch.
5Release the brake pedal and check that “ACCESSORY” or “IGNITION ON” is not
shown on the meter.
Modes can be changed by pressing the engine switch with the brake pedal released. (The
mode changes each time the switch is pressed.)
1Off
The emergency flashers can be used.
2ACCESSORY mode
Some electrical components such as
the audio system can be used.
“ACCESSORY” will be displayed on
the meter.
3IGNITION ON mode
All electrical components can be used.
“IGNITION ON” will be displayed on
the meter.
Stopping the engine
Changing engine switch modes
 1
1 2
2 3
3 4
4 5
5 6
6 7
7 8
8 9
9 10
10 11
11 12
12 13
13 14
14 15
15 16
16 17
17 18
18 19
19 20
20 21
21 22
22 23
23 24
24 25
25 26
26 27
27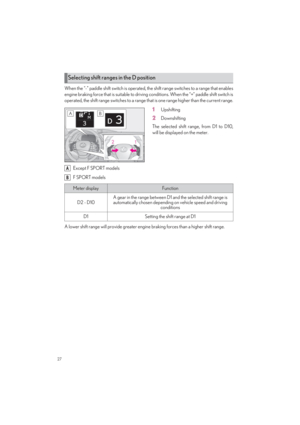 28
28 29
29 30
30 31
31 32
32 33
33 34
34 35
35 36
36 37
37 38
38 39
39 40
40 41
41 42
42 43
43 44
44 45
45 46
46 47
47 48
48 49
49 50
50 51
51 52
52 53
53 54
54 55
55 56
56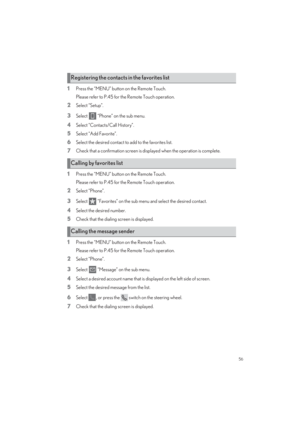 57
57 58
58 59
59 60
60 61
61 62
62 63
63 64
64 65
65 66
66 67
67 68
68 69
69 70
70 71
71 72
72 73
73 74
74 75
75 76
76 77
77 78
78 79
79 80
80 81
81 82
82 83
83 84
84 85
85 86
86 87
87 88
88 89
89 90
90 91
91 92
92 93
93 94
94 95
95 96
96 97
97 98
98 99
99 100
100 101
101 102
102 103
103
Seat cushion (front) angle adjustment
Ver")
 can be registered to recall your preferred driving
position.
■Registering procedure
Record your driving position to button “1”, “2”")


Check that the shift position indicator shows P an")