2022 KIA RIO ess
[x] Cancel search: essPage 372 of 528
What to do in an emergency
18
6
You may not be able to identify a low
tire by simply looking at it. Always
use a good quality tire pressure
gauge to measure the tire's inflation
pressure. Please note that a tire that
is hot (from being driven) will have a
higher pressure measurement than a
tire that is cold (from sitting station-
ary for at least 3 hours and driven
less than 1 mile (1.6 km) during that
3 hour period).
Allow the tire to cool before measur-
ing the inflation pressure. Always be
sure the tire is cold before inflating to
the recommended pressure.
A cold tire means the vehicle has
been sitting for 3 hours and driven for
less than 1 mile (1.6 km) in that 3
hour period.
Never use tire sealant if your vehicle
is equipped with a Tire Pressure
Monitoring System. The liquid
sealant can damage the tire pres-
sure sensors. The TPMS cannot alert you to
severe and sudden tire damage
caused by external factors such as
nails or road debris.
If you feel any vehicle instability, immediately take your foot off the
accelerator, apply the brakes grad-
ually and with light force, and slow-
ly move to a safe position off the
road.
✽ ✽ NOTICE - Protecting TPMS
Tampering with, modifying, or dis-
abling the Tire Pressure Monitoring
System (TPMS) components may
interfere with the system's ability to
warn the driver of low tire pressure
conditions and/or TPMS malfunc-
tions. Tampering with, modifying,
or disabling the Tire Pressure
Monitoring System (TPMS) compo-
nents may void the warranty for
that portion of the vehicle.
This device complies with Part 15
of the FCC rules.
Operation is subject to the following
two conditions:
1. This device may not cause harm-
ful interference, and
2. This device must accept any inter- ference received, including inter-
ference that may cause undesired
operation.
SC PE USA 6.qxp 8/23/2021 6:01 PM Page 18
Page 378 of 528

What to do in an emergency
24
6
10. To install the wheel, hold it on the
studs, put the wheel nuts on the
studs and tighten them finger
tight. Jiggle the tire to be sure it is
completely seated, then tighten
the nuts as much as possible
with your fingers again.
11. Lower the vehicle to the ground by turning the wheel nut wrench
counterclockwise. Then position the wrench as shown in
the drawing and tighten the wheel
nuts. Be sure the socket is seated
completely over the nut. Do not stand
on the wrench handle or use an exten-
sion pipe over the wrench handle.
Go around the wheel tightening every
nut following the numerical sequence
shown in the image until they are tight.
Then double-check each nut for tight-
ness. After changing the wheels, have
an authorized Kia dealer tighten the
wheel nuts to their proper torque as
soon as possible.
Wheel nut tightening torque:
Steel wheel & aluminium alloy wheel:
79 ~ 94 lbf·ft (11 ~ 13 kgf·m) If you have a tire gauge, remove the
valve cap and check the air pressure.
If the pressure is lower than recom-
mended, drive slowly to the nearest
service station and inflate to the cor-
rect pressure. If it is too high, adjust it
until it is correct. Always reinstall the
valve cap after checking or adjusting
the tire pressure. If the cap is not
replaced, air may leak from the tire. If
you lose a valve cap, buy another and
install it as soon as possible.
After you have changed wheels,
always secure the flat tire in its place
and return the jack and tools to their
proper storage locations.
WARNING- Installing a
wheel
Make sure the wheel makes
good contact with the hub when
installed. If the contact of the
mounting surface between the
wheel and hub is not good, the
wheel nuts could come loose
and cause the loss of a wheel.
Loss of a wheel may result in
loss of control of the vehicle.
OSC061050N
CAUTION
When replacing the tires, after driving for about 30 miles (50km), tighten the wheel nuts tocheck that there is no looseness.
Recheck and tighten the wheelnuts again after driving forabout 620 miles (1,000 km).
SC PE USA 6.qxp 8/23/2021 6:01 PM Page 24
Page 379 of 528
625
What to do in an emergency
Note that most lug nuts do not have
metric threads. Be sure to use
extreme care in checking for thread
style before installing aftermarket lug
nuts or wheels. If in doubt, consult an
authorized Kia dealer.To prevent the jack, jack handle,
wheel lug nut wrench and spare tire
from rattling while the vehicle is in
motion, store them properly.
Check the inflation pressures as
soon as possible after installing the
spare tire. Adjust it to the specified
pressure, if necessary. Refer to
“Tires and wheels” in chapter 7.
Important - use of compact spare
tire (if equipped)
Your vehicle is equipped with a com-
pact spare tire. This compact spare
tire takes up less space than a regu-
lar-size tire. This tire is smaller than a
conventional tire and is designed for
temporary use only.
You should drive carefully when the
compact spare is in use. The com-
pact spare should be replaced by the
proper conventional tire and rim at
the first opportunity.
The operation of this vehicle is not
recommended with more than one
compact spare tire in use at the
same time.
CAUTION- Replacing lug nuts
Make certain during wheelremoval that the same nuts thatwere removed are reinstalled -or, if replaced, that nuts withmetric threads and the samechamfer configuration are used.Your vehicle has metric threadson the wheel studs and nuts.Installation of a non-metricthread nut on a metric stud willnot secure the wheel to the hubproperly and will damage thestud so that it must be replaced.
WARNING- Wheel studs
Do not drive your vehicle with
damaged wheel studs. If the
studs are damaged, they may
lose their ability to retain the
wheel. This could lead to the
loss of the wheel and a collision.
SC PE USA 6.qxp 8/23/2021 6:01 PM Page 25
Page 380 of 528
What to do in an emergency
26
6
The compact spare should be inflat-
ed to 60 psi (420 kPa).
✽ ✽
NOTICE
Check the inflation pressure after
installing the spare tire. Adjust it to
the specified pressure, as necessary.
When using a compact spare tire,
observe the following precautions:
Under no circumstances should you
exceed 50 mph (80 km/h); a higher
speed could damage the tire.
Ensure that you drive slowly enough for the road conditions to avoid all
hazards. Any road hazard, such as a
pothole or debris, could seriously
damage the compact spare.
Any continuous road use of this tire could result in tire failure, loss of
vehicle control, and possible per-
sonal injury.
Do not exceed the vehicle’s maxi- mum load rating or the load-carry-
ing capacity shown on the sidewall
of the compact spare tire. Avoid driving over obstacles. The
compact spare tire diameter is
smaller than the diameter of a con-
ventional tire and reduces the
ground clearance approximately
1 inch (25 mm), which could result
in damage to the vehicle.
Do not take this vehicle through an automatic car wash while the com-
pact spare tire is installed.
Do not use tire chains on the com- pact spare tire. Because of the
smaller size, a tire chain will not fit
properly. This could damage the
vehicle and result in loss of the
chain.
The compact spare tire should not be installed on the front axle if the
vehicle must be driven in snow or
on ice.
WARNING- Spare tire
Do not operate your vehicle on
this compact spare at speeds
over 50 mph (80 km/h). The
compact spare tire is for emer-
gency use only. The original tire
should be repaired or replaced
as soon as possible to avoid
failure of the spare that may
possibly lead to bodily injury or
death.
SC PE USA 6.qxp 8/23/2021 6:01 PM Page 26
Page 382 of 528
What to do in an emergency
28
6
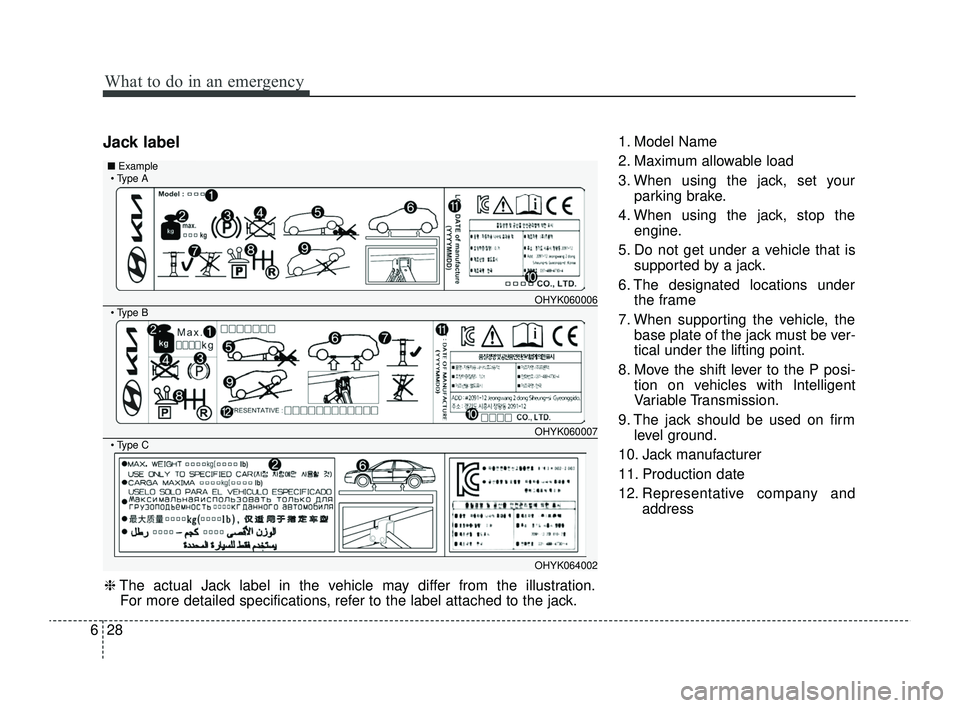
Jack label1. Model Name
2. Maximum allowable load
3. When using the jack, set your
parking brake.
4. When using the jack, stop the engine.
5. Do not get under a vehicle that is supported by a jack.
6. The designated locations under the frame
7. When supporting the vehicle, the base plate of the jack must be ver-
tical under the lifting point.
8. Move the shift lever to the P posi- tion on vehicles with Intelligent
Variable Transmission.
9. The jack should be used on firm level ground.
10. Jack manufacturer
11. Production date
12. Representative company and address
OHYK060006
OHYK060007
OHYK064002
Type A■Example
Type B
Type C
❈The actual Jack label in the vehicle may differ from the illustration.
For more detailed specifications, refer to the label attached to the jack.
SC PE USA 6.qxp 8/23/2021 6:02 PM Page 28
Page 383 of 528

629
What to do in an emergency
TOWING
Towing service
If emergency towing is necessary,
we recommend having it done by an
authorized Kia dealer or a commer-
cial tow-truck service. Proper lifting
and towing procedures are neces-
sary to prevent damage to the vehi-
cle. The use of wheel dollies or
flatbed is recommended.It is acceptable to tow the vehicle
with the rear wheels on the ground
(without dollies) and the front wheels
off the ground.
If any of the loaded wheels or sus-
pension components are damaged
or the vehicle is being towed with the
front wheels on the ground, use a
towing dolly under the front wheels.
When being towed by a commercial
tow truck and wheel dollies are not
used, the front of the vehicle should
always be lifted, not the rear.
OMC045012
dolly
WARNING- Side and cur-
tain air bag
If your vehicle is equipped with
side and curtain air bags, set
the ignition switch to the LOCK
or ACC position when the vehi-
cle is being towed. The side and
curtain air bag may deploy
when the ignition is in the ON
position and the rollover sensor
detects a rollover situation.
HXD02
HXD03
OSC071054N
SC PE USA 6.qxp 8/23/2021 6:02 PM Page 29
Page 384 of 528
What to do in an emergency
30
6
When towing your vehicle in an
emergency without wheel dollies :
1. Set the ignition switch in the ACC
position.
2. Place the transmission shift lever in N (Neutral).
3. Release the parking brake.Removable towing hook (front)
(if equipped)
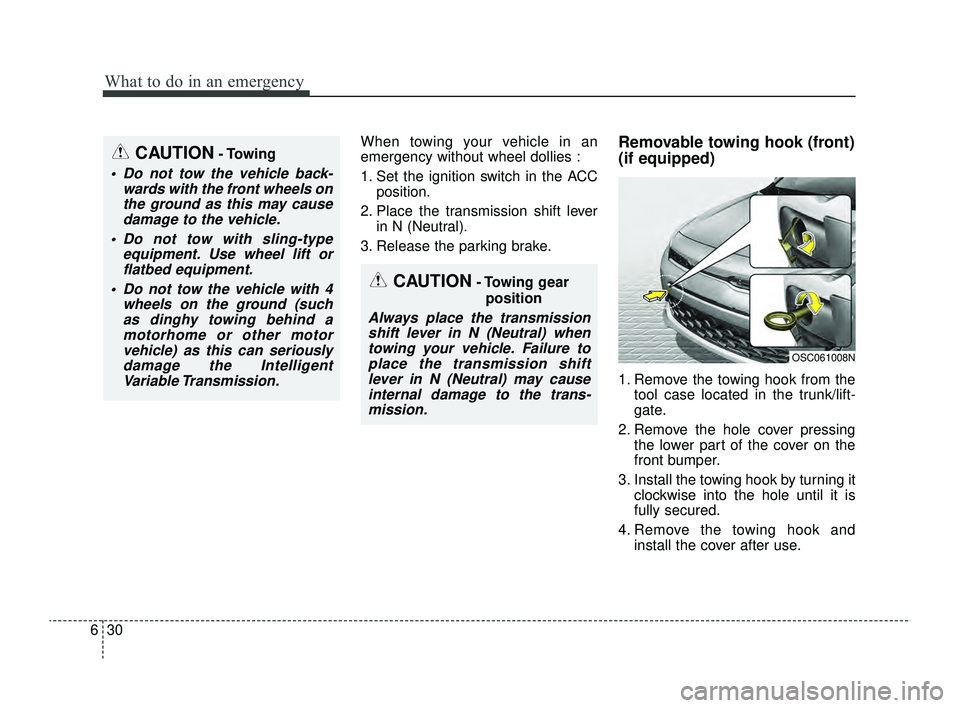
1. Remove the towing hook from the tool case located in the trunk/lift-
gate.
2. Remove the hole cover pressing the lower part of the cover on the
front bumper.
3. Install the towing hook by turning it clockwise into the hole until it is
fully secured.
4. Remove the towing hook and install the cover after use.
CAUTION- Towing gear
position
Always place the transmissionshift lever in N (Neutral) whentowing your vehicle. Failure toplace the transmission shiftlever in N (Neutral) may causeinternal damage to the trans-mission.
OSC061008N
CAUTION- Towing
Do not tow the vehicle back- wards with the front wheels onthe ground as this may causedamage to the vehicle.
Do not tow with sling-type equipment. Use wheel lift orflatbed equipment.
Do not tow the vehicle with 4 wheels on the ground (suchas dinghy towing behind amotorhome or other motorvehicle) as this can seriouslydamage the IntelligentVariable Transmission.
SC PE USA 6.qxp 8/23/2021 6:02 PM Page 30
Page 385 of 528
631
What to do in an emergency
Emergency towingIf towing is necessary, we recom-
mend you have it done by an
authorized Kia dealer or a com-
mercial tow truck service.
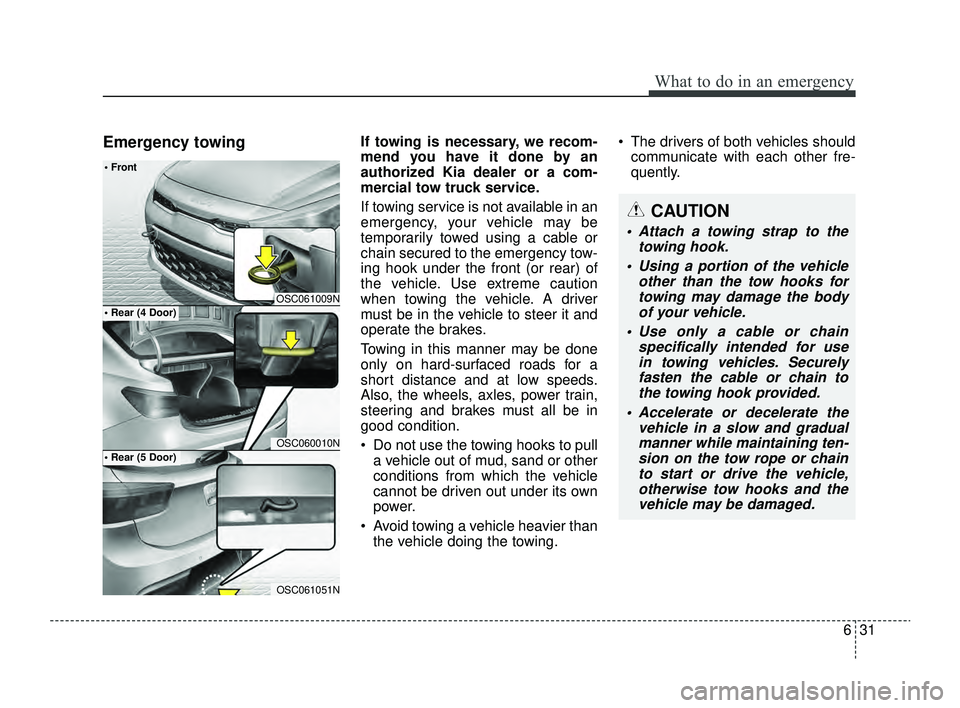
If towing service is not available in an
emergency, your vehicle may be
temporarily towed using a cable or
chain secured to the emergency tow-
ing hook under the front (or rear) of
the vehicle. Use extreme caution
when towing the vehicle. A driver
must be in the vehicle to steer it and
operate the brakes.
Towing in this manner may be done
only on hard-surfaced roads for a
short distance and at low speeds.
Also, the wheels, axles, power train,
steering and brakes must all be in
good condition.
Do not use the towing hooks to pulla vehicle out of mud, sand or other
conditions from which the vehicle
cannot be driven out under its own
power.
Avoid towing a vehicle heavier than the vehicle doing the towing. The drivers of both vehicles should
communicate with each other fre-
quently.
OSC061009N
OSC060010N
Front
Rear (4 Door)
OSC061051N
Rear (5 Door)
CAUTION
Attach a towing strap to the
towing hook.
Using a portion of the vehicle other than the tow hooks fortowing may damage the bodyof your vehicle.
Use only a cable or chain specifically intended for usein towing vehicles. Securelyfasten the cable or chain tothe towing hook provided.
Accelerate or decelerate the vehicle in a slow and gradualmanner while maintaining ten-sion on the tow rope or chainto start or drive the vehicle,otherwise tow hooks and thevehicle may be damaged.
SC PE USA 6.qxp 8/23/2021 6:02 PM Page 31