Page 49 of 66

•Defrost mode activates A /C and opens Fresh Air Vent to help dehumidify the air and improve Defroster per formance
•During Auto Operation, the A /C indicator will NOT illuminate The fan speed, air intake, air flow and air conditioning may automatically be engaged at any time to reach desired temperature and reduce humidit y
•Keep inside glass as clean as possible to reduce window fogging
QUICK TIPS
Your Automatic Climate Control system may differ from those in the illustration
Refer to section 4 in the Owner ’s Manual for more information
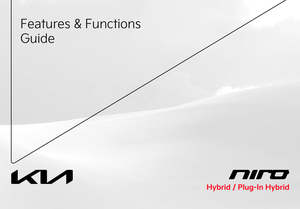
Automatic Climate Control
A Driver Only Fan Control
B Temperature Control knob
C Automatic Climate Control button
D Front Windshield Defroster
E Rear Windshield Defroster
F Air Conditioning On/Off button
G Recirculated Air button
H Mode Selection button
I Dual Temperature Control knob
J Dual Climate Control button (SYNC)
K Climate information screen selection button
L Fan Speed Control buttons
M System OFF button
Climate Control Auto Function
•Press AUTO to select Full Auto Operation The Auto setting automatically controls the air flow modes, fan speeds, air intake and air conditioning according to the temperature setting selected
•Set desired temperature
•Press SYNC to synchronize driver and passenger temperature control
REMINDERS:
•
Continuous use of the climate control system in the recirculated air position may allow humidit y to increase inside the vehicle which may fog the glass and obscure visibilit y
•
Pressing any but ton during AUTO operation will deactivate the AUTO function and switch to manual mode, except for Temperature Control
•
MA X A /C Mode automatically engages Recirculated Air
•
When in AUTO mode, Air Flow mode and Fan Speed do not display on the Climate Control Display
•
Cold or warm ambient air may flow in through vents if Recirculated Air but ton is not pressed ON (LED lit)
Auto Defogging System: Auto defogging is designed to reduce the fogging up of the inside of the windshield by automatically sensing the moisture of the inside of the windshield The system will automatically change to defrost mode when needed
Auto Defogging is set ON by default To cancel Auto Defogging, press and hold the Front Defrost button for three seconds when the ignition is on (the defrost button light will flash three times and the ADS OFF icon will illuminate) To turn Auto Defogging on again, press and hold the Front Defrost button again for three seconds and the defrost button light will flash six times and ADS OFF icon will turn off
Driver Only Ventilation: Driver Only Ventilation restricts air flow to the driver ’s side vents only This can help to optimize driving range by limiting the power drawn from the battery Press DRIVER ONLY button to enable air flow through the driver ’s side vents only
Defrost Outside and/or Inside Windshield:
•Set fan speed to the highest position
•Set temperature to Hot
•Press the Front Defrost button
Air Flow Modes: To select Air Flow Modes, press the Mode selection buttons:
47*IF EQUIPPEDALWAYS CHECK THE OWNER ’S MANUAL FOR COMPLETE OPER ATING INFORMATION AND SAFET Y WARNINGS
Refer to the inside front cover for more information on QR codes www youtube com/KiaFeatureVideos
Automatic Climate Control Operation Video
Auto Defogging System Video
QR CODE
E
MLK
FGH
Face-LevelFloor/Defrost-LevelFloor-LevelBi-Level
CENTER PANEL
CENTERPA N EL
B
A
C
D
I
J
Page 50 of 66
![KIA NIRO PHEV 2022 Features and Functions Guide P: Park
R: Reverse
N: Neutral
D: Drive (ECO Mode)
D: Drive, left gate (Sport Mode)
[+]: Manual Sport Mode Upshift
[–] : Manual Sport Mode Downshift
Manual / Sport Mode: To enter Manual / Sport Mod](/manual-img/2/54744/w960_54744-49.png "KIA NIRO PHEV 2022 Features and Functions Guide P: Park
R: Reverse
N: Neutral
D: Drive (ECO Mode)
D: Drive, left gate (Sport Mode)
[+]: Manual Sport Mode Upshift
[–] : Manual Sport Mode Downshift
Manual / Sport Mode: To enter Manual / Sport Mod")
P: Park
R: Reverse
N: Neutral
D: Drive (ECO Mode)
D: Drive, left gate (Sport Mode)
[+]: Manual Sport Mode Upshift
[–] : Manual Sport Mode Downshift
Manual / Sport Mode: To enter Manual / Sport Mode, move shift lever from D to left gate When in Manual / Sport Mode, if the shift lever is not moved up or down, then the vehicle will automatically shift gears To shift while in Manual / Sport mode, move shift lever up [+] to upshift or down [–] to downshift See page 10 for more information on the Drive Modes
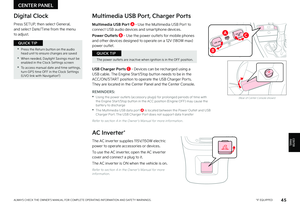
MANUAL / SPORT
ECO
Dual Clutch Transmission (DCT)
The Dual Clutch Transmission (DCT) gives the driving feel of a manual transmission, yet provides the ease of a fully automatic transmission
The following are unique driving tips for the Dual Clutch Transmission:
•To hold the vehicle stationary on an incline, the service brake or parking brake MUST be used or the gear shift MUST be in the (P) Park position If the vehicle is held stationary by applying the accelerator pedal on a slope, the clutch/transmission may overheat, resulting in damage
•
Avoid aggressive launches on steep grades as this may result in an overheated clutch and transmission
•
A slight time lag may be experienced at takeoff from standstill during aggressive acceleration maneuvers
•
If the clutch is overheating, the first warning, an amber-colored warning light , will be displayed in the instrument cluster When indicator turns red, reduce speed, pull over and place the vehicle in Park until it cools
Refer to the Owner ’s Manual for additional information on DCT operation or call Kia Consumer Affairs for additional information
REMINDER: When in Manual / Spor t mode, pulling the left and right paddle shifters at the same time will NOT shift gears
Paddle Shifters*
When gear shift is in ECO mode (D - Drive position), the paddle shifters control the regenerative braking level When in Manual Sport mode (left gate), the paddle shifters shift the gears
Pull the [+] or [-] paddle shifter once to shift up or down one gear
48*IF EQUIPPEDNIRO HYBRID / PLUG-IN HYBRID FEATURES & FUNCTIONS GUIDE
Refer to the inside front cover for more information on QR codes www youtube com/KiaFeatureVideos
Sportmatic® Shifting Video
Dual Clutch Transmission (DCT) Driving Experience Video
QR CODEAutomatic Gear Shift with Sportmatic® Shifting
CENTER PANEL
CENTERPA N EL
Page 51 of 66

•When leaving your keys with parking lot at tendants or valet, make sure to inform them how to operate the EPB
•If parked on a steep incline, pull up the EPB switch for more than 3 seconds for a firmer EPB application
•Pull up and hold EPB switch a second time to increase brake pressure if parked on a decline or incline
QUICK TIPS
Electric Parking Brake (EPB)*
AUTO
HOLD
� �-�P�D�B�U�F�E���P�O���$�F�O�U�F�S���1�B�O�F�M�
REMINDERS:
•
As a bulb check, the EPB malfunction indicator will illuminate for approximately 3 seconds when the ignition switch is turned ON
•
If the warning light does not illuminate temporarily, or continues to remain lit, take your vehicle to an authorized Kia dealer and have the system checked
•The EPB should not be operated while the vehicle is moving
•
A click or electric brake motor sound may be heard while operating or releasing the EPB, but these conditions are normal and indicate that the EPB is functioning properly
Image is for illustrative purposes only and may not reflect actual feature or operation
Auto Hold temporarily maintains the vehicle at a standstill even though the brake pedal is not depressed after the driver brings the vehicle to a complete stop by depressing the brake pedal Auto Hold can be turned On/Off using the AUTO HOLD button A on the center panel below the gear shift Before Auto Hold will operate, the driver ’s door, engine hood and liftgate must be closed, and the driver ’s seat belt must be fastened
The Auto Hold indicator on the Instrument Cluster has four states:
White: Standby – When vehicle is in Park and at a standstill, and AUTO HOLD button A is pressed On, the indicator will illuminate white While driving the vehicle (vehicle is not at a
standstill), the Auto Hold indicator will remain white
Green: Engaged – When coming to a complete stop by depressing the brake pedal, the Auto Hold indicator changes from white to green
Off (not illuminated) – The indicator will turn Off when the AUTO HOLD button A is manually pressed Off or when the EPB is manually turned On
Yellow: Malfunction – When the indicator is illuminated yellow, there may be a system malfunction Take your vehicle to a local Kia dealer
Auto Hold*
REMINDERS:
•
Auto Hold only operates when vehicle is in Drive, Reverse or Neutral
•
To reduce the risk of an accident, do not activate Auto Hold while driving downhill, backing up or parking your vehicle
•
Do not solely rely on the Auto Hold system to keep the vehicle stopped Always pay at tention to traf fic and road conditions, and be prepared to depress the brakes
Refer to section 5 in the Owner ’s Manual for more information
49*IF EQUIPPEDALWAYS CHECK THE OWNER ’S MANUAL FOR COMPLETE OPER ATING INFORMATION AND SAFET Y WARNINGS
Refer to the inside front cover for more information on QR codes www youtube com/KiaFeatureVideos
Electric Parking Brake Video
QR CODE
The Electric Parking Brake (EPB) system utilizes an electric motor to engage the parking brake
Applying the Parking Brake
Depress the brake pedal and pull up the EPB switch B
Ensure that the indicator light is illuminated on the instrument cluster
Releasing the Parking Brake
The EPB will automatically release when the brake pedal is engaged and shifter is shifted out of P (Park) to R (Reverse) or shifted out of N (Neutral) to Reverse or D (Drive)
To release EPB manually, depress the brake pedal, then press the EPB switch B down, with the ignition switch in the ON position Ensure that the indicator light is OFF
B
A
CENTER PANEL
CENTERPA N EL
Page 52 of 66

50†LEGAL DISCL AIMERS ON BACK INSIDE COVER | *IF EQUIPPEDNIRO HYBRID / PLUG-IN HYBRID FEATURES & FUNCTIONS GUIDE
•With the seat warmer switch in the ON position, the heating system in the seat turns OFF or ON automatically depending on the seat temperature
•System is OFF by default
QUICK TIPS
Orange Color: Warming
Blue Color: Ventilating
Seat Warmers†1 4 / Ventilated Seats*
REMINDER: Use extreme caution when using the seat warmers to avoid burns Refer to the Owner ’s Manual for more information
Refer to section 5 in the Owner ’s Manual for more information
A Seat Warmers
•Press the button up once for high setting (3 LEDs lit)
•Press the button twice for medium setting (2 LEDs lit)
•Press a third time for low setting (1 LED lit) and again to turn OFF
B Ventilated Seats
•Press the button down once for high setting (3 LEDs lit)
•Press twice for medium setting (2 LEDs lit)
•Press a third time for low setting (1 LED lit) and again to turn OFFRefer to the inside front cover for more information on QR codes www youtube com/KiaFeatureVideos
Seat Warmers/Ventilated Seats Video
QR CODE
CENTER PANEL
CENTERPA N EL
B
A
Page 53 of 66

51†LEGAL DISCL AIMERS ON BACK INSIDE COVER | *IF EQUIPPEDALWAYS CHECK THE OWNER ’S MANUAL FOR COMPLETE OPER ATING INFORMATION AND SAFET Y WARNINGS
For easy adjustments, hold a headrest post with one hand while using the other hand to pull the headrest from underneath
QUICK TIP
Driver Position Memory System*†1 2
To store a seating position into memory, first place the shifter into P (Park) while the ignition switch is ON Then:
1 Adjust the driver ’s seat
2 Press the SET button A on the control panel System will beep once
3 Press one of the memory buttons B within 5 seconds The system will beep twice when memory has been stored
4 “Driver (1 or 2) set is memorized” will appear on the instrument cluster LCD screen
Do not at tempt to operate the driver position memor y system while the vehicle is moving This could result in a loss of control of the vehicle
Front Seat Headrest Adjustment†12
•To raise headrest: Pull headrest up
•To lower headrest: Press lock C, then press the headrest down
SET
1
2
Do not operate the vehicle with the headrests removed Headrests can provide critical neck and head suppor t in an accident
Check rear seats
: Alarm OffOK
Rear Occupant Alert (ROA)
with Door Monitoring
The Rear Occupant Alert (ROA) with Door Monitoring can help alert the driver when a rear passenger may be left in the vehicle
The alert will be a message on the Instrument Cluster stating to “Check rear seats” D and a chime will sound
The factory default is set to OFF To turn the system ON or OFF, go to User Settings in the Instrument cluster or Vehicle Settings*, on the audio head unit select
Convenience, then Rear Occupant Alert and check/uncheck the box
REMINDER: Always be sure to check the passenger areas before leaving the vehicle
Rear Occupant Aler t is not a substitute for one’s at tention and may not detect all movement within the vehicle Always check the vehicle interior when exiting the vehicle
See section 4 in the Owner ’s Manual for more information
Image is for illustrative purposes only and may not reflect actual feature or operation
Refer to the inside front cover for more information on QR codes www youtube com/KiaFeatureVideos
Rear Occupant Alert (ROA) with Door Monitoring Video
QR CODE
C
SEATING
S E AT I N G
BA
D
Page 54 of 66

52†LEGAL DISCL AIMERS ON BACK INSIDE COVER | *IF EQUIPPEDNIRO HYBRID / PLUG-IN HYBRID FEATURES & FUNCTIONS GUIDE
SeatbackLumbarSeatSeat Cushion
6-Way Manual Adjustable
Driver’s Seat*†1 2
Pull lever D to slide Seat forward/backward
Pull/press lever E up/down one or more times to adjust Seat height
Pull lever F to adjust Seatback recline
Power Adjustable Driver’s Seat*†1 2
Move/Press controls to adjust Seat forward/backward, Seat Cushion tilt up/down, Seatback forward/backward or Lumbar forward/backward
REMINDER: Do not at tempt to adjust the seat while the vehicle is moving This could result in loss of control of the vehicle
Do not at tempt to adjust the seat while the vehicle is moving This could result in loss of control of the vehicle
Refer to section 3 in the Owner ’s Manual for more information
Refer to the inside front cover for more information on QR codes www youtube com/KiaFeatureVideos
Manual Adjustable Driver’s Seat Video
QR CODE
A
A A CF
D
E
SEATING
S E AT I N G
When adjusting seat for ward or backward, ensure seat clicks or locks into place before driving vehicle
QUICK TIP
B
B
C
Page 55 of 66

53*IF EQUIPPEDALWAYS CHECK THE OWNER ’S MANUAL FOR COMPLETE OPER ATING INFORMATION AND SAFET Y WARNINGS
•It may be necessar y to adjust the front seatbacks to fully lower rear seats
•Ensure the seat is locked by pressing down on Seatback and ensuring red line is NOT visible on bot tom of Folder Lever
QUICK TIPS
Folding Rear Seats
To Fold:
1 Ensure the belt strap is out of way of the Seatback folding A Insert the metal seat belt tab into the holder B
2 Adjust the Front Seatback to the upright position and lower the rear headrest to the lowest position
3 Pull on the Rear Seatback lock release lever C, then fold the seat toward the front
To Unfold:
1 Pull the lock release lever C and pull and lift the Seatback backward until it clicks firmly in place
2 Return the rear seat belt to the proper position
REMINDERS:
•
Before unfolding Seatback, ensure the metal seat belt tab is placed into the holder
•
Always make sure the seatback is locked in place when unfoldedFor illustration purposes only Actual vehicle might be slightly different Refer to section 3 in the Owner ’s Manual for more information
C
SEATING
S E AT I N G
B
A
Page 56 of 66
54*IF EQUIPPEDNIRO HYBRID / PLUG-IN HYBRID FEATURES & FUNCTIONS GUIDE
HOLD
HOLD
HOLDHOLD
Remote Keyless Entry (Folding Key)*
Remote but ton configuration may var y depending on vehicle options To turn OFF Alarm, press any but ton
Refer to section 4 in the Owner ’s Manual for more information
Refer to the inside front cover for more information on QR codes www youtube com/KiaFeatureVideos
Kia Smart & Folding Key Fobs Video
QR CODE
A Press the release button to unfold the key
B Press to lock All doors; Press twice within two seconds to sound the horn
C Press to unlock Driver ’s Door; Press twice in 4 seconds to unlock All Doors and Liftgate
D Press and hold for more than 1 second to unlock Liftgate Then lift by the handle to manually open Liftgate
E Press and hold more than a half second for Panic Alarm To turn off Alarm, press any button
OTHER KEY FEATURES
OTHER KEY F E AT U R E S
B
C
D
E
A


*
Remote but ton configuration may var y depending on vehicle options To tu")