2022 HYUNDAI TUCSON reverse
[x] Cancel search: reversePage 23 of 638
02
2-11
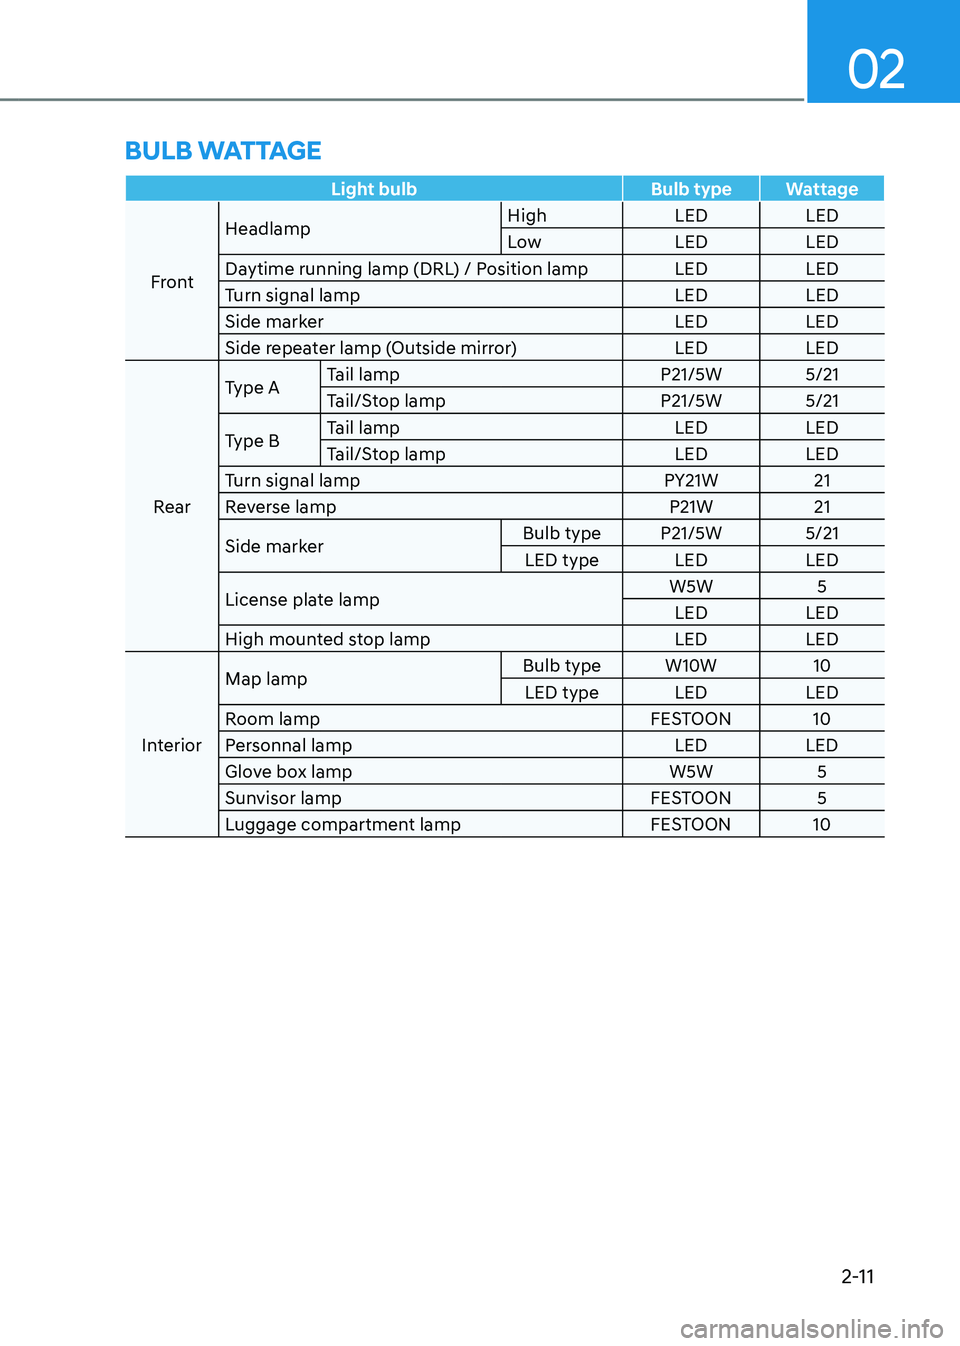
Light bulbBulb typeWattage
Front Headlamp
High
LEDLED
Low LEDLED
Daytime running lamp (DRL) / Position lamp LEDLED
Turn signal lamp LEDLED
Side marker LEDLED
Side repeater lamp (Outside mirror) LEDLED
Rear Type A
Tail lamp
P21/5W5/21
Tail/Stop lamp P21/5W5/21
Type B Tail lamp
LEDLED
Tail/Stop lamp LEDLED
Turn signal lamp PY21W21
Reverse lamp P21W21
Side marker Bulb type
P21/5W 5/21
LED type LEDLED
License plate lamp W5W
5
LED LED
High mounted stop lamp LEDLED
Interior Map lamp
Bulb type
W10W 10
LED type LEDLED
Room lamp FESTOON10
Personnal lamp LEDLED
Glove box lamp W5W5
Sunvisor lamp FESTOON5
Luggage compartment lamp FESTOON10
BULB WATTAGE
Page 45 of 638
Seats & Safety System
3-14
Head Restraints
The vehicle’s front and rear (second row
and/or third row) seats have adjustable
head restraints. The head restraints
provide comfort for passengers, but
more importantly they are designed to
help protect passengers from whiplash
and other neck and spinal injuries during
an accident, especially in a rear impact
collision.
WARNING
To reduce the risk of serious injury or
death in an accident, take the following
precautions when adjusting your head
restraints:
• Always properly adjust the head
restraints for all passengers BEFORE
starting the vehicle.
• NEVER let anyone ride in a seat
with the head restraints removed or
reversed.
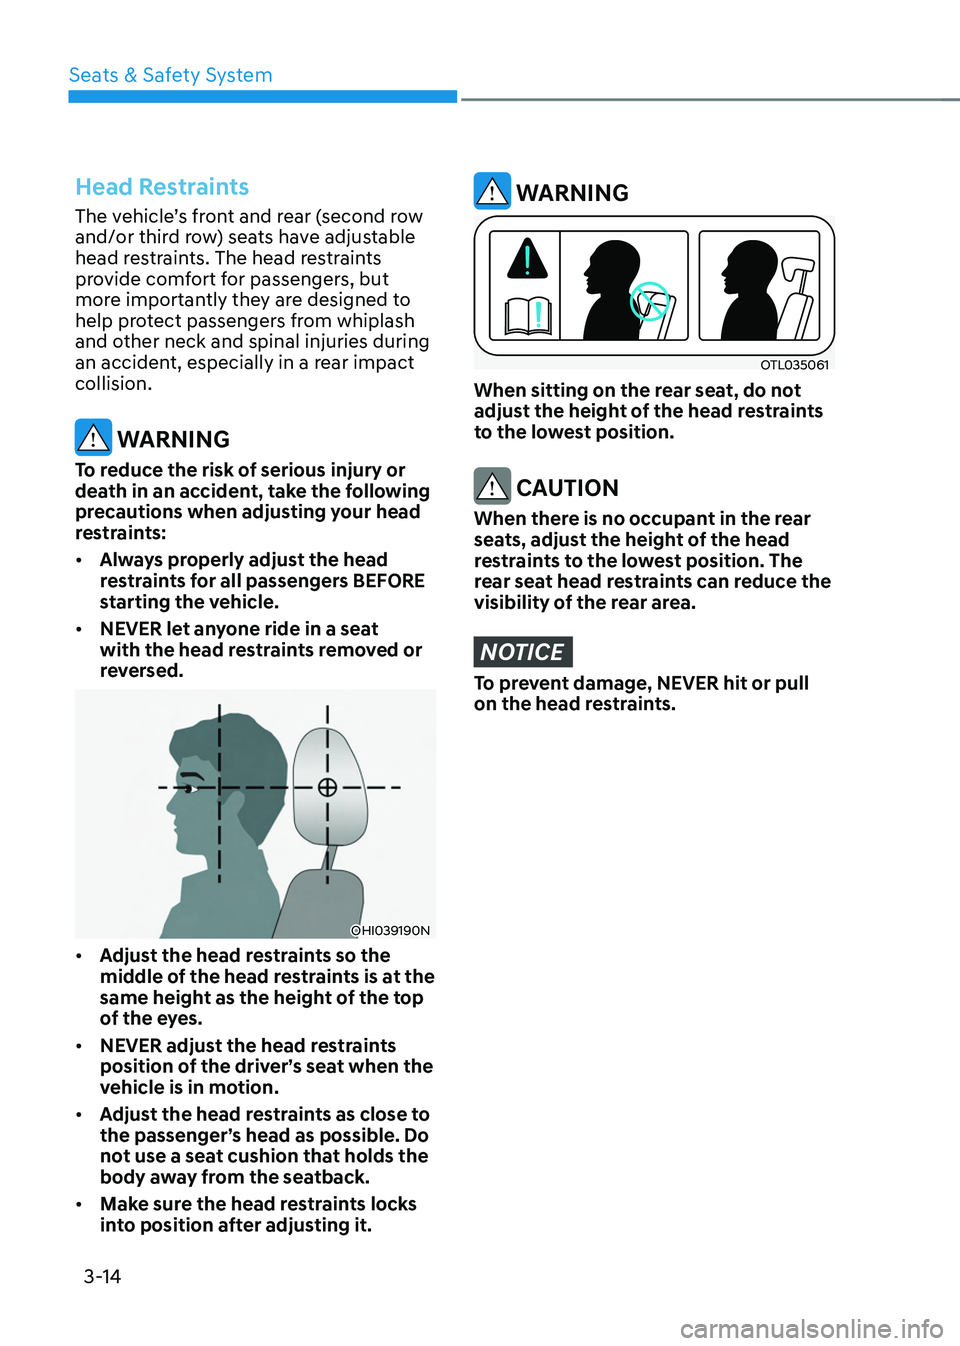
OHI039190N
• Adjust the head restraints so the
middle of the head restraints is at the
same height as the height of the top
of the eyes.
• NEVER adjust the head restraints
position of the driver’s seat when the
vehicle is in motion.
• Adjust the head restraints as close to
the passenger’s head as possible. Do
not use a seat cushion that holds the
body away from the seatback.
• Make sure the head restraints locks
into position after adjusting it.
WARNING
OTL035061
When sitting on the rear seat, do not
adjust the height of the head restraints
to the lowest position.
CAUTION
When there is no occupant in the rear
seats, adjust the height of the head
restraints to the lowest position. The
rear seat head restraints can reduce the
visibility of the rear area.
NOTICE
To prevent damage, NEVER hit or pull
on the head restraints.
Page 133 of 638
04
4-35
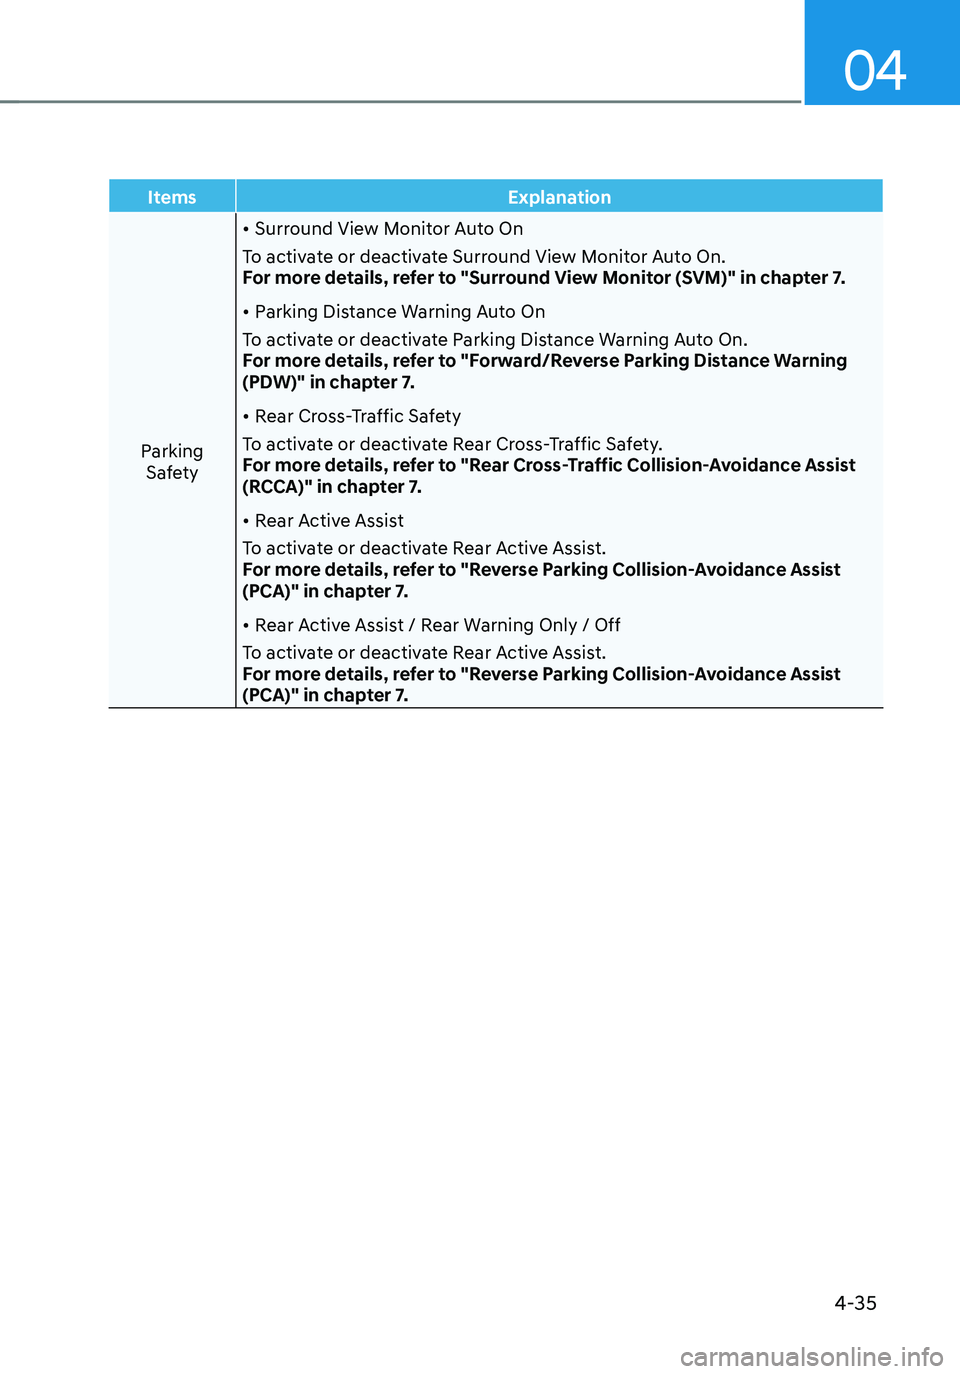
ItemsExplanation
Parking Safety
• Surround View Monitor Auto On
To activate or deactivate Surround View Monitor Auto On.
For more details, refer to "Surround View Monitor (SVM)" in chapter 7.
• Parking Distance Warning Auto On
To activate or deactivate Parking Distance Warning Auto On.
For more details, refer to "Forward/Reverse Parking Distance Warning
(PDW)" in chapter 7.
• Rear Cross-Traffic Safety
To activate or deactivate Rear Cross-Traffic Safety.
For more details, refer to "Rear Cross-Traffic Collision-Avoidance Assist
(RCCA)" in chapter 7.
• Rear Active Assist
To activate or deactivate Rear Active Assist.
For more details, refer to "Reverse Parking Collision-Avoidance Assist
(PCA)" in chapter 7.
• Rear Active Assist / Rear Warning Only / Off
To activate or deactivate Rear Active Assist.
For more details, refer to "Reverse Parking Collision-Avoidance Assist
(PCA)" in chapter 7.
Page 136 of 638
Instrument cluster
4-38
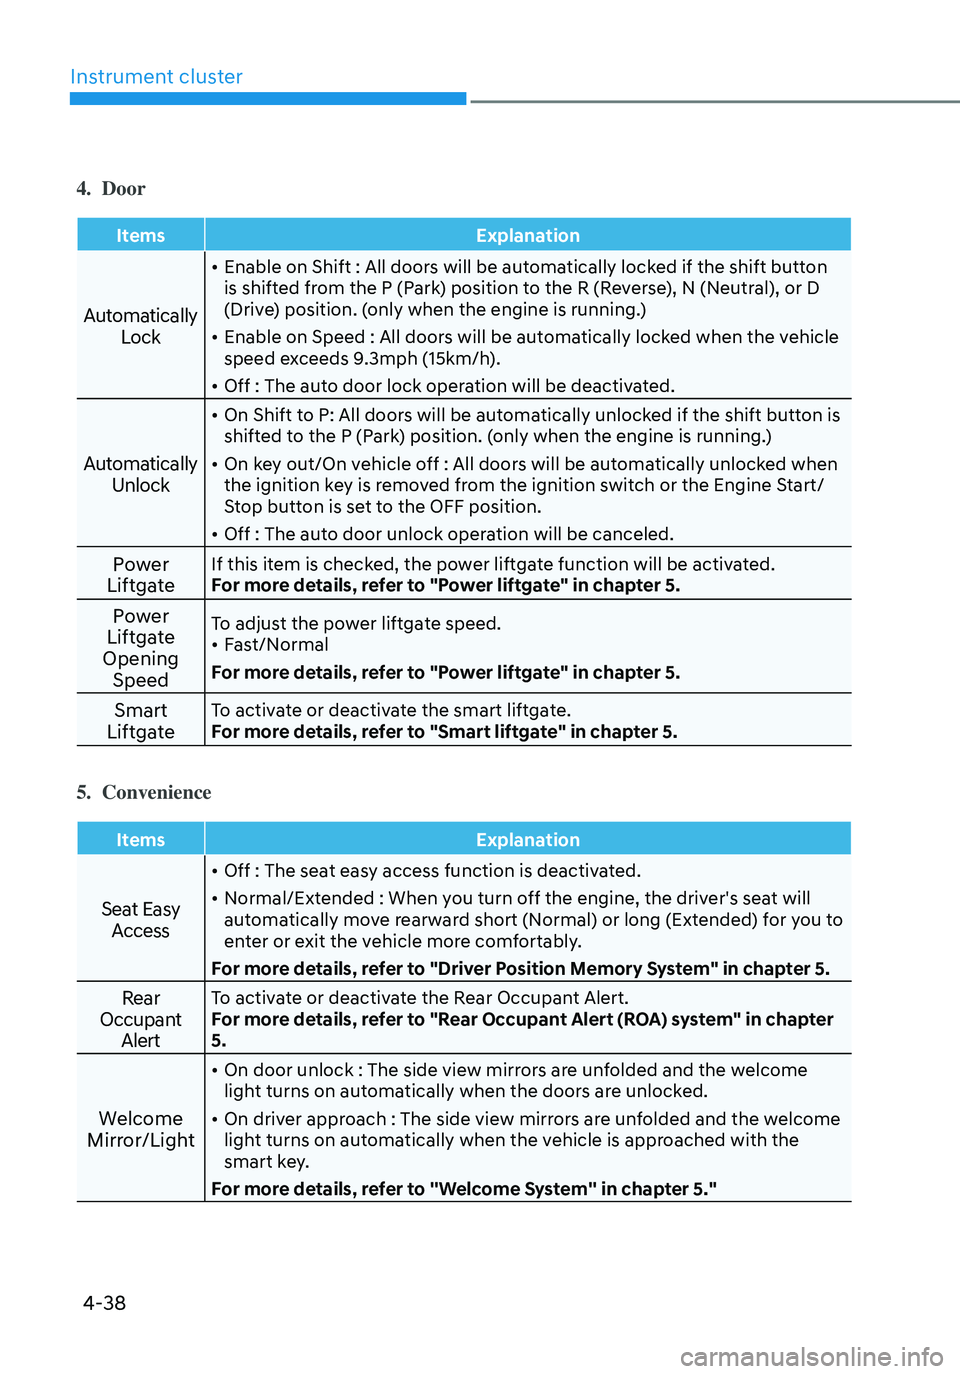
4. Door
ItemsExplanation
Automatically
Lock
• Enable on Shift : All doors will be automatically locked if the shift button
is shifted from the P (Park) position to the R (Reverse), N (Neutral), or D
(Drive) position. (only when the engine is running.)
• Enable on Speed : All doors will be automatically locked when the vehicle
speed exceeds 9.3mph (15km/h).
• Off : The auto door lock operation will be deactivated.
Automatically Unlock
• On Shift to P: All doors will be automatically unlocked if the shift button is
shifted to the P (Park) position. (only when the engine is running.)
• On key out/On vehicle off : All doors will be automatically unlocked when
the ignition key is removed from the ignition switch or the Engine Start/
Stop button is set to the OFF position.
• Off : The auto door unlock operation will be canceled.
Power
LiftgateIf this item is checked, the power liftgate function will be activated.
For more details, refer to "Power liftgate" in chapter 5.
Power
Liftgate
Opening SpeedTo adjust the power liftgate speed.• Fast/Normal
For more details, refer to "Power liftgate" in chapter 5.
Smart
LiftgateTo activate or deactivate the smart liftgate.
For more details, refer to "Smart liftgate" in chapter 5.
5. Convenience
Items Explanation
Seat Easy
Access
• Off : The seat easy access function is deactivated.
• Normal/Extended : When you turn off the engine, the driver's seat will
automatically move rearward short (Normal) or long (Extended) for you to
enter or exit the vehicle more comfortably.
For more details, refer to "Driver Position Memory System" in chapter 5.
Rear
Occupant AlertTo activate or deactivate the Rear Occupant Alert.
For more details, refer to "Rear Occupant Alert (ROA) system" in chapter
5.
Welcome
Mirror/Light
• On door unlock : The side view mirrors are unfolded and the welcome
light turns on automatically when the doors are unlocked.
• On driver approach : The side view mirrors are unfolded and the welcome
light turns on automatically when the vehicle is approached with the
smart key.
For more details, refer to ''Welcome System'' in chapter 5."
Page 188 of 638
Convenient features
5-44
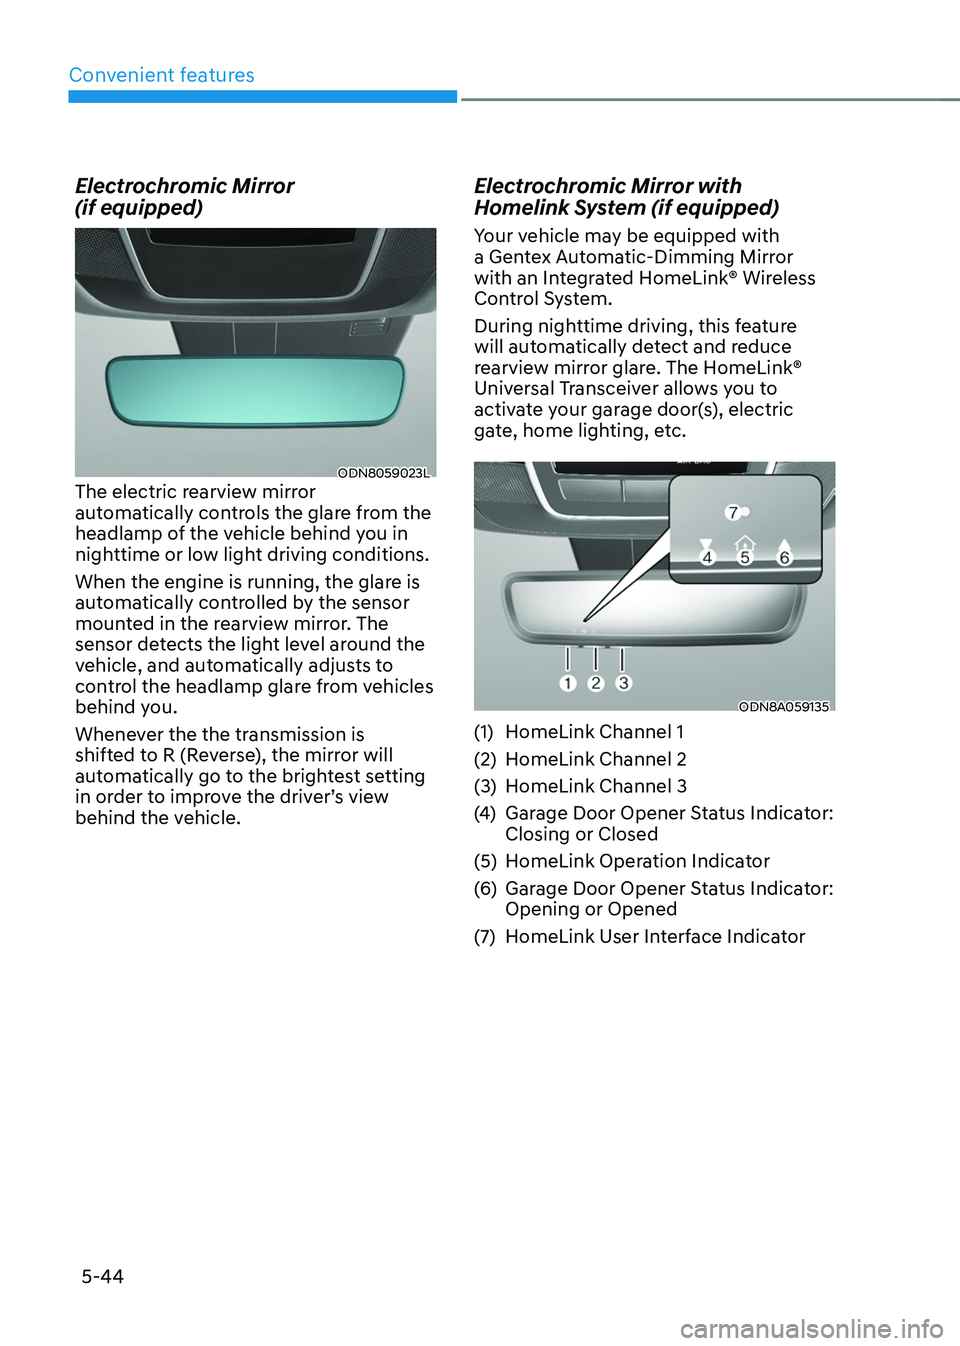
Electrochromic Mirror
(if equipped)
ODN8059023LThe electric rearview mirror
automatically controls the glare from the
headlamp of the vehicle behind you in
nighttime or low light driving conditions.
When the engine is running, the glare is
automatically controlled by the sensor
mounted in the rearview mirror. The
sensor detects the light level around the
vehicle, and automatically adjusts to
control the headlamp glare from vehicles
behind you.
Whenever the the transmission is
shifted to R (Reverse), the mirror will
automatically go to the brightest setting
in order to improve the driver’s view
behind the vehicle.
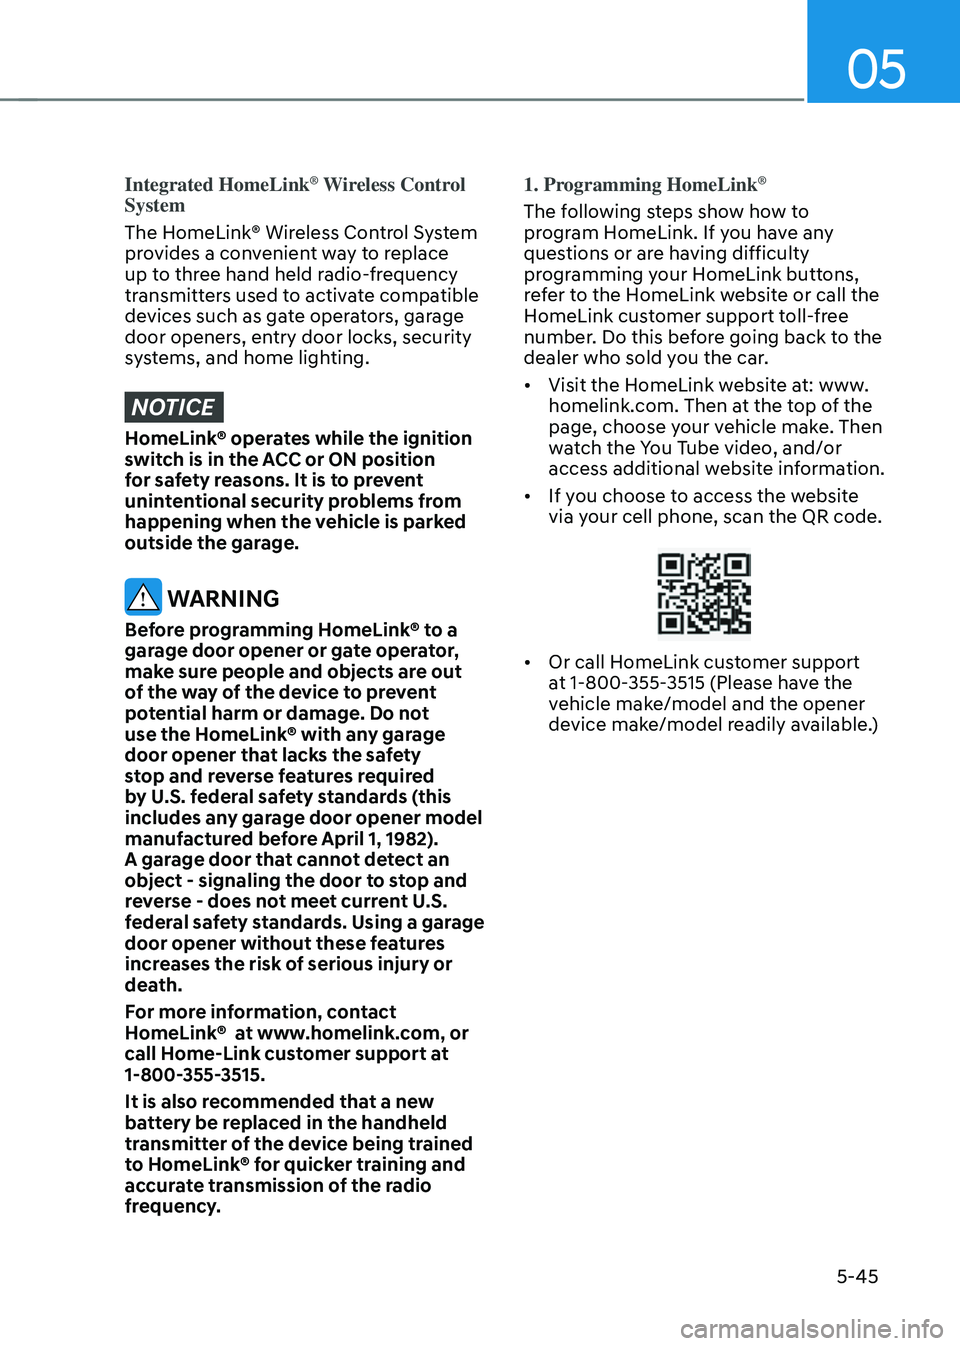
Electrochromic Mirror with
Homelink System (if equipped)
Your vehicle may be equipped with
a Gentex Automatic-Dimming Mirror
with an Integrated HomeLink® Wireless
Control System.
During nighttime driving, this feature
will automatically detect and reduce
rearview mirror glare. The HomeLink®
Universal Transceiver allows you to
activate your garage door(s), electric
gate, home lighting, etc.
ODN8A059135
(1) HomeLink Channel 1
(2) HomeLink Channel 2
(3) HomeLink Channel 3
(4) Garage Door Opener Status Indicator:
Closing or Closed
(5) HomeLink Operation Indicator
(6) Garage Door Opener Status Indicator:
Opening or Opened
(7) HomeLink User Interface Indicator
Page 189 of 638
05
5-45
Integrated HomeLink® Wireless Control
System
The HomeLink® Wireless Control System
provides a convenient way to replace
up to three hand held radio-frequency
transmitters used to activate compatible
devices such as gate operators, garage
door openers, entry door locks, security
systems, and home lighting.
NOTICE
HomeLink® operates while the ignition
switch is in the ACC or ON position
for safety reasons. It is to prevent
unintentional security problems from
happening when the vehicle is parked
outside the garage.
WARNING
Before programming HomeLink® to a
garage door opener or gate operator,
make sure people and objects are out
of the way of the device to prevent
potential harm or damage. Do not
use the HomeLink® with any garage
door opener that lacks the safety
stop and reverse features required
by U.S. federal safety standards (this
includes any garage door opener model
manufactured before April 1, 1982).
A garage door that cannot detect an
object - signaling the door to stop and
reverse - does not meet current U.S.
federal safety standards. Using a garage
door opener without these features
increases the risk of serious injury or
death.
For more information, contact
HomeLink® at www.homelink.com, or
call Home-Link customer support at
1-800-355-3515.
It is also recommended that a new
battery be replaced in the handheld
transmitter of the device being trained
to HomeLink® for quicker training and
accurate transmission of the radio
frequency. 1. Programming HomeLink
®
The following steps show how to
program HomeLink. If you have any
questions or are having difficulty
programming your HomeLink buttons,
refer to the HomeLink website or call the
HomeLink customer support toll-free
number. Do this before going back to the
dealer who sold you the car.
•
Visit the HomeLink website at: www.
homelink.com. Then at the top of the
page, choose your vehicle make. Then
watch the You Tube video, and/or
access additional website information.
• If you choose to access the website
via your cell phone, scan the QR code.
• Or call HomeLink customer support
at 1-800-355-3515 (Please have the
vehicle make/model and the opener
device make/model readily available.)
Page 201 of 638
05
5-57
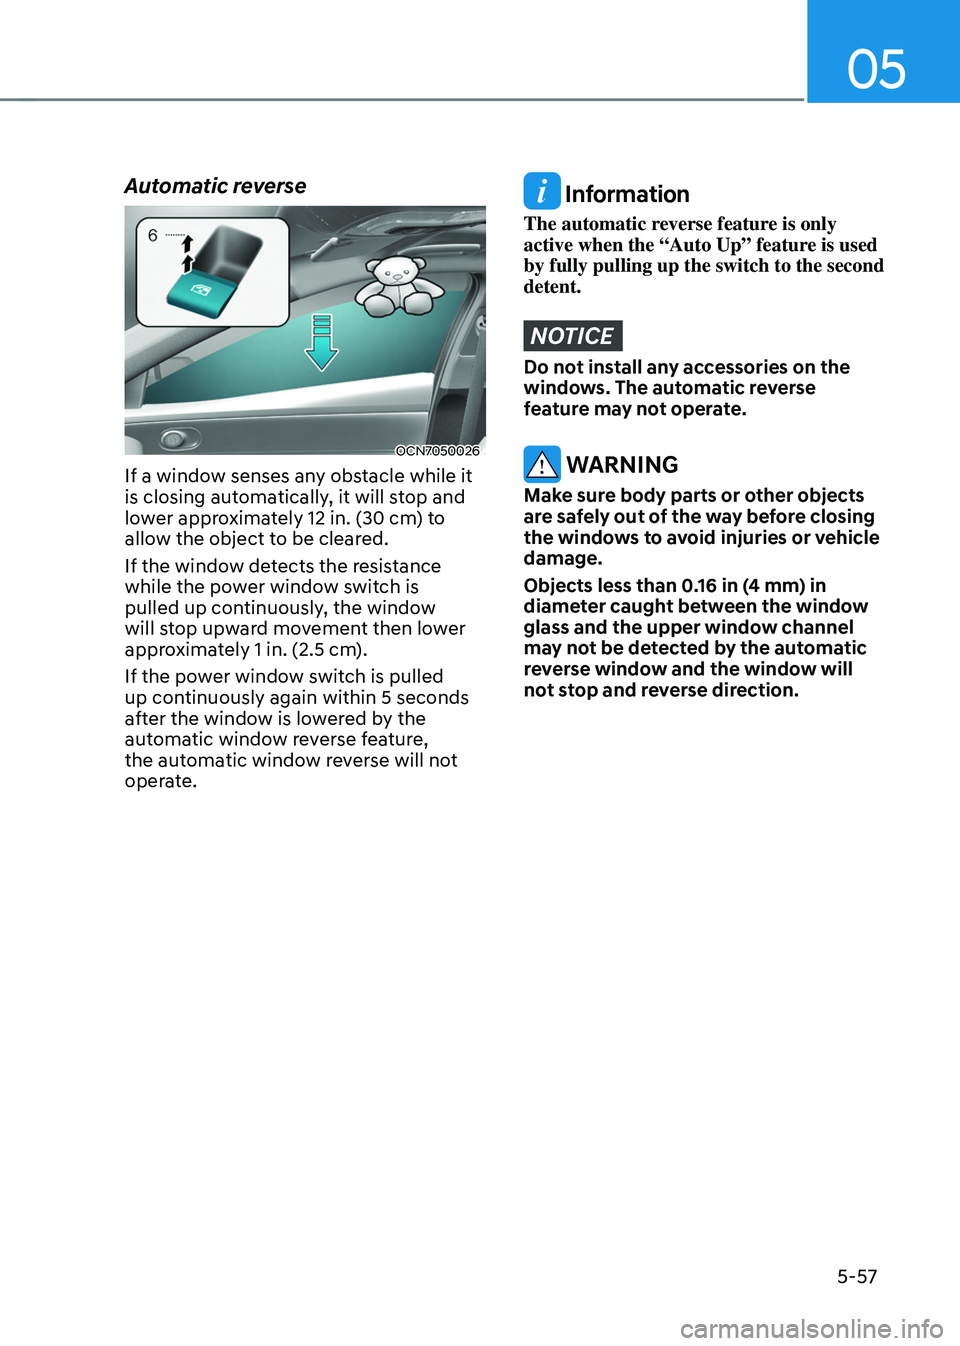
Automatic reverse
OCN7050026
If a window senses any obstacle while it
is closing automatically, it will stop and
lower approximately 12 in. (30 cm) to
allow the object to be cleared.
If the window detects the resistance
while the power window switch is
pulled up continuously, the window
will stop upward movement then lower
approximately 1 in. (2.5 cm).
If the power window switch is pulled
up continuously again within 5 seconds
after the window is lowered by the
automatic window reverse feature,
the automatic window reverse will not
operate.
Information
The automatic reverse feature is only
active when the “Auto Up” feature is used
by fully pulling up the switch to the second
detent.
NOTICE
Do not install any accessories on the
windows. The automatic reverse
feature may not operate.
WARNING
Make sure body parts or other objects
are safely out of the way before closing
the windows to avoid injuries or vehicle
damage.
Objects less than 0.16 in (4 mm) in
diameter caught between the window
glass and the upper window channel
may not be detected by the automatic
reverse window and the window will
not stop and reverse direction.
Page 206 of 638
Convenient features
5-62
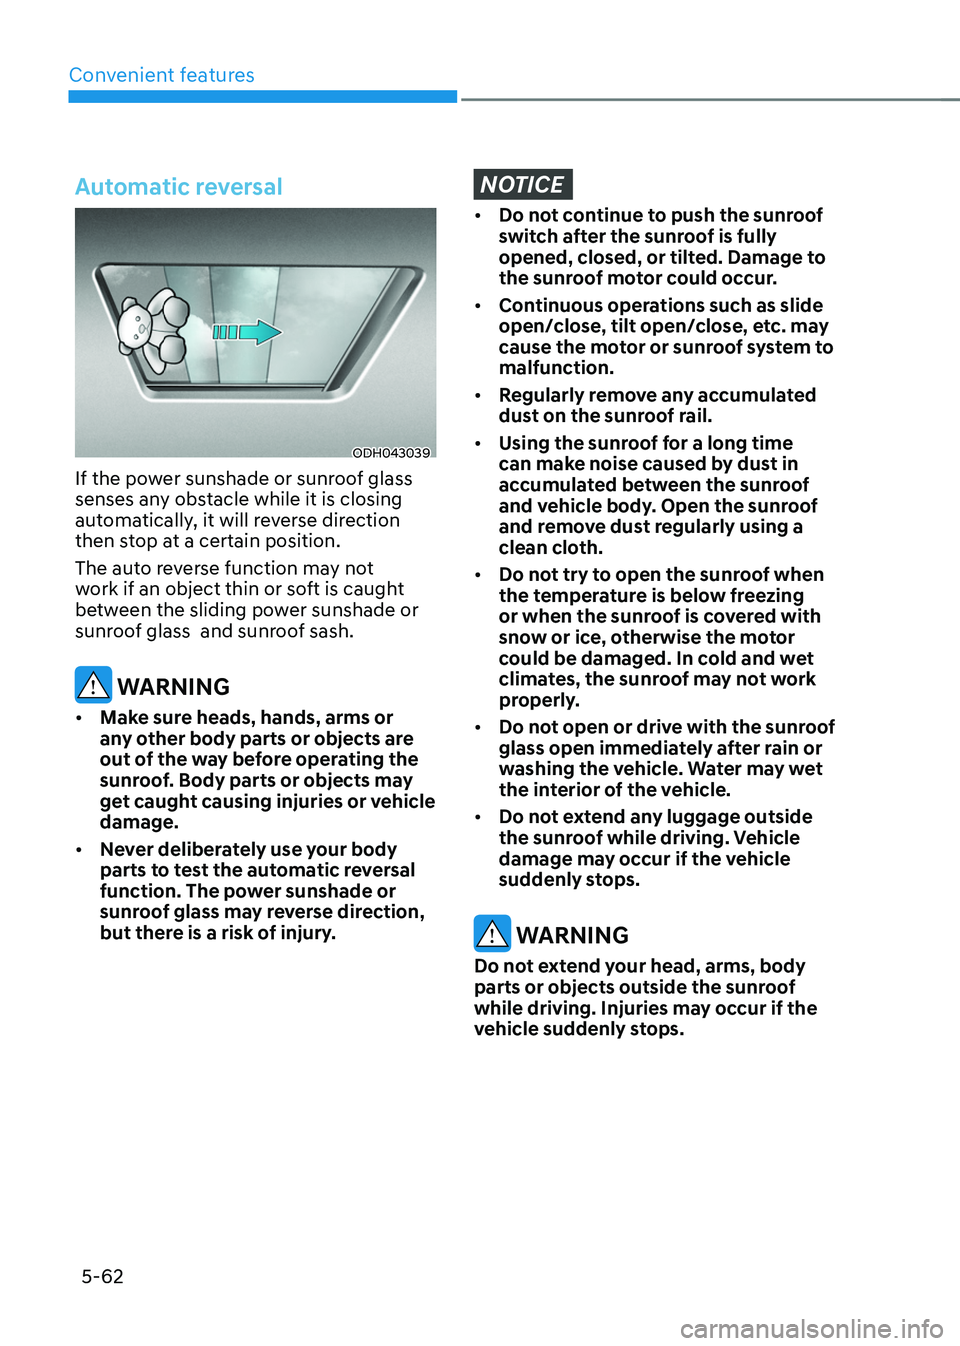
Automatic reversal
ODH043039
If the power sunshade or sunroof glass
senses any obstacle while it is closing
automatically, it will reverse direction
then stop at a certain position.
The auto reverse function may not
work if an object thin or soft is caught
between the sliding power sunshade or
sunroof glass and sunroof sash.
WARNING
• Make sure heads, hands, arms or
any other body parts or objects are
out of the way before operating the
sunroof. Body parts or objects may
get caught causing injuries or vehicle
damage.
• Never deliberately use your body
parts to test the automatic reversal
function. The power sunshade or
sunroof glass may reverse direction,
but there is a risk of injury.
NOTICE
• Do not continue to push the sunroof
switch after the sunroof is fully
opened, closed, or tilted. Damage to
the sunroof motor could occur.
• Continuous operations such as slide
open/close, tilt open/close, etc. may
cause the motor or sunroof system to
malfunction.
• Regularly remove any accumulated
dust on the sunroof rail.
• Using the sunroof for a long time
can make noise caused by dust in
accumulated between the sunroof
and vehicle body. Open the sunroof
and remove dust regularly using a
clean cloth.
• Do not try to open the sunroof when
the temperature is below freezing
or when the sunroof is covered with
snow or ice, otherwise the motor
could be damaged. In cold and wet
climates, the sunroof may not work
properly.
• Do not open or drive with the sunroof
glass open immediately after rain or
washing the vehicle. Water may wet
the interior of the vehicle.
• Do not extend any luggage outside
the sunroof while driving. Vehicle
damage may occur if the vehicle
suddenly stops.
WARNING
Do not extend your head, arms, body
parts or objects outside the sunroof
while driving. Injuries may occur if the
vehicle suddenly stops.