2022 HYUNDAI KONA driver controls
[x] Cancel search: driver controlsPage 20 of 579
2-7
02
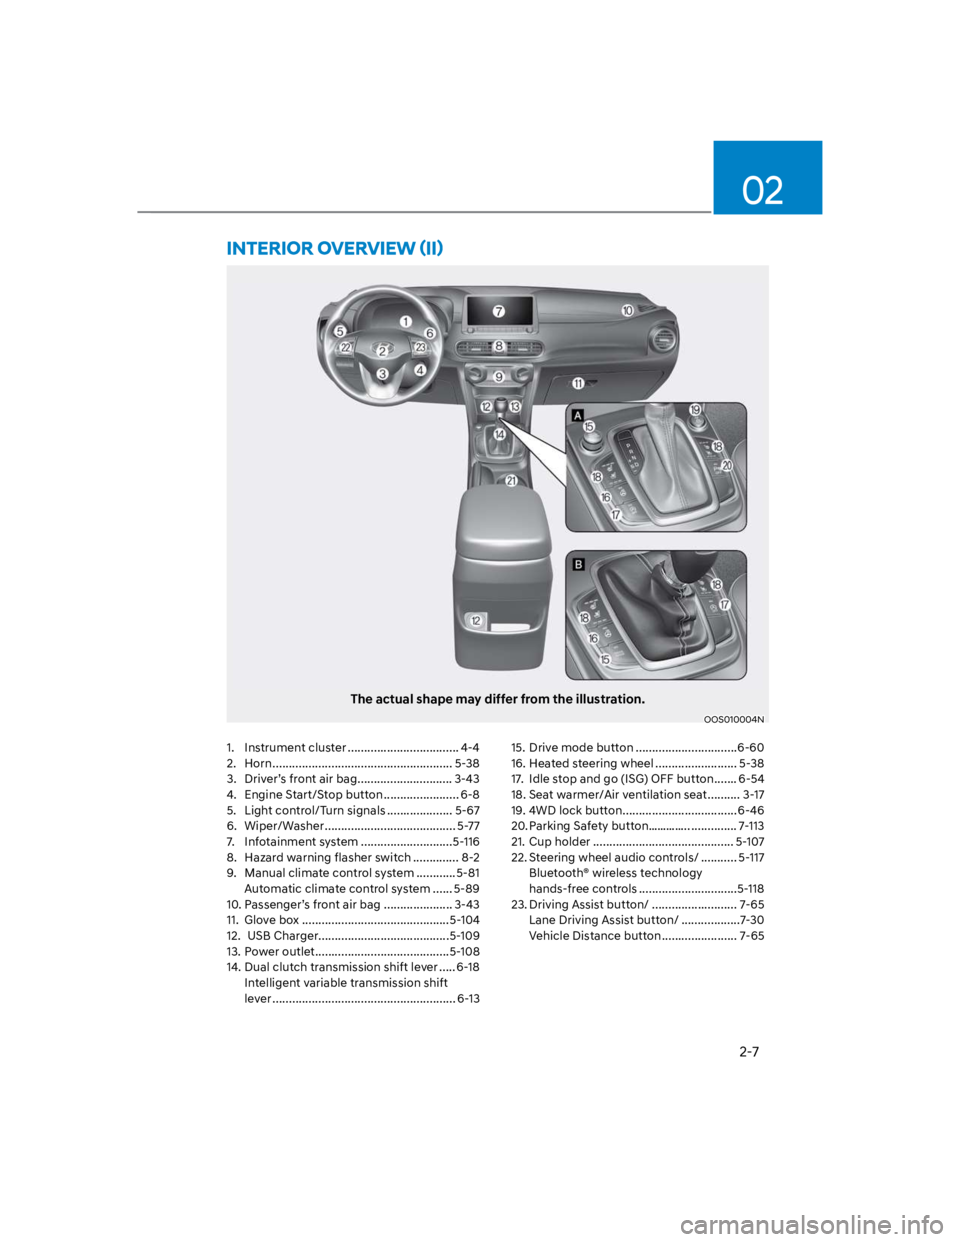
The actual shape may differ from the illustration.
OOS010004N
1. Instrument cluster .................................. 4-4
2. Horn ....................................................... 5-38
3. Driver’s front air bag ............................. 3-43
4. Engine Start/Stop button ....................... 6-8
5. Light control/Turn signals .................... 5-67
6. Wiper/Washer ........................................ 5-77
7. Infotainment system ............................5-116
8. Hazard warning flasher switch .............. 8-2
9. Manual climate control system ............5-81
Automatic climate control system ...... 5-89
10. Passenger’s front air bag ..................... 3-43
11. Glove box .............................................5-104
12. USB Charger........................................5-109
13. Power outlet .........................................5-108
14. Dual clutch transmission shift lever ..... 6-18
Intelligent variable transmission shift
lever ........................................................ 6-13
15. Drive mode button ...............................6-60
16. Heated steering wheel ......................... 5-38
17. Idle stop and go (ISG) OFF button ....... 6-54
18. Seat warmer/Air ventilation seat .......... 3-17
19. 4WD lock button ...................................6-46
20. Parking Safety button………….. .............. 7-113
21. Cup holder ........................................... 5-107
22. Steering wheel audio controls/ ........... 5-117
Bluetooth® wireless technology
hands-free controls ..............................5-118
23. Driving Assist button/ .......................... 7-65
Lane Driving Assist button/ ..................7-30
Vehicle Distance button ....................... 7-65
Page 37 of 579
Seats & Safety System
3-6
Manual adjustment
The front seat can be adjusted by using
the levers located underneath the seat
cushion. Before driving, adjust the seat
to the proper position so that you can
easily control the steering wheel, foot
pedals and controls on the instrument
panel.
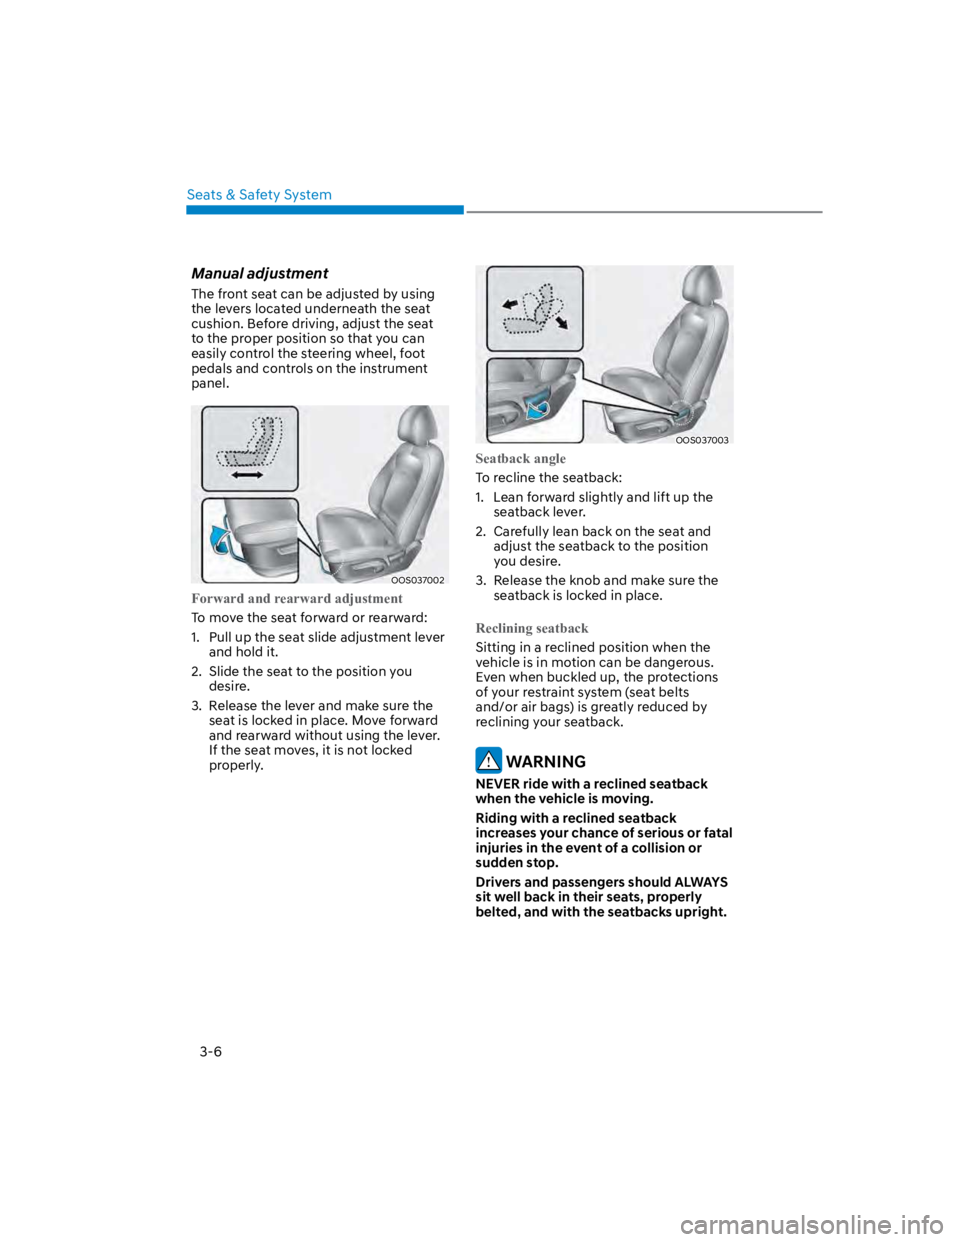
OOS037002
Forward and rearward adjustment
To move the seat forward or rearward:
1. Pull up the seat slide adjustment lever
and hold it.
2. Slide the seat to the position you
desire.
3. Release the lever and make sure the
seat is locked in place. Move forward
and rearward without using the lever.
If the seat moves, it is not locked
properly.
OOS037003
Seatback angle
To recline the seatback:
1. Lean forward slightly and lift up the
seatback lever.
2. Carefully lean back on the seat and
adjust the seatback to the position
you desire.
3. Release the knob and make sure the
seatback is locked in place.
Reclining seatback
Sitting in a reclined position when the
vehicle is in motion can be dangerous.
Even when buckled up, the protections
of your restraint system (seat belts
and/or air bags) is greatly reduced by
reclining your seatback.
WARNING
NEVER ride with a reclined seatback
when the vehicle is moving.
Riding with a reclined seatback
increases your chance of serious or fatal
injuries in the event of a collision or
sudden stop.
Drivers and passengers should ALWAYS
sit well back in their seats, properly
belted, and with the seatbacks upright.
Page 38 of 579
03
3-7
Seat belts must be snug against your
hips and chest to work properly. When
the seatback is reclined, the shoulder
belt cannot do its job because it will not
be snug against your chest. Instead,
it will be in front of you. During an
accident, you could be thrown into the
seat belt, causing neck or other injuries.
The more the seatback is reclined,
the greater chance the passenger’s
hips will slide under the lap belt or the
passenger’s neck will strike the shoulder
belt.
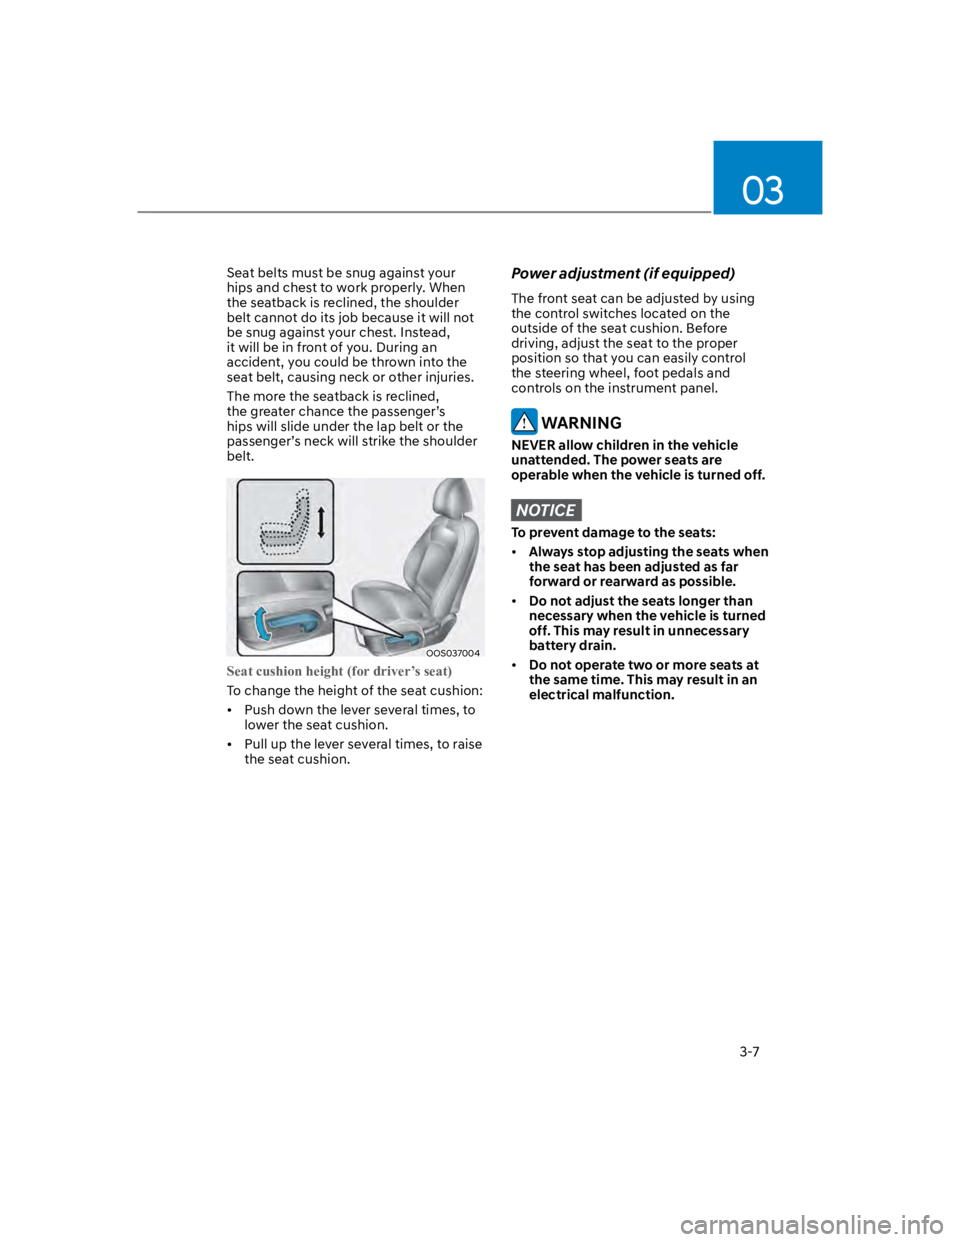
OOS037004
Seat cushion height (for driver’s seat)
To change the height of the seat cushion:
Push down the lever several times, to
lower the seat cushion.
Pull up the lever several times, to raise
the seat cushion.
Power adjustment (if equipped)
The front seat can be adjusted by using
the control switches located on the
outside of the seat cushion. Before
driving, adjust the seat to the proper
position so that you can easily control
the steering wheel, foot pedals and
controls on the instrument panel.
WARNING
NEVER allow children in the vehicle
unattended. The power seats are
operable when the vehicle is turned off.
NOTICE
To prevent damage to the seats:
Always stop adjusting the seats when
the seat has been adjusted as far
forward or rearward as possible.
Do not adjust the seats longer than
necessary when the vehicle is turned
off. This may result in unnecessary
battery drain.
Do not operate two or more seats at
the same time. This may result in an
electrical malfunction.
Page 74 of 579
03
3-43
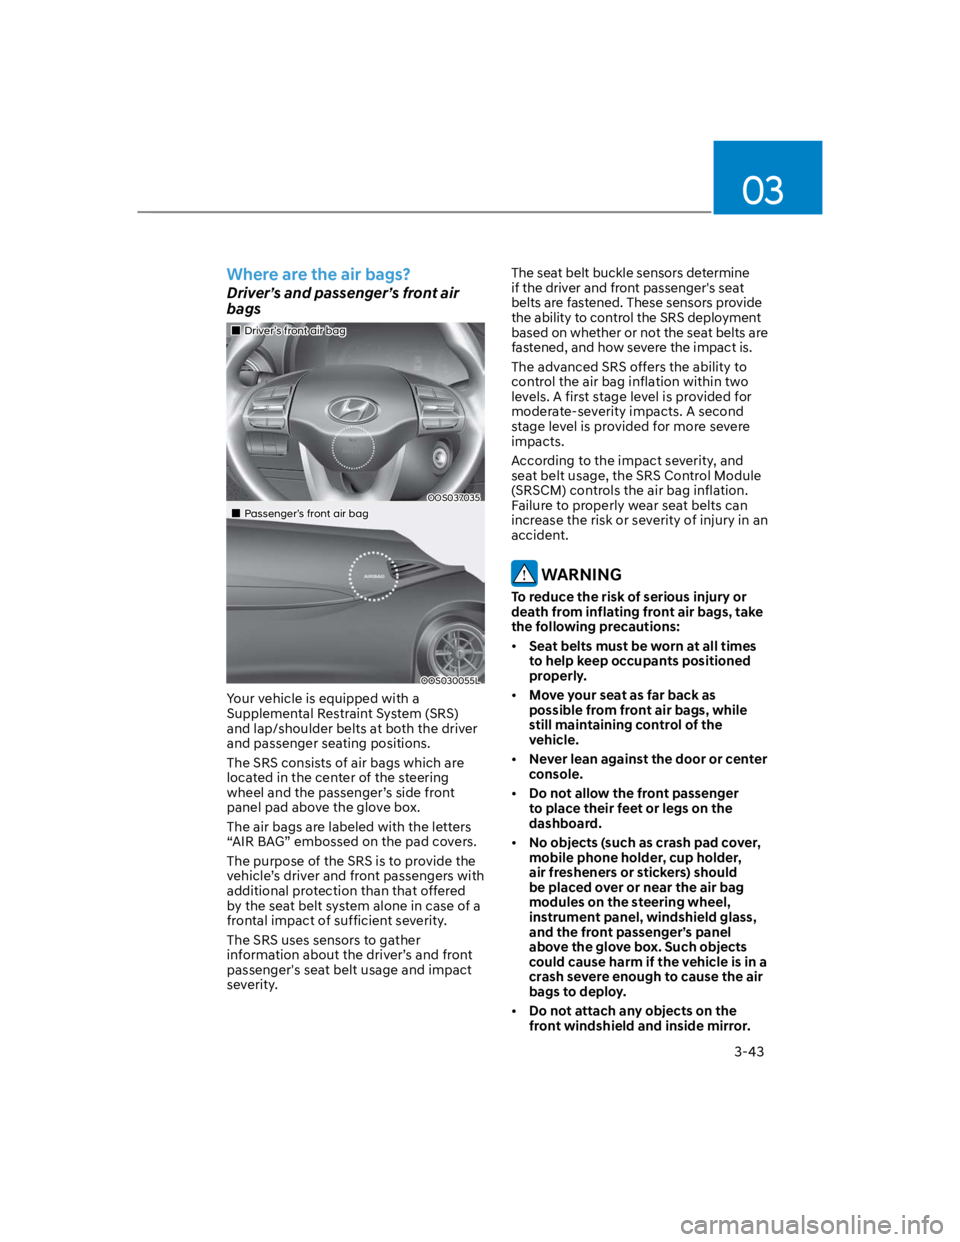
Where are the air bags?
Driver’s and passenger’s front air
bags
Driver’s front air bag
OOS037035
Passenger’s front air bag
OOS030055L
Your vehicle is equipped with a
Supplemental Restraint System (SRS)
and lap/shoulder belts at both the driver
and passenger seating positions.
The SRS consists of air bags which are
located in the center of the steering
wheel and the passenger’s side front
panel pad above the glove box.
The air bags are labeled with the letters
“AIR BAG” embossed on the pad covers.
The purpose of the SRS is to provide the
vehicle’s driver and front passengers with
additional protection than that offered
by the seat belt system alone in case of a
frontal impact of sufficient severity.
The SRS uses sensors to gather
information about the driver’s and front
passenger's seat belt usage and impact
severity.
The seat belt buckle sensors determine
if the driver and front passenger's seat
belts are fastened. These sensors provide
the ability to control the SRS deployment
based on whether or not the seat belts are
fastened, and how severe the impact is.
The advanced SRS offers the ability to
control the air bag inflation within two
levels. A first stage level is provided for
moderate-severity impacts. A second
stage level is provided for more severe
impacts.
According to the impact severity, and
seat belt usage, the SRS Control Module
(SRSCM) controls the air bag inflation.
Failure to properly wear seat belts can
increase the risk or severity of injury in an
accident.
WARNING
To reduce the risk of serious injury or
death from inflating front air bags, take
the following precautions:
Seat belts must be worn at all times
to help keep occupants positioned
properly.
Move your seat as far back as
possible from front air bags, while
still maintaining control of the
vehicle.
Never lean against the door or center
console.
Do not allow the front passenger
to place their feet or legs on the
dashboard.
No objects (such as crash pad cover,
mobile phone holder, cup holder,
air fresheners or stickers) should
be placed over or near the air bag
modules on the steering wheel,
instrument panel, windshield glass,
and the front passenger’s panel
above the glove box. Such objects
could cause harm if the vehicle is in a
crash severe enough to cause the air
bags to deploy.
Do not attach any objects on the
front windshield and inside mirror.
Page 80 of 579
03
3-49
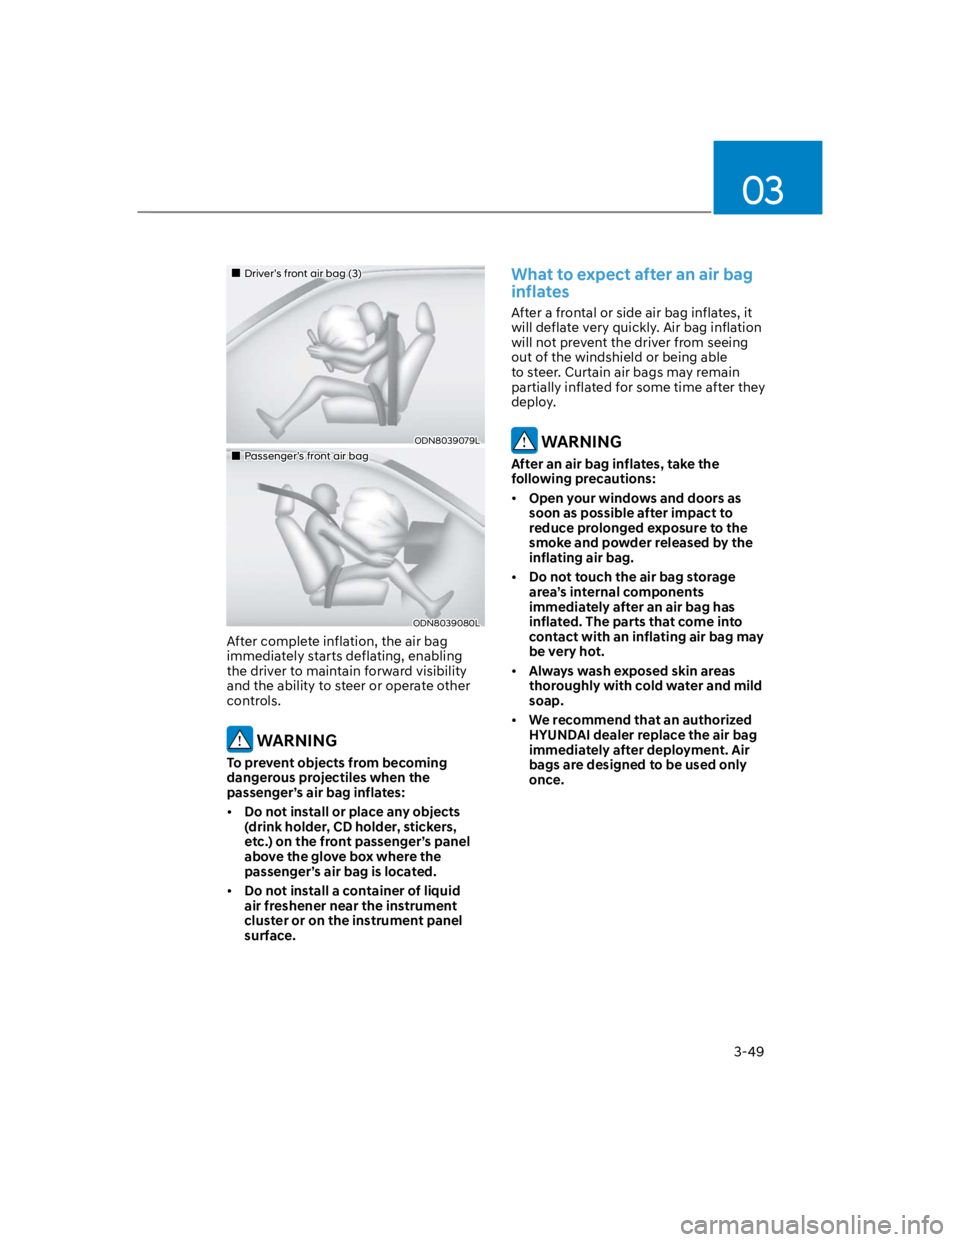
Driver’s front air bag (3)
ODN8039079L
Passenger’s front air bag
ODN8039080L
After complete inflation, the air bag
immediately starts deflating, enabling
the driver to maintain forward visibility
and the ability to steer or operate other
controls.
WARNING
To prevent objects from becoming
dangerous projectiles when the
passenger’s air bag inflates:
Do not install or place any objects
(drink holder, CD holder, stickers,
etc.) on the front passenger’s panel
above the glove box where the
passenger’s air bag is located.
Do not install a container of liquid
air freshener near the instrument
cluster or on the instrument panel
surface.
What to expect after an air bag
inflates
After a frontal or side air bag inflates, it
will deflate very quickly. Air bag inflation
will not prevent the driver from seeing
out of the windshield or being able
to steer. Curtain air bags may remain
partially inflated for some time after they
deploy.
WARNING
After an air bag inflates, take the
following precautions:
Open your windows and doors as
soon as possible after impact to
reduce prolonged exposure to the
smoke and powder released by the
inflating air bag.
Do not touch the air bag storage
area’s internal components
immediately after an air bag has
inflated. The parts that come into
contact with an inflating air bag may
be very hot.
Always wash exposed skin areas
thoroughly with cold water and mild
soap.
We recommend that an authorized
HYUNDAI dealer replace the air bag
immediately after deployment. Air
bags are designed to be used only
once.
Page 138 of 579
Convenient features
5-4
Remote key (if equipped)
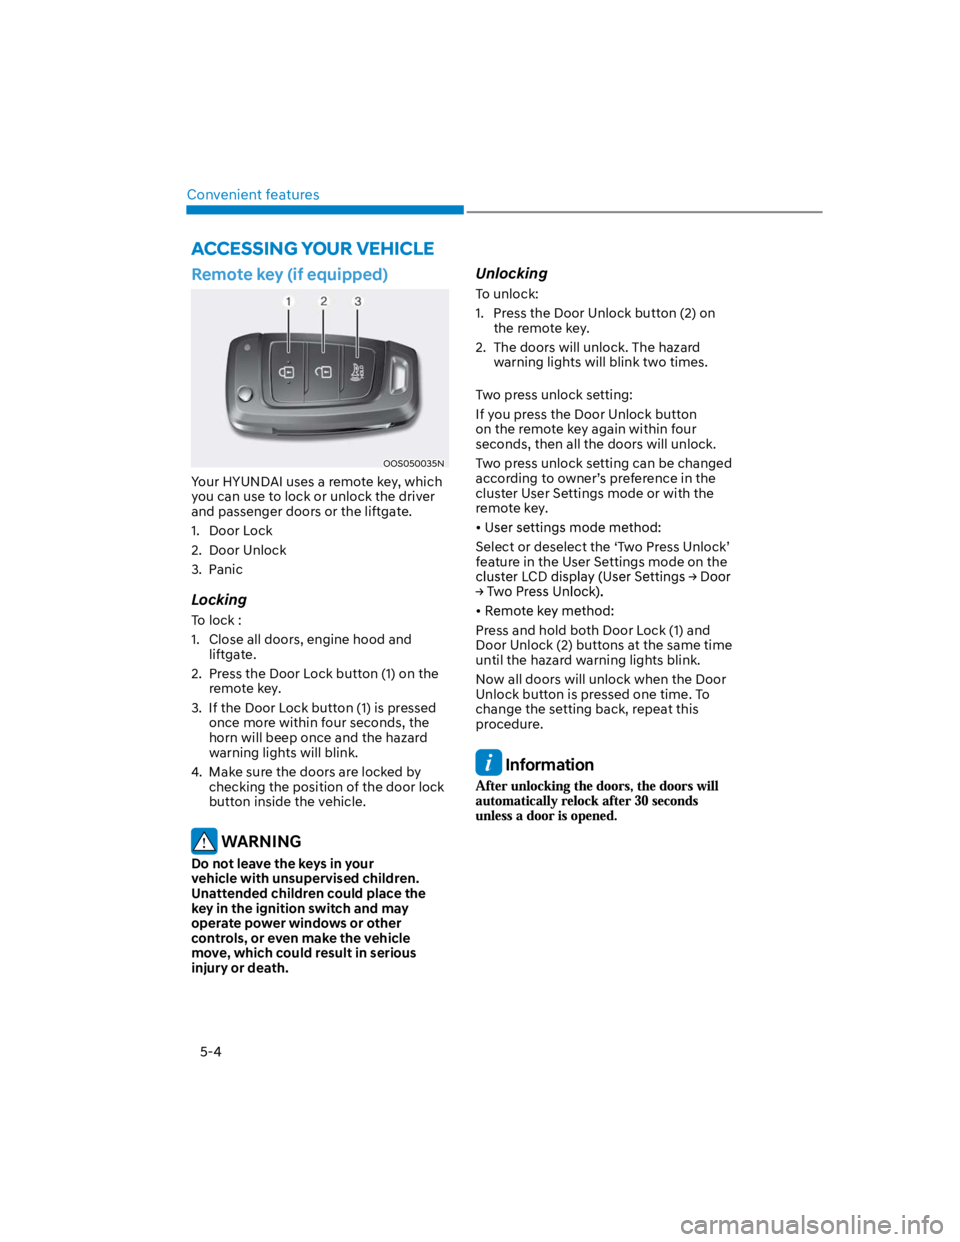
OOS050035N
Your HYUNDAI uses a remote key, which
you can use to lock or unlock the driver
and passenger doors or the liftgate.
1. Door Lock
2. Door Unlock
3. Panic
Locking
To lock :
1. Close all doors, engine hood and
liftgate.
2. Press the Door Lock button (1) on the
remote key.
3. If the Door Lock button (1) is pressed
once more within four seconds, the
horn will beep once and the hazard
warning lights will blink.
4. Make sure the doors are locked by
checking the position of the door lock
button inside the vehicle.
WARNING
Do not leave the keys in your
vehicle with unsupervised children.
Unattended children could place the
key in the ignition switch and may
operate power windows or other
controls, or even make the vehicle
move, which could result in serious
injury or death.
Unlocking
To unlock:
1. Press the Door Unlock button (2) on
the remote key.
2. The doors will unlock. The hazard
warning lights will blink two times.
Two press unlock setting:
If you press the Door Unlock button
on the remote key again within four
seconds, then all the doors will unlock.
Two press unlock setting can be changed
according to owner’s preference in the
cluster User Settings mode or with the
remote key.
Select or deselect the ‘Two Press Unlock’
feature in the User Settings mode on the
Press and hold both Door Lock (1) and
Door Unlock (2) buttons at the same time
until the hazard warning lights blink.
Now all doors will unlock when the Door
Unlock button is pressed one time. To
change the setting back, repeat this
procedure.
Information
ACCESSING YOUR VEHICLE
Page 318 of 579
06
6-61
SMART mode
SMART mode selects the proper
driving mode among NORMAL,
ECO and SPORT by judging
the driver's driving habits (i.e.
mild or dynamic) from the
brake pedal depression or the
steering wheel operation.
Rotate the DRIVE MODE knob to
activate SMART mode. When SMART
mode is activated, the indicator
illuminates on the instrument cluster.
The vehicle starts in SMART mode,
when the engine was turned OFF in
SMART mode.
SMART mode automatically controls
gear shifting patterns, engine torque,
in accordance with the driver's driving
habits.
Information
The driving mode automatically
changes to ECO mode after a certain
period of time, when you gently
depress the accelerator pedal (Your
driving is categorized to be mild.).
The driving mode automatically
changes from SMART ECO mode to
SMART NORMAL mode after a certain
period of time, when you sharply or
repetitively depress the accelerator
pedal.
The driving mode automatically
changes to SMART NORMAL mode
with the same driving patterns, when
the vehicle starts to drive on an
upward slope of a certain angle. The
driving mode automatically returns to
SMART ECO mode, when the vehicle
enters a leveled road.
The driving mode automatically
changes to SMART SPORT, when
you abruptly accelerate the vehicle
or repetitively operate the steering
wheel (Your driving is categorized
to be sporty.). In this mode, your
vehicle drives in a lower gear for
abrupt accelerating/decelerating
and increases the engine brake
performance.
You may still sense the engine brake
performance, even when you release
the accelerator pedal in SMART
SPORT mode. It is because your
vehicle remains to be in a lower gear
over a certain period of time for next
acceleration. Thus, it is a normal
driving situation, not indicating any
malfunction.
The driving mode automatically
changes to SMART SPORT mode
only in harsh driving situations. In
most of the normal driving situations,
the driving mode sets to be either
in SMART ECO mode or in SMART
NORMAL mode.
Page 531 of 579
![HYUNDAI KONA 2022 Owners Manual 09
9-45
FUSES
OLF074075
A
Blade type
Cartridge type
Multi fuse
A
A
B
B
B
B
A
[A] : Normal, [B] : Blown
A vehicle’s electrical system is protected
from electrical overload damage by
fuses.
This veh HYUNDAI KONA 2022 Owners Manual 09
9-45
FUSES
OLF074075
A
Blade type
Cartridge type
Multi fuse
A
A
B
B
B
B
A
[A] : Normal, [B] : Blown
A vehicle’s electrical system is protected
from electrical overload damage by
fuses.
This veh](/manual-img/35/41169/w960_41169-530.png)
09
9-45
FUSES
OLF074075
A
Blade type
Cartridge type
Multi fuse
A
A
B
B
B
B
A
[A] : Normal, [B] : Blown
A vehicle’s electrical system is protected
from electrical overload damage by
fuses.
This vehicle has 5 fuse panels, one
located in the driver’s side panel bolster,
the other in the engine compartment.
If any of your vehicle’s lights,
accessories, or controls do not work,
check the appropriate circuit fuse. If a
fuse has blown, the element inside the
fuse will be melted or broken.
If the electrical system does not work,
first check the driver’s side fuse panel.
Before replacing a blown fuse, turn the
engine and all switches off, and then
disconnect the negative battery cable.
Always replace a blown fuse with one of
the same rating.
If the replacement fuse blows, this
indicates an electrical problem.
Avoid using the system involved. We
recommend that you immediately
consult an authorized HYUNDAI dealer.
WARNING
NEVER replace a fuse with anything but
another fuse of the same rating.
A higher capacity fuse could cause
damage and possibly cause a fire.
Do not install a wire or aluminum
foil instead of the proper fuse -
even as a temporary repair. It may
cause extensive wiring damage and
possibly a fire.
NOTICE
Do not use a screwdriver or any other
metal object to remove fuses because
it may cause a short circuit and damage
the system.