Page 163 of 579

05
5-29
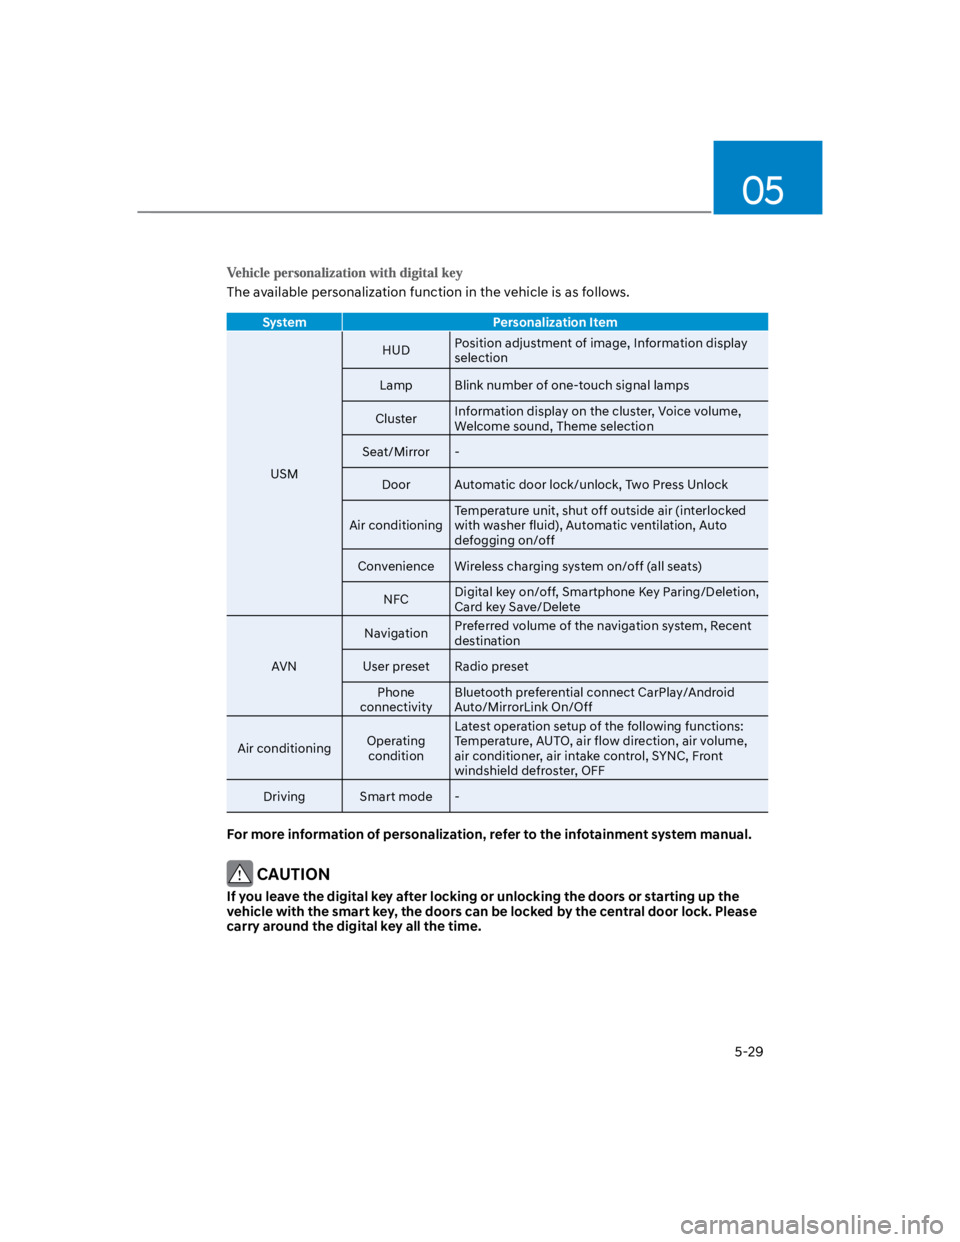
The available personalization function in the vehicle is as follows.
System Personalization Item
USM
HUDPosition adjustment of image, Information display
selection
Lamp Blink number of one-touch signal lamps
ClusterInformation display on the cluster, Voice volume,
Welcome sound, Theme selection
Seat/Mirror -
Door Automatic door lock/unlock, Two Press Unlock
Air conditioning
Temperature unit, shut off outside air (interlocked
with washer fluid), Automatic ventilation, Auto
defogging on/off
Convenience Wireless charging system on/off (all seats)
NFCDigital key on/off, Smartphone Key Paring/Deletion,
Card key Save/Delete
AVN
NavigationPreferred volume of the navigation system, Recent
destination
User preset Radio preset
Phone
connectivity
Bluetooth preferential connect CarPlay/Android
Auto/MirrorLink On/Off
Air conditioningOperating
condition
Latest operation setup of the following functions:
Temperature, AUTO, air flow direction, air volume,
air conditioner, air intake control, SYNC, Front
windshield defroster, OFF
Driving Smart mode -
For more information of personalization, refer to the infotainment system manual.
CAUTION
If you leave the digital key after locking or unlocking the doors or starting up the
vehicle with the smart key, the doors can be locked by the central door lock. Please
carry around the digital key all the time.
Page 251 of 579
05
5-117
Steering wheel remote controls
OOS050023K
The steering wheel audio control
switches are installed for your
convenience.
NOTICE
Do not operate multiple audio remote
control buttons simultaneously.
VOLUME ( + / - ) (1)
Move the VOLUME toggle switch up
to increase volume.
Move the VOLUME toggle switch
down to decrease volume.
SEEK/PRESET (/ ) (2)
If the SEEK/PRESET toggle switch is
moved up or down and held for 0.8
seconds or more, it will function in the
following modes.
It will function as the AUTO SEEK select
switch. It will SEEK until you release the
switch.
It will function as the FF/REW switch.
If the SEEK/PRESET toggle switch is
moved up or down, it will function in the
following modes.
It will function as the PRESET STATION
UP/DOWN switch.
It will function as the TRACK UP/ DOWN
switch.
MODE () (3)
Press the MODE button to select Radio,
Disc, or AUX.
MUTE () (4)
Press the button to mute the sound.
Press the button again to activate the
sound.
Information
Page 255 of 579

05
5-121
Using a cellular phone or a twoway
radio
When a cellular phone is used inside
the vehicle, noise may be produced
from the audio system. This does not
mean that something is wrong with the
audio equipment. In such a case, use
the cellular phone at a place as far as
possible from the audio equipment.
NOTICE
When using a communication system
such as a cellular phone or a radio set
inside the vehicle, a separate external
antenna must be fitted. When a cellular
phone or a radio set is used with an
internal antenna alone, it may interfere
with the vehicle’s electrical system and
adversely affect safe operation of the
vehicle.
WARNING
Do not use a cellular phone while
driving. Stop at a safe location to use a
cellular phone.
iPod®
iPod® is a registered trademark of Apple
Inc.
Bluetooth® Wireless Technology
The Bluetooth® word mark and logos
are registered trademarks owned by
Bluetooth SIG, Inc. and any use of such
marks by HYUNDAI is under license.
Other trademarks and trade names are
those of their respective owners.
A Bluetooth® Wireless Technology
enabled cell phone is required to use
Bluetooth® Wireless Technology.
Page 455 of 579

08
8-5
Jump starting procedure
Information
1. Position the vehicles close enough
that the jumper cables will reach, but
do not allow the vehicles to touch.
2. Avoid fans or any moving parts in the
engine compartment at all times, even
when the vehicles are turned off.
3. Turn off all electrical devices such as
radios, lights, air conditioning, etc.
Put the vehicles in P (Park) and set the
parking brake. Turn both vehicles OFF.
4. Open the engine hood.
OOS080008N
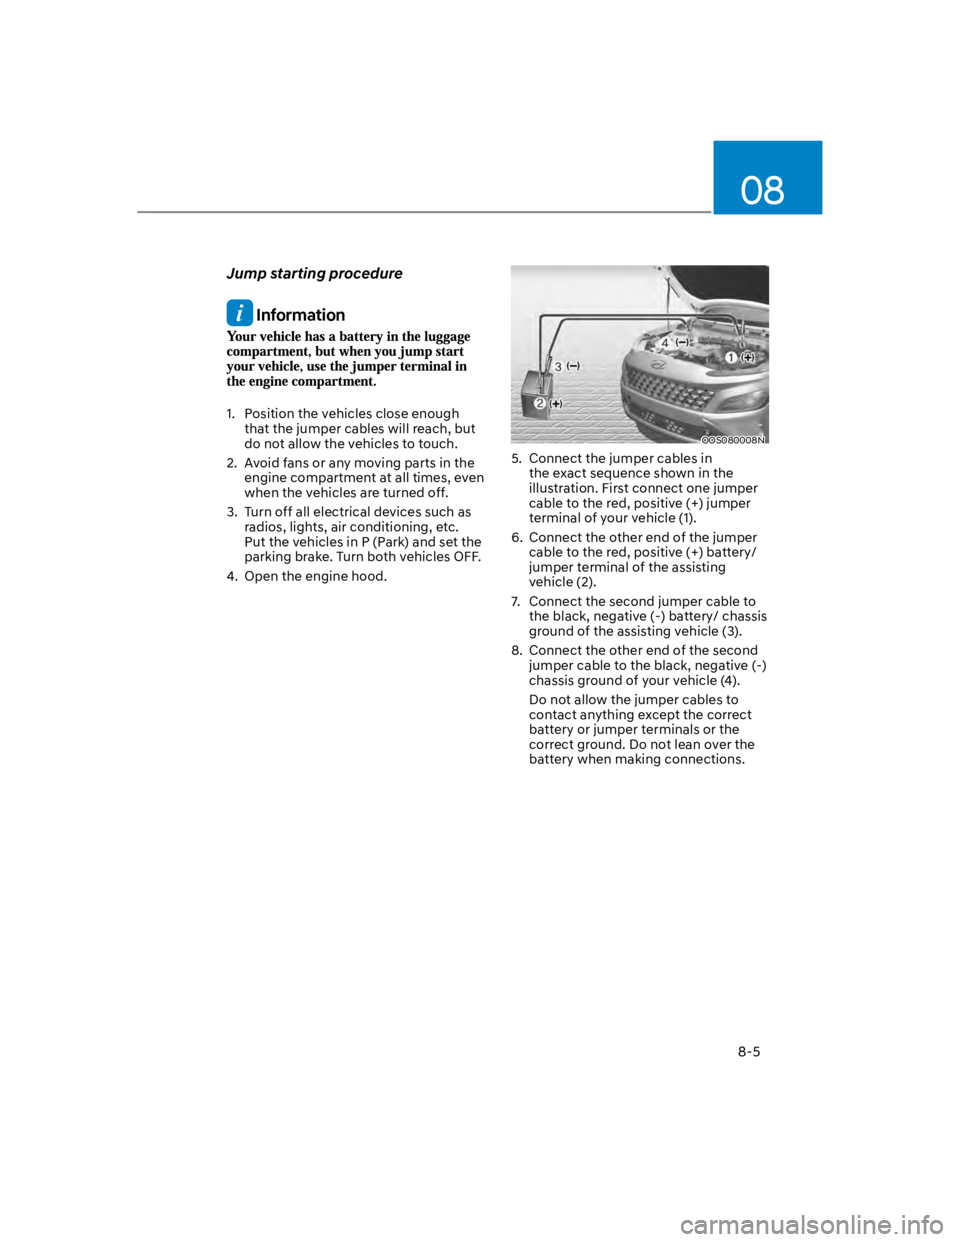
5. Connect the jumper cables in
the exact sequence shown in the
illustration. First connect one jumper
cable to the red, positive (+) jumper
terminal of your vehicle (1).
6. Connect the other end of the jumper
cable to the red, positive (+) battery/
jumper terminal of the assisting
vehicle (2).
7. Connect the second jumper cable to
the black, negative (-) battery/ chassis
ground of the assisting vehicle (3).
8. Connect the other end of the second
jumper cable to the black, negative (-)
chassis ground of your vehicle (4).
Do not allow the jumper cables to
contact anything except the correct
battery or jumper terminals or the
correct ground. Do not lean over the
battery when making connections.