2022 HYUNDAI KONA EV child lock
[x] Cancel search: child lockPage 84 of 548
03
3-5
Seat belts
Always fasten your seat belt before
starting any trip. At all times, passengers
should sit upright and be properly
restrained. Infants and small children
must be restrained in appropriate Child
Restraint Systems. Children who have
outgrown a booster seat and adults must
be restrained using the seat belts.
WARNING
Take the following precautions when
adjusting your seat belt: • NEVER use one seat belt for more
than one occupant.
• Always position the seatback upright
with the lap portion of the seat belt
snug and low across the hips.
• NEVER allow children or small infants
to ride on a passenger’s lap.
• Do not route the seat belt across your
neck, across sharp edges, or reroute
the shoulder strap away from your
body.
• Do not allow the seat belt to become
caught or jammed.
Front seats
The front seat can be adjusted by using
the control lever (or knob) or switches
located on the outside of the seat
cushion. Before driving, adjust the seat
to the proper position so that you can
easily control the steering wheel, foot
pedals and controls on the instrument panel.
WARNING
Take the following precautions when
adjusting your seat: • NEVER attempt to adjust the seat
while the vehicle is moving. The seat
could respond with unexpected
movement and may cause loss
of vehicle control resulting in an
accident.
• Do not place anything under the
front seats. Loose objects in the
driver’s foot area could interfere
with the operation of the foot pedals,
causing an accident.
• Do not allow anything to interfere
with the normal position and proper
locking of the seatback.
• Do not place a cigarette lighter on
the floor or seat. When you operate
the seat, gas may exit out of the
lighter causing a fire.
• Use extreme caution when picking
up small objects trapped under the
seats or between the seat and the
center console. Your hands might be
cut or injured by the sharp edges of
the seat mechanism.
• If there are occupants in the rear
seats, be careful while adjusting the
front seat position.
• Make sure that the seat is locked in
place after the adjustment. If not,
the seat might move unexpectedly
resulting in an accident.
Page 96 of 548
03
3-17
OOS037018
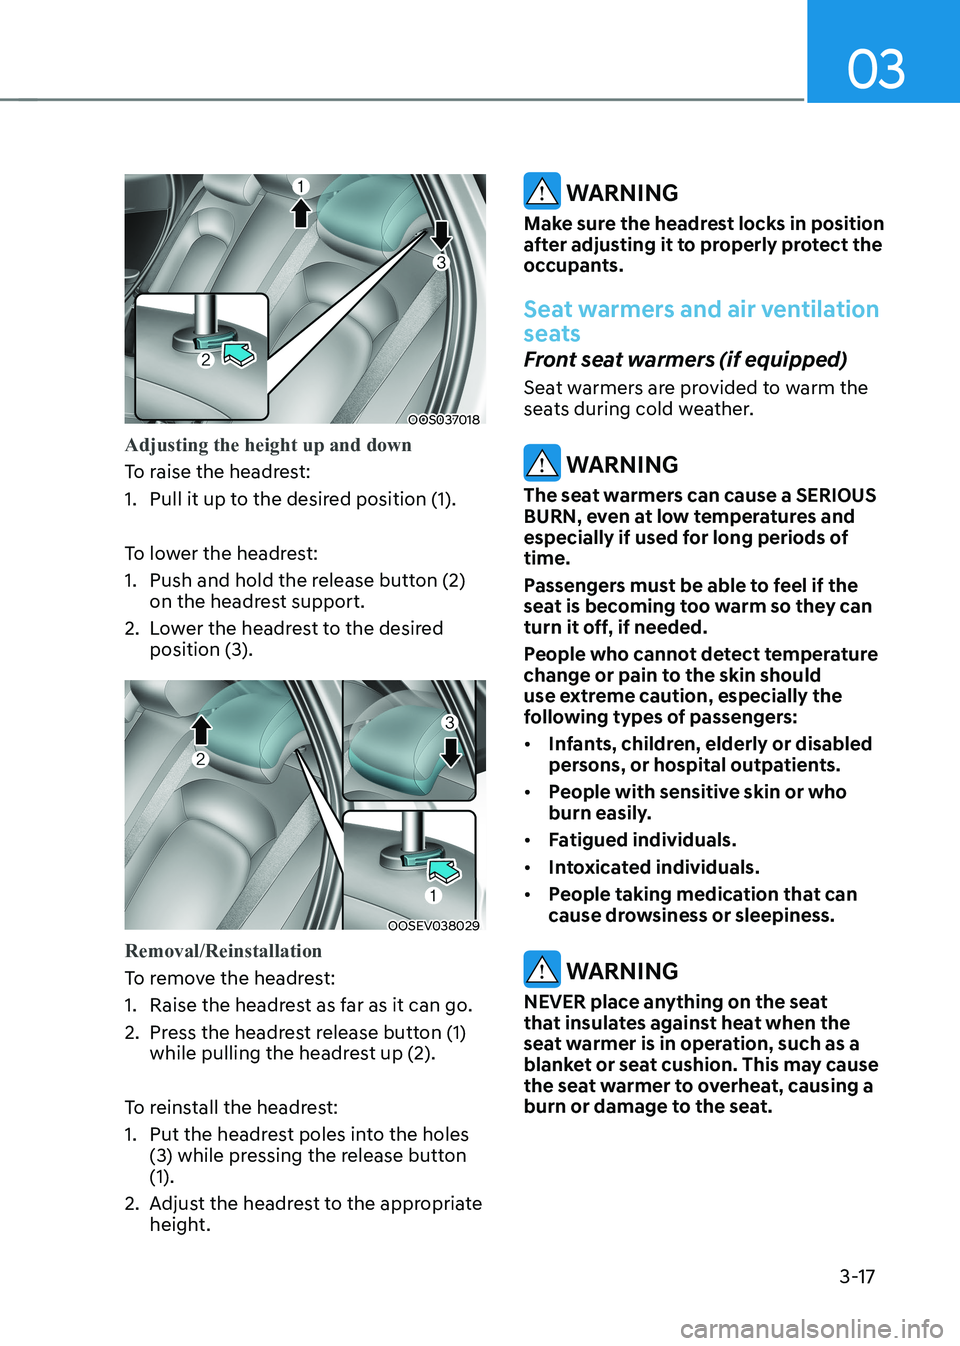
Adjusting the height up and down
To raise the headrest:
1. Pull it up to the desired position (1).
To lower the headrest:
1. Push and hold the release button (2) on the headrest support.
2. Lower the headrest to the desired position (3).
OOSEV038029
Removal/Reinstallation
To remove the headrest:
1. Raise the headrest as far as it can go.
2. Press the headrest release button (1) while pulling the headrest up (2).
To reinstall the headrest:
1. Put the headrest poles into the holes (3) while pressing the release button (1).
2. Adjust the headrest to the appropriate height.
WARNING
Make sure the headrest locks in position
after adjusting it to properly protect the
occupants.
Seat warmers and air ventilation
seats
Front seat warmers (if equipped)
Seat warmers are provided to warm the
seats during cold weather.
WARNING
The seat warmers can cause a SERIOUS
BURN, even at low temperatures and
especially if used for long periods of time.
Passengers must be able to feel if the
seat is becoming too warm so they can
turn it off, if needed.
People who cannot detect temperature
change or pain to the skin should
use extreme caution, especially the
following types of passengers: • Infants, children, elderly or disabled
persons, or hospital outpatients.
• People with sensitive skin or who
burn easily.
• Fatigued individuals.
• Intoxicated individuals.
• People taking medication that can
cause drowsiness or sleepiness.
WARNING
NEVER place anything on the seat
that insulates against heat when the
seat warmer is in operation, such as a
blanket or seat cushion. This may cause
the seat warmer to overheat, causing a
burn or damage to the seat.
Page 118 of 548
03
3-39
Securing a Child Restraint System with a lap/shoulder belt
WARNING
ALWAYS place a rearward-facing Child
Restraint System in the rear seat of the
vehicle.
Placing a rearward-facing child restraint
in the front seat can result in serious
injury or death if the Child Restraint
System is struck by an inflating air bag.
When not using the LATCH system, all
Child Restraint Systems must be secured
to a rear seat with the lap part of a lap/shoulder belt.
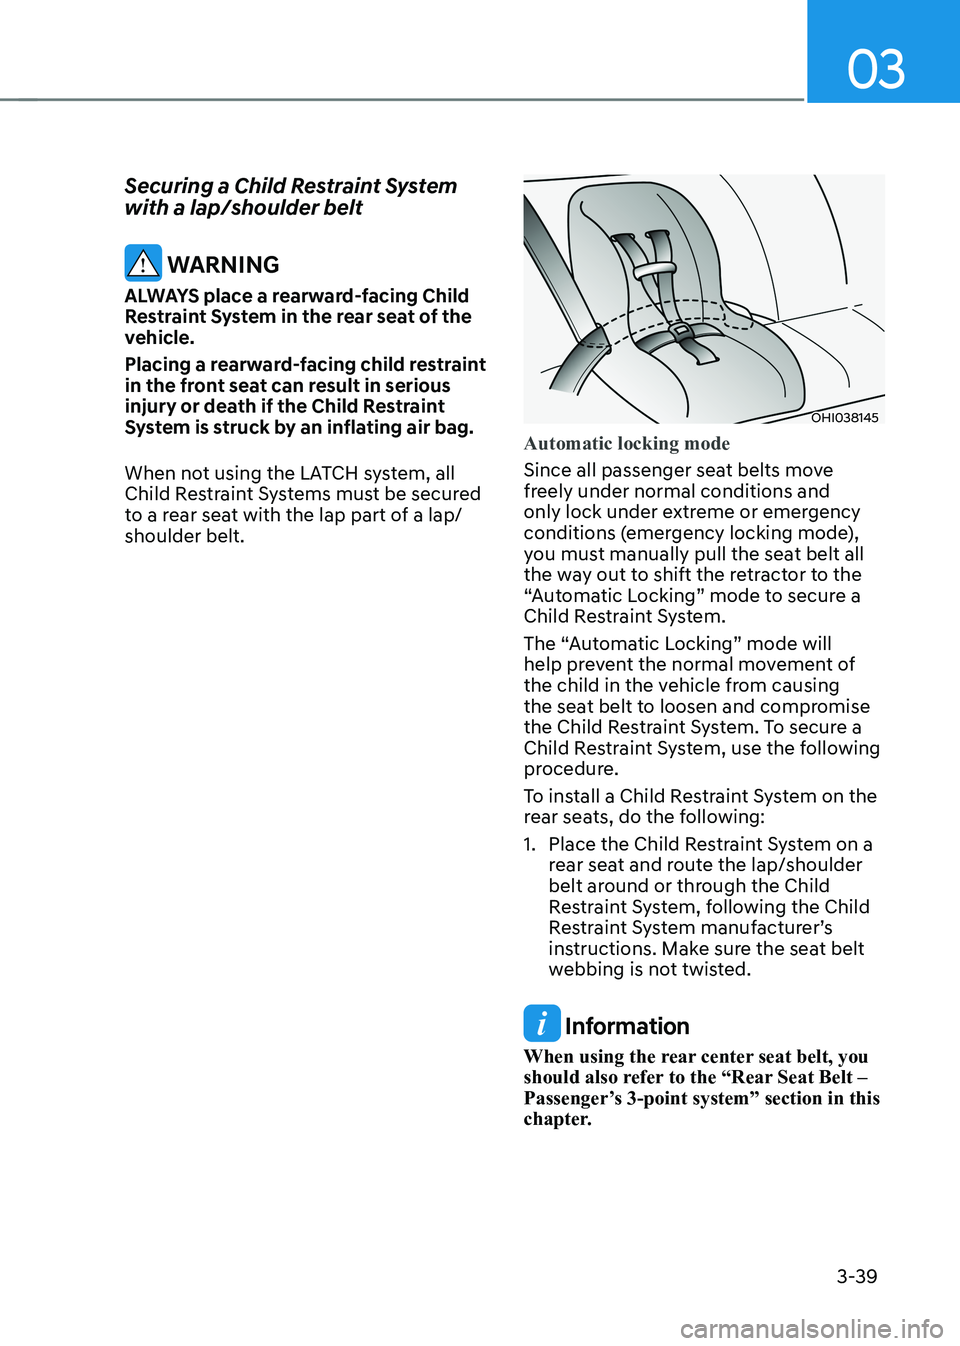
OHI038145
Automatic locking mode
Since all passenger seat belts move
freely under normal conditions and
only lock under extreme or emergency
conditions (emergency locking mode),
you must manually pull the seat belt all
the way out to shift the retractor to the
“Automatic Locking” mode to secure a
Child Restraint System.
The “Automatic Locking” mode will
help prevent the normal movement of
the child in the vehicle from causing
the seat belt to loosen and compromise
the Child Restraint System. To secure a
Child Restraint System, use the following
procedure.
To install a Child Restraint System on the
rear seats, do the following:
1. Place the Child Restraint System on a rear seat and route the lap/shoulder
belt around or through the Child
Restraint System, following the Child
Restraint System manufacturer’s
instructions. Make sure the seat belt
webbing is not twisted.
Information
When using the rear center seat belt, you
should also refer to the “Rear Seat Belt –
Passenger’s 3-point system” section in this
chapter.
Page 119 of 548
Safety system
3-40
OOS037030N
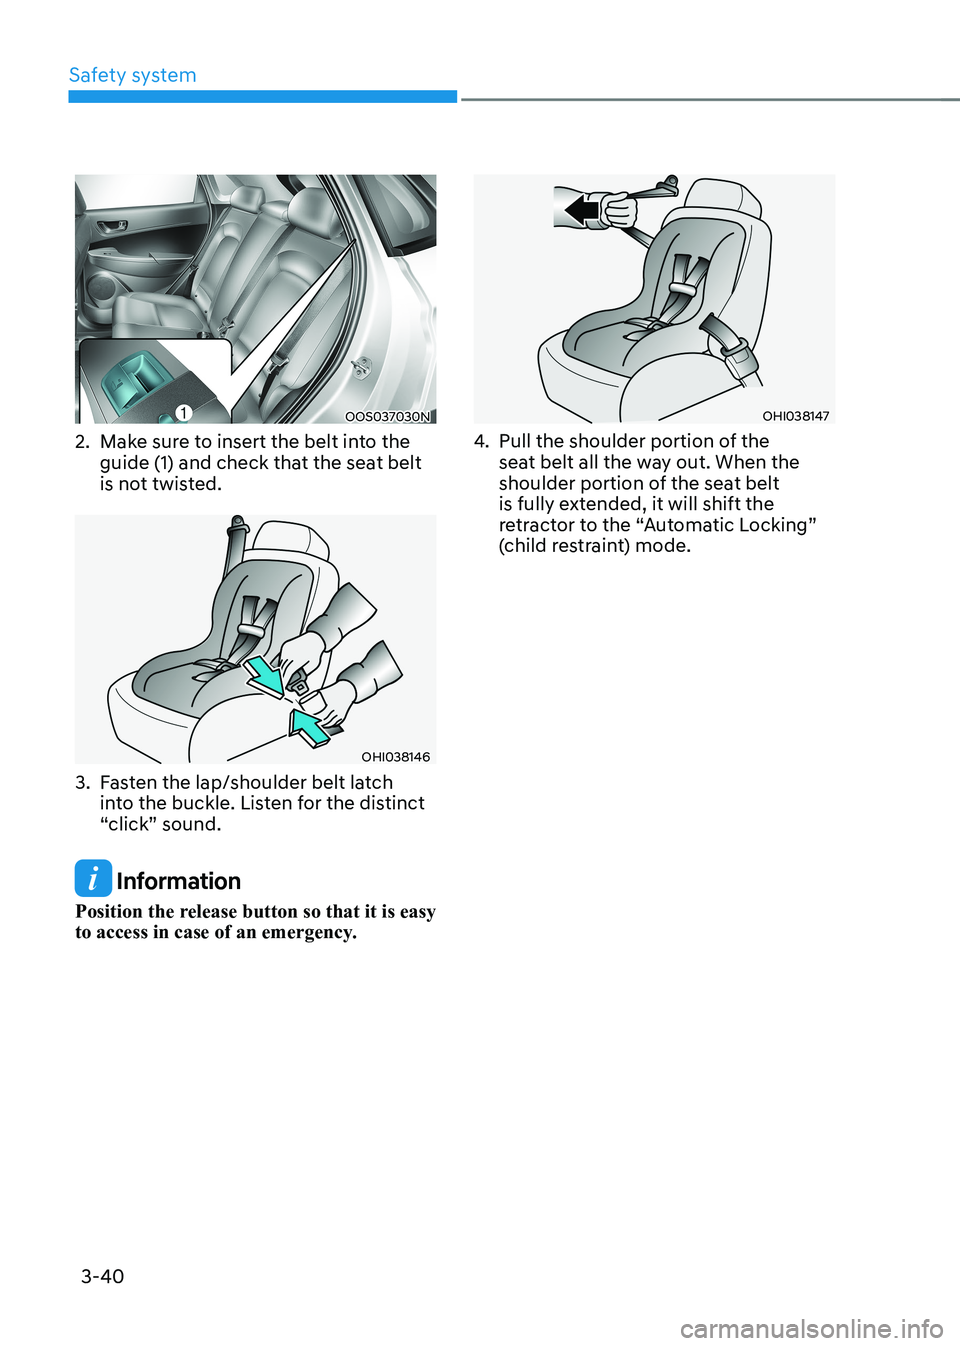
2. Make sure to insert the belt into the guide (1) and check that the seat belt
is not twisted.
OHI038146
3. Fasten the lap/shoulder belt latch into the buckle. Listen for the distinct
“click” sound.
Information
Position the release button so that it is easy
to access in case of an emergency.
OHI038147
4. Pull the shoulder portion of the
seat belt all the way out. When the
shoulder portion of the seat belt
is fully extended, it will shift the
retractor to the “Automatic Locking”
(child restraint) mode.
Page 120 of 548
03
3-41
OHI038148
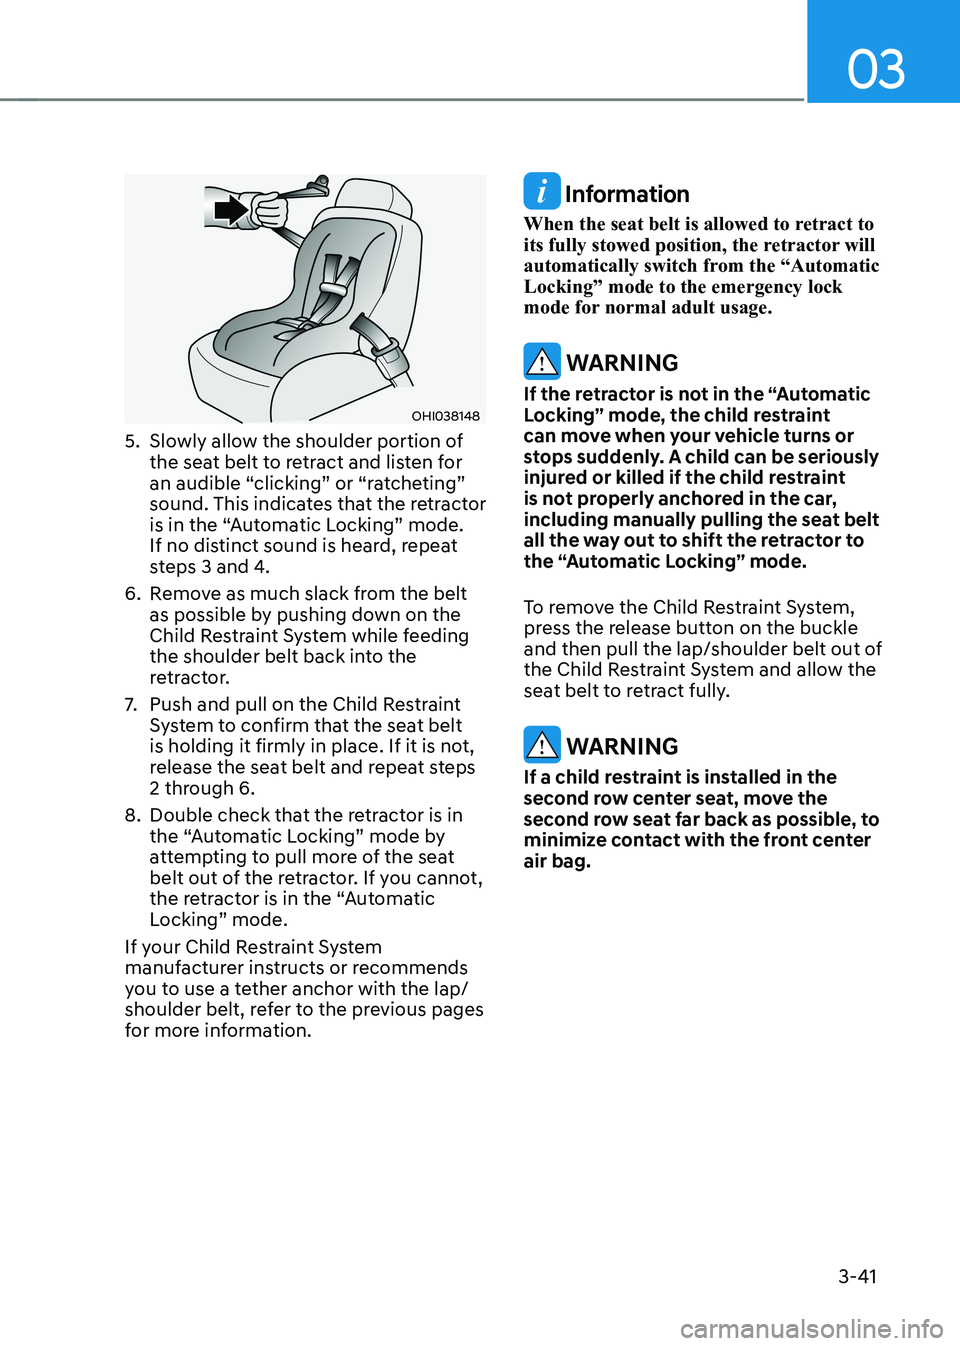
5. Slowly allow the shoulder portion of the seat belt to retract and listen for
an audible “clicking” or “ratcheting”
sound. This indicates that the retractor
is in the “Automatic Locking” mode.
If no distinct sound is heard, repeat
steps 3 and 4.
6. Remove as much slack from the belt as possible by pushing down on the
Child Restraint System while feeding
the shoulder belt back into the
retractor.
7. Push and pull on the Child Restraint
System to confirm that the seat belt
is holding it firmly in place. If it is not,
release the seat belt and repeat steps
2 through 6.
8. Double check that the retractor is in the “Automatic Locking” mode by
attempting to pull more of the seat
belt out of the retractor. If you cannot,
the retractor is in the “Automatic
Locking” mode.
If your Child Restraint System
manufacturer instructs or recommends
you to use a tether anchor with the lap/
shoulder belt, refer to the previous pages
for more information.
Information
When the seat belt is allowed to retract to
its fully stowed position, the retractor will
automatically switch from the “Automatic Locking” mode to the emergency lock
mode for normal adult usage.
WARNING
If the retractor is not in the “Automatic
Locking” mode, the child restraint
can move when your vehicle turns or
stops suddenly. A child can be seriously
injured or killed if the child restraint
is not properly anchored in the car,
including manually pulling the seat belt
all the way out to shift the retractor to
the “Automatic Locking” mode.
To remove the Child Restraint System,
press the release button on the buckle
and then pull the lap/shoulder belt out of
the Child Restraint System and allow the
seat belt to retract fully.
WARNING
If a child restraint is installed in the
second row center seat, move the
second row seat far back as possible, to
minimize contact with the front center air bag.
Page 128 of 548
03
3-49
•
In addition to inflating in serious side
collisions, vehicles equipped with a
rollover sensor, side and/or curtain air
bags will inflate if the sensing system
detects a rollover.
When a rollover is detected, curtain
air bags will remain inflated longer to
help provide protection from ejection, especially when used in conjunction
with the seat belts. (if equipped with a
rollover sensor)
• To help provide protection, the air
bags must inflate rapidly. The speed
of air bag inflation is a consequence
of extremely short time in which
to inflate the air bag between the
occupant and the vehicle structures
before the occupant impacts those
structures. This speed of inflation
reduces the risk of serious or
lifethreatening injuries and is thus a
necessary part of air bag design.
However, the rapid air bag inflation can also cause injuries which can
include facial abrasions, bruises and
broken bones because the inflation
speed also causes the air bags to
expand with a great deal of force.
• There are even circumstances under
which contact with the air bag can
cause fatal injuries, especially if the
occupant is positioned excessively
close to the air bag.
You can take steps to reduce the risk of
being injured by an inflating air bag. The
greatest risk is sitting too close to the air
bag. An air bag needs space to inflate.
It is recommended that drivers sit as far
as possible between the center of the
steering wheel and the chest while still
maintaining control of the vehicle.
WARNING
To reduce the risk of serious injury or
death from an inflating air bag, take the
following precautions: • NEVER place a child restraint in the
front passenger seat.
Always properly restrain children
under age 13 in the rear seats of the
vehicle.
• Adjust the front passenger’s and
driver’s seats as far to the rear as
possible while allowing you to
maintain full control of the vehicle.
• Hold the steering wheel with
hands at the 9 o’clock and 3 o’clock positions.
• Never place anything or anyone
between the air bag and the seat
occupant.
• Do not allow the front passenger
to place their feet or legs on the
dashboard.
Page 185 of 548
5
Accessing your vehicle ..................................................................................... 5-4
Smart key .................................................................................................................... 5-4
Immobilizer system ...................................................................................................... 5-9
Door locks .................................................................................................................. 5-10
Operating door locks from outside the vehicle........................................................ 5-10
Operating door locks from inside the vehicle ...........................................................5-11
Auto door lock/unlock features..................................................................................5-13
Child-protector rear door locks ................................................................................. 5-14
Rear Occupant Alert (ROA) ....................................................................................... 5-14
Theft-alarm system .......................................................................................... 5-15
Steering wheel ................................................................................................. 5-16
Electric power steering (EPS) .................................................................................... 5-16
Tilt steering/Telescopic steering ................................................................................ 5-17
Heated steering wheel ............................................................................................... 5-18
Horn............................................................................................................................. 5-18
Mirrors .............................................................................................................. 5-19
Inside rearview mirror ................................................................................................ 5-19
Outside rearview mirror ............................................................................................. 5-30
Windows .......................................................................................................... 5-33
Power windows .......................................................................................................... 5-33
Sunroof ............................................................................................................. 5-37
Sunroof opening and closing .................................................................................... 5-38
Sliding the sunroof ..................................................................................................... 5-38
Tilting the sunroof ...................................................................................................... 5-39
Sunshade .................................................................................................................... 5-39
Resetting the sunroof ................................................................................................ 5-39
Sunroof open warning .............................................................................................. 5-40
Exterior features ............................................................................................... 5-41
Hood ............................................................................................................................ 5-41
Tailgate ........................................................................................................................ 5-43
Charging door ............................................................................................................. 5-45
Head Up Display (HUD) .................................................................................. 5-46
Precautions while using the head up display ..........................................................5-46
Head Up Display ON/OFF .......................................................................................... 5-47
Head Up Display Information .................................................................................... 5-47
Head Up Display Setting ............................................................................................ 5-47
5. Convenient features
Page 189 of 548
05
5-5
Even though you press the outside
door handle button, the doors will not
lock and the chime will sound for three
seconds if any of the following occur: •
The Smart Key is in the vehicle.
• The START/STOP button is ON position.
• Any door except the tailgate is open.
WARNING
Do not leave the Smart Key in your
vehicle with unsupervised children.
Unattended children could press the
START/STOP button and may operate
power windows or other controls, or
even make the vehicle move, which
could result in serious injury or death. Unlocking
OOS047001
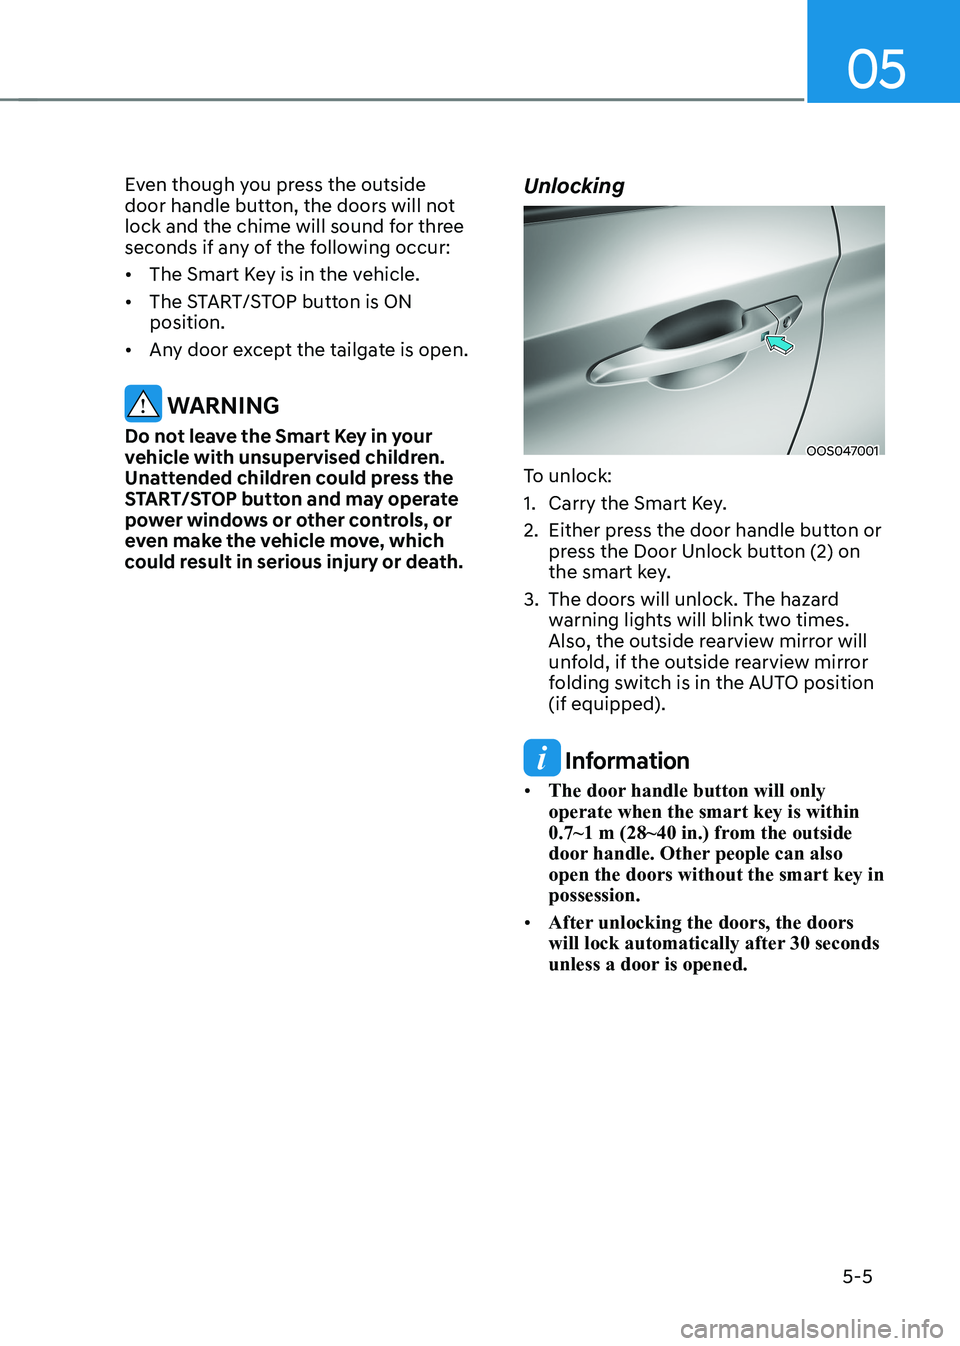
To unlock:
1. Carry the Smart Key.
2. Either press the door handle button or press the Door Unlock button (2) on
the smart key.
3. The doors will unlock. The hazard warning lights will blink two times.
Also, the outside rearview mirror will
unfold, if the outside rearview mirror
folding switch is in the AUTO position (if equipped).
Information
• The door handle button will only operate when the smart key is within
0.7~1 m (28~40 in.) from the outside
door handle. Other people can also open the doors without the smart key in possession.
• After unlocking the doors, the doors
will lock automatically after 30 seconds
unless a door is opened.