2022 HYUNDAI KONA EV display
[x] Cancel search: displayPage 452 of 548
07
7-119
Limitations of Forward/Reverse
Parking Distance Warning •
Forward/Reverse Parking Distance
Warning may not operate normally when:
- Moisture is frozen to the sensor
- Sensor is covered with foreign material, such as snow or water
(Forward/Reverse Parking Distance
Warning will operate normally
when such foreign material are
removed.)
- The weather is extremely hot or cold
- The sensor or sensor assembly is disassembled
- The surface of the sensor is pressed hard or an impact is applied with a
hard object
- The surface of the sensor is scratched with a sharp object
- The sensors or its surrounding area is directly sprayed with high
pressure washer
• Forward/Reverse Parking Distance
Warning may malfunction when:
- Heavy rain or water spray is present
- Water flows on the surface of the sensor
- Affected by another vehicle’s
sensors
- The sensor is covered with snow
- Driving on uneven road, gravel roads or bushes
- Objects that generates ultrasonic waves are near the sensor
- Installing the license plate differently from the original location
- The vehicle bumper height or ultrasonic sensor installation has been modified
- Attaching equipments or accessories around the ultrasonic
sensors •
The following objects may not be
detected:
- Sharp or slim objects, such as ropes, chains or small poles.
- Objects, which tend to absorb sensor frequency, such as clothes,
spongy material or snow.
- Objects smaller than 100 cm (40 in.) in length and narrower than 14 cm
(6 in.) in diameter.
- Pedestrians, animals or objects that are very close to the ultrasonic
sensors
• Parking Distance Warning Indicators
may be displayed differently from
the actual detected location when
the obstacle is located between the
sensors.
• Parking Distance Warning indicator
may not occur sequentially depending
on vehicle speed or obstacle shape.
• If Forward/Reverse Parking Distance
Warning needs repair, we recommend
that the vehicle be inspected by an
authorized HYUNDAI dealer.
Page 461 of 548
Emergency situations
8-6
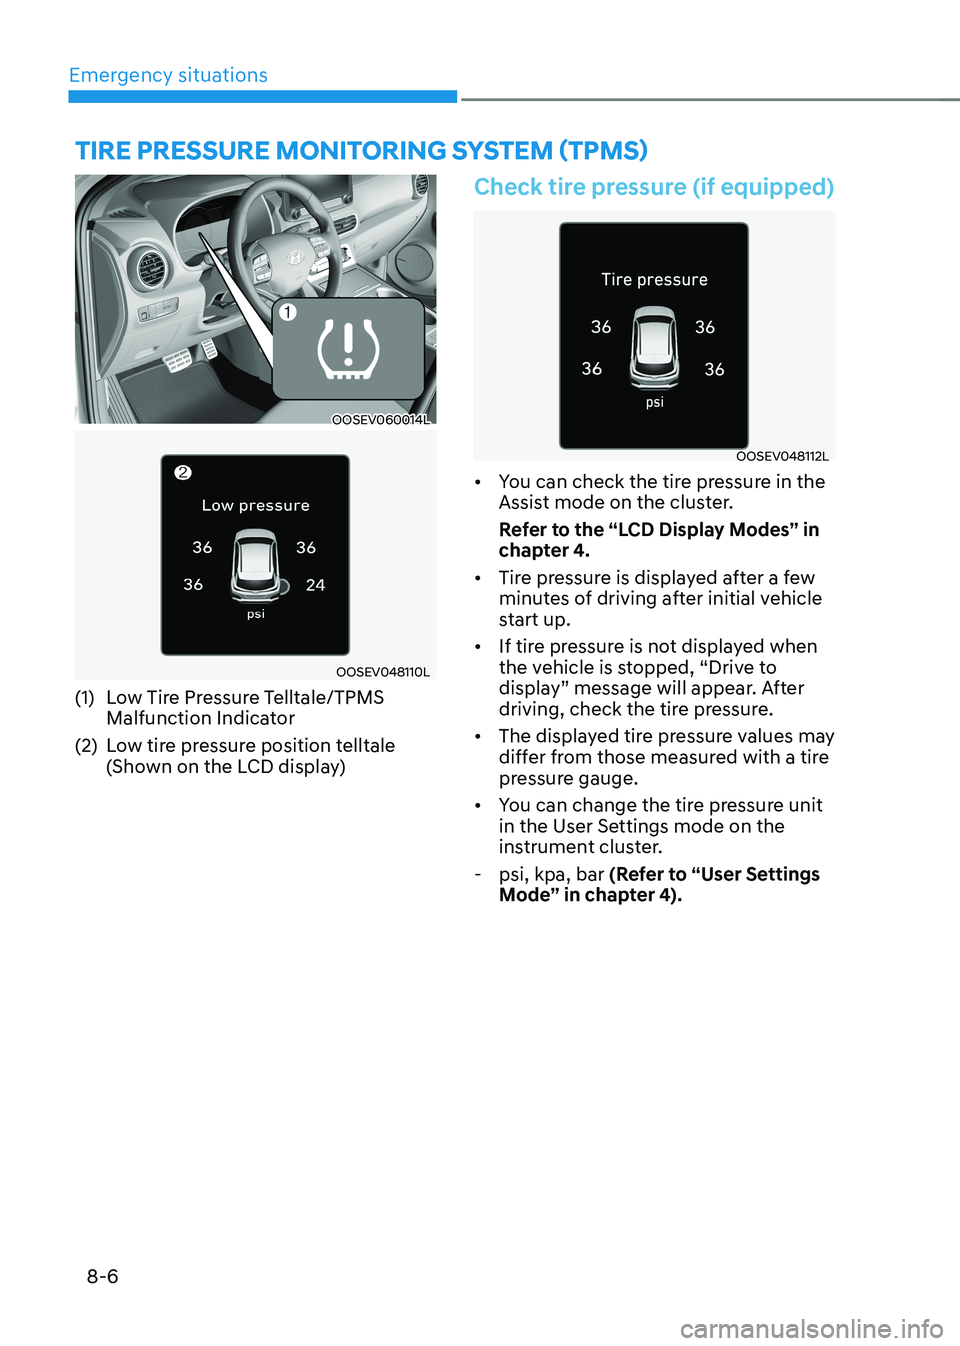
OOSEV060014L
OOSEV048110L
(1) Low Tire Pressure Telltale/TPMS Malfunction Indicator
(2) Low tire pressure position telltale (Shown on the LCD display)
Check tire pressure (if equipped)
OOSEV048112L
• You can check the tire pressure in the
Assist mode on the cluster.
Refer to the “LCD Display Modes” in
chapter 4.
• Tire pressure is displayed after a few
minutes of driving after initial vehicle
start up.
• If tire pressure is not displayed when
the vehicle is stopped, “Drive to
display” message will appear. After
driving, check the tire pressure.
• The displayed tire pressure values may
differ from those measured with a tire
pressure gauge.
• You can change the tire pressure unit
in the User Settings mode on the
instrument cluster.
- psi, kpa, bar (Refer to “User Settings
Mode” in chapter 4).
TIRE PRESSURE MoNIToRING SYSTEM (TPMS)
Page 463 of 548
Emergency situations
8-8
Low tire pressure telltale
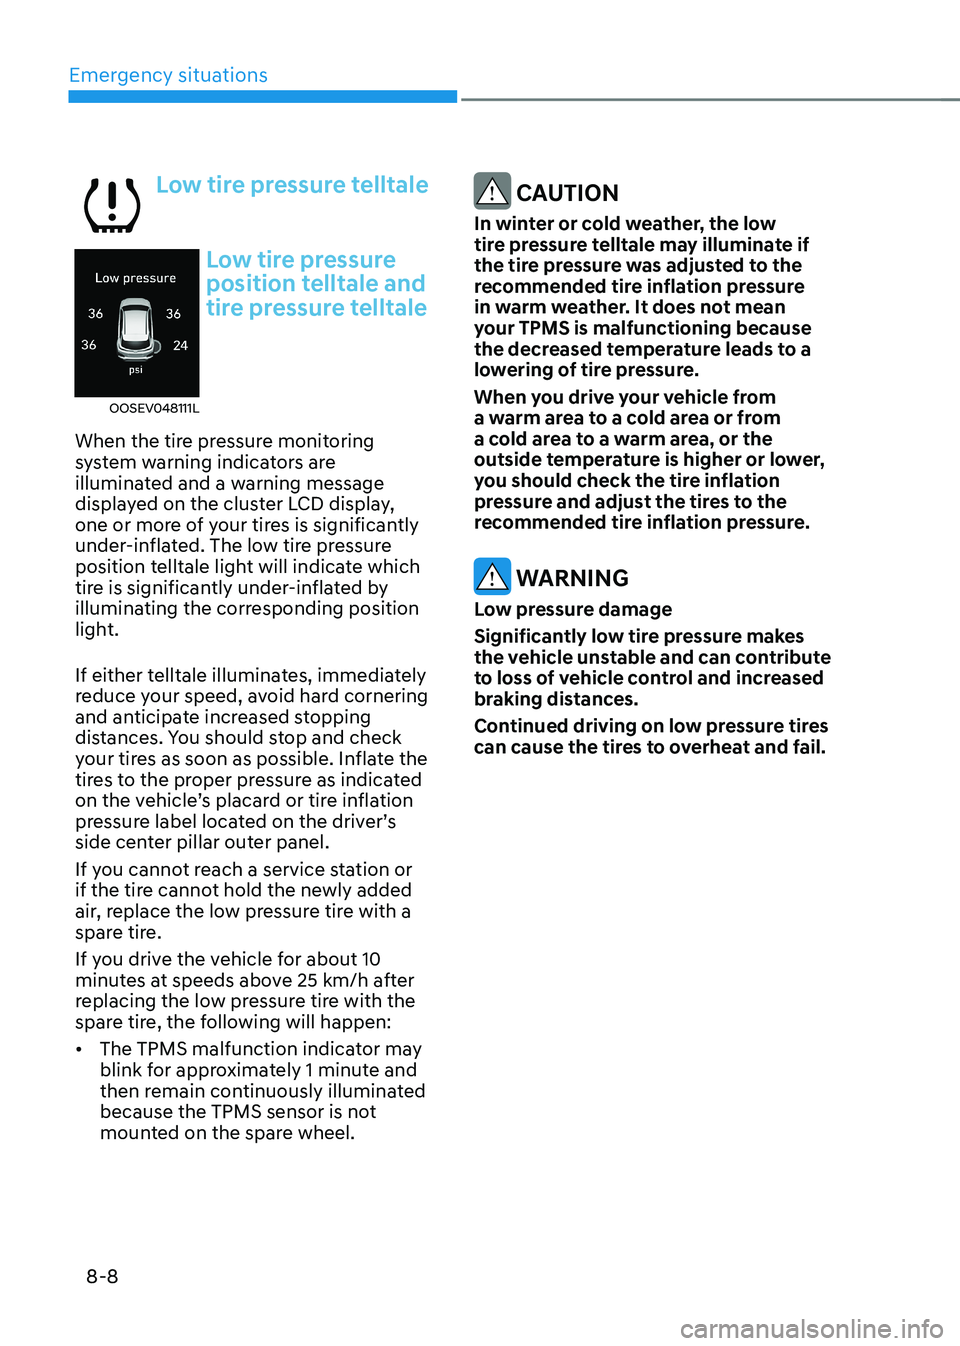
OOSEV048111L
Low tire pressure
position telltale and
tire pressure telltale
When the tire pressure monitoring
system warning indicators are
illuminated and a warning message
displayed on the cluster LCD display,
one or more of your tires is significantly
under-inflated. The low tire pressure
position telltale light will indicate which
tire is significantly under-inflated by
illuminating the corresponding position
light.
If either telltale illuminates, immediately
reduce your speed, avoid hard cornering
and anticipate increased stopping
distances. You should stop and check
your tires as soon as possible. Inflate the
tires to the proper pressure as indicated
on the vehicle’s placard or tire inflation
pressure label located on the driver’s
side center pillar outer panel.
If you cannot reach a service station or
if the tire cannot hold the newly added
air, replace the low pressure tire with a
spare tire.
If you drive the vehicle for about 10
minutes at speeds above 25 km/h after
replacing the low pressure tire with the
spare tire, the following will happen: • The TPMS malfunction indicator may
blink for approximately 1 minute and
then remain continuously illuminated
because the TPMS sensor is not
mounted on the spare wheel.
CAUTION
In winter or cold weather, the low
tire pressure telltale may illuminate if
the tire pressure was adjusted to the
recommended tire inflation pressure
in warm weather. It does not mean
your TPMS is malfunctioning because
the decreased temperature leads to a
lowering of tire pressure.
When you drive your vehicle from
a warm area to a cold area or from
a cold area to a warm area, or the
outside temperature is higher or lower,
you should check the tire inflation
pressure and adjust the tires to the
recommended tire inflation pressure.
WARNING
Low pressure damage
Significantly low tire pressure makes
the vehicle unstable and can contribute
to loss of vehicle control and increased
braking distances.
Continued driving on low pressure tires
can cause the tires to overheat and fail.
Page 464 of 548
08
8-9
TPMS (Tire Pressure
Monitoring System)
malfunction indicator
The TPMS malfunction indicator
will illuminate after it blinks for
approximately one minute when there
is a problem with the Tire Pressure
Monitoring System.
We recommend that the system be
checked by an authorized HYUNDAI
dealer.
NOTICE
If there is a malfunction with the TPMS,
the Low Tire Pressure Position Telltale
will not be displayed even though the
vehicle has an under-inflated tire.
NOTICE
The TPMS Malfunction Indicator may
illuminate after blinking for one minute
if the vehicle is near electric power
supply cables or radio transmitters
such as police stations, government
and public offices, broadcasting
stations, military installations, airports,
transmitting towers, etc.
Additionally, the TPMS Malfunction
Indicator may illuminate if snow chains
are used or electronic devices such as
computers, chargers, remote starters,
navigation, etc. This may interfere with
normal operation of the TPMS.
Changing a tire with TPMS
If you have a flat tire, the Low Tire
Pressure and Position telltales will come
on. We recommend that the flat tire be
repaired by an authorized HYUNDAI
dealer as soon as possible or replace the
flat tire with the spare tire.
CAUTION
It is recommended that you do not use a
puncture-repairing agent not approved
by HYUNDAI dealer to repair and/or
inflate a low pressure tire. Tire sealant
not approved by HYUNDAI dealer may
damage the tire pressure sensor.
Once the original tire equipped with
a tire pressure monitoring sensor is
reinflated to the recommended pressure
and reinstalled on the vehicle, the
Low Tire Pressure Telltale and TPMS
Malfunction Indicator will go off within a
few minutes of driving.
Each wheel is equipped with a tire
pressure sensor mounted inside
the tire behind the valve stem. You
must use TPMS specific wheels. It is
recommended that you have your tires
serviced by an authorized HYUNDAI
dealer.
If the indicators do not extinguish after
a few minutes, we recommend that you
visit an authorized HYUNDAI dealer.
You may not be able to identify a tire
with low pressure by simply looking at it.
Always use a good quality tire pressure
gauge to measure. Please note that a tire
that is hot (from being driven) will have a
higher pressure measurement than a tire
that is cold.
A cold tire means the vehicle has been
sitting for 3 hours and driven for less
than 1.6 km (1 mile) in that 3 hour period.
Allow the tire to cool before measuring
the inflation pressure. Always be sure
the tire is cold before inflating to the
recommended pressure.
Page 467 of 548
Emergency situations
8-12
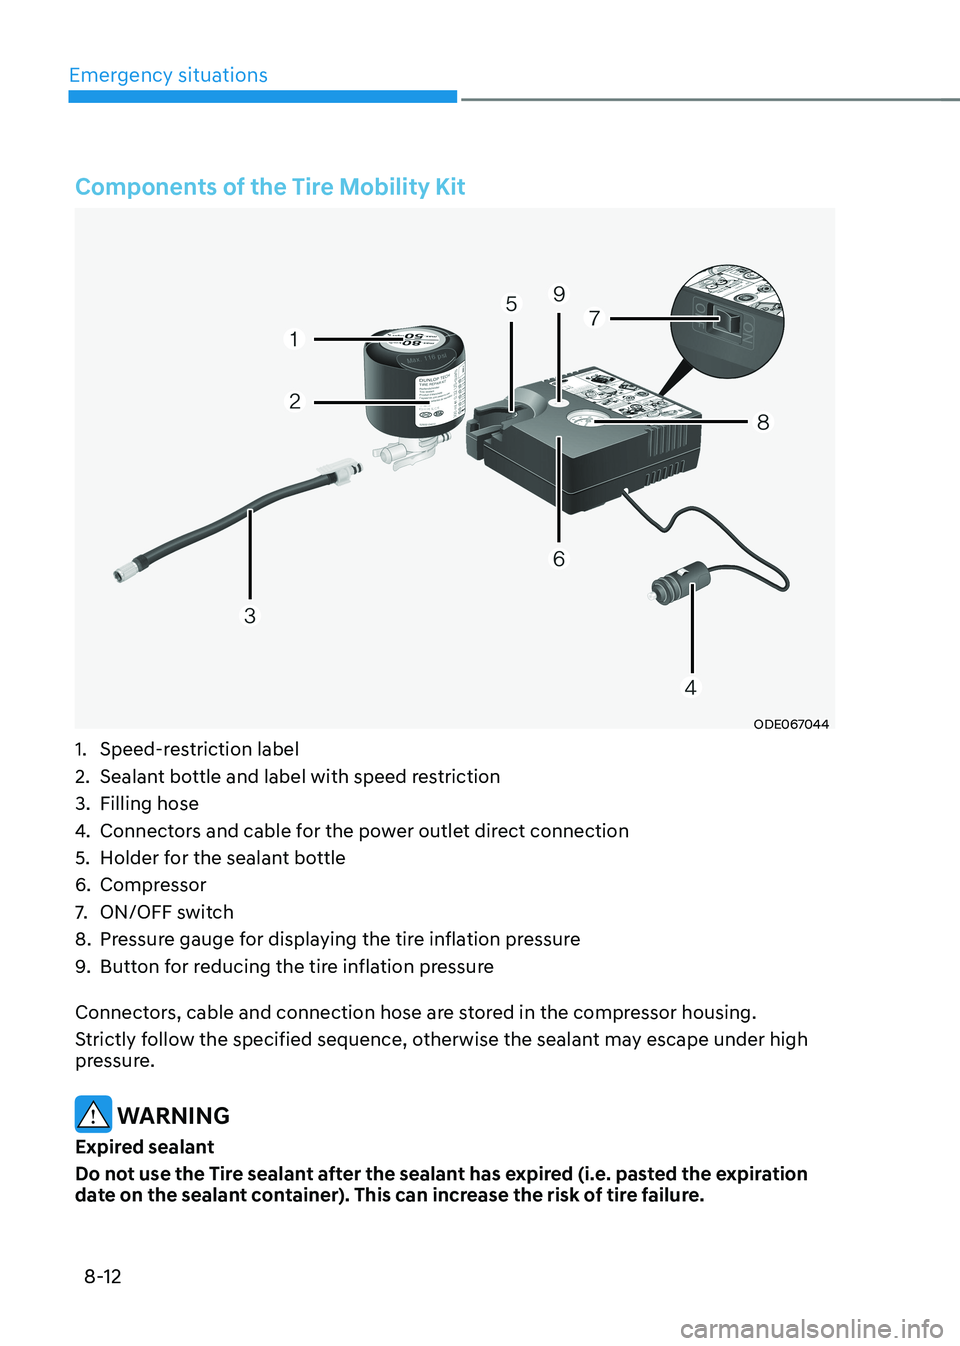
Components of the Tire Mobility Kit
ODE067044
1. Speed-restriction label
2. Sealant bottle and label with speed restriction
3. Filling hose
4. Connectors and cable for the power outlet direct connection
5. Holder for the sealant bottle
6. Compressor
7. ON/OFF switch
8. Pressure gauge for displaying the tire inflation pressure
9. Button for reducing the tire inflation pressure
Connectors, cable and connection hose are stored in the compressor housing.
Strictly follow the specified sequence, otherwise the sealant may escape under high
pressure.
WARNING
Expired sealant
Do not use the Tire sealant after the sealant has expired (i.e. pasted the expiration
date on the sealant container). This can increase the risk of tire failure.
Page 501 of 548

09
9-25
Wheel size designation
Wheels are also marked with important
information that you need if you ever
have to replace one. The following
explains what the letters and numbers in
the wheel size designation mean.
Example wheel size designation:6.5JX166.5 - Rim width in inches.
J - Rim contour designation.
16 - Rim diameter in inches.
Tire speed ratings
The chart below lists many of the
different speed ratings currently being
used for passenger vehicle tires. The
speed rating is part of the tire size
designation on the sidewall of the tire.
This symbol corresponds to that tire’s
designed maximum safe operating speed.
Speed Rating Symbol Maximum Speed
S 180 km/h (112 mph)
T 190 km/h (118 mph)
H 210 km/h (130 mph)
V 240 km/h (149 mph)
W 270km/h (168mph) Y 300km/h (186mph) 3. Checking tire life
(TIN : Tire Identification Number)
Any tires that are over six years old,
based on the manufacturing date,
(including the spare tire) should be
replaced by new ones. You can find the
manufacturing date on the tire sidewall
(possibly on the inside of the wheel),
displaying the DOT Code. The DOT Code
is a series of numbers on a tire consisting
of numbers and English letters. The
manufacturing date is designated by the
last four digits (characters) of the DOT code.
DOT : XXXX XXXX OOOO
The front part of the DOT shows a plant
code number, tire size and tread pattern
and the last four numbers indicate week
and year manufactured.
For example:
DOT XXXX XXXX 1521 represents that the
tire was produced in the 15th week of 2021.
4. Tire ply composition and material
The number of layers or plies of
rubber-coated fabric in the tire. Tire
manufacturers also must indicate the
materials in the tire, which include steel,
nylon, polyester, and others. The letter
“R” means radial ply construction; the
letter “D“ means diagonal or bias ply
construction; and the letter “B” means
belted-bias ply construction.
Page 513 of 548
09
9-37
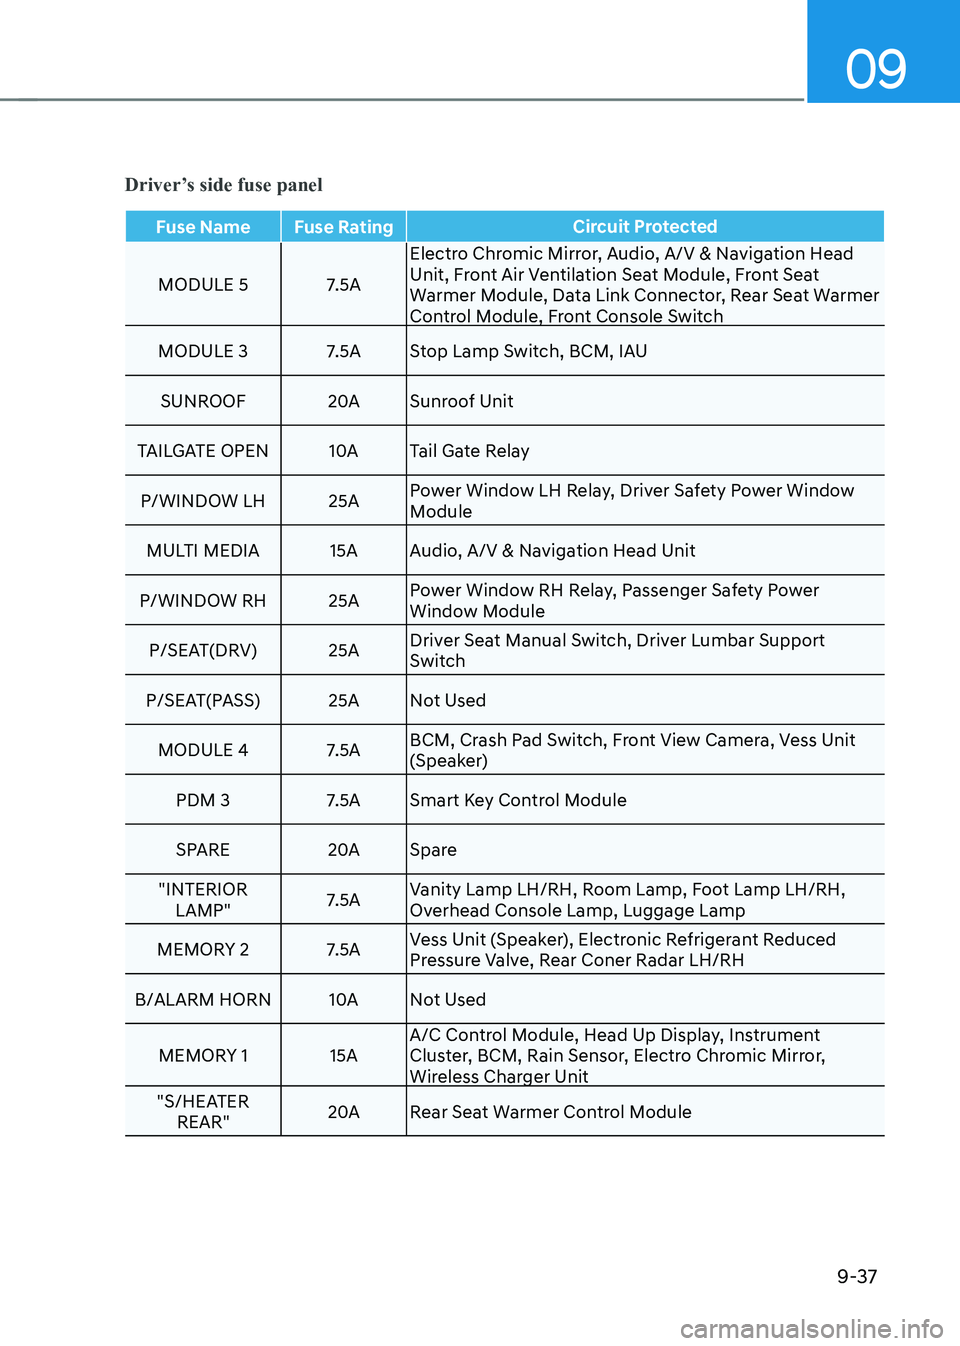
Driver’s side fuse panel
Fuse Name Fuse RatingCircuit Protected
MODULE 5 7.5AElectro Chromic Mirror, Audio, A/V & Navigation Head
Unit, Front Air Ventilation Seat Module, Front Seat
Warmer Module, Data Link Connector, Rear Seat Warmer
Control Module, Front Console Switch
MODULE 3 7.5A Stop Lamp Switch, BCM, IAU
SUNROOF 20ASunroof Unit
TAILGATE OpEN 10ATail Gate Relay
p/WINDOW LH 25A power Window LH Relay, Driver Safety power Window
Module
MULTI MEDIA 15A Audio, A/V & Navigation Head Unit
p/WINDOW RH 25A power Window RH Relay, passenger Safety power
Window Module
p/SEAT(DRV) 25A Driver Seat Manual Switch, Driver Lumbar Support
Switch
p/SEAT(pASS) 25A Not Used
MODULE 4 7.5A BCM, Crash pad Switch, Front View Camera, Vess Unit
(Speaker)
pDM 3 7.5A Smart Key Control Module
SpARE 20ASpare
"INTERIOR LAMp" 7.5AVanity Lamp LH/RH, Room Lamp, Foot Lamp LH/RH,
Overhead Console Lamp, Luggage Lamp
MEMORY 2 7.5A Vess Unit (Speaker), Electronic Refrigerant Reduced
pressure Valve, Rear Coner Radar LH/RH
B/ALARM HORN 10ANot Used
MEMORY 1 15A A/C Control Module, Head Up Display, Instrument
Cluster, BCM, Rain Sensor, Electro Chromic Mirror,
Wireless Charger Unit
"S/HEATER REAR" 20A
Rear Seat Warmer Control Module
Page 514 of 548

Maintenance
9-38
Fuse Name Fuse RatingCircuit Protected
AMp
30AAMp
MODULE 6 7.5A Smart Key Control Module, BCM, IAU MDpS 7.5A MDpS Unit
MODULE 1 7.5A Active Air Flap, Hazard Switch, Data Link Connector
MODULE 7 7.5A Front Air Ventilation Seat Module, Front Seat Warmer
Module, Rear Seat Warmer Control Module
A/BAG IND 7.5A A/C Control Module
BRAKE SWITCH 7.5A Stop Lamp Switch, Smart Key Control Module STA RT 7.5A Smart Key Control Module, EpCU
CLUSTER 7.5A Head Up Display, Instrument Cluster
DOOR LOCK 20ADoor Lock Relay, Door Unlock Relay, ICM Relay Box (Two
Turn Unlock Relay)
pDM 2 7.5A Driver/passenger Smart Key Outside Handle, BLE Unit,
IAU
FCA 10AFront Radar Unit
S/HEATER FRT 20AFront Seat Warmer Module, Front Air Ventilation Seat
Module
SpARE 10ASpare
A/C 7.5A A/C Control Module
pDM 1 15A Smart Key Control Module, Start/Stop Button
AIR BAG 15A SRS Control Module, passenger Occupant Detection Sensor
Driver’s side fuse Panel