2022 HYUNDAI ELANTRA HYBRID ECO mode
[x] Cancel search: ECO modePage 285 of 529
Driving your vehicle
6-40
Various driving situations, which you may
encounter in SMART mode
• The driving mode automatically
changes to SMART ECO mode after
a certain period of time, when you
gently depress the accelerator pedal
(Your driving is categorized to be
economic.).
• The driving mode automatically
changes from SMART ECO mode to
SMART NORMAL mode after a certain
period of time, when you sharply or
repetitively depress the accelerator pedal.
• The driving mode automatically
changes to SMART NORMAL mode
with the same driving patterns, when
the vehicle starts to drive on an
upward slope of a certain angle. The
driving mode automatically returns to
SMART ECO mode, when the vehicle
enters a leveled road.
• The driving mode automatically
changes to SMART SPORT, when
you abruptly accelerate the vehicle
or repetitively operate the steering
wheel (Your driving is categorized
to be sporty.). In this mode, your
vehicle drives in a lower gear for
abrupt accelerating/decelerating
and increases the engine brake
performance.
• You may still sense the engine
braking performance, even when
you release the accelerator pedal in
SMART SPORT mode. It is because
your vehicle remains in lower gear
over a certain period of time for next
acceleration. Thus, it is a normal
driving situation, not indicating any malfunction.
• The driving mode automatically
changes to SMART SPORT mode
only in harsh driving situations. In
most of the normal driving situations,
the driving mode sets to be either
in SMART ECO mode or in SMART NORMAL mode.
Limitation of SMART mode
The SMART mode may be limited in
following situations. (The OFF indicator
illuminates in those situations.) • The cruise control is activated :
The cruise control system may
deactivate the SMART mode when
the vehicle is controlled by the set
speed of Smart Cruise Control system.
(SMART mode is not deactivated
just by activating the cruise control
system.)
• The transmission oil temperature is
either extremely low or extremely high :
The SMART mode can be active in
most of the normal driving situations.
However, an extremely high/ low
transmission oil temperature may
temporarily deactivate the SMART
mode, because the transmission
condition is out of normal operation condition.
Page 286 of 529
06
6-41
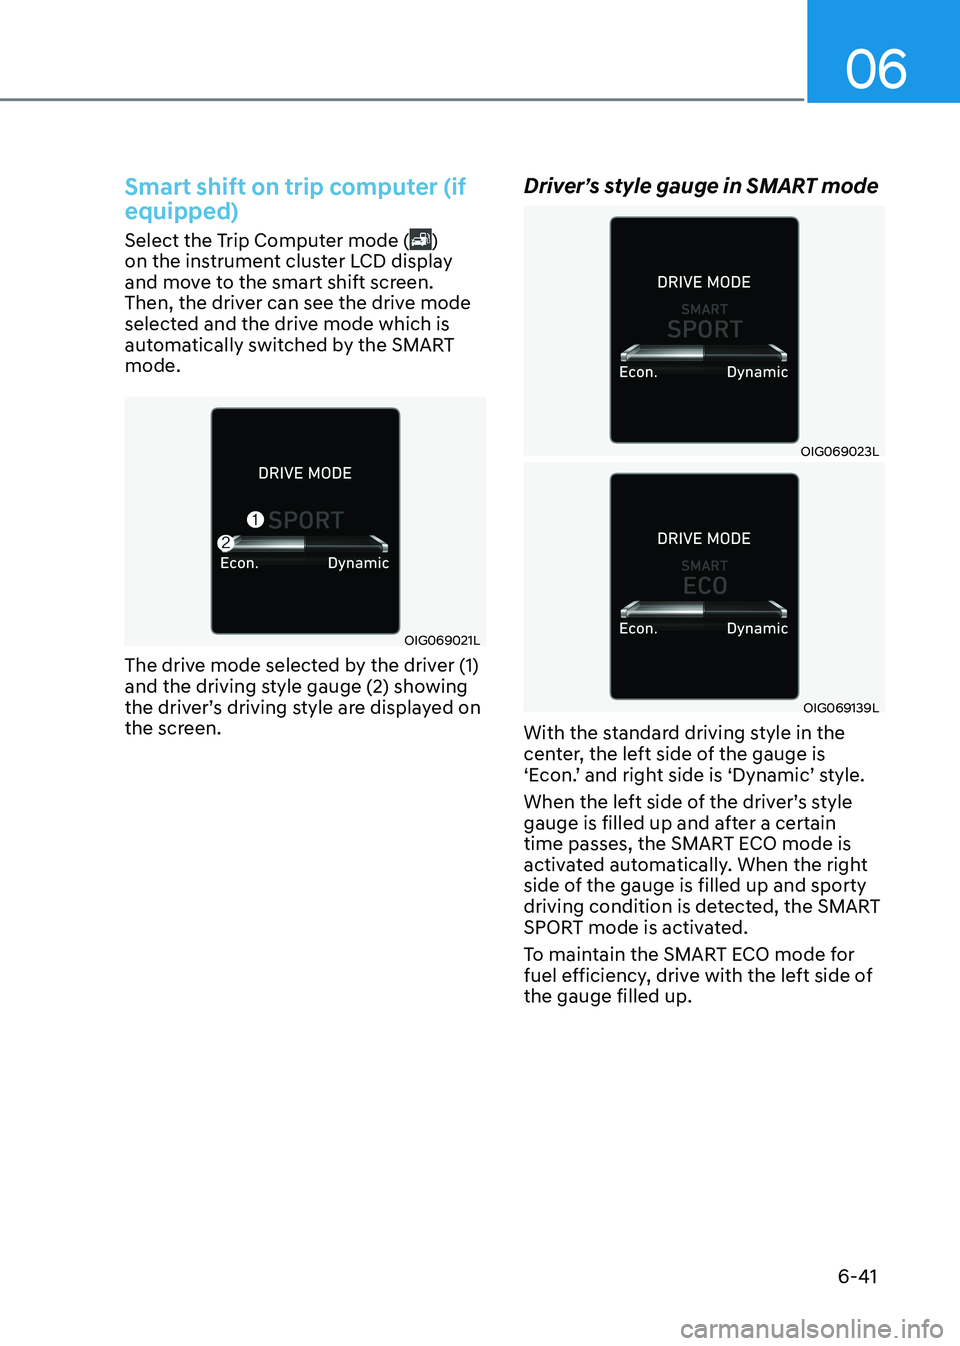
Smart shift on trip computer (if equipped)
Select the Trip Computer mode ()
on the instrument cluster LCD display
and move to the smart shift screen.
Then, the driver can see the drive mode
selected and the drive mode which is
automatically switched by the SMART mode.
OIG069021L
The drive mode selected by the driver (1)
and the driving style gauge (2) showing
the driver’s driving style are displayed on
the screen. Driver’s style gauge in SMART mode
OIG069023L
OIG069139L
With the standard driving style in the
center, the left side of the gauge is
‘Econ.’ and right side is ‘Dynamic’ style.
When the left side of the driver’s style
gauge is filled up and after a certain
time passes, the SMART ECO mode is
activated automatically. When the right
side of the gauge is filled up and sporty
driving condition is detected, the SMART
SPORT mode is activated.
To maintain the SMART ECO mode for
fuel efficiency, drive with the left side of the gauge filled up.
Page 425 of 529
Emergency Situations
8-4
• Be sure to shift the gear to P (Park).
The vehicle starts only when the gear
is in P (Park).
• This vehicle does not have a regular
12V battery that needs periodic
replacement. It is lithium ion polymer
type integrated into the HEV high
voltage battery. The vehicle has a
12V battery protection system that
cuts 12V battery from vehicle draw
to prevent full discharge. If vehicle
will not start, first try pressing the
12V Battery Reset switch (left side of
the steering wheel near the fuel door
open switch) to reconnect the 12V
battery, but you must start vehicle
within 15 seconds of pressing the 12V
Battery Reset switch. After starting
the vehicle (
indicator ON ),
operate the vehicle safely outdoors in
ready mode stopped and/or drive it
for 30 minutes total to charge the 12V
battery fully.
• Check the fuel level and add fuel if
necessary.
If the vehicle still does not start, call
an authorized HYUNDAI dealer for
assistance.
NOTICE
Push or pull starting the vehicle may
cause the catalytic converter to
overload which can lead to damage to
the emission control system.
iF tHe engine Will not start
Page 426 of 529
08
8-5
Before Jump Starting
This vehicle does not have a regular 12V
battery that needs periodic replacement.
It is lithium ion polymer type integrated
into the HEV high voltage battery. The
vehicle has a 12V battery protection
system that cuts 12V battery from vehicle
draw to prevent full discharge.
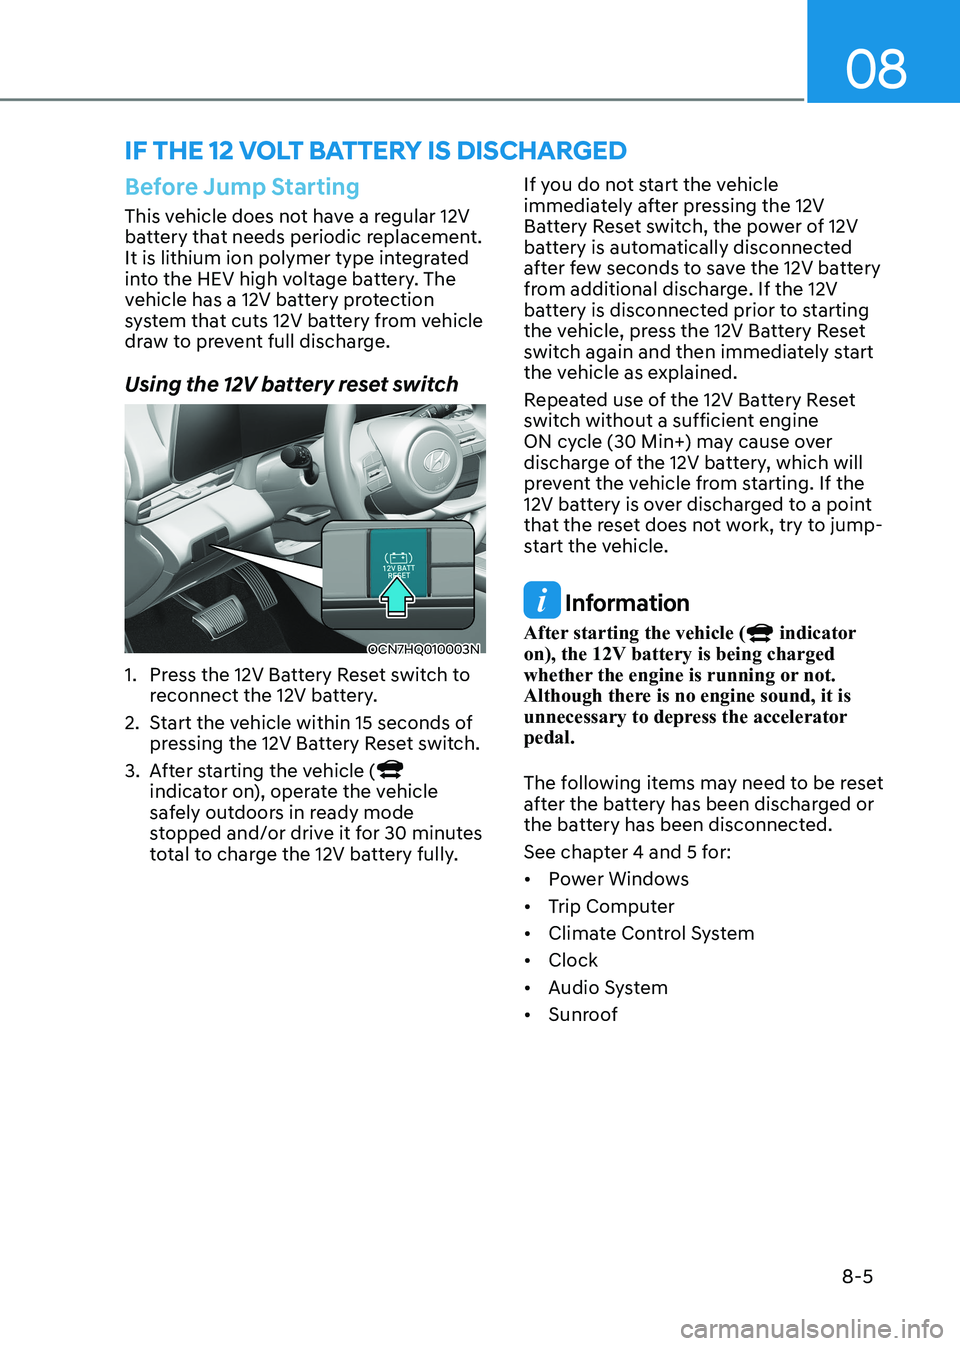
Using the 12V battery reset switch
OCN7HQ010003N
1. Press the 12V Battery Reset switch to reconnect the 12V battery.
2. Start the vehicle within 15 seconds of pressing the 12V Battery Reset switch.
3. After starting the vehicle (
indicator on), operate the vehicle
safely outdoors in ready mode
stopped and/or drive it for 30 minutes
total to charge the 12V battery fully. If you do not start the vehicle
immediately after pressing the 12V
Battery Reset switch, the power of 12V
battery is automatically disconnected
after few seconds to save the 12V battery
from additional discharge. If the 12V
battery is disconnected prior to starting
the vehicle, press the 12V Battery Reset
switch again and then immediately start
the vehicle as explained.
Repeated use of the 12V Battery Reset
switch without a sufficient engine
ON cycle (30 Min+) may cause over
discharge of the 12V battery, which will
prevent the vehicle from starting. If the
12V battery is over discharged to a point
that the reset does not work, try to jump-
start the vehicle.
Information
After starting the vehicle (
indicator
on), the 12V battery is being charged
whether the engine is running or not.
Although there is no engine sound, it is
unnecessary to depress the accelerator pedal.
The following items may need to be reset
after the battery has been discharged or
the battery has been disconnected.
See chapter 4 and 5 for:• Power Windows
• Trip Computer
• Climate Control System
• Clock
• Audio System
• Sunroof
iF tHe 12 volt Battery is disCHarged
Page 428 of 529
08
8 -7
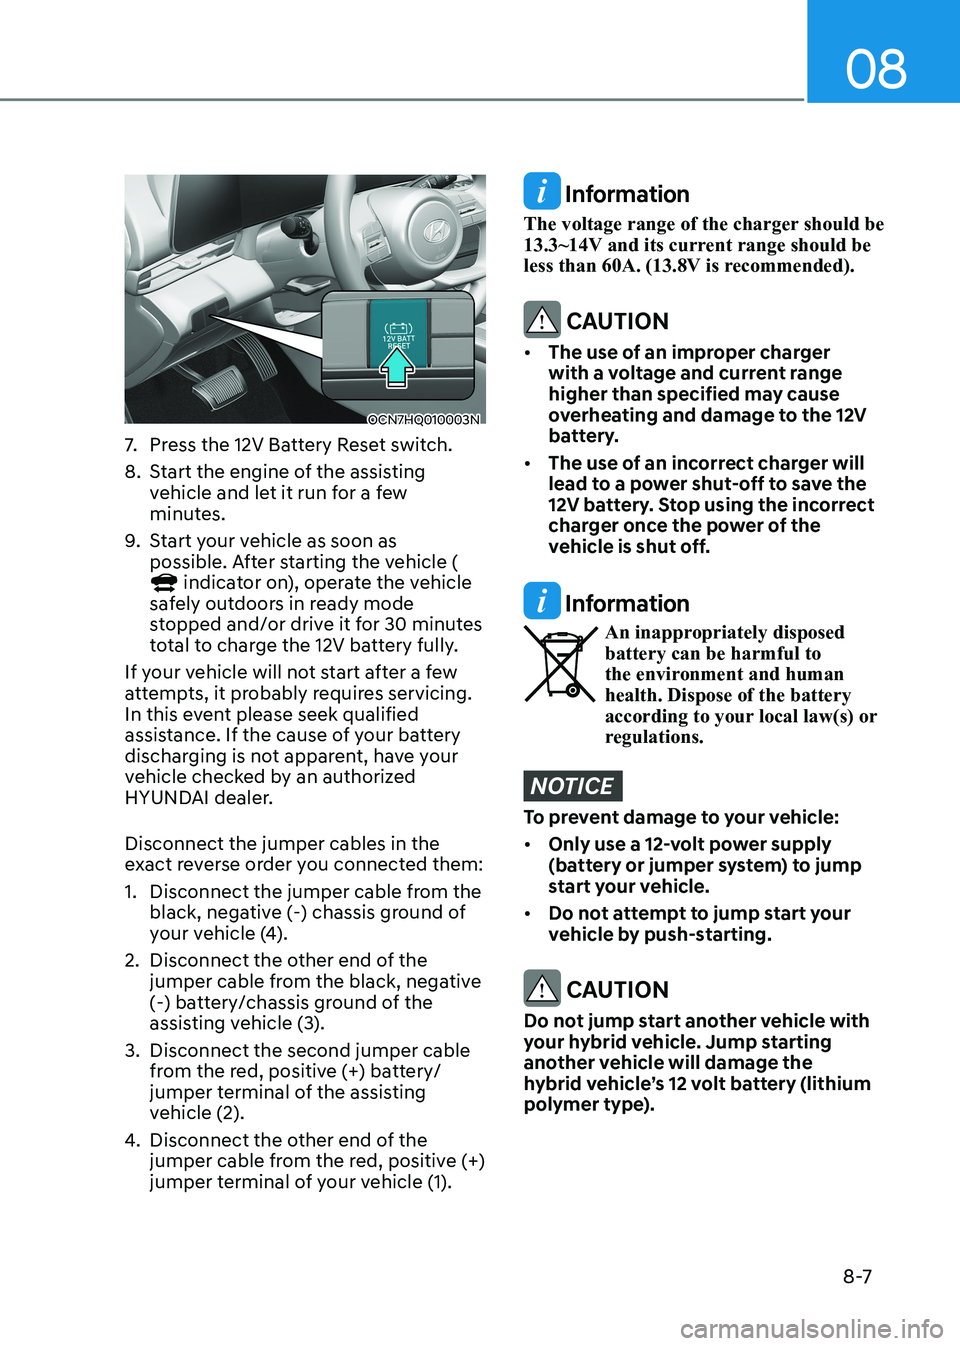
OCN7HQ010003N
7. Press the 12V Battery Reset switch.
8. Start the engine of the assisting vehicle and let it run for a few
minutes.
9. Start your vehicle as soon as
possible. After starting the vehicle (
indicator on), operate the vehicle
safely outdoors in ready mode
stopped and/or drive it for 30 minutes
total to charge the 12V battery fully.
If your vehicle will not start after a few
attempts, it probably requires servicing.
In this event please seek qualified
assistance. If the cause of your battery
discharging is not apparent, have your
vehicle checked by an authorized
HYUNDAI dealer. Disconnect the jumper cables in the
exact reverse order you connected them:
1. Disconnect the jumper cable from the black, negative (-) chassis ground of
your vehicle (4).
2. Disconnect the other end of the jumper cable from the black, negative
(-) battery/chassis ground of the
assisting vehicle (3).
3. Disconnect the second jumper cable from the red, positive (+) battery/
jumper terminal of the assisting
vehicle (2).
4. Disconnect the other end of the
jumper cable from the red, positive (+)
jumper terminal of your vehicle (1).
Information
The voltage range of the charger should be
13.3~14V and its current range should be
less than 60A. (13.8V is recommended).
CAUTION
• The use of an improper charger
with a voltage and current range
higher than specified may cause
overheating and damage to the 12V
battery.
• The use of an incorrect charger will
lead to a power shut-off to save the
12V battery. Stop using the incorrect
charger once the power of the
vehicle is shut off.
Information
An inappropriately disposed battery can be harmful to
the environment and human health. Dispose of the battery
according to your local law(s) or
regulations.
NOTICE
To prevent damage to your vehicle: • Only use a 12-volt power supply
(battery or jumper system) to jump
start your vehicle.
• Do not attempt to jump start your
vehicle by push-starting.
CAUTION
Do not jump start another vehicle with
your hybrid vehicle. Jump starting
another vehicle will damage the
hybrid vehicle’s 12 volt battery (lithium
polymer type).
Page 488 of 529

09
9-39
All Season Tires
HYUNDAI specifies all season
tires on some models to provide
good performance for use all year
round, including snowy and icy
road conditions. All season tires
are identified by ALL SEASON and/
or M+S (Mud and Snow) on the tire
sidewall. Snow tires have better
snow traction than all season tires
and may be more appropriate in
some areas.
Summer Tires
HYUNDAI specifies summer tires on
some models to provide superior
performance on dry roads. Summer
tire performance is substantially
reduced in snow and ice. Summer
tires do not have the tire traction
rating M+S (Mud and Snow) on
the tire side wall. If you plan to
operate your vehicle in snowy or icy
conditions, HYUNDAI recommends
the use of snow tires or all season
tires on all four wheels.
Snow Tires
If you equip your car with snow
tires, they should be the same size
and have the same load capacity as
the original tires. Snow tires should
be installed on all four wheels;
otherwise, poor handling may result.
Snow tires should carry 28 kPa (4 psi)
more air pressure than the pressure
recommended for the standard
tires on the tire label on the driver’s
side of the center pillar, or up to the
maximum pressure shown on the tire
sidewall, whichever is less. Do not
drive faster than 120 km/h (75 mph)
when your vehicle is equipped with
snow tires.
Radial-Ply Tires
Radial-ply tires provide improved
tread life, road hazard resistance
and smoother high speed ride. The
radial-ply tires used on this vehicle
are of belted construction, and are
selected to complement the ride
and handling characteristics of your
vehicle.
Radial-ply tires have the same load
carrying capacity, as bias-ply or
bias belted tires of the same size,
and use the same recommended
inflation pressure. Mixing of radial-
ply tires with bias-ply or bias belted
tires is not recommended. Any
combinations of radial-ply and bias-
ply or bias belted tires when used
on the same vehicle will seriously
deteriorate vehicle handling. The
best rule to follow is: Identical pairs
of radial-ply tires should always be
used as a set for the front tires and a
set for the rear tires.
Longer wearing tires can be more
susceptible to irregular tread wear.
It is very important to follow the tire
rotation interval in this chapter to
achieve the tread life potential of
these tires. Cuts and punctures in
radial-ply tires are repairable only in
the tread area, because of sidewall
flexing. Consult your tire dealer for
radial-ply tire repairs.
WARNING
Do not mix bias ply and radial ply
tires under any circumstances.
This may cause unusual handling
characteristics that may cause loss
of vehicle control resulting in an accident.