2022 HYUNDAI ELANTRA HYBRID trunk
[x] Cancel search: trunkPage 249 of 529
Driving your vehicle
6-4
Before Entering the Vehicle
• Be sure all windows, outside mirror(s),
and outside lights are clean and
unobstructed.
• Remove frost, snow, or ice.
• Visually check the tires for uneven
wear and damage.
• Check under the vehicle for any sign
of leaks.
• Be sure there are no obstacles behind
you if you intend to back up.
Before Starting
• Make sure the hood, the trunk, and
the doors are securely closed and
locked.
• Adjust the position of the seat and
steering wheel.
• Adjust the inside and side view
mirrors.
• Verify all the lights work.
• Fasten your seatbelt. Check that
all passengers have fastened their
seatbelts.
• Check the gauges and indicators
in the instrument panel and the
messages on the instrument display
when the ignition switch is in the ON position.
• Check that any items you are carrying
are stored properly or fastened down
securely.
WARNING
To reduce the risk of SERIOUS INJURY or
DEATH, take the following precautions: • ALWAYS wear your seat belt. All
passengers must be properly belted
whenever the vehicle is moving.
For more information, refer to "Seat
Belts" in chapter 3.
• Always drive defensively. Assume
other drivers or pedestrians may be
careless and make mistakes.
• Stay focused on the task of driving.
Driver distraction can cause
accidents.
• Leave plenty of space between you
and the vehicle in front of you.
WARNING
NEVER drink alcohol or take drugs and
drive.
Drinking alcohol or taking drugs and
driving is dangerous and may result in
an accident and SERIOUS INJURY or
DEATH. Drunk driving is the number one
contributor to the highway death
toll each year. Even a small amount
of alcohol will affect your reflexes,
perceptions and judgment. Just
one drink can reduce your ability to
respond to changing conditions and
emergencies and your reaction time
gets worse with each additional drink.
Driving while under the influence
of drugs is as dangerous or more
dangerous than driving under the
influence of alcohol.
You are much more likely to have a
serious accident if you drink or take
drugs and drive. If you are drinking or
taking drugs, don't drive. Do not ride
with a driver who has been drinking
or taking drugs. Choose a designated
driver or call a taxi.
Before Driving
Page 271 of 529
Driving your vehicle
6-26
• Satisfy the following conditions
1. Ensure seat belts are fastened and the doors, hood and tailgate are closed.
2. With the vehicle in the ready (
)
mode, depress the brake pedal and
shift out of P (Park) to R (Reverse), D
(Drive) or Manual shift mode.
3. Depress the accelerator pedal.
Make sure the Parking Brake Warning
Light goes off.
Information
• For your safety, you can engage the EPB even though the ignition switch
is in the OFF position, but you cannot
release it.
• For your safety, depress the brake
pedal and release the parking brake manually with the EPB switch when
you drive downhill or when backing up the vehicle.
NOTICE
• If the parking brake warning light
is still on even though the EPB has
been released, have the system be
checked by an authorized HYUNDAI
dealer.
• Do not drive your vehicle with the
EPB applied. It may cause excessive
brake pad and brake rotor wear.
EPB (Electronic Parking Brake) may be automatically applied when: • Requested by other systems
• The driver turns the engine off while
Auto Hold is operating. Warning messages
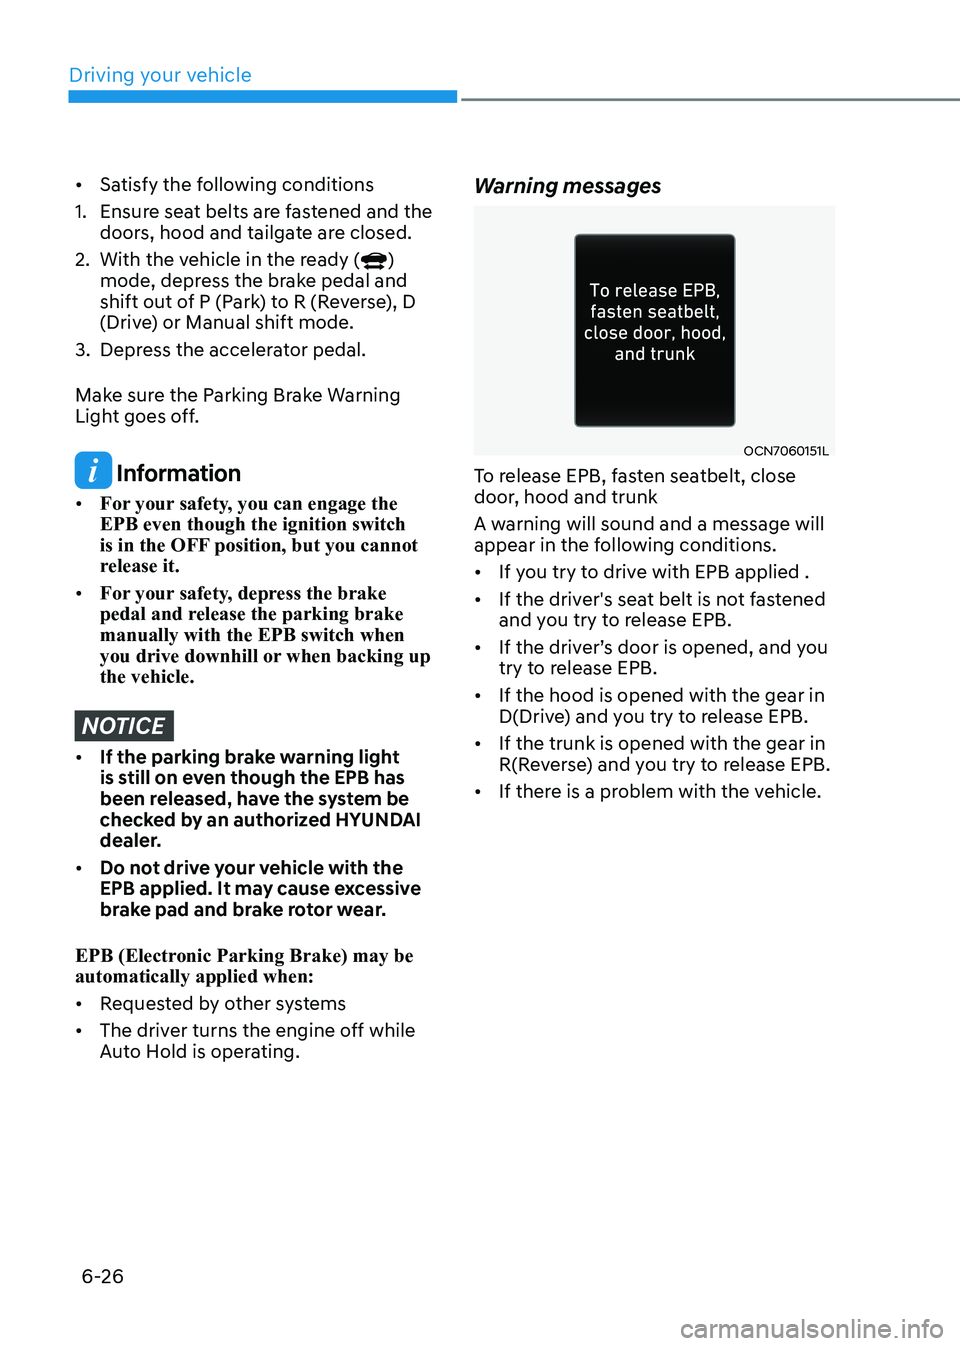
OCN7060151L
To release EPB, fasten seatbelt, close
door, hood and trunk
A warning will sound and a message will
appear in the following conditions. • If you try to drive with EPB applied .
• If the driver's seat belt is not fastened
and you try to release EPB.
• If the driver’s door is opened, and you
try to release EPB.
• If the hood is opened with the gear in
D(Drive) and you try to release EPB.
• If the trunk is opened with the gear in
R(Reverse) and you try to release EPB.
• If there is a problem with the vehicle.
Page 275 of 529
![HYUNDAI ELANTRA HYBRID 2022 Owners Manual Driving your vehicle
6-30
To cancel :
OCN7060018
1. Depress the brake pedal.
2. Press the [AUTO HOLD] switch.
The AUTO HOLD indicator will turn off.
WARNING
To prevent, unexpected and sudden
ve HYUNDAI ELANTRA HYBRID 2022 Owners Manual Driving your vehicle
6-30
To cancel :
OCN7060018
1. Depress the brake pedal.
2. Press the [AUTO HOLD] switch.
The AUTO HOLD indicator will turn off.
WARNING
To prevent, unexpected and sudden
ve](/manual-img/35/56241/w960_56241-274.png)
Driving your vehicle
6-30
To cancel :
OCN7060018
1. Depress the brake pedal.
2. Press the [AUTO HOLD] switch.
The AUTO HOLD indicator will turn off.
WARNING
To prevent, unexpected and sudden
vehicle movement, ALWAYS press your
foot on the brake pedal to cancel the
Auto Hold before you: - Drive downhill.
- Drive the vehicle in R (Reverse).
- Park the vehicle.
Information
• The Auto Hold does not operate when:
- The driver’s door is opened
- The engine hood is opened in D
(Driving) or N (Neutral)
- The shift lever is in P (Park)
- The trunk is opened in R (Reverse)
- The EPB is applied
- The vehicle stop more than 30 minutes.
• For your safety, the Auto Hold automatically switches to EPB when:
- The driver’s door is opened in D
(Driving) or N(Neutral).
- The engine hood is opened.
- The trunk is opened in R (Reverse).
- The vehicle stops for more than 10 minutes
- The vehicle stands on a steep slope
- The vehicle moves several times
- The vehicle stops for more than 30
minutes accumulatively.
In these cases, the parking brake
warning light comes on, the AUTO
HOLD indicator changes from green
to white, and a warning sound and a
message will appear to inform you that
EPB has been automatically engaged.
Before driving off again, press foot
brake pedal, check the surrounding area
near your vehicle and release parking brake manually with the EPB switch.
• While operating Auto Hold, you may
hear mechanical noise. However, it is normal operating noise.
NOTICE
If the AUTO HOLD indicator changes
to yellow, the Auto Hold is not working
properly. Contact an authorized
HYUNDAI dealer.
WARNING
• Depress the accelerator pedal slowly
when you start the vehicle.
• For your safety, cancel the Auto Hold
when you drive downhill, back up the
vehicle or park the vehicle.
NOTICE
If there is a malfunction with the
driver's door or engine hood open
detection system, the Auto Hold may
not work properly.
Contact an authorized HYUNDAI dealer.
•
•CLUSTER
Page 276 of 529
06
6-31
Warning messages
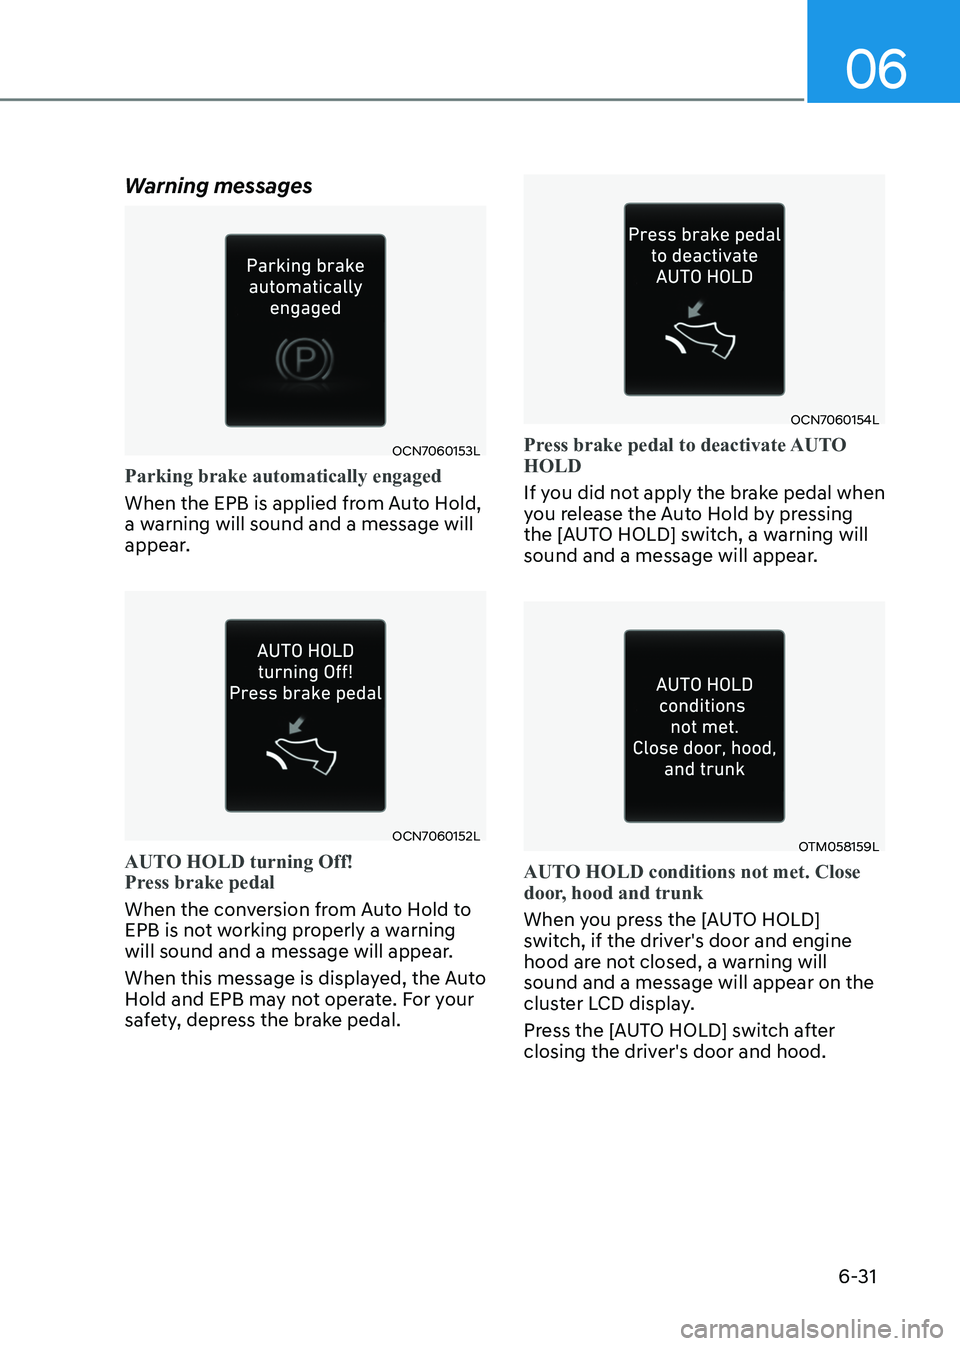
OCN7060153L
Parking brake automatically engaged
When the EPB is applied from Auto Hold,
a warning will sound and a message will
appear.
OCN7060152L
AUTO HOLD turning Off!
Press brake pedal
When the conversion from Auto Hold to
EPB is not working properly a warning
will sound and a message will appear.
When this message is displayed, the Auto
Hold and EPB may not operate. For your
safety, depress the brake pedal.
OCN7060154L
Press brake pedal to deactivate AUTO HOLD
If you did not apply the brake pedal when
you release the Auto Hold by pressing
the [AUTO HOLD] switch, a warning will
sound and a message will appear.
OTM058159L
AUTO HOLD conditions not met. Close
door, hood and trunk
When you press the [AUTO HOLD]
switch, if the driver's door and engine
hood are not closed, a warning will sound and a message will appear on the
cluster LCD display.
Press the [AUTO HOLD] switch after
closing the driver's door and hood.
Page 445 of 529
Emergency Situations
8-24
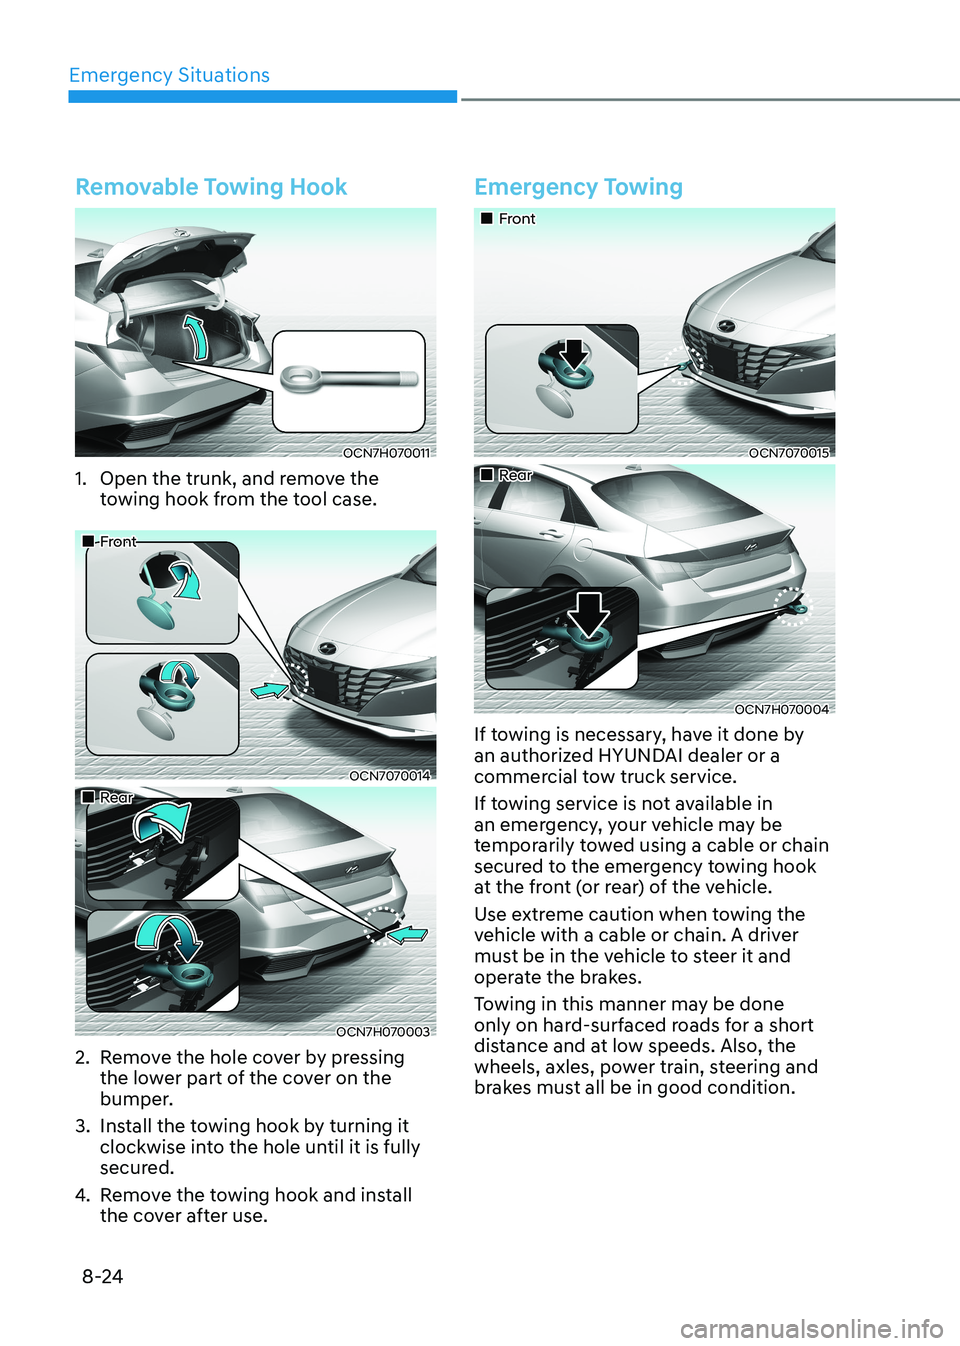
Removable Towing Hook
OCN7H070011
1. Open the trunk, and remove the towing hook from the tool case.
„„Front
OCN7070014
„„Rear
OCN7H070003
2. Remove the hole cover by pressing the lower part of the cover on the
bumper.
3. Install the towing hook by turning it clockwise into the hole until it is fully
secured.
4. Remove the towing hook and install
the cover after use.
Emergency Towing
„„Front
OCN7070015
„„Rear
OCN7H070004
If towing is necessary, have it done by
an authorized HYUNDAI dealer or a
commercial tow truck service.
If towing service is not available in
an emergency, your vehicle may be
temporarily towed using a cable or chain
secured to the emergency towing hook
at the front (or rear) of the vehicle.
Use extreme caution when towing the
vehicle with a cable or chain. A driver
must be in the vehicle to steer it and
operate the brakes.
Towing in this manner may be done
only on hard-surfaced roads for a short
distance and at low speeds. Also, the
wheels, axles, power train, steering and
brakes must all be in good condition.
Page 494 of 529
09
9-45
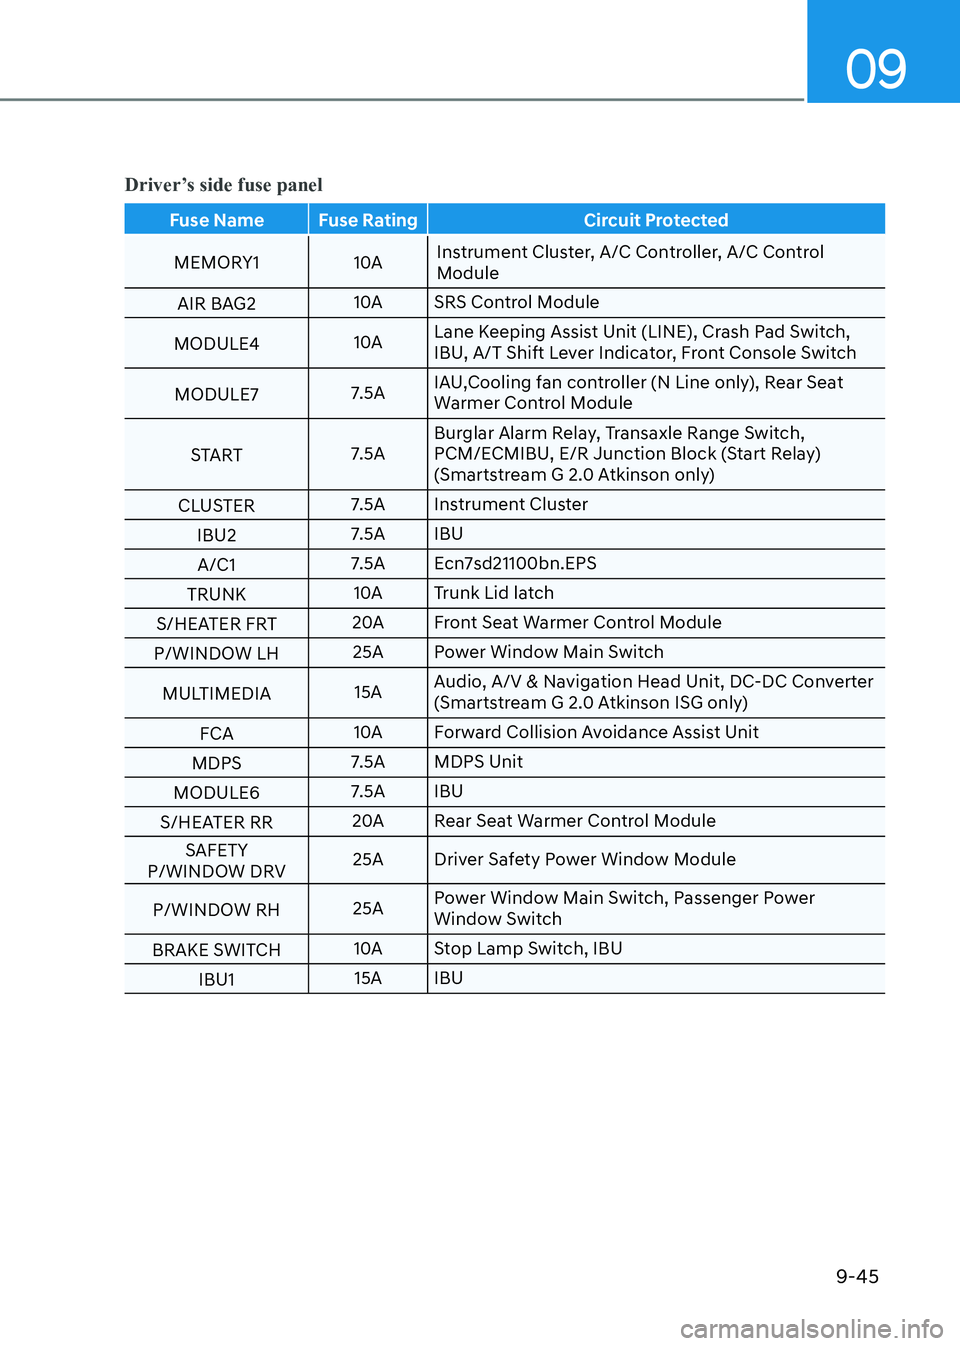
Driver’s side fuse panel
Fuse Name Fuse Rating Circuit Protected
MEMORY1 10AInstrument Cluster, A/C Controller, A/C Control
Module
AIR BAG2 10A SRS Control Module
MODULE4 10ALane Keeping Assist Unit (LINE), Crash Pad Switch,
IBU, A/T Shift Lever Indicator, Front Console Switch
MODULE7 7.5AIAU, Cooling fan controller (N Line only), Rear Seat
Warmer Control Module
START 7.5ABurglar Alarm Relay, Transaxle Range Switch,
PCM/ECM IBU, E/R Junction Block (Start Relay)
(Smartstream G 2.0 Atkinson only)
CLUSTER 7.5A Instrument Cluster
IBU2 7.5A IBU
A/C1 7.5A Ecn7sd21100bn.EPS
TRUNK 10A Trunk Lid latch
S/HEATER FRT 20A Front Seat Warmer Control Module
P/WINDOW LH 25A Power Window Main Switch
MULTIMEDIA 15AAudio, A/V & Navigation Head Unit, DC-DC Converter
(Smartstream G 2.0 Atkinson ISG only)
FCA 10A Forward Collision Avoidance Assist Unit
MDPS 7.5A MDPS Unit
MODULE6 7.5A IBU
S/HEATER RR 20A Rear Seat Warmer Control Module
SAFETY
P/WINDOW DRV 25A Driver Safety Power Window Module
P/WINDOW RH 25APower Window Main Switch, Passenger Power
Window Switch
BRAKE SWITCH 10A Stop Lamp Switch, IBU
IBU1 15A IBU
Page 497 of 529
![HYUNDAI ELANTRA HYBRID 2022 Owners Manual Maintenance
9-48
Engine compartment fuse panel
Type Fuse NameFuse Rating Circuit Protected
MULTI
FUSE-3 ALT
150A
180A [Smartstream G 2.0 Atkinson with AMS2]
Alternator, (Fuse - ABS1, ABS2, EOP1, POW HYUNDAI ELANTRA HYBRID 2022 Owners Manual Maintenance
9-48
Engine compartment fuse panel
Type Fuse NameFuse Rating Circuit Protected
MULTI
FUSE-3 ALT
150A
180A [Smartstream G 2.0 Atkinson with AMS2]
Alternator, (Fuse - ABS1, ABS2, EOP1, POW](/manual-img/35/56241/w960_56241-496.png)
Maintenance
9-48
Engine compartment fuse panel
Type Fuse NameFuse Rating Circuit Protected
MULTI
FUSE-3 ALT
150A
180A [Smartstream G 2.0 Atkinson with AMS2]
Alternator, (Fuse - ABS1, ABS2, EOP1, POWER OUTLET1)
[Smartstream G 2.0 Atkinson & Smartstream
G1.6 T-GDi without AMS2] Alternator, (Fuse -
ABS1, ABS2, POWER OUTLET1)
MDPS1 80A MDPS Unit
MULTI
FUSE-2 COOLING
FAN2 60A [G4FP] Cooling Fan Controller
DCT3 40A [G4FP] SGA
MULTI
FUSE-1 B+5
60APCB Block (Engine Control Relay, Fuse -
ECU3, ECU4, HORN, WIPER, A/C)
B+1 60AICU Junction Block (IPS2/IPS5/IPS6/IPS7/
IPS14)
B+2 60AICU Junction Block (IPS1/IPS4/IPS8/IPS9/
IPS10)
B+3 50AICU Junction Block (Fuse - TRUNK, AMP,
SAFETY P/WINDOW DRV, P/SEAT DRV, P/
SEAT PASS, S/HEATER FRT, S/HEATER RR,
Long Term Load Latch Relay)
EPB 60A ESC Control Module
PTC HEATER 50A E/R Junction Block (PTC Heater Relay)
BLOWER 40A BLOWER Motor, Ecn7sd21100dn.EPS
IG1 40AE/R Junction Block (PDM (IG1/ACC) Relay),
Ignition Switch
IG2 40AE/R Junction Block (PDM (IG2) Relay, Start
Relay), Ignition Switch
Page 504 of 529
09
9-55
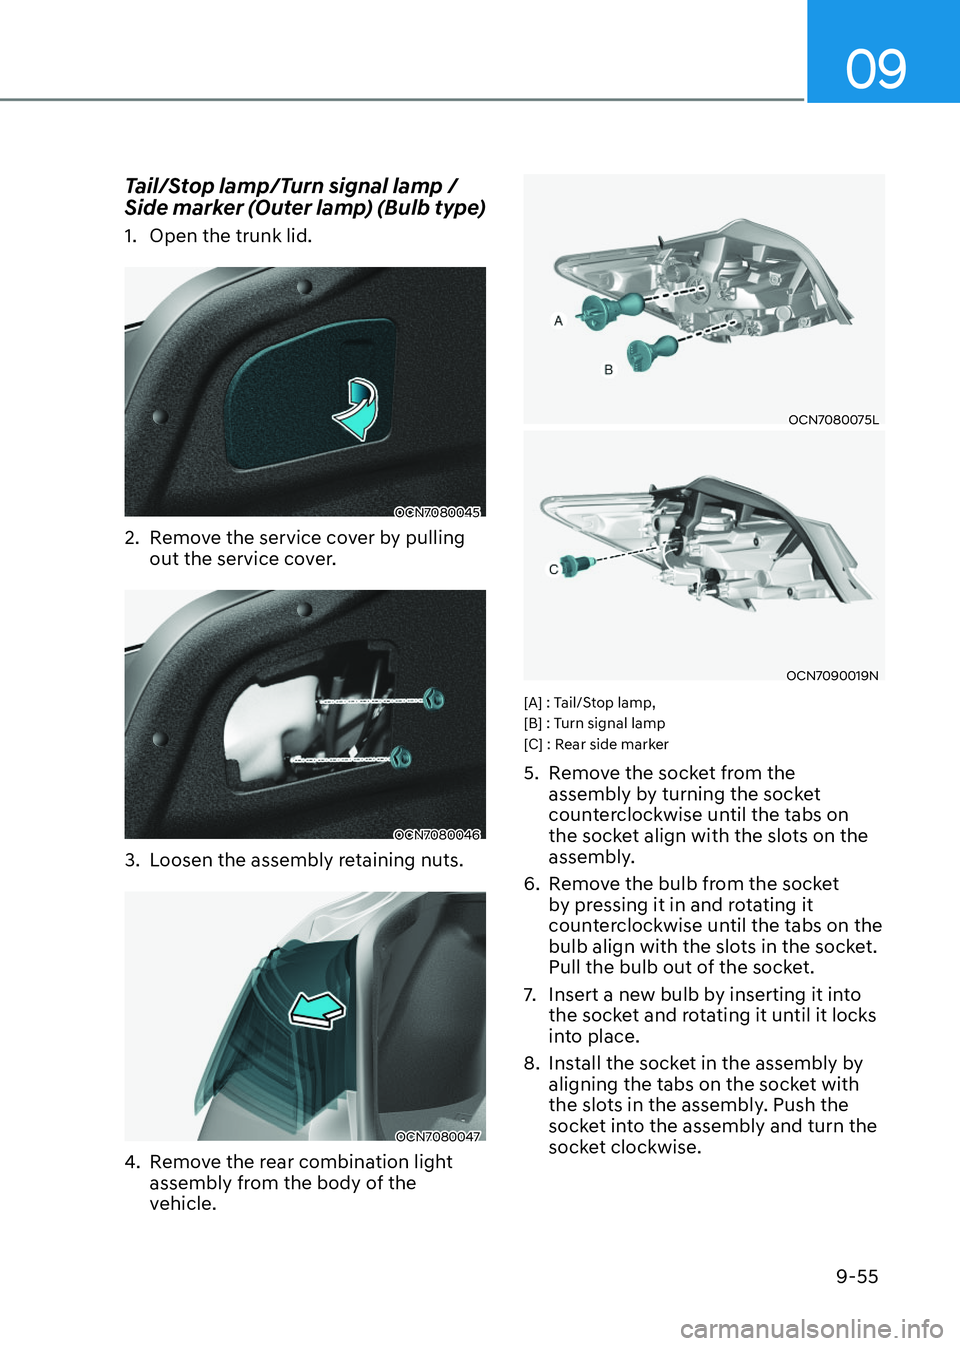
Tail/Stop lamp/Turn signal lamp /
Side marker (Outer lamp) (Bulb type)
1. Open the trunk lid.
OCN7080045OCN7080045
2. Remove the service cover by pulling out the service cover.
OCN7080046OCN7080046
3. Loosen the assembly retaining nuts.
OCN7080047OCN7080047
4. Remove the rear combination light assembly from the body of the
vehicle.
OCN7080075LOCN7080075L
OCN7090019NOCN7090019N
[A] : Tail/Stop lamp,
[B] : Turn signal lamp
[C] : Rear side marker
5. Remove the socket from the assembly by turning the socket
counterclockwise until the tabs on
the socket align with the slots on the
assembly.
6. Remove the bulb from the socket by pressing it in and rotating it
counterclockwise until the tabs on the
bulb align with the slots in the socket.
Pull the bulb out of the socket.
7. Insert a new bulb by inserting it into the socket and rotating it until it locks
into place.
8. Install the socket in the assembly by aligning the tabs on the socket with
the slots in the assembly. Push the
socket into the assembly and turn the
socket clockwise.