2022 HYUNDAI ELANTRA HYBRID run flat
[x] Cancel search: run flatPage 84 of 529

Seats & Safety System
3-42
SRS warning light
The SRS (Supplement Restraint System)
air bag warning light on the instrument
panel displays the air bag symbol
depicted in the illustration. The system
checks the air bag electrical system for
malfunctions. The light indicates that
there is a potential malfunction with your
air bag system, which could include your
side and curtain air bags used for rollover
protection.
WARNING
If your SRS malfunctions, the air bag
may not inflate properly during an
accident increasing the risk of serious
injury or death.
If any of the following conditions occur,
your SRS is malfunctioning: • The light does not turn on for
approximately three to six seconds
when the Engine Start/Stop button is in the ON position.
• The light stays on after illuminating
for approximately three to six
seconds.
• The light comes on while the vehicle
is in motion.
• The light blinks when the engine is running.
Have an authorized HYUNDAI dealer inspect the SRS as soon as possible if
any of these conditions occur. During a frontal collision, sensors will
detect the vehicle’s deceleration. If the
rate of deceleration is high enough, the
control unit will inflate the front air bags.
The front air bags help protect the driver
and front passenger by responding to
frontal impacts in which seat belts alone
cannot provide adequate restraint. When
needed, the side air bags help provide
protection in the event of a side impact
or rollover. •
Air bags are activated (able to inflate
if necessary) when the Engine Start/
Stop button is in the ON position or
approximately within 3 minutes after
ignition off.
• Air bags inflate in the event of certain
frontal or side collisions to help
protect the occupants from serious
physical injury.
• Generally, air bags are designed to
inflate based upon the severity of
a collision, its direction, etc. These
two factors determine whether
the sensors produce an electronic
deployment/inflation signal.
• The front air bags will completely
inflate and deflate in an instant. It is
virtually impossible for you to see the
air bags inflate during an accident. It is
much more likely that you will simply
see the deflated air bags hanging out
of their storage compartments after the collision.
Page 266 of 529

06
6-21
Shift-lock release
If the shift lever cannot be moved from
the P (Park) position into R (Reverse)
position with the brake pedal depressed,
continue depressing the brake, and then
do the following:
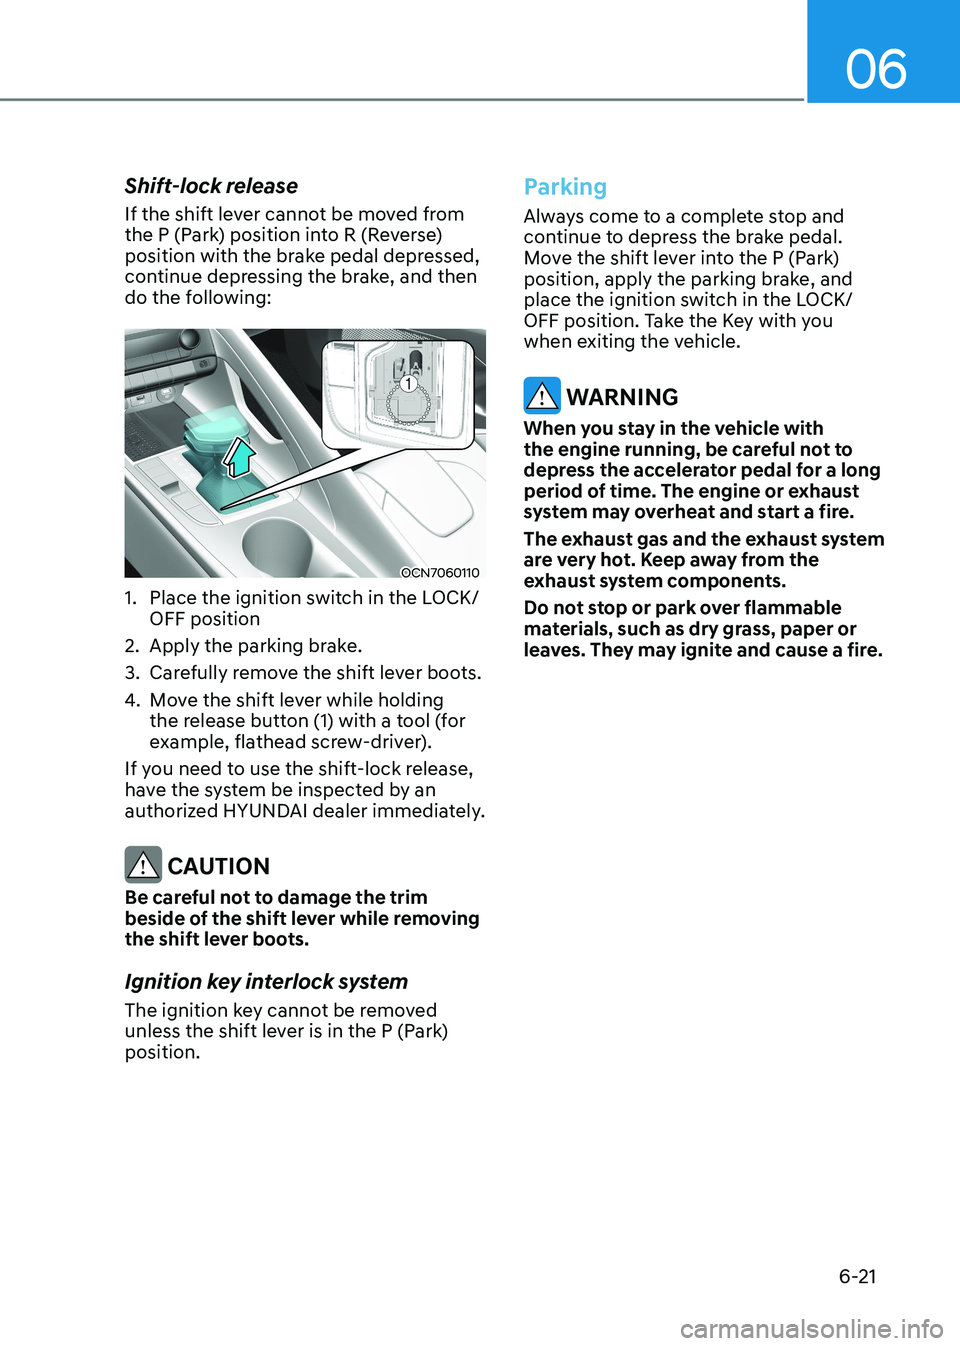
OCN7060110
1. Place the ignition switch in the LOCK/ OFF position
2. Apply the parking brake.
3. Carefully remove the shift lever boots.
4. Move the shift lever while holding
the release button (1) with a tool (for
example, flathead screw-driver).
If you need to use the shift-lock release,
have the system be inspected by an
authorized HYUNDAI dealer immediately.
CAUTION
Be careful not to damage the trim
beside of the shift lever while removing
the shift lever boots.
Ignition key interlock system
The ignition key cannot be removed
unless the shift lever is in the P (Park) position.
Parking
Always come to a complete stop and
continue to depress the brake pedal.
Move the shift lever into the P (Park)
position, apply the parking brake, and
place the ignition switch in the LOCK/
OFF position. Take the Key with you
when exiting the vehicle.
WARNING
When you stay in the vehicle with
the engine running, be careful not to
depress the accelerator pedal for a long
period of time. The engine or exhaust
system may overheat and start a fire.
The exhaust gas and the exhaust system
are very hot. Keep away from the
exhaust system components.
Do not stop or park over flammable
materials, such as dry grass, paper or
leaves. They may ignite and cause a fire.
Page 433 of 529

Emergency Situations
8-12
NOTICE
If any of the below happens, have
the system checked by an authorized
HYUNDAI dealer.
1. The Low Tire Pressure Telltale/ TPMS Malfunction Indicator does not
illuminate for 3 seconds when the
ignition switch is placed to the ON position or engine is running.
2. The TPMS Malfunction Indicator remains illuminated after blinking for
approximately 1 minute.
3. The Low Tire Pressure Position Telltale remains illuminated.
Low Tire Pressure Telltale
Low Tire Pressure Position and
tire Pressure Telltale
OCN7080057L
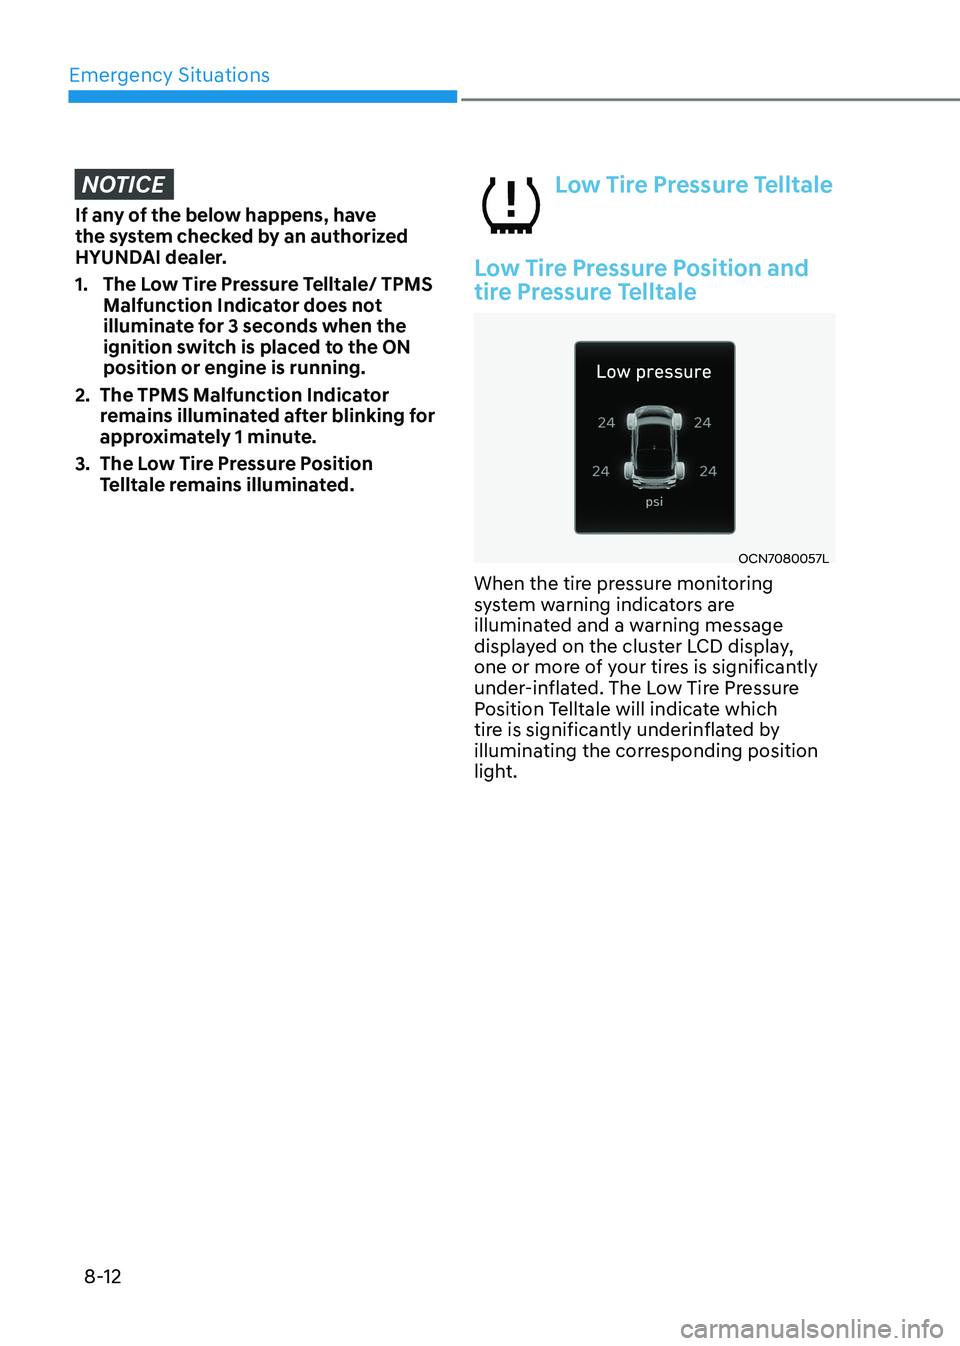
When the tire pressure monitoring
system warning indicators are
illuminated and a warning message
displayed on the cluster LCD display,
one or more of your tires is significantly
under-inflated. The Low Tire Pressure
Position Telltale will indicate which
tire is significantly underinflated by
illuminating the corresponding position
light.
Page 451 of 529

Tires and Wheels .......................................................................................... 9-29Tire Care .................................................................................................................. 9-29
Recommended Cold Tire Inflation Pressures ....................................................... 9-29
Check Tire Inflation Pressure ................................................................................. 9-30
Tire Rotation ............................................................................................................ 9-31
Wheel Alignment and Tire Balance ........................................................................ 9-31
Tire Replacement ................................................................................................... 9-32
Wheel Replacement ............................................................................................... 9-33
Tire Traction ............................................................................................................ 9-33
Tire Maintenance.................................................................................................... 9-33
Tire Sidewall Labeling ............................................................................................ 9-33
Tire Terminology and Definitions .......................................................................... 9-36
All Season Tires ....................................................................................................... 9-39
Summer Tires ......................................................................................................... 9-39
Snow Tires............................................................................................................... 9-39
Radial-Ply Tires ....................................................................................................... 9-39
Fuses ............................................................................................................. 9-41 Instrument Panel Fuse Replacement .................................................................... 9-42
Engine Compartment Panel Fuse Replacement .................................................. 9-43
Fuse/Relay Panel Description................................................................................9-44
Light Bulbs .................................................................................................... 9-51 Headlamp, Parking Lamp, Daytime Running Light, Turn Signal Lamp and Side
Marker ......................................................................................................................9- 51
Side Repeater Lamp Replacement ....................................................................... 9-54
Rear Combination Lamp Bulb Replacement ........................................................ 9-54
High Mounted Stop Lamp Replacement .............................................................. 9-57
License Plate Light Bulb Replacement ................................................................. 9-57
Interior Light Bulb Replacement ...........................................................................9-58
Exterior Care ........................................................................................................... 9-59
Appearance Care .........................................................................................9-59 Interior Care ............................................................................................................9-64
Emission Control System ............................................................................ 9-66 1. Crankcase Emission Control System .................................................................9-66
2. Evaporative Emission Control System Including Onboard Refueling Vapor Recovery (ORVR) ............................................................................................ 9-66
3. Exhaust Emission Control System ..................................................................... 9-67
9
Page 506 of 529
![HYUNDAI ELANTRA HYBRID 2022 Owners Manual 09
9-57
High Mounted Stop Lamp
Replacement
OCN7080032OCN7080032
OAD075042OAD075042
[A] : High mounted stop lamp
1. Open the trunk.
2. Remove the socket by turning it
counterclockwise until the HYUNDAI ELANTRA HYBRID 2022 Owners Manual 09
9-57
High Mounted Stop Lamp
Replacement
OCN7080032OCN7080032
OAD075042OAD075042
[A] : High mounted stop lamp
1. Open the trunk.
2. Remove the socket by turning it
counterclockwise until the](/manual-img/35/56241/w960_56241-505.png)
09
9-57
High Mounted Stop Lamp
Replacement
OCN7080032OCN7080032
OAD075042OAD075042
[A] : High mounted stop lamp
1. Open the trunk.
2. Remove the socket by turning it
counterclockwise until the tabs on the
socket align with the slots.
3. Remove the bulb from the socket by pressing it in and rotating it
counterclockwise until the tabs on the
bulb align with the slots in the socket.
Pull the bulb out of the socket.
4. Insert a new bulb by inserting it into the socket and rotating it until it locks
into place.
5. Install the socket in the assembly by aligning the tabs on the socket with
the slots in the assembly.
Push the socket into the assembly and
turn the socket clockwise.
License Plate Light Bulb
Replacement
OCN7H090020OCN7H090020
1. Using a flat-blade screwdriver gently pry the lens cover from the lamp housing.
2. Remove the bulb by pulling it straight out.
3. Install a new bulb.
4. Reinstall in the reverse order.
Page 507 of 529

Maintenance
9-58
Interior Light Bulb Replacement
Map lampMap lamp
OCN7080033OCN7080033
Room lampRoom lamp
OCN7080034OCN7080034
Sunvisor lampSunvisor lamp
OCN7050058OCN7050058
Trunk room lampTrunk room lamp
OCN7H050006OCN7H050006
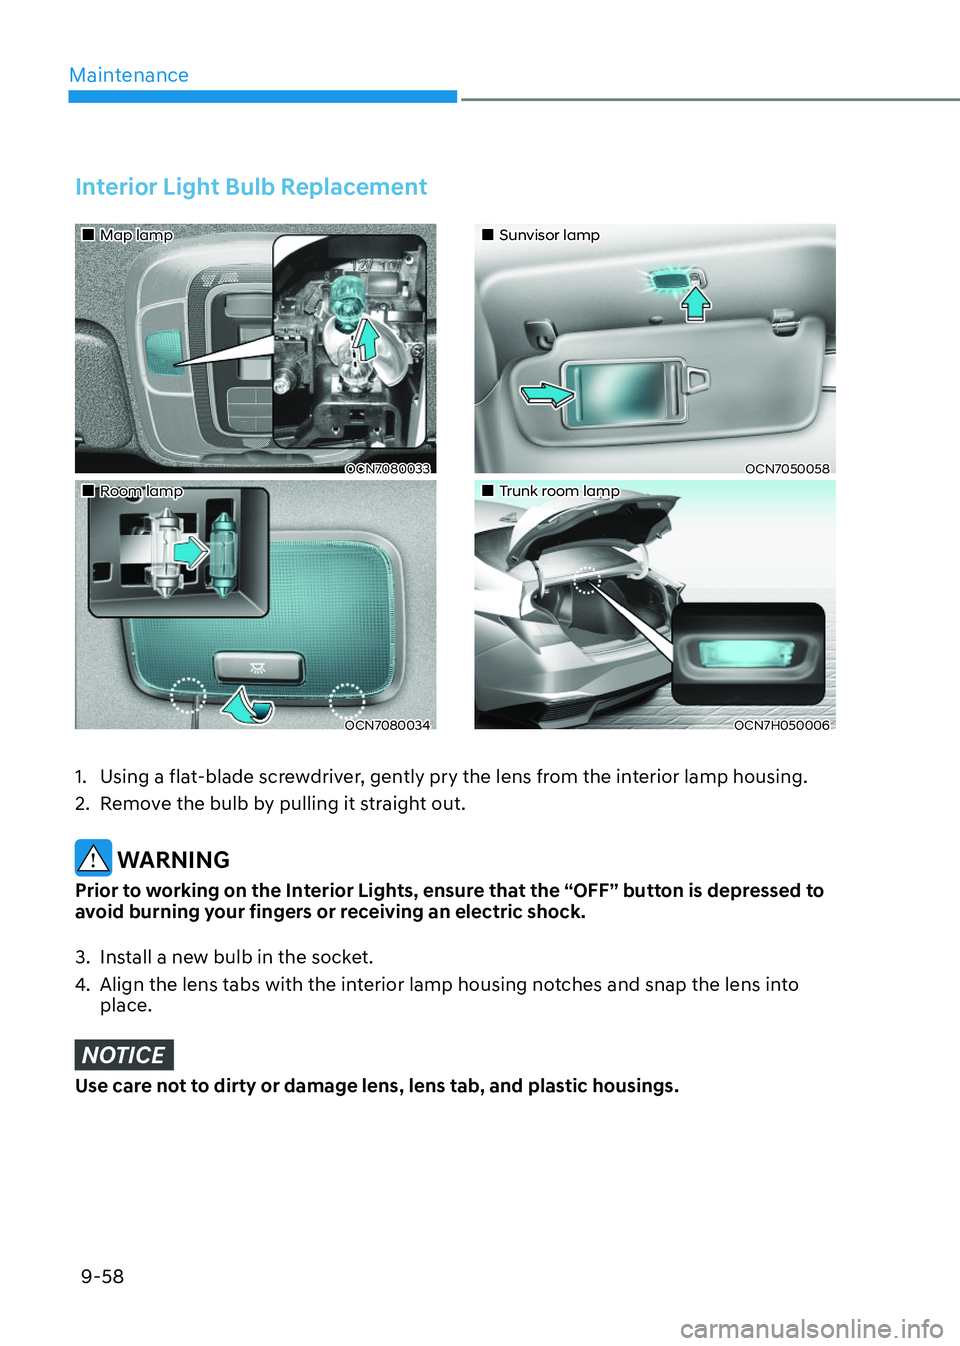
1. Using a flat-blade screwdriver, gently pry the lens from the interior lamp housing.
2. Remove the bulb by pulling it straight out.
WARNING
Prior to working on the Interior Lights, ensure that the “OFF” button is depressed to
avoid burning your fingers or receiving an electric shock.
3. Install a new bulb in the socket.
4. Align the lens tabs with the interior lamp housing notches and snap the lens into place.
NOTICE
Use care not to dirty or damage lens, lens tab, and plastic housings.