2022 FORD MAVERICK clock
[x] Cancel search: clockPage 15 of 533

Audio System - Vehicles
Without: SYNC 3
General Information ...................................375
Audio Unit ......................................................
375
AM/FM Radio ...............................................
376
Connecting a Bluetooth® Device ..........
377
Streaming Bluetooth Audio ....................
378
Playing Media From a USB Device .......
379
USB Port .........................................................
379
Apps ................................................................
380
Using Voice Recognition ..........................
382
Audio System – Troubleshooting .........
383
Audio System - Vehicles With: SYNC 3
Audio System Precautions .....................
384
Switching the Audio Unit On and Off ........................................................................\
384
Selecting the Audio Source ....................
384
Playing or Pausing the Audio Source ........................................................................\
384
Adjusting the Volume ...............................
384
Switching Shuffle Mode On and Off ........................................................................\
384
Switching Repeat Mode On and Off ........................................................................\
384
Setting a Memory Preset .........................
384
Muting the Audio ........................................
385
Adjusting the Sound Settings ................
385
Setting the Clock and Date ....................
385
AM/FM Radio ...............................................
386
Digital Radio .................................................
386
Satellite Radio .............................................
388
SYNC™ 3
General Information ..................................
389
Using Voice Recognition ...........................
391
Entertainment .............................................
398
Phone .............................................................
408
Navigation ......................................................
410Electric Vehicle Information
....................
415
Apps .................................................................
416
Settings ...........................................................
418
SYNC™ 3 Troubleshooting ....................
420
Accessories
Accessories ...................................................
433
Ford Protect
What Is Ford Protect .................................
434
Scheduled Maintenance
General Maintenance Information ......
436
Normal Scheduled Maintenance .........
439
Special Operating Conditions Scheduled Maintenance ............................................
442
Customer Information
Rollover Warning ........................................
445
The Better Business Bureau Auto Line Program .....................................................
445
The Mediation and Arbitration Program .......................................................................
446
Ordering a Canadian French Owner's Manual .......................................................
446
Reporting Safety Defects in the United States ..........................................................
447
Reporting Safety Defects in Canada ........................................................................\
447
Radio Frequency Certification Labels .......................................................................
448
Perchlorate ...................................................
480
Replacement Parts Recommendation ........................................................................\
.
481
Mobile Communications Equipment ........................................................................\
.
481
Federal Highway Administration Regulation .................................................
482
End User License Agreement ................
482
Emission Law ...............................................
507
12
2022 Maverick (CFE) Canada/United States of America, enUSA, Edition date: 202106, First-Printing Table of Contents
Page 44 of 533
If the booster seat slides on the vehicle
seat upon which it is being used, placing a
rubberized mesh sold as shelf or carpet
liner under the booster seat may improve
this condition. Do not use any item thicker
than this under the booster seat. Check
with the booster seat manufacturer's
instructions.
CHILD SAFETY LOCKS
WARNING: You cannot open the
rear doors from inside if you have put the
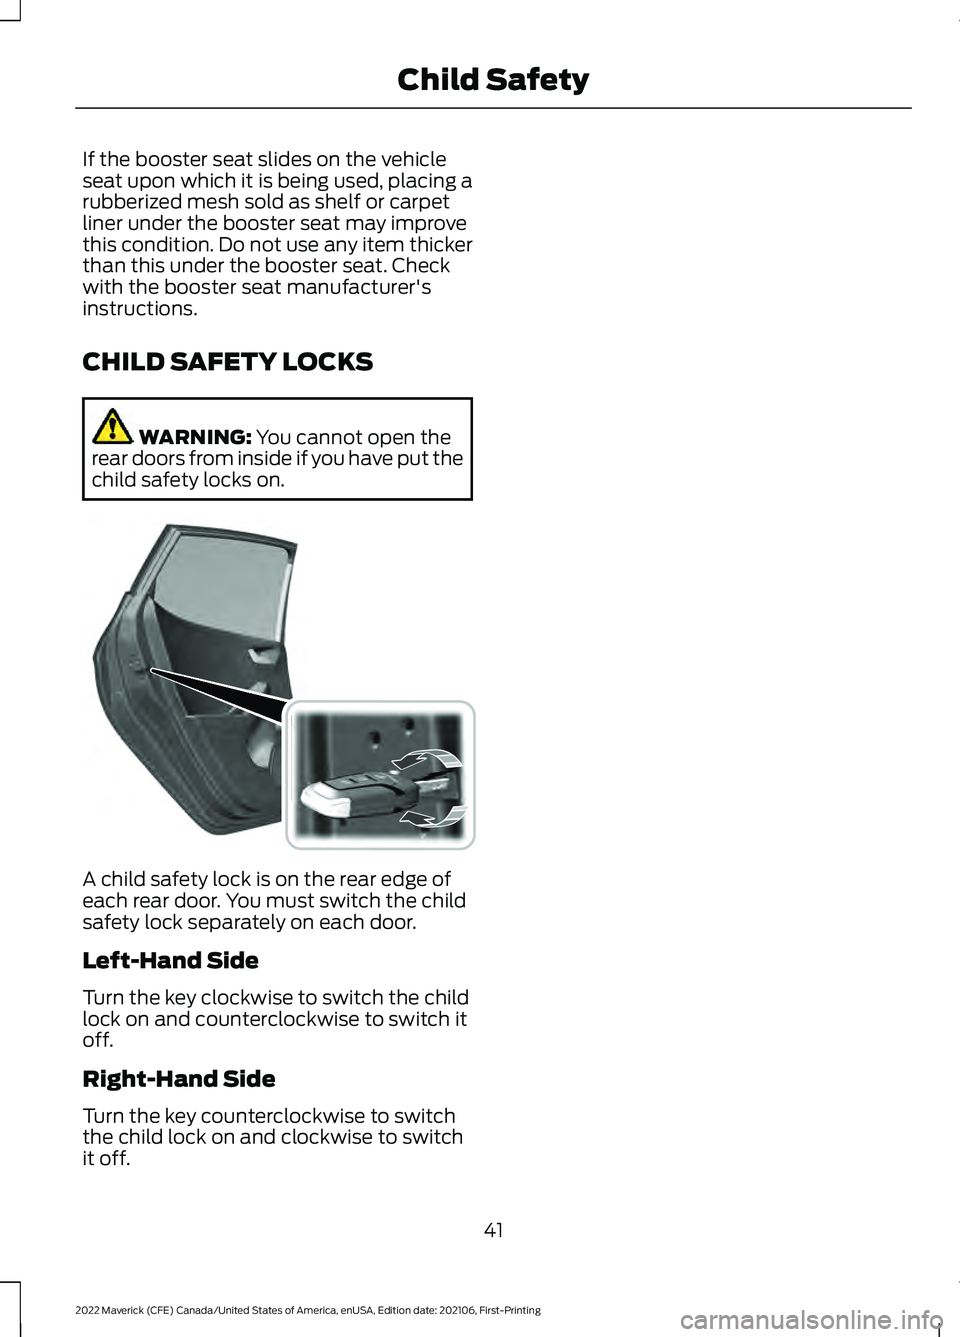
child safety locks on. A child safety lock is on the rear edge of
each rear door. You must switch the child
safety lock separately on each door.
Left-Hand Side
Turn the key clockwise to switch the child
lock on and counterclockwise to switch it
off.
Right-Hand Side
Turn the key counterclockwise to switch
the child lock on and clockwise to switch
it off.
41
2022 Maverick (CFE) Canada/United States of America, enUSA, Edition date: 202106, First-Printing Child Safety E238364
Page 306 of 533
ENGINE OIL
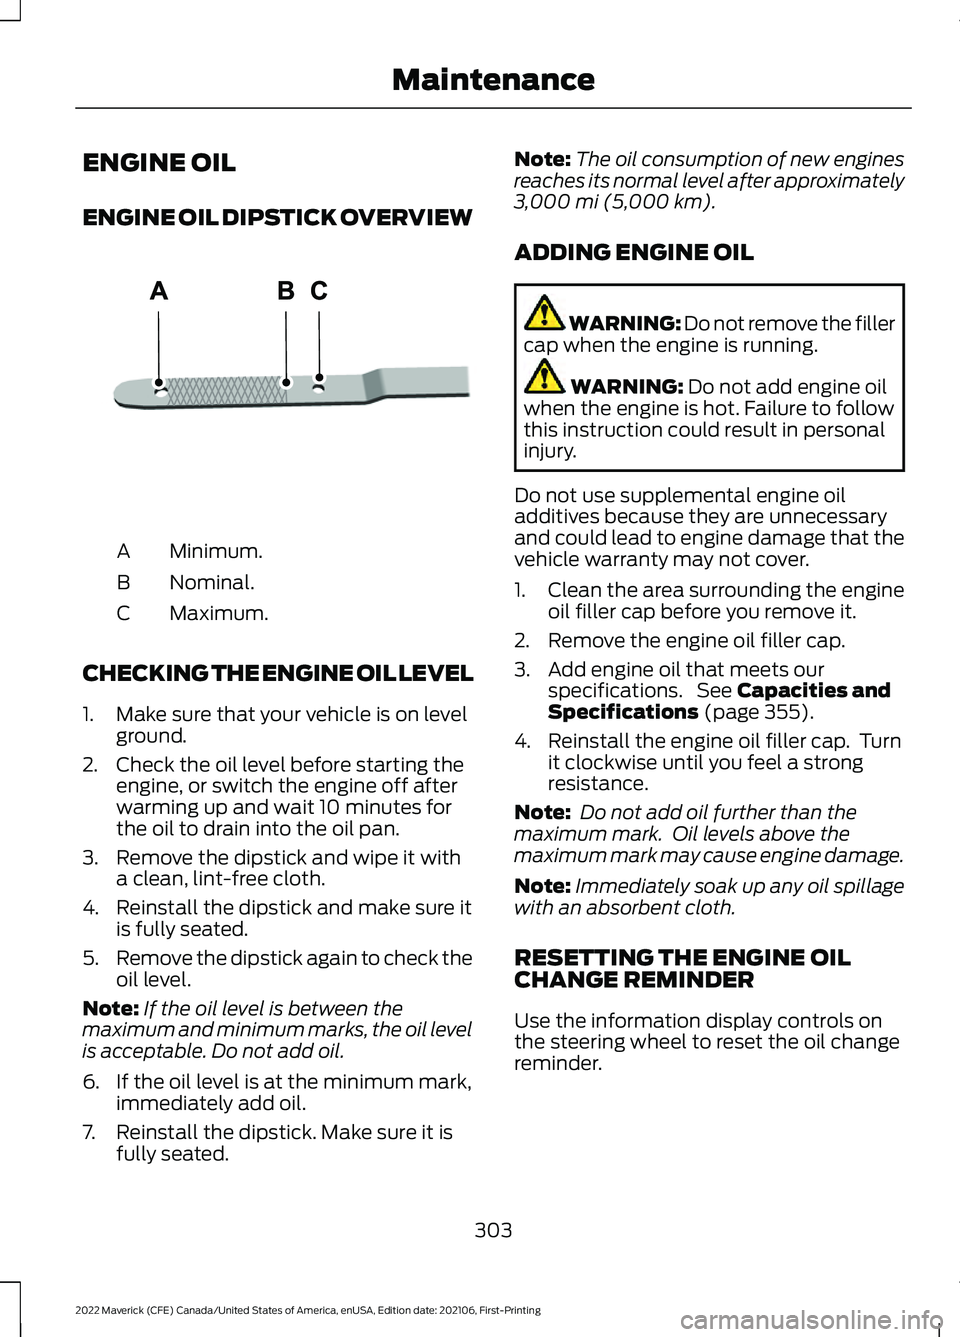
ENGINE OIL DIPSTICK OVERVIEW
Minimum.
A
Nominal.
B
Maximum.
C
CHECKING THE ENGINE OIL LEVEL
1. Make sure that your vehicle is on level ground.
2. Check the oil level before starting the engine, or switch the engine off after
warming up and wait 10 minutes for
the oil to drain into the oil pan.
3. Remove the dipstick and wipe it with a clean, lint-free cloth.
4. Reinstall the dipstick and make sure it is fully seated.
5. Remove the dipstick again to check the
oil level.
Note: If the oil level is between the
maximum and minimum marks, the oil level
is acceptable. Do not add oil.
6. If the oil level is at the minimum mark, immediately add oil.
7. Reinstall the dipstick. Make sure it is fully seated. Note:
The oil consumption of new engines
reaches its normal level after approximately
3,000 mi (5,000 km).
ADDING ENGINE OIL WARNING: Do not remove the filler
cap when the engine is running. WARNING:
Do not add engine oil
when the engine is hot. Failure to follow
this instruction could result in personal
injury.
Do not use supplemental engine oil
additives because they are unnecessary
and could lead to engine damage that the
vehicle warranty may not cover.
1. Clean the area surrounding the engine oil filler cap before you remove it.
2. Remove the engine oil filler cap.
3. Add engine oil that meets our specifications. See
Capacities and
Specifications (page 355).
4. Reinstall the engine oil filler cap. Turn it clockwise until you feel a strong
resistance.
Note: Do not add oil further than the
maximum mark. Oil levels above the
maximum mark may cause engine damage.
Note: Immediately soak up any oil spillage
with an absorbent cloth.
RESETTING THE ENGINE OIL
CHANGE REMINDER
Use the information display controls on
the steering wheel to reset the oil change
reminder.
303
2022 Maverick (CFE) Canada/United States of America, enUSA, Edition date: 202106, First-Printing MaintenanceE250320
Page 308 of 533
WARNING: Do not put coolant in
the windshield washer reservoir. If
sprayed on the windshield, coolant could
make it difficult to see through the
windshield.
Note: Do not use stop leak pellets, cooling
system sealants, or non-specified additives
as they can cause damage to the engine
cooling or heating systems. Resulting
component damage may not be covered by
the vehicle Warranty.
Note: Automotive fluids are not
interchangeable.
It is very important to use prediluted
coolant approved to the correct
specification in order to avoid plugging the
small passageways in the engine cooling
system. See
Capacities and
Specifications (page 355). Do not mix
different colors or types of coolant in your
vehicle. Mixing of engine coolants or using
an incorrect coolant may harm the engine
or cooling system components and could
void the vehicle Warranty.
Note: If prediluted coolant is not available,
use the approved concentrated coolant
diluting it to 50/50 with deionized or
distilled water. See
Capacities and
Specifications (page 355). Using water that
ha
s not been deionized may contribute to
deposit formation, corrosion and plugging
of the small cooling system passageways.
To top up the coolant level do the
following:
1. Unscrew the cap slowly. Any pressure escapes as you unscrew the cap.
2. Add enough prediluted coolant to reach the correct level.
Note: We do not recommend the use of
recycled coolant. 3.
Replace the coolant reservoir cap. Turn
the cap clockwise until it contacts the
hard stop.
4. Check the coolant level in the coolant reservoir the next few times you drive
your vehicle. If necessary, repeat step
2.
If you have to add more than
1.1 qt (1 L) of
engine coolant per month, have your
vehicle checked as soon as possible.
Operating an engine with a low level of
coolant can result in engine overheating
and possible engine damage.
In case of emergency, you can add a large
amount of water without engine coolant
in order to reach a vehicle service location.
Service your vehicle as soon as possible.
Water alone, without engine coolant, can
cause engine damage from corrosion,
overheating or freezing.
Do not use the following as a coolant
substitute, as they can cause engine
damage from overheating or freezing:
• Alcohol.
• Methanol.
• Brine.
• Any coolant mixed with alcohol or
methanol antifreeze.
Do not add extra inhibitors or additives to
the coolant. These can be harmful and
compromise the corrosion protection of
the coolant.
Severe Climates
If you drive in extremely cold climates, you
may need to increase the coolant
concentration above 50%.
Note: A coolant concentration of 60%
provides improved freeze point protection.
Coolant concentrations above 60%
decrease the overheat protection
characteristics of the coolant and could
cause engine damage.
305
2022 Maverick (CFE) Canada/United States of America, enUSA, Edition date: 202106, First-Printing Maintenance
Page 315 of 533
Electrical Accessory Installation
To make sure the battery management
system works correctly, do not connect an
electrical device ground connection
directly to the battery negative post. This
can cause inaccurate measurements of
the battery condition and potential
incorrect system operation.
Note:
If you add electrical accessories or
components to the vehicle, it may adversely
affect battery performance and durability.
This may also affect the performance of
other electrical systems in the vehicle.
Remove and Reinstall the Battery
Install a battery approved for use by our
specifications. See Capacities and
Specifications (page 355).
To disconnect or remove the battery, do
the following:
1. Apply the parking brake and switch the
ignition off.
2. Switch all electrical equipment off, for
example lights and radio.
3. Wait a minimum of two minutes before
disconnecting the battery.
Note: The engine management system has
a power hold function and remains powered
for a period of time after you switch the
ignition off. This is to allow the system to
store diagnostic and adaptive tables.
Disconnecting the battery without waiting
can cause damage not covered by the
vehicle warranty.
4. Disconnect the negative battery cable terminal.
5. Disconnect the positive battery cable terminal.
6. Remove the battery securing clamp.
7. Remove the battery.
8. To install, reverse the removal procedure. Note:
Before reconnecting the battery,
make sure the ignition remains switched off.
Note: Make sure to fully tighten the battery
cables.
If you disconnect or replace the vehicle
battery, you must reset the following
features:
• Window bounce-back. See
What Is
Window Bounce-Back (page 101).
• Clock Settings.
• Pre-set radio stations.
Battery Disposal Make sure that you dispose of
old batteries in an
environmentally friendly way.
Seek advice from your local authority
about recycling old batteries.
ADJUSTING THE HEADLAMPS
Vertical Aim Adjustment
The headlamps on your vehicle are
properly aimed at the assembly plant. If
your vehicle has been in an accident, have
the alignment of your headlamps checked
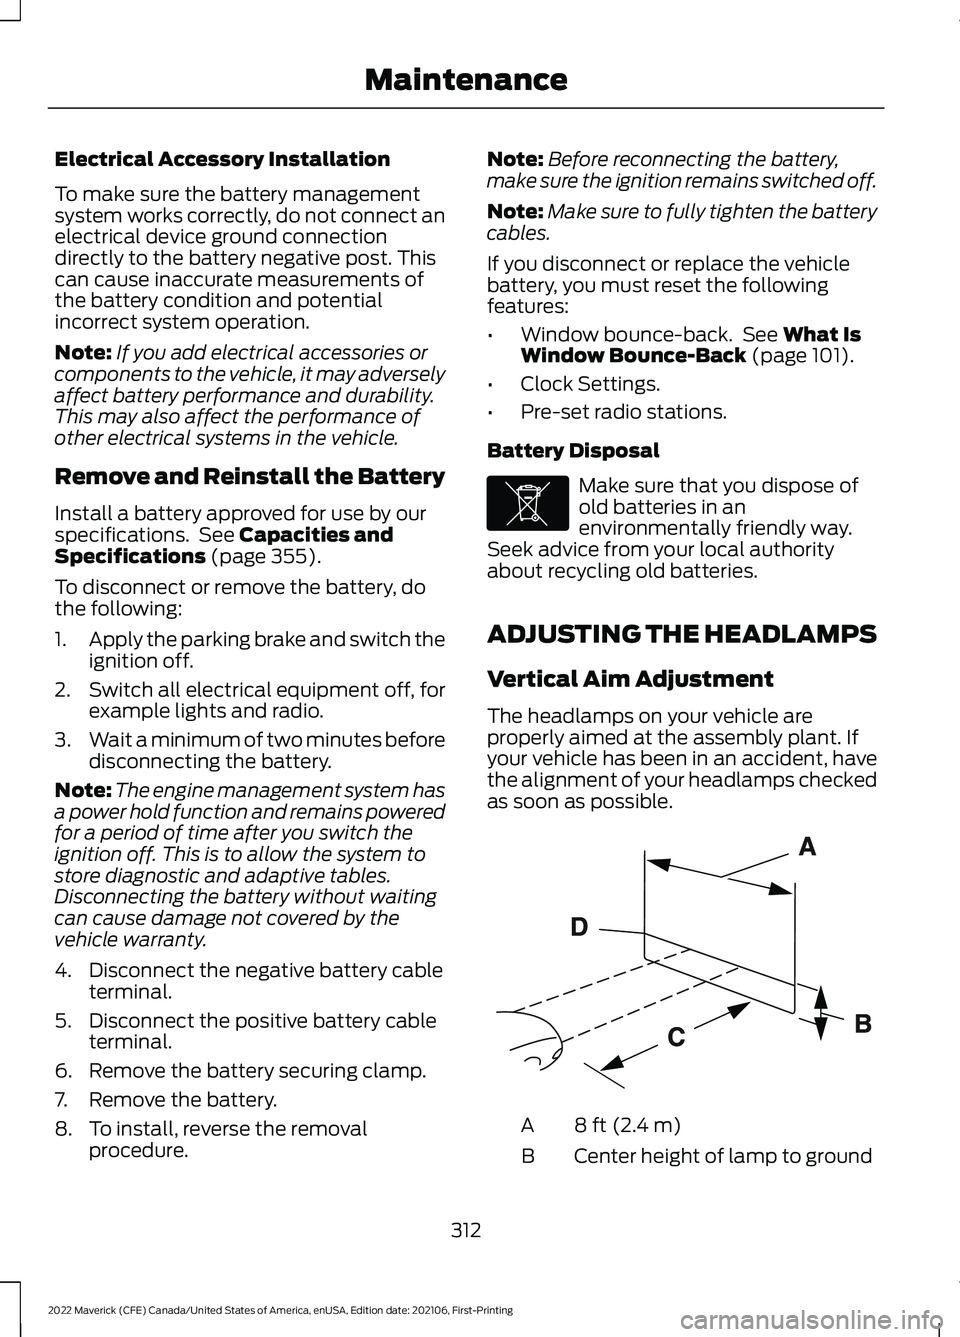
as soon as possible. 8 ft (2.4 m)
A
Center height of lamp to ground
B
312
2022 Maverick (CFE) Canada/United States of America, enUSA, Edition date: 202106, First-Printing MaintenanceE107998 E142592
Page 316 of 533
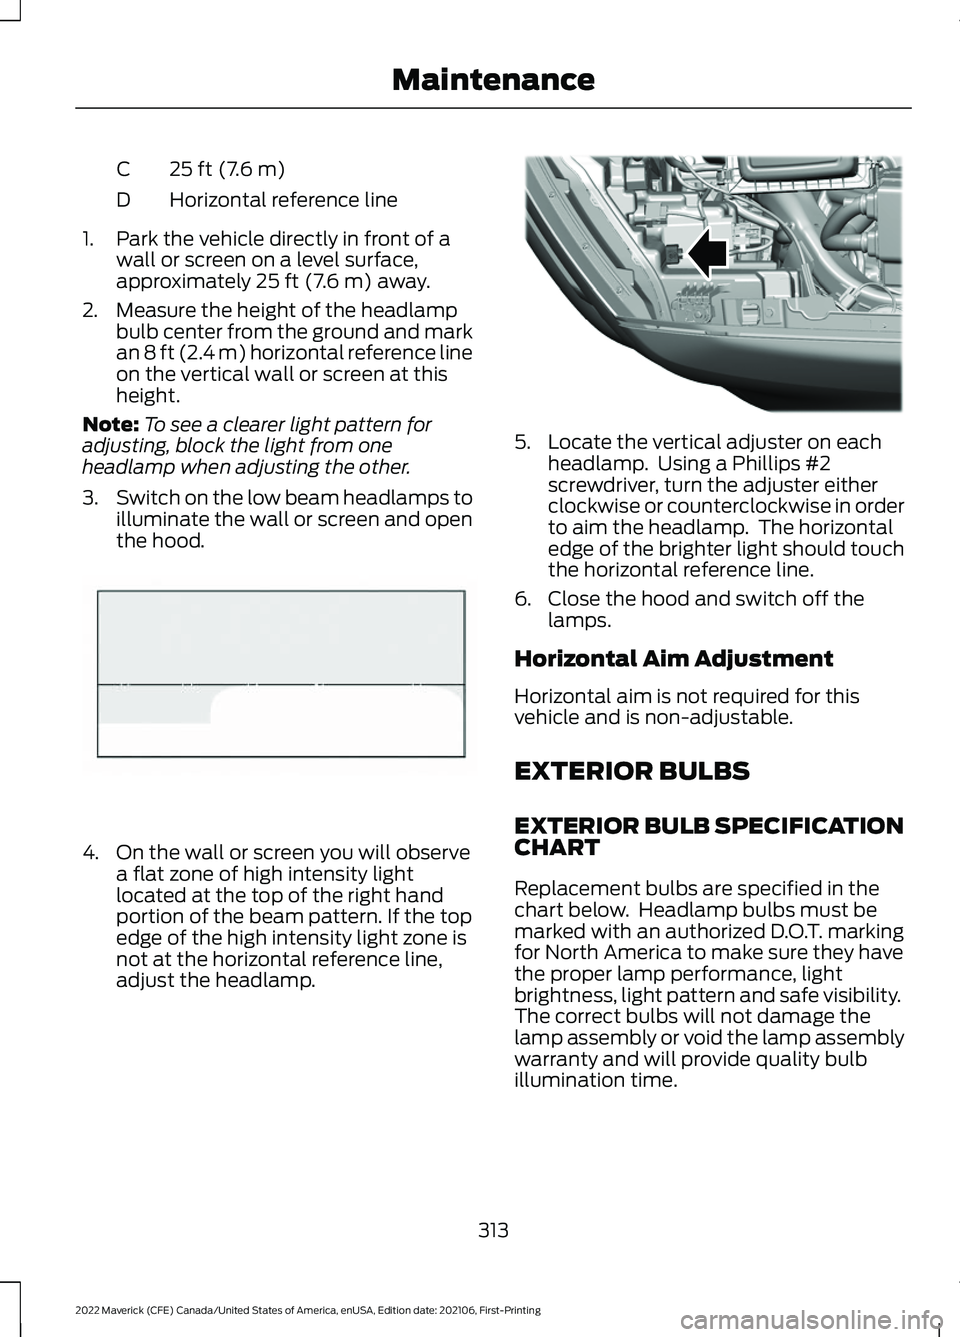
25 ft (7.6 m)
C
Horizontal reference line
D
1. Park the vehicle directly in front of a wall or screen on a level surface,
approximately 25 ft (7.6 m) away.
2. Measure the height of the headlamp bulb center from the ground and mark
an
8 ft (2.4 m) horizontal reference line
on the vertical wall or screen at this
height.
Note: To see a clearer light pattern for
adjusting, block the light from one
headlamp when adjusting the other.
3. Switch on the low beam headlamps to
illuminate the wall or screen and open
the hood. 4. On the wall or screen you will observe
a flat zone of high intensity light
located at the top of the right hand
portion of the beam pattern. If the top
edge of the high intensity light zone is
not at the horizontal reference line,
adjust the headlamp. 5. Locate the vertical adjuster on each
headlamp. Using a Phillips #2
screwdriver, turn the adjuster either
clockwise or counterclockwise in order
to aim the headlamp. The horizontal
edge of the brighter light should touch
the horizontal reference line.
6. Close the hood and switch off the lamps.
Horizontal Aim Adjustment
Horizontal aim is not required for this
vehicle and is non-adjustable.
EXTERIOR BULBS
EXTERIOR BULB SPECIFICATION
CHART
Replacement bulbs are specified in the
chart below. Headlamp bulbs must be
marked with an authorized D.O.T. marking
for North America to make sure they have
the proper lamp performance, light
brightness, light pattern and safe visibility.
The correct bulbs will not damage the
lamp assembly or void the lamp assembly
warranty and will provide quality bulb
illumination time.
313
2022 Maverick (CFE) Canada/United States of America, enUSA, Edition date: 202106, First-Printing MaintenanceE142465 E355886
Page 318 of 533
5. To install, reverse the removal
procedure.
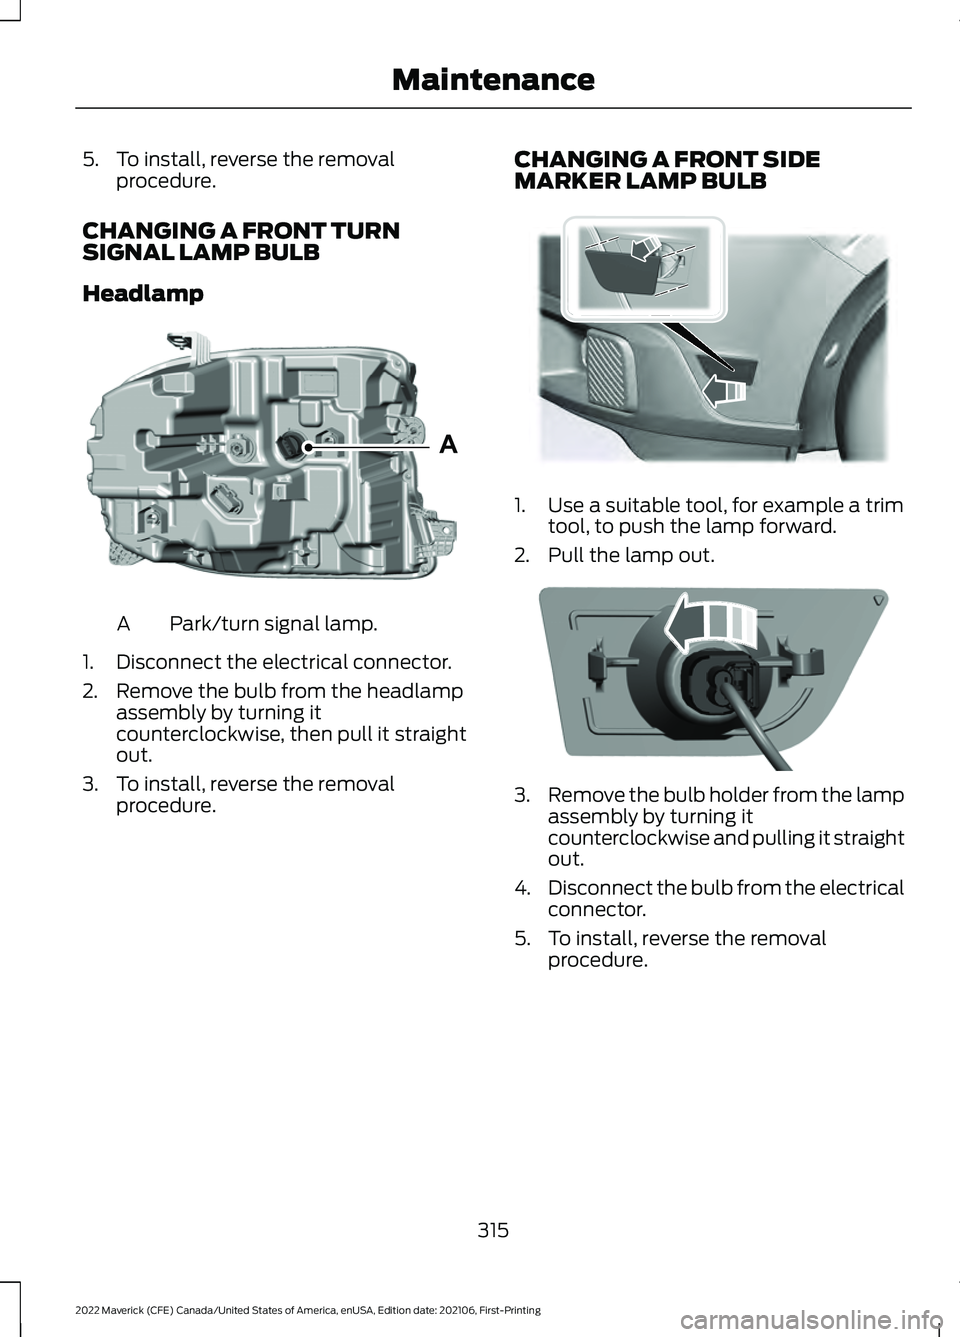
CHANGING A FRONT TURN
SIGNAL LAMP BULB
Headlamp Park/turn signal lamp.
A
1. Disconnect the electrical connector.
2. Remove the bulb from the headlamp assembly by turning it
counterclockwise, then pull it straight
out.
3. To install, reverse the removal procedure. CHANGING A FRONT SIDE
MARKER LAMP BULB 1. Use a suitable tool, for example a trim
tool, to push the lamp forward.
2. Pull the lamp out. 3.
Remove the bulb holder from the lamp
assembly by turning it
counterclockwise and pulling it straight
out.
4. Disconnect the bulb from the electrical
connector.
5. To install, reverse the removal procedure.
315
2022 Maverick (CFE) Canada/United States of America, enUSA, Edition date: 202106, First-Printing MaintenanceAE348847 E349259 E349260
Page 319 of 533
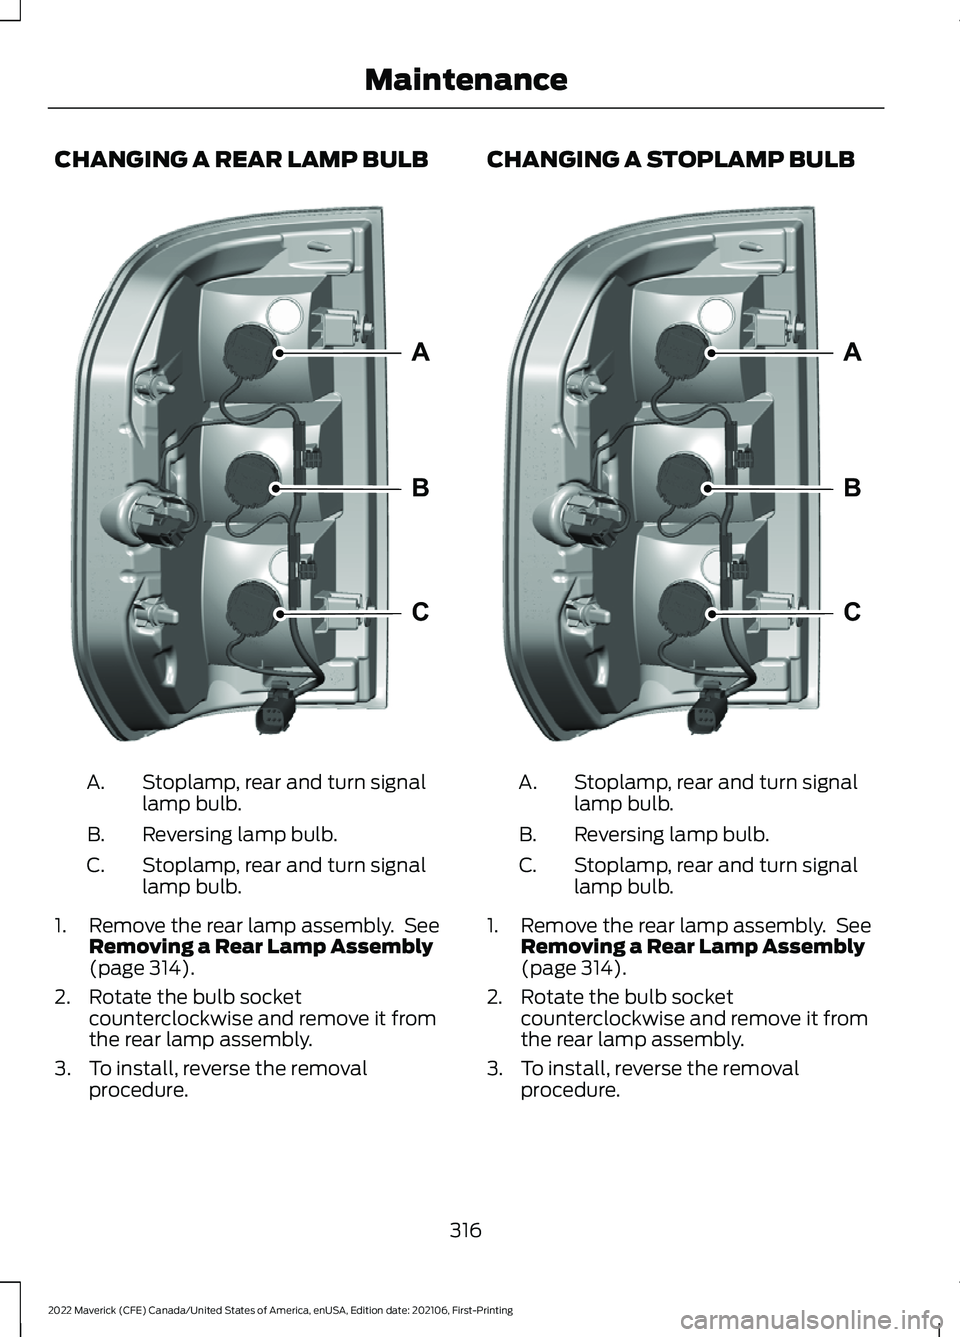
CHANGING A REAR LAMP BULB
Stoplamp, rear and turn signal
lamp bulb.
A.
Reversing lamp bulb.
B.
Stoplamp, rear and turn signal
lamp bulb.
C.
1. Remove the rear lamp assembly. See Removing a Rear Lamp Assembly
(page 314).
2. Rotate the bulb socket counterclockwise and remove it from
the rear lamp assembly.
3. To install, reverse the removal procedure. CHANGING A STOPLAMP BULB
Stoplamp, rear and turn signal
lamp bulb.
A.
Reversing lamp bulb.
B.
Stoplamp, rear and turn signal
lamp bulb.
C.
1. Remove the rear lamp assembly. See Removing a Rear Lamp Assembly
(page 314).
2. Rotate the bulb socket counterclockwise and remove it from
the rear lamp assembly.
3. To install, reverse the removal procedure.
316
2022 Maverick (CFE) Canada/United States of America, enUSA, Edition date: 202106, First-Printing MaintenanceA
B
CE348848 A
B
CE348848