Page 320 of 533
CHANGING A REAR TURN SIGNAL
LAMP BULB
Stoplamp, rear and turn signal
lamp bulb.
A.
Reversing lamp bulb.
B.
Stoplamp, rear and turn signal
lamp bulb.
C.
1. Remove the rear lamp assembly. See Removing a Rear Lamp Assembly
(page 314).
2. Rotate the bulb socket counterclockwise and remove it from
the rear lamp assembly.
3. To install, reverse the removal procedure. CHANGING A REVERSING LAMP
BULB
Stoplamp, rear and turn signal
lamp bulb.
A.
Reversing lamp bulb.
B.
Stoplamp, rear and turn signal
lamp bulb.
C.
1. Remove the rear lamp assembly. See Removing a Rear Lamp Assembly
(page 314).
2. Rotate the bulb socket counterclockwise and remove it from
the rear lamp assembly.
3. To install, reverse the removal procedure.
317
2022 Maverick (CFE) Canada/United States of America, enUSA, Edition date: 202106, First-Printing MaintenanceA
B
CE348848 A
B
CE348848
Page 321 of 533
CHANGING A HIGH MOUNTED
STOPLAMP BULB
1. Make sure the lamps are off.
2.
Remove the four screws and move the
lamp assembly away from the vehicle
to expose the bulb sockets. 3. Remove the bulb socket by rotating it
counterclockwise and pulling it out of
the lamp assembly.
4. Pull the bulb straight out of the socket.
5. To install, reverse the removal procedure.
INTERIOR BULBS
INTERIOR BULB SPECIFICATION
CHART
Your vehicle has LED lamps. These are not
serviceable items. See an authorized dealer
if they fail.
318
2022 Maverick (CFE) Canada/United States of America, enUSA, Edition date: 202106, First-Printing MaintenanceE187290
Page 352 of 533
Drive cautiously when using a full-size
dissimilar spare wheel and tire assembly
and seek service as soon as possible.
Removing the Vehicle Jack and
Tool Bag
The vehicle jack and tool bag are on the
rear passenger side of your vehicle, behind
the passenger seat.
1. Turn the wing bolt on the jack bracket
counterclockwise to release the jack
and tool bag from the jack bracket. 2.
Remove the jack and tool bag from the
jack bracket. 3. Release the jack tool bag straps.
4.
Slide the jack tool bag through the jack
load rest to remove for access to the
jack tools.
5. Remove the tools from the tool bag.
Note: Your jack does not require
maintenance or additional lubrication over
the service life of your vehicle.
Removing the Spare Tire
The spare tire is located under the vehicle,
just forward of the rear bumper.
349
2022 Maverick (CFE) Canada/United States of America, enUSA, Edition date: 202106, First-Printing Changing a Road WheelE352020 E352025 E352022 E352033
Page 353 of 533

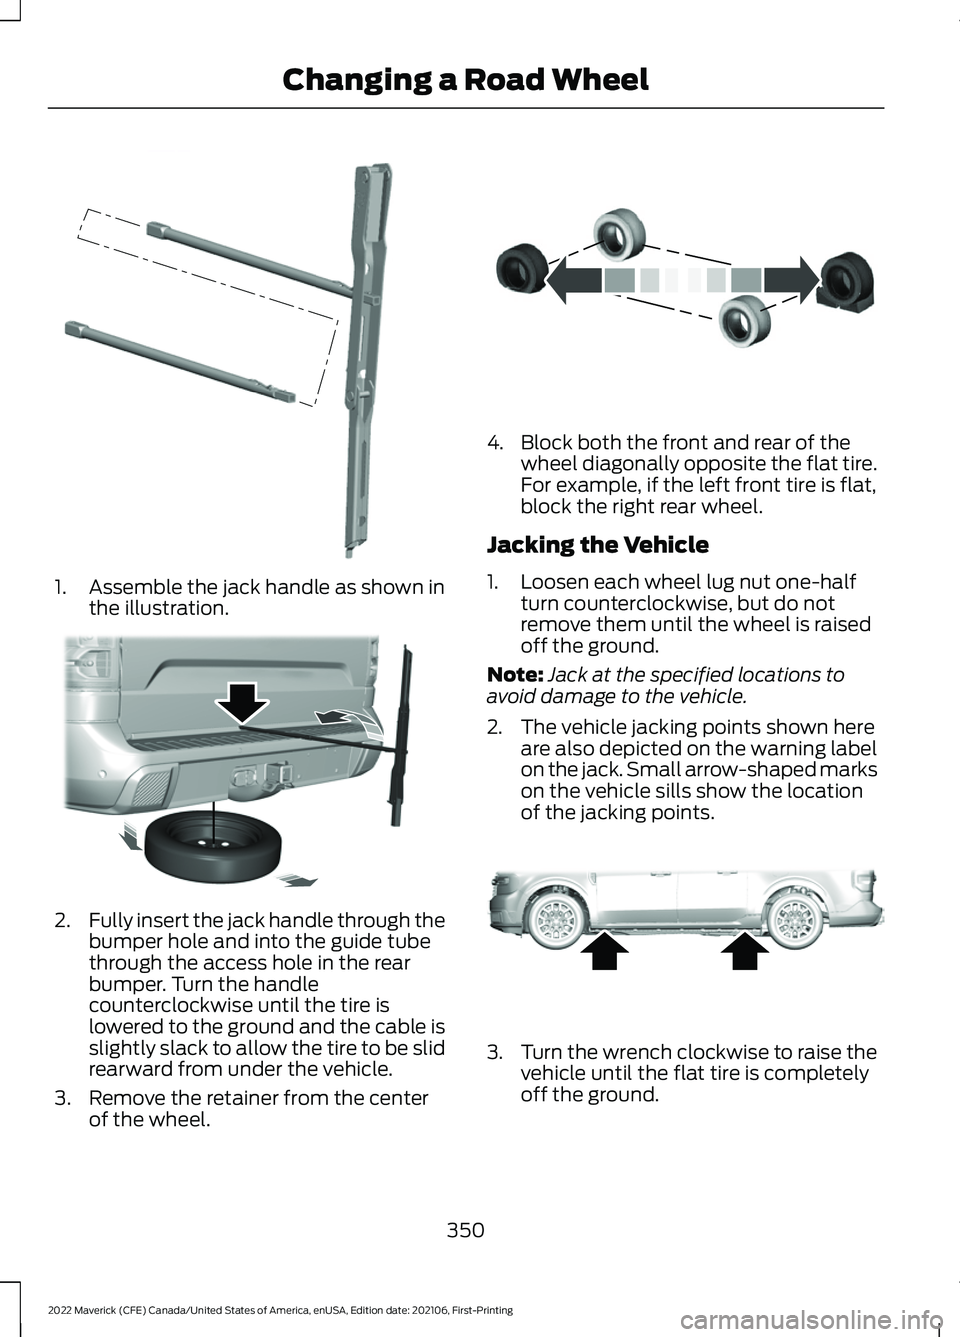
1. Assemble the jack handle as shown in
the illustration. 2.
Fully insert the jack handle through the
bumper hole and into the guide tube
through the access hole in the rear
bumper. Turn the handle
counterclockwise until the tire is
lowered to the ground and the cable is
slightly slack to allow the tire to be slid
rearward from under the vehicle.
3. Remove the retainer from the center of the wheel. 4. Block both the front and rear of the
wheel diagonally opposite the flat tire.
For example, if the left front tire is flat,
block the right rear wheel.
Jacking the Vehicle
1. Loosen each wheel lug nut one-half turn counterclockwise, but do not
remove them until the wheel is raised
off the ground.
Note: Jack at the specified locations to
avoid damage to the vehicle.
2. The vehicle jacking points shown here are also depicted on the warning label
on the jack. Small arrow-shaped marks
on the vehicle sills show the location
of the jacking points. 3.
Turn the wrench clockwise to raise the
vehicle until the flat tire is completely
off the ground.
350
2022 Maverick (CFE) Canada/United States of America, enUSA, Edition date: 202106, First-Printing Changing a Road WheelE352148 E352181 E175447 E352156
Page 354 of 533

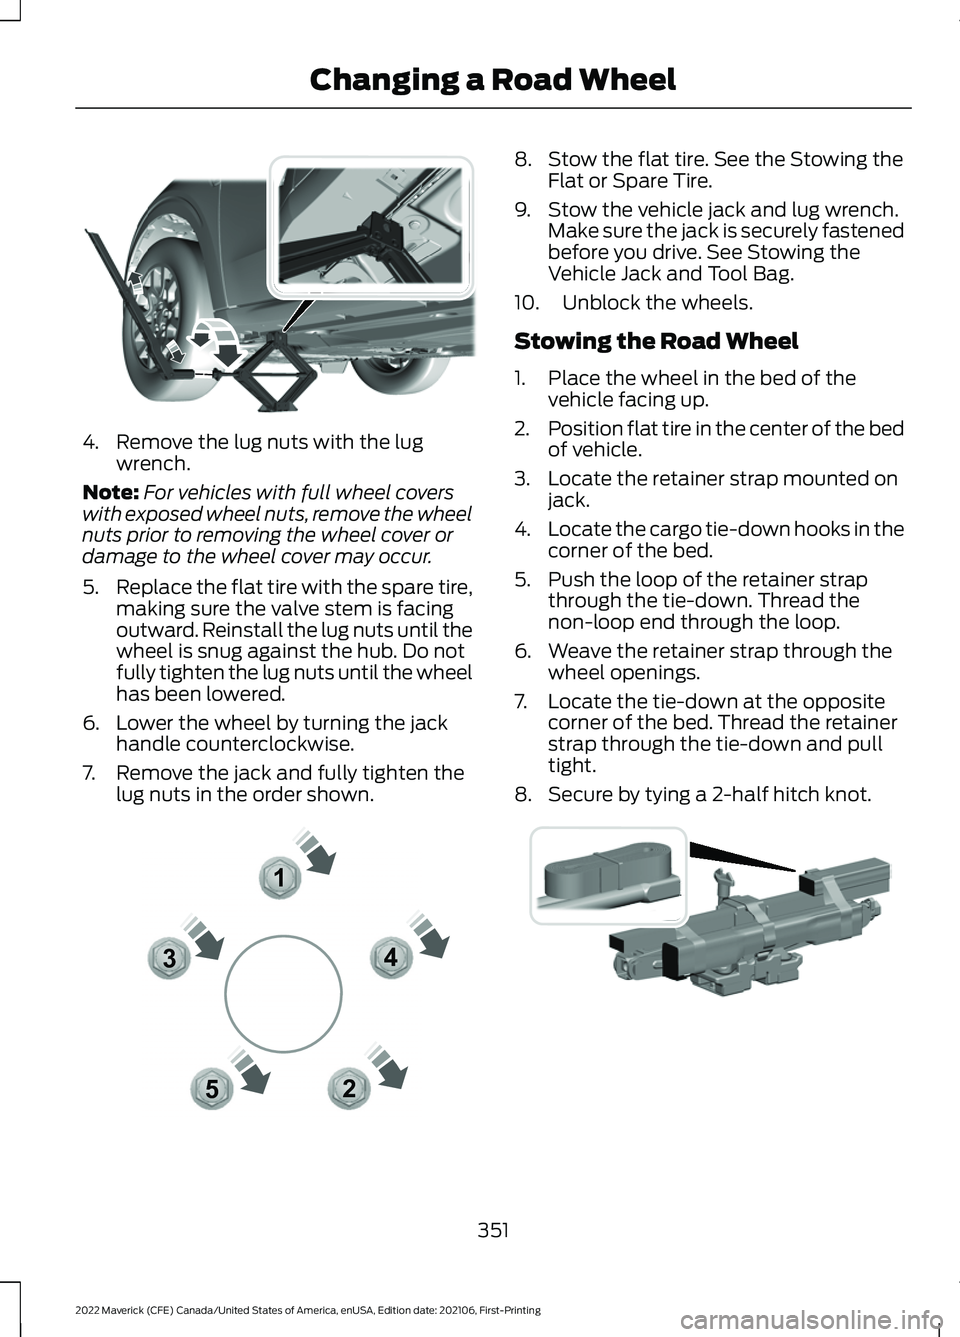
4. Remove the lug nuts with the lug
wrench.
Note: For vehicles with full wheel covers
with exposed wheel nuts, remove the wheel
nuts prior to removing the wheel cover or
damage to the wheel cover may occur.
5. Replace the flat tire with the spare tire,
making sure the valve stem is facing
outward. Reinstall the lug nuts until the
wheel is snug against the hub. Do not
fully tighten the lug nuts until the wheel
has been lowered.
6. Lower the wheel by turning the jack handle counterclockwise.
7. Remove the jack and fully tighten the lug nuts in the order shown. 8. Stow the flat tire. See the Stowing the
Flat or Spare Tire.
9. Stow the vehicle jack and lug wrench. Make sure the jack is securely fastened
before you drive. See Stowing the
Vehicle Jack and Tool Bag.
10. Unblock the wheels.
Stowing the Road Wheel
1. Place the wheel in the bed of the vehicle facing up.
2. Position flat tire in the center of the bed
of vehicle.
3. Locate the retainer strap mounted on jack.
4. Locate the cargo tie-down hooks in the
corner of the bed.
5. Push the loop of the retainer strap through the tie-down. Thread the
non-loop end through the loop.
6. Weave the retainer strap through the wheel openings.
7. Locate the tie-down at the opposite corner of the bed. Thread the retainer
strap through the tie-down and pull
tight.
8. Secure by tying a 2-half hitch knot. 351
2022 Maverick (CFE) Canada/United States of America, enUSA, Edition date: 202106, First-Printing Changing a Road WheelE352182 12
3
4
5E306781 E355266
Page 355 of 533

Stowing the Spare Tire
Note:
Failure to follow the spare tire
stowage instructions could result in failure
of the cable or loss of the spare tire.
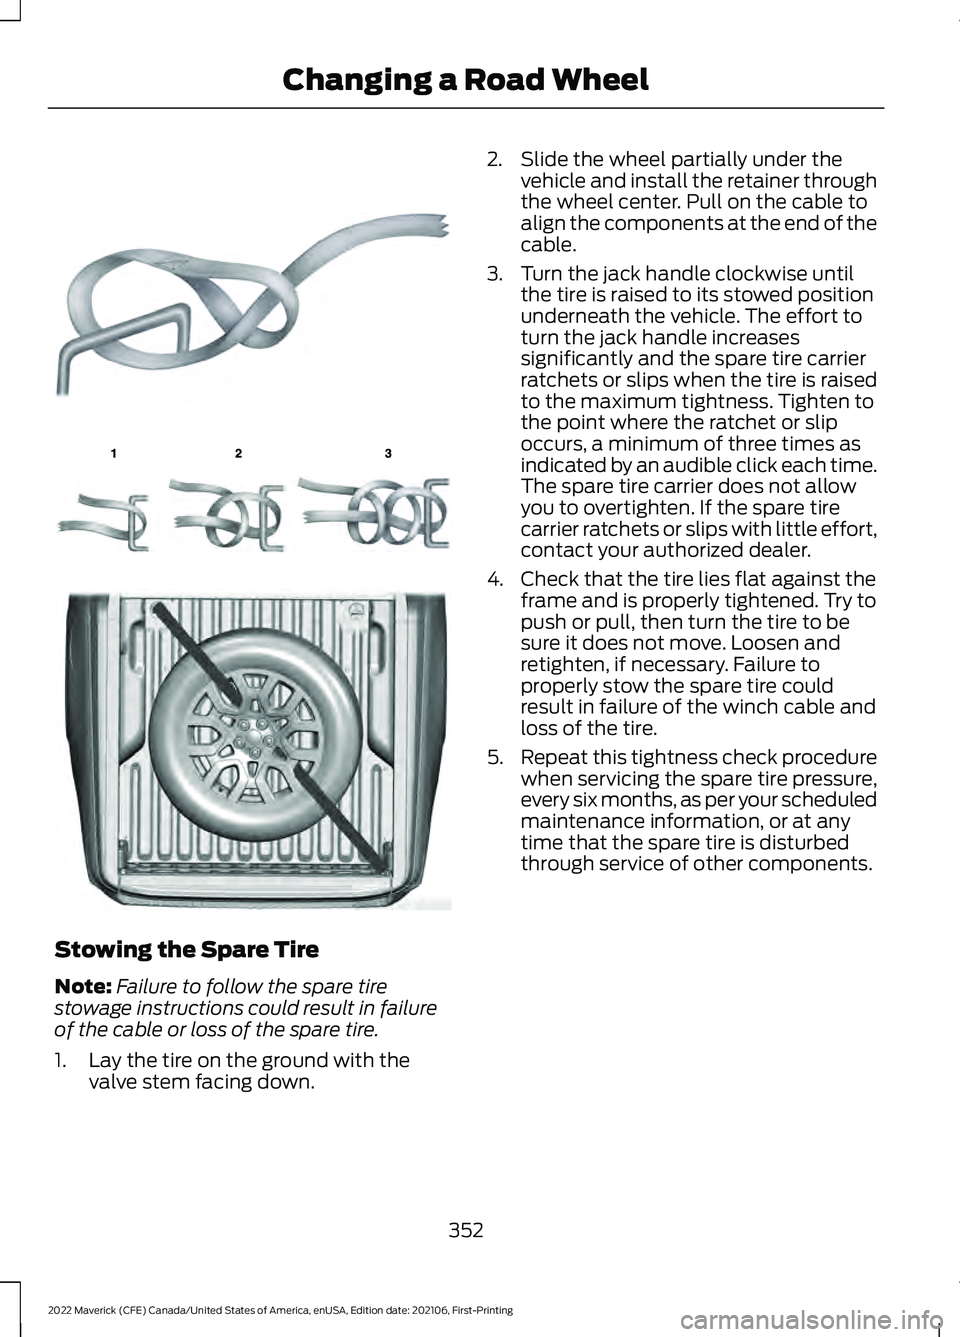
1. Lay the tire on the ground with the valve stem facing down. 2. Slide the wheel partially under the
vehicle and install the retainer through
the wheel center. Pull on the cable to
align the components at the end of the
cable.
3. Turn the jack handle clockwise until the tire is raised to its stowed position
underneath the vehicle. The effort to
turn the jack handle increases
significantly and the spare tire carrier
ratchets or slips when the tire is raised
to the maximum tightness. Tighten to
the point where the ratchet or slip
occurs, a minimum of three times as
indicated by an audible click each time.
The spare tire carrier does not allow
you to overtighten. If the spare tire
carrier ratchets or slips with little effort,
contact your authorized dealer.
4. Check that the tire lies flat against the frame and is properly tightened. Try to
push or pull, then turn the tire to be
sure it does not move. Loosen and
retighten, if necessary. Failure to
properly stow the spare tire could
result in failure of the winch cable and
loss of the tire.
5. Repeat this tightness check procedure
when servicing the spare tire pressure,
every six months, as per your scheduled
maintenance information, or at any
time that the spare tire is disturbed
through service of other components.
352
2022 Maverick (CFE) Canada/United States of America, enUSA, Edition date: 202106, First-Printing Changing a Road WheelE142906 E143746 E355267
Page 356 of 533
Stowing the Vehicle Jack and Tool
Bag
1. Place the tools inside of the tool bag.
2.
Install the tool bag through the vehicle
jack load rest. 3.
Secure the jack tool bag straps around
the vehicle jack. 4. Place the jack and tool bag back onto
the jack bracket. 5. Turn the wing bolt on the jack bracket
clockwise until the jack and tools are
secured to the jack bracket.
353
2022 Maverick (CFE) Canada/United States of America, enUSA, Edition date: 202106, First-Printing Changing a Road WheelE352149 E352034 E352022 E352027 E352026
Page 388 of 533

Note:
The audio mutes briefly while the
system saves the preset and returns once it
is stored.
Note: You can save presets from multiple
sources to the memory preset bar.
MUTING THE AUDIO Press the button on the steering
wheel to mute the audio.
Press to mute the signal. Press
again to restore the signal.
ADJUSTING THE SOUND
SETTINGS
Balance and Fade (If Equipped)
1. Access the vehicle drawer on the touchscreen.
2. Press
SETTINGS.
3. Press
Sound.
4. Press
Balance / Fade.
5. Press the arrows to adjust the settings.
Tone Settings
1. Access the vehicle drawer on the touchscreen.
2. Press
SETTINGS.
3. Press
Sound.
4. Press
Tone Settings.
5. Use the slider bar to adjust the settings.
Speed Compensated Volume
1. Access the vehicle drawer on the touchscreen.
2. Press
SETTINGS.
3. Press
Sound.
4. Press
Speed Compensated Volume. 5. Press a setting.
Occupancy Mode
(If Equipped)
1. Access the vehicle drawer on the touchscreen.
2. Press
SETTINGS.
3. Press
Sound.
4. Press
Occupancy Mode.
5. Press a setting.
Sound Mode
(If Equipped)
1. Access the vehicle drawer on the touchscreen.
2. Press
SETTINGS.
3. Press
Sound.
4. Press
Sound Mode.
5. Press a setting.
SETTING THE CLOCK AND
DATE
1. Access the vehicle drawer on the touchscreen.
2. Press
SETTINGS.
3. Press
Clock.
4. Set the time.
Note: The
AM and PM options are not
available if 24-hour mode is on.
5. Press the arrows to adjust the settings.
Switching Automatic Time
Updates On and Off
1. Access the vehicle drawer on the touchscreen.
2. Press
SETTINGS.
3. Press
Clock.
4. Switch
Automatic time zone update
on or off.
385
2022 Maverick (CFE) Canada/United States of America, enUSA, Edition date: 202106, First-Printing Audio System - Vehicles With: SYNC 3