2022 FORD MAVERICK buttons
[x] Cancel search: buttonsPage 63 of 533

REMOTE CONTROL
LIMITATIONS
WARNING: Changes or
modifications not expressively approved
by the party responsible for compliance
could void the user's authority to operate
the equipment. The term "IC:" before the
radio certification number only signifies
that Industry Canada technical
specifications were met.
This device complies with Part 15 of the
FCC Rules and with Industry Canada
license-exempt RSS standard(s).
Operation is subject to the following two
conditions: (1) This device may not cause
harmful interference, and (2) This device
must accept any interference received,
including interference that may cause
undesired operation.
Make sure a valid remote control is within
5 ft (1.5 m)
from the front door handles
and rear of vehicle.
The system may not function if:
• The remote control remains stationary
for about a minute.
• The vehicle battery has no charge.
• The remote control battery has no
charge.
• There is interference causing issues
with the remote control frequencies.
• The remote control is too close to
metal objects or electronic devices, for
example keys or a cell phone.
USING THE REMOTE CONTROL
Use your remote control to access various
vehicle systems.
Note: The buttons on your remote may vary
depending on the vehicle region or options. Unlock Press the button to unlock all
doors. See
Unlocking and
Locking the Doors Using the
Remote Control
(page 73).
Lock Press the button to lock all
doors. See
Unlocking and
Locking the Doors Using the
Remote Control
(page 73).
Remote Start
(If Equipped) Press the button to remote start.
See
What Is Remote Start
(page 123).
Tailgate
(If Equipped) Press the button to open the
tailgate. See
Locking and
Unlocking the Tailgate (page
83).
Panic Alarm
(If Equipped) Press the button to sound the
panic alarm. See Sounding the
Panic Alarm
(page 61).
OPENING AND CLOSING THE
FLIP KEY
Opening Your Flip Key
Press the round button on the remote
control to extend the flip key.
60
2022 Maverick (CFE) Canada/United States of America, enUSA, Edition date: 202106, First-Printing Keys and Remote ControlsE138629 E138623 E138625 E191530 E138624
Page 80 of 533
KEYLESS ENTRY LIMITATIONS
Make sure your remote control is within 3 ft
(1 m) from the front door handles and the
tailgate.
The system could not function if:
• The remote control remains stationary
for about a minute.
• The vehicle battery has no charge.
• The remote control battery has no
charge.
• There is interference causing issues
with the remote control frequencies.
• The remote control is too close to
metal objects or electronic devices, for
example keys or a cell phone.
KEYLESS ENTRY SETTINGS
Switching Keyless Entry On and
Off
1. Switch the ignition on using an original
key that has not been created as a
MyKey.
2. Using the information display controls on the steering wheel, select Settings.
3. Select
Vehicle Settings.
4. Select
Locks.
Reprogramming the Unlocking
Function
You can enable two-stage unlocking
function allowing you to unlock only the
driver door when you touch the unlock
sensor.
Press and hold both the lock and unlock
buttons on the remote control for four
seconds to disable or enable two-stage
unlocking. If you program the unlocking function so
that only the driver door unlocks, you can
unlock all of the other doors from inside
your vehicle using the power door lock
control. You can unlock individual doors
by pulling the interior door handles on
those doors.
USING KEYLESS ENTRY
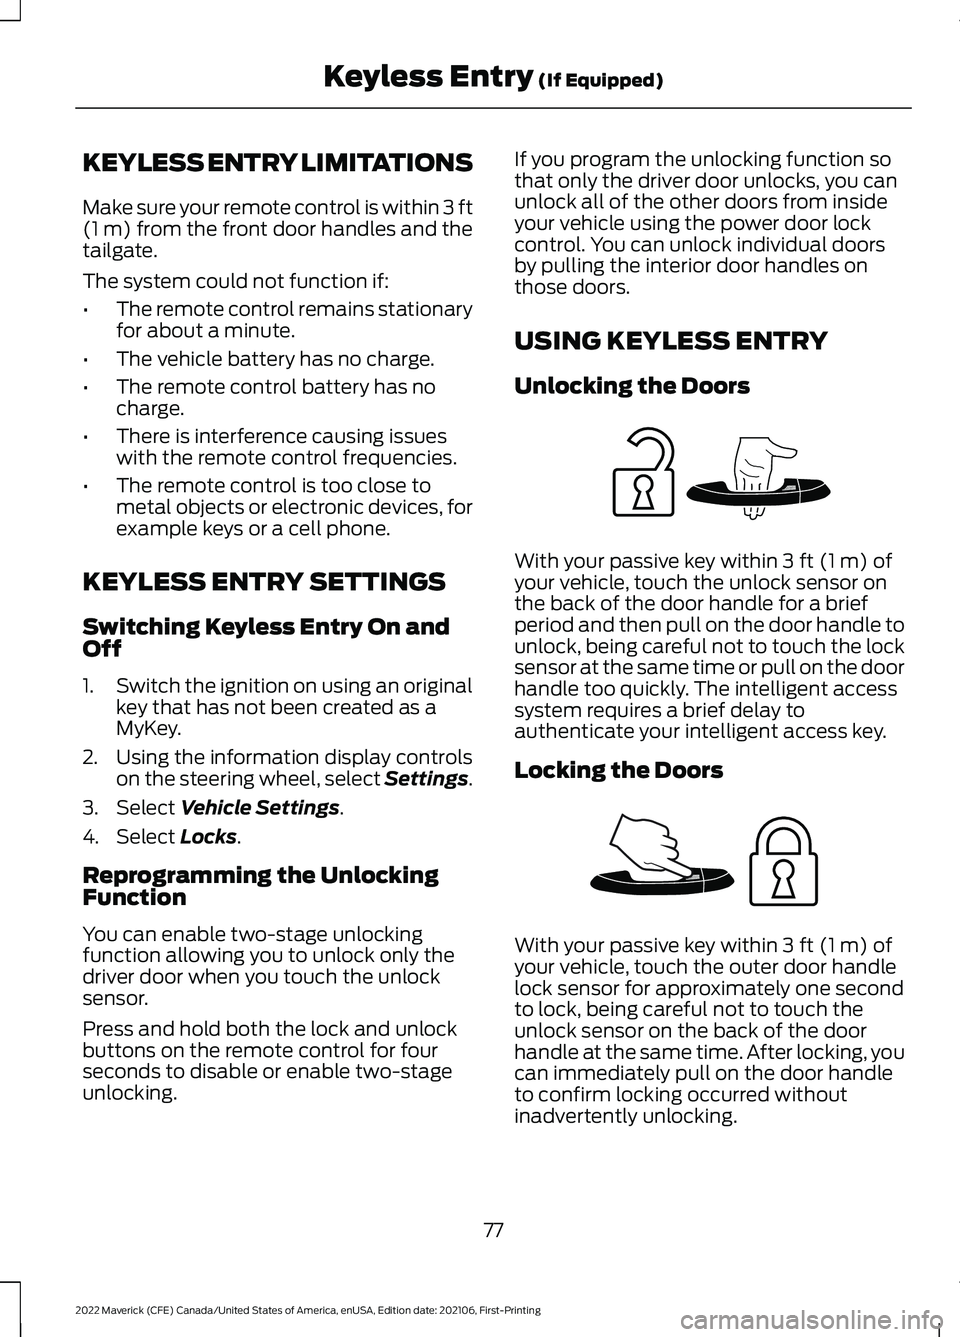
Unlocking the Doors
With your passive key within
3 ft (1 m) of
your vehicle, touch the unlock sensor on
the back of the door handle for a brief
period and then pull on the door handle to
unlock, being careful not to touch the lock
sensor at the same time or pull on the door
handle too quickly. The intelligent access
system requires a brief delay to
authenticate your intelligent access key.
Locking the Doors With your passive key within
3 ft (1 m) of
your vehicle, touch the outer door handle
lock sensor for approximately one second
to lock, being careful not to touch the
unlock sensor on the back of the door
handle at the same time. After locking, you
can immediately pull on the door handle
to confirm locking occurred without
inadvertently unlocking.
77
2022 Maverick (CFE) Canada/United States of America, enUSA, Edition date: 202106, First-Printing Keyless Entry
(If Equipped)E248553 E248554
Page 93 of 533
WIPERS
WIPER PRECAUTIONS
Do not operate the wipers on a dry
windshield. This could scratch the glass or
damage the wiper blades. Use the
windshield washers before wiping a dry
windshield.
Fully defrost the windshield before you
switch the windshield wipers on.
Switch the windshield wipers off before
entering a car wash.
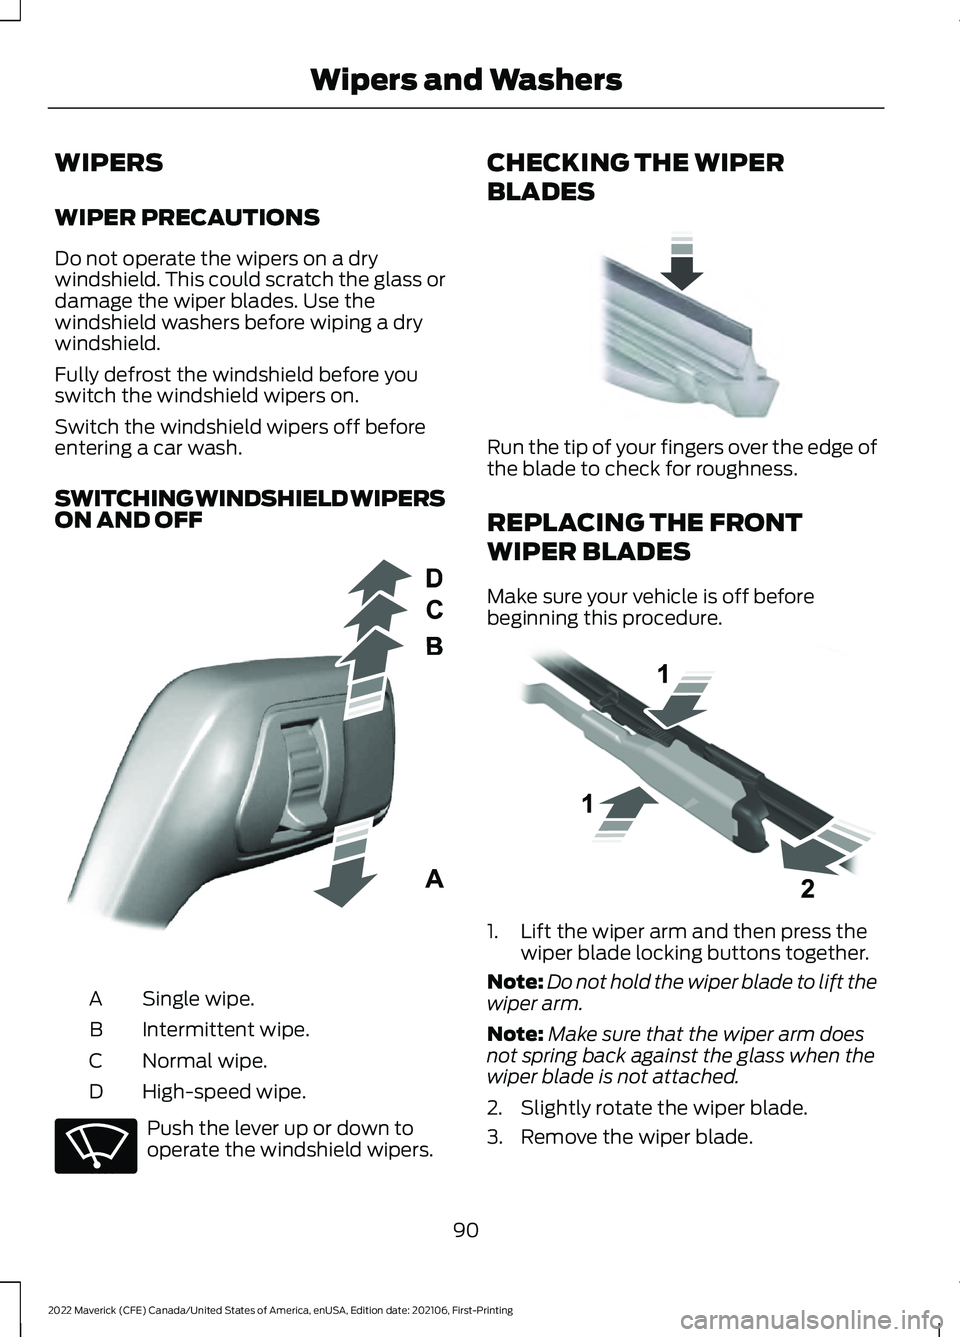
SWITCHING WINDSHIELD WIPERS
ON AND OFF
Single wipe.
A
Intermittent wipe.
B
Normal wipe.
C
High-speed wipe.
D Push the lever up or down to
operate the windshield wipers. CHECKING THE WIPER
BLADES
Run the tip of your fingers over the edge of
the blade to check for roughness.
REPLACING THE FRONT
WIPER BLADES
Make sure your vehicle is off before
beginning this procedure.
1. Lift the wiper arm and then press the
wiper blade locking buttons together.
Note: Do not hold the wiper blade to lift the
wiper arm.
Note: Make sure that the wiper arm does
not spring back against the glass when the
wiper blade is not attached.
2. Slightly rotate the wiper blade.
3. Remove the wiper blade.
90
2022 Maverick (CFE) Canada/United States of America, enUSA, Edition date: 202106, First-Printing Wipers and WashersE295996 E270969 E142463 E129990
Page 102 of 533
SWITCHING ALL OF THE
INTERIOR LAMPS ON AND OFF
The lamps turn on under the following
conditions:
•
You open any door.
• You press a button on the remote
control.
• You press the all lamps on button on
the overhead console. Press to switch all interior lamps
on or off.
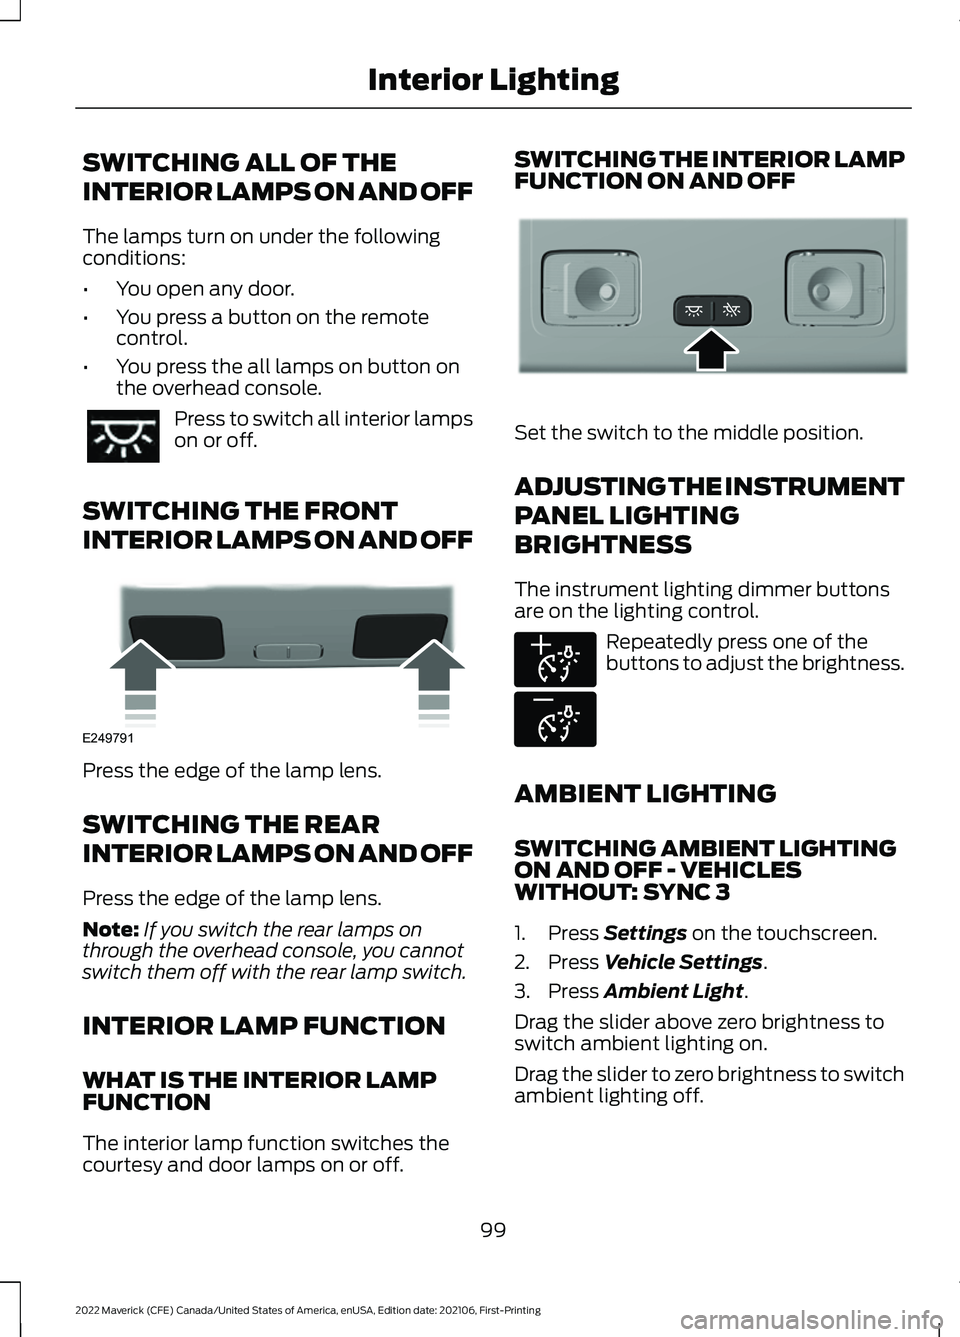
SWITCHING THE FRONT
INTERIOR LAMPS ON AND OFF Press the edge of the lamp lens.
SWITCHING THE REAR
INTERIOR LAMPS ON AND OFF
Press the edge of the lamp lens.
Note:
If you switch the rear lamps on
through the overhead console, you cannot
switch them off with the rear lamp switch.
INTERIOR LAMP FUNCTION
WHAT IS THE INTERIOR LAMP
FUNCTION
The interior lamp function switches the
courtesy and door lamps on or off. SWITCHING THE INTERIOR LAMP
FUNCTION ON AND OFF
Set the switch to the middle position.
ADJUSTING THE INSTRUMENT
PANEL LIGHTING
BRIGHTNESS
The instrument lighting dimmer buttons
are on the lighting control.
Repeatedly press one of the
buttons to adjust the brightness.
AMBIENT LIGHTING
SWITCHING AMBIENT LIGHTING
ON AND OFF - VEHICLES
WITHOUT: SYNC 3
1. Press Settings on the touchscreen.
2. Press
Vehicle Settings.
3. Press
Ambient Light.
Drag the slider above zero brightness to
switch ambient lighting on.
Drag the slider to zero brightness to switch
ambient lighting off.
99
2022 Maverick (CFE) Canada/United States of America, enUSA, Edition date: 202106, First-Printing Interior Lighting E249791 E299443 E291299 E296433
Page 119 of 533
USING THE INSTRUMENT
CLUSTER DISPLAY CONTROLS
WARNING: Driving while distracted
can result in loss of vehicle control, crash
and injury. We strongly recommend that
you use extreme caution when using any
device that may take your focus off the
road. Your primary responsibility is the
safe operation of your vehicle. We
recommend against the use of any
hand-held device while driving and
encourage the use of voice-operated
systems when possible. Make sure you
are aware of all applicable local laws
that may affect the use of electronic
devices while driving.
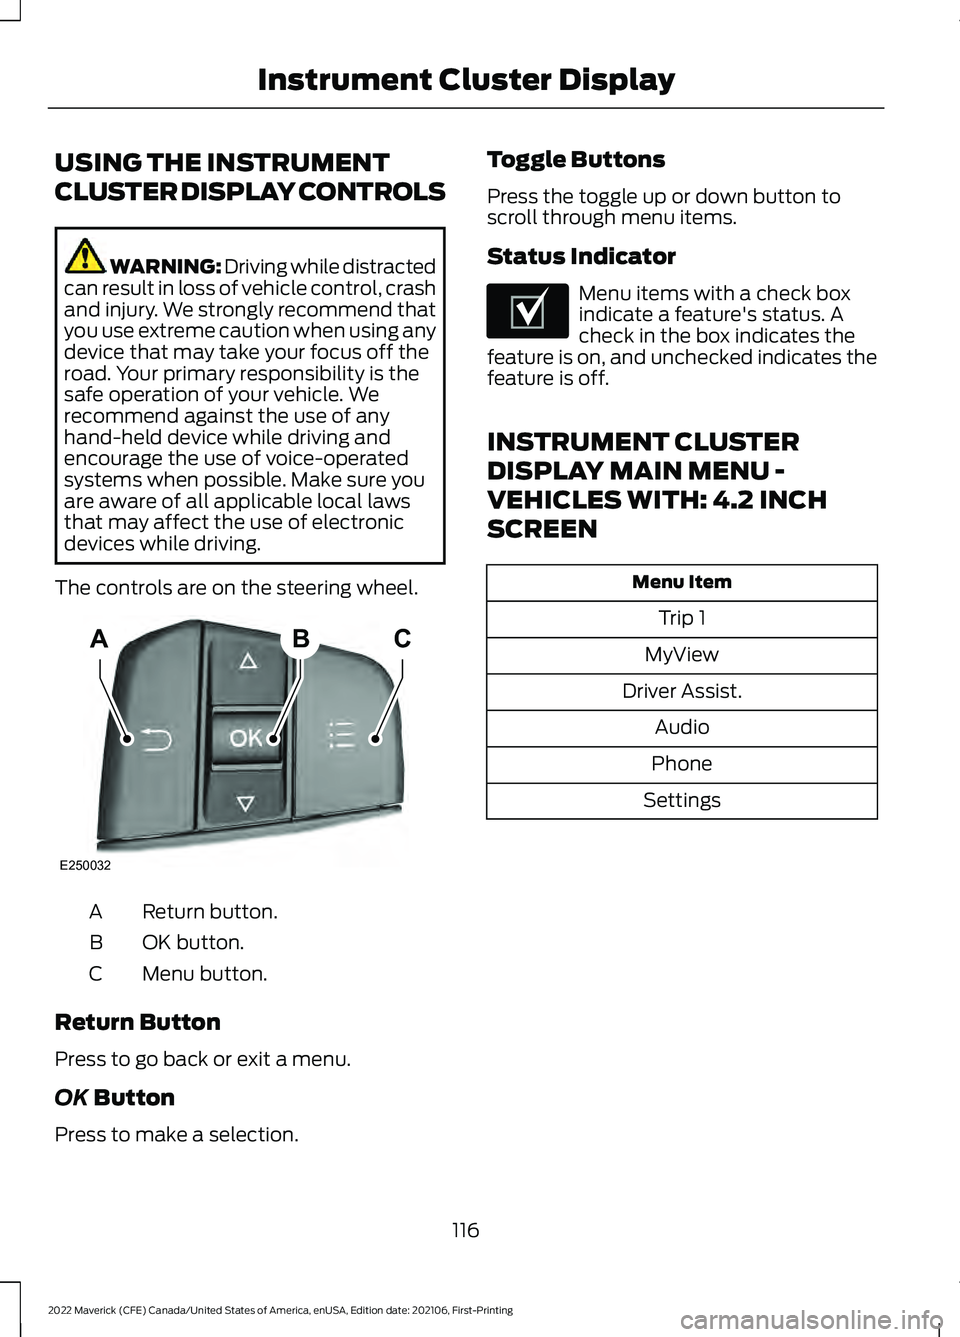
The controls are on the steering wheel. Return button.
A
OK button.
B
Menu button.
C
Return Button
Press to go back or exit a menu.
OK Button
Press to make a selection. Toggle Buttons
Press the toggle up or down button to
scroll through menu items.
Status Indicator Menu items with a check box
indicate a feature's status. A
check in the box indicates the
feature is on, and unchecked indicates the
feature is off.
INSTRUMENT CLUSTER
DISPLAY MAIN MENU -
VEHICLES WITH: 4.2 INCH
SCREEN Menu Item
Trip 1
MyView
Driver Assist. Audio
Phone
Settings
116
2022 Maverick (CFE) Canada/United States of America, enUSA, Edition date: 202106, First-Printing Instrument Cluster DisplayABC
E250032 E204495
Page 206 of 533
WHAT IS HILL DESCENT
CONTROL
Hill descent control allows the driver to set
and maintain vehicle speed while
descending steep slopes in various surface
conditions.
HOW DOES HILL DESCENT
CONTROL WORK
Hill descent control can maintain vehicle
speeds on downhill slopes between
2
– 20 mph (3– 32 km/h). Above 20 mph
(32 km/h), the system remains on but the
descent speed cannot be set or
maintained.
Note: The system does not function below
2 mph (3 km/h)
.
The system requires a cool down interval
after a period of sustained use. Hill descent
control provides a warning in the message
center and a tone sounds when the system
is about to disengage for cooling. At this
time, manually apply the brakes as needed
to maintain descent speed.
Note: The amount of time that the system
can remain active before cooling varies with
conditions.
HILL DESCENT CONTROL
PRECAUTIONS WARNING:
The system does not
control speed in low traction conditions
or extremely steep slopes. The system
is designed to be an aid and does not
relieve you of your responsibility to drive
with due care and attention. Failure to
follow this instruction could result in
personal injury. WARNING:
Hill descent control
cannot control descent in all surface
conditions and circumstances, such as
ice or extremely steep grades. Hill
descent control is a driver assist system
and cannot substitute for good judgment
by the driver. Failure to do so may result
in loss of vehicle control, crash or serious
injury. WARNING:
The system does not
replace the parking brake. When you
leave your vehicle, always apply the
parking brake and shift the transmission
into park (P) for automatic transmission
or first gear for manual transmission.
SWITCHING HILL DESCENT
CONTROL ON AND OFF Press the button on the center
console. A light illuminates and
a tone sounds when the system
is active.
SETTING THE HILL DESCENT
SPEED
To increase or decrease the descent speed,
press the accelerator or brake pedal, or use
the SET
+ and SET - buttons on the
steering wheel. Once you reach the
preferred speed remove your feet from the
pedals.
HILL DESCENT CONTROL
INDICATOR Illuminates when you switch hill
descent control on.
203
2022 Maverick (CFE) Canada/United States of America, enUSA, Edition date: 202106, First-Printing Hill Descent Control
(If Equipped)E163171 E163171
Page 379 of 533
Turning off the Audio
Press the button to turn off the
audio.
Press the button again to turn on
the audio.
Changing Radio Stations
Manual Tuning Note:
You can change radio stations using
the seek buttons.
Note: You can recall radio stations using
the preset buttons on the touchscreen.
Seek Up and Next Track Button Select to skip to the next track.
Press and hold the button to fast
forward through the track.
Seek Down and Previous Track
Button Select to return to the beginning
of a track.
Repeatedly press the button to
return to previous tracks.
Press and hold the button to fast rewind. Pausing or Playing Media Select to play a track. Press the
button again to pause the track.
In radio mode, press the button to mute
the radio. Press the button again to
unmute.
Switching the Screen On and Off Press the button to switch the
screen on or off.
Sound Settings Press the button to adjust the
sound settings. You can optimize
the sound for different seating
positions.
You can also activate and set the
sensitivity of the speed compensated
volume.
Display Settings Select the settings option on the
feature bar.
1. Select Display.
2. Adjust the settings.
General Settings Select the settings option on the
feature bar.
1. Select
General.
Adjust the settings.
AM/FM RADIO
Using the Radio Select the audio option on the
feature bar.
376
2022 Maverick (CFE) Canada/United States of America, enUSA, Edition date: 202106, First-Printing Audio System - Vehicles Without: SYNC 3 E290691 E354722
Page 380 of 533
Selecting a Radio Station From a List
1. Select Sources.
2. Select a radio source.
3. Select
Browse.
4. Select a radio station from the list.
Manually Changing Radio Stations Rotate the control to change the
frequency.
Automatically Changing Radio
Stations
Press to seek the next station up
the frequency band.
Press and hold to quickly seek
up the frequency band. Press to seek the next station
down the frequency band.
Press and hold to quickly seek
down the frequency band.
Storing a Radio Station
Press and hold one of the preset buttons
on the touchscreen.
Note: The radio could briefly mutes to
indicate the station has been stored. Radio Settings Select the settings option on the
feature bar.
1. Select Radio.
2. Adjust the settings.
CONNECTING A BLUETOOTH®
DEVICE
Go to the settings menu on your device and
switch Bluetooth on. Select the settings options on
the feature bar.
1. Select
Bluetooth.
2. Switch Bluetooth on.
3. Select
Add a Bluetooth Device.
Note: A prompt alerts you to search for your
vehicle on your device.
4. Select your vehicle on your device.
Note: A number appears on your device and
on the touchscreen.
5. Confirm that the number on your device matches the number on the
touchscreen.
Note: The touchscreen indicates that you
have successfully paired your device.
Bluetooth Settings Select the settings option on the
feature bar.
1. Select
Bluetooth.
2. Adjust the settings.
Using Your Cell Phone
Recent Call List
Display and select an entry from a list of
previous calls.
377
2022 Maverick (CFE) Canada/United States of America, enUSA, Edition date: 202106, First-Printing Audio System - Vehicles Without: SYNC 3E290691 E142607