2022 FORD F-650/750 air suspension
[x] Cancel search: air suspensionPage 218 of 379
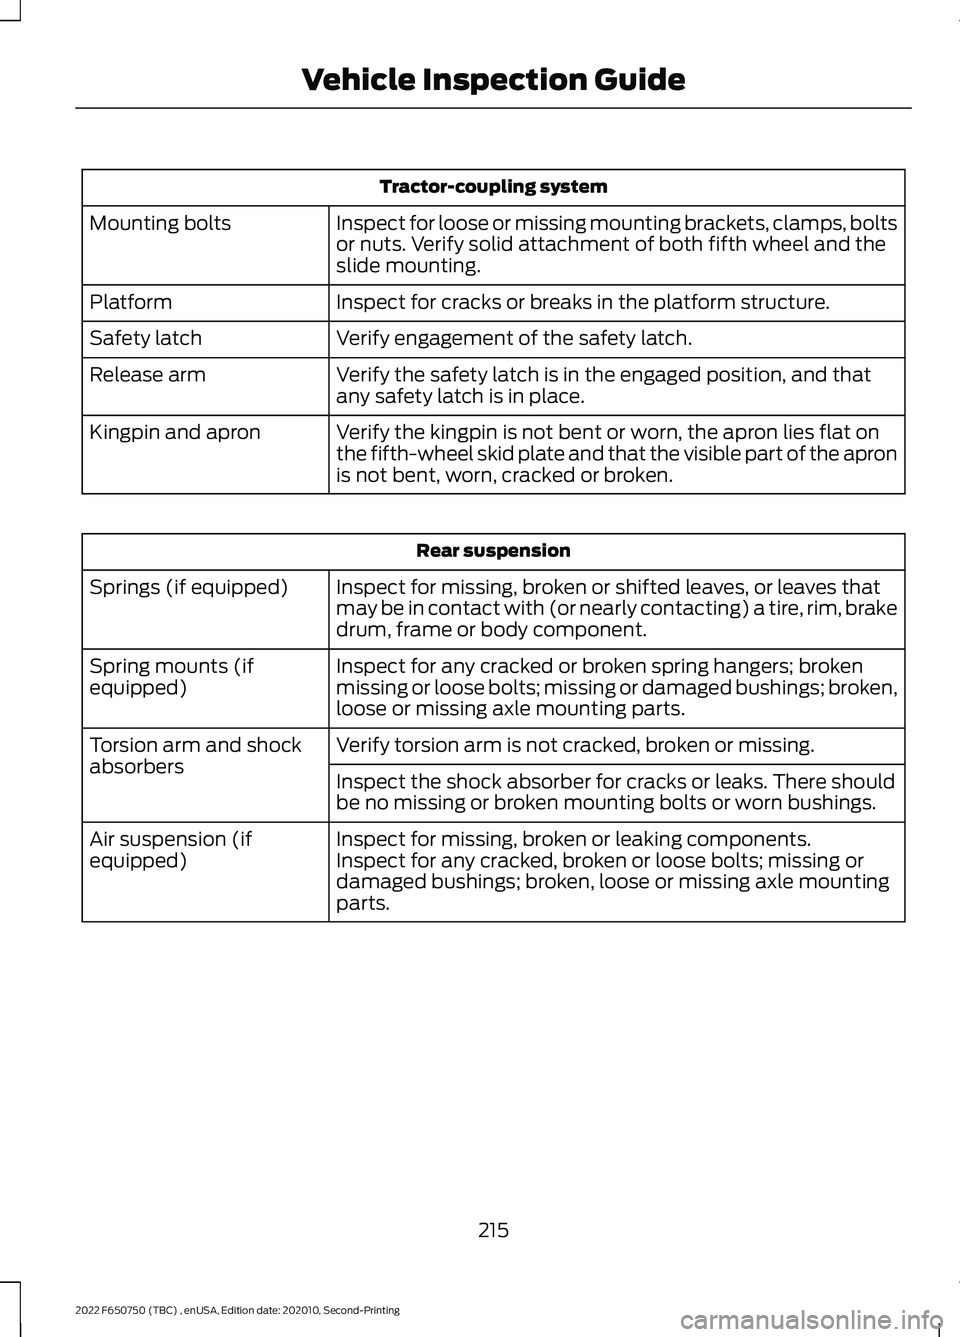
Tractor-coupling system
Inspect for loose or missing mounting brackets, clamps, bolts
or nuts. Verify solid attachment of both fifth wheel and the
slide mounting.
Mounting bolts
Inspect for cracks or breaks in the platform structure.
Platform
Verify engagement of the safety latch.
Safety latch
Verify the safety latch is in the engaged position, and that
any safety latch is in place.
Release arm
Verify the kingpin is not bent or worn, the apron lies flat on
the fifth-wheel skid plate and that the visible part of the apron
is not bent, worn, cracked or broken.
Kingpin and apron Rear suspension
Inspect for missing, broken or shifted leaves, or leaves that
may be in contact with (or nearly contacting) a tire, rim, brake
drum, frame or body component.
Springs (if equipped)
Inspect for any cracked or broken spring hangers; broken
missing or loose bolts; missing or damaged bushings; broken,
loose or missing axle mounting parts.
Spring mounts (if
equipped)
Verify torsion arm is not cracked, broken or missing.
Torsion arm and shock
absorbers
Inspect the shock absorber for cracks or leaks. There should
be no missing or broken mounting bolts or worn bushings.
Inspect for missing, broken or leaking components.
Air suspension (if
equipped) Inspect for any cracked, broken or loose bolts; missing or
damaged bushings; broken, loose or missing axle mounting
parts.
215
2022 F650750 (TBC) , enUSA, Edition date: 202010, Second-Printing Vehicle Inspection Guide
Page 219 of 379

Rear brakes
Inspect for cracked, worn or frayed hoses, and that all coup-
lings are secure.
Hoses
Verify that there are no cracks or dents, and that the cham-
bers are securely mounted.
Brake chambers
Inspect for broken, loose or missing parts.
Slack adjusters
Note: The angle between the push rod and adjuster arm
should be approximately 90 degrees when the brakes are
applied. When pulled by hand, the push rod should not move
more than approximately
1 in (2.5 cm).
Verify that there are no cracks, dents, holes, and no loose or
missing bolts and that the brake linings are not worn,
dangerously thin or contaminated by lubricant.
Drums Rear wheels
Check for even separation of dual wheels, and that the tires
are not touching each other.
Spacers
Inspect for damaged or bent rims. They should not have
welding repairs, and there should be no rust trails, which
indicate it is loose on the wheel.
Rims
Verify all lug nuts are present and not loose (look for rust
trails around the lug nuts). There should be no cracks radiating
from the lug bolt holes or distortion of the bolt holes.
Lug nuts
Trailer
If you are pulling a trailer, perform an
inspection of the trailer similar to that of
the tractor. The inspection should follow
trailer manufacturer recommendations
and should include at a minimum: general
condition, landing gear, doors, sides, lights,
reflectors, suspension, brakes, tires,
wheels, cargo placement, stability and
tie-downs. Transmission WARNING:
If the unit starts in gear
and/or the neutral start switch is not
functioning correctly, the vehicle may
inadvertently move which could result
in property damage, personal injury or
death.
Regularly inspect the transmission's
neutral start switch. The engine should
only start in neutral (N) or park (P) (if
equipped with a park position).
216
2022 F650750 (TBC) , enUSA, Edition date: 202010, Second-Printing Vehicle Inspection Guide
Page 222 of 379
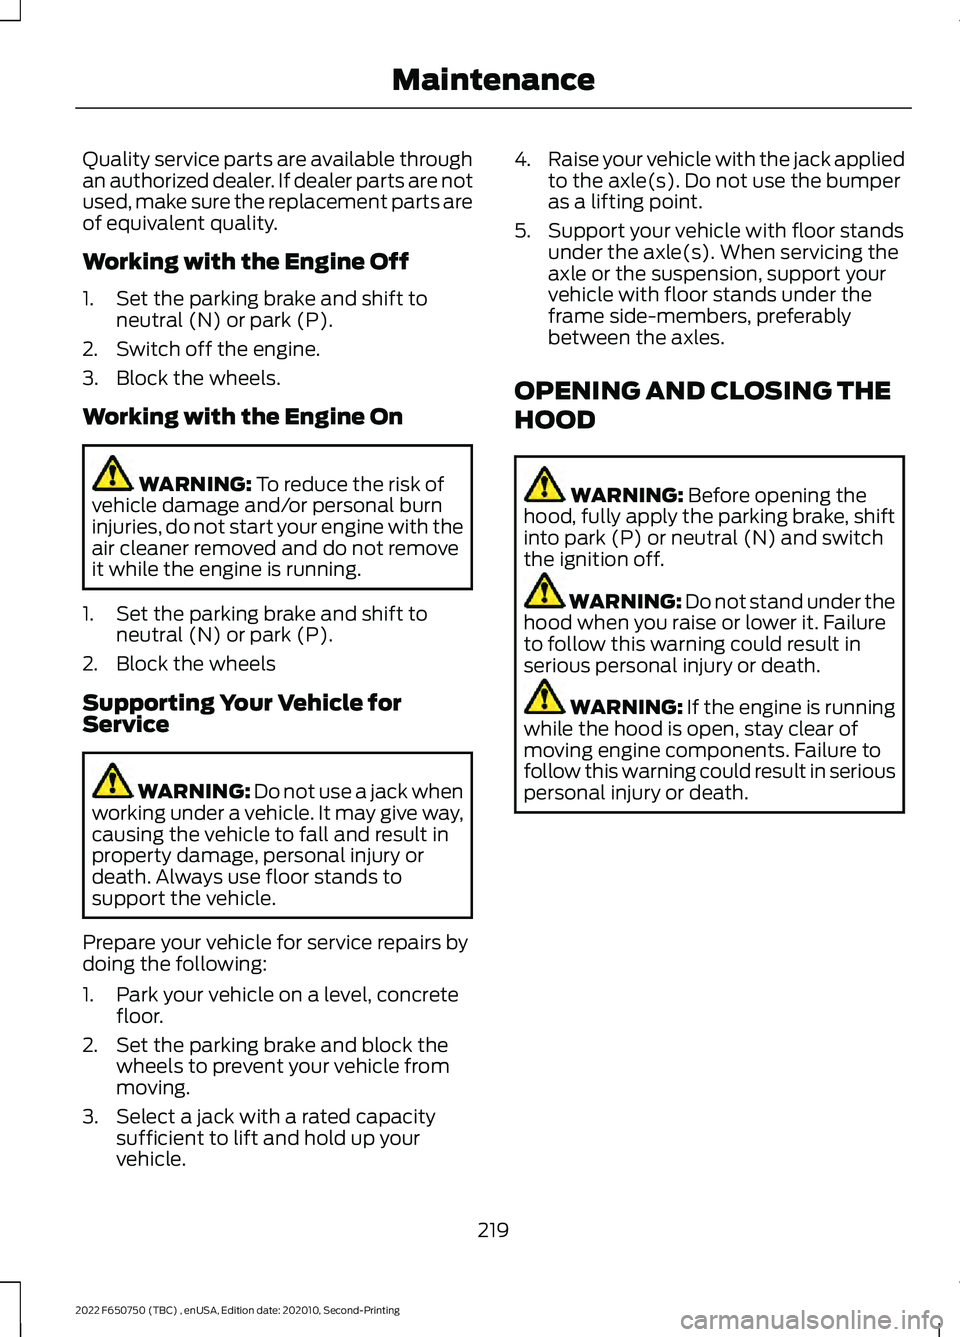
Quality service parts are available through
an authorized dealer. If dealer parts are not
used, make sure the replacement parts are
of equivalent quality.
Working with the Engine Off
1. Set the parking brake and shift to
neutral (N) or park (P).
2. Switch off the engine.
3. Block the wheels.
Working with the Engine On WARNING: To reduce the risk of
vehicle damage and/or personal burn
injuries, do not start your engine with the
air cleaner removed and do not remove
it while the engine is running.
1. Set the parking brake and shift to neutral (N) or park (P).
2. Block the wheels
Supporting Your Vehicle for
Service WARNING:
Do not use a jack when
working under a vehicle. It may give way,
causing the vehicle to fall and result in
property damage, personal injury or
death. Always use floor stands to
support the vehicle.
Prepare your vehicle for service repairs by
doing the following:
1. Park your vehicle on a level, concrete floor.
2. Set the parking brake and block the wheels to prevent your vehicle from
moving.
3. Select a jack with a rated capacity sufficient to lift and hold up your
vehicle. 4.
Raise your vehicle with the jack applied
to the axle(s). Do not use the bumper
as a lifting point.
5. Support your vehicle with floor stands under the axle(s). When servicing the
axle or the suspension, support your
vehicle with floor stands under the
frame side-members, preferably
between the axles.
OPENING AND CLOSING THE
HOOD WARNING:
Before opening the
hood, fully apply the parking brake, shift
into park (P) or neutral (N) and switch
the ignition off. WARNING:
Do not stand under the
hood when you raise or lower it. Failure
to follow this warning could result in
serious personal injury or death. WARNING: If the engine is running
while the hood is open, stay clear of
moving engine components. Failure to
follow this warning could result in serious
personal injury or death.
219
2022 F650750 (TBC) , enUSA, Edition date: 202010, Second-Printing Maintenance
Page 261 of 379
Follow the tire manufacturer's
recommended cold inflation pressure for
the tire size, load range (ply rating) and
steer axle loading typical for their operation
(each steer axle tire equals ½ steer axle
loading).
Special applications may warrant a setting
based on experience with the type of tire
operating loads and conditions. Radial tires
are more sensitive to toe-in setting than
bias ply tires. Fine tuning school bus
alignment to line-haul truck standards
does not drastically improve tire tread life.
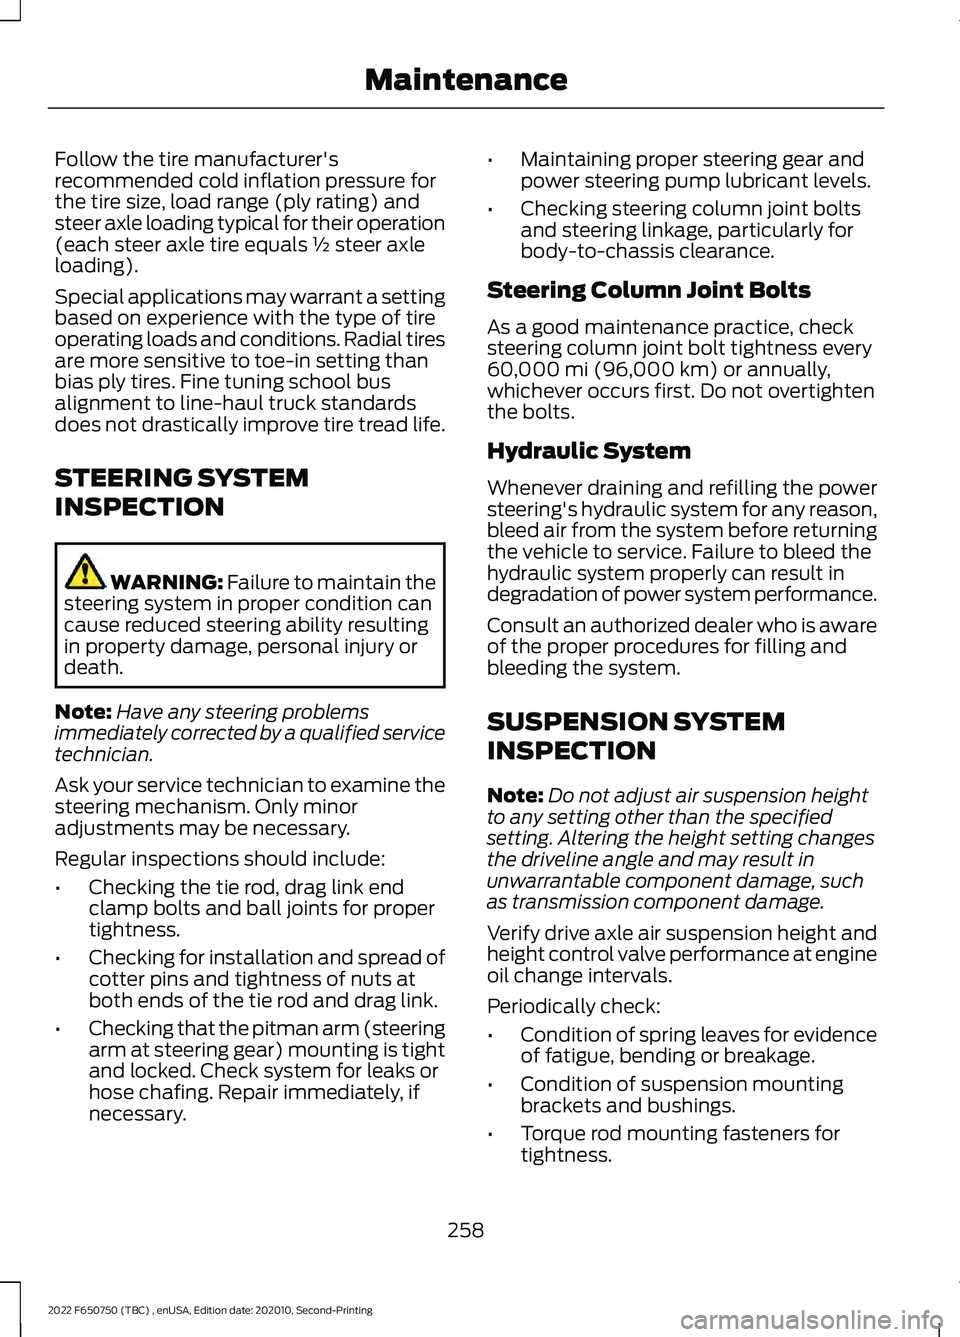
STEERING SYSTEM
INSPECTION
WARNING: Failure to maintain the
steering system in proper condition can
cause reduced steering ability resulting
in property damage, personal injury or
death.
Note: Have any steering problems
immediately corrected by a qualified service
technician.
Ask your service technician to examine the
steering mechanism. Only minor
adjustments may be necessary.
Regular inspections should include:
• Checking the tie rod, drag link end
clamp bolts and ball joints for proper
tightness.
• Checking for installation and spread of
cotter pins and tightness of nuts at
both ends of the tie rod and drag link.
• Checking that the pitman arm (steering
arm at steering gear) mounting is tight
and locked. Check system for leaks or
hose chafing. Repair immediately, if
necessary. •
Maintaining proper steering gear and
power steering pump lubricant levels.
• Checking steering column joint bolts
and steering linkage, particularly for
body-to-chassis clearance.
Steering Column Joint Bolts
As a good maintenance practice, check
steering column joint bolt tightness every
60,000 mi (96,000 km)
or annually,
whichever occurs first. Do not overtighten
the bolts.
Hydraulic System
Whenever draining and refilling the power
steering's hydraulic system for any reason,
bleed air from the system before returning
the vehicle to service. Failure to bleed the
hydraulic system properly can result in
degradation of power system performance.
Consult an authorized dealer who is aware
of the proper procedures for filling and
bleeding the system.
SUSPENSION SYSTEM
INSPECTION
Note: Do not adjust air suspension height
to any setting other than the specified
setting. Altering the height setting changes
the driveline angle and may result in
unwarrantable component damage, such
as transmission component damage.
Verify drive axle air suspension height and
height control valve performance at engine
oil change intervals.
Periodically check:
• Condition of spring leaves for evidence
of fatigue, bending or breakage.
• Condition of suspension mounting
brackets and bushings.
• Torque rod mounting fasteners for
tightness.
258
2022 F650750 (TBC) , enUSA, Edition date: 202010, Second-Printing Maintenance
Page 262 of 379
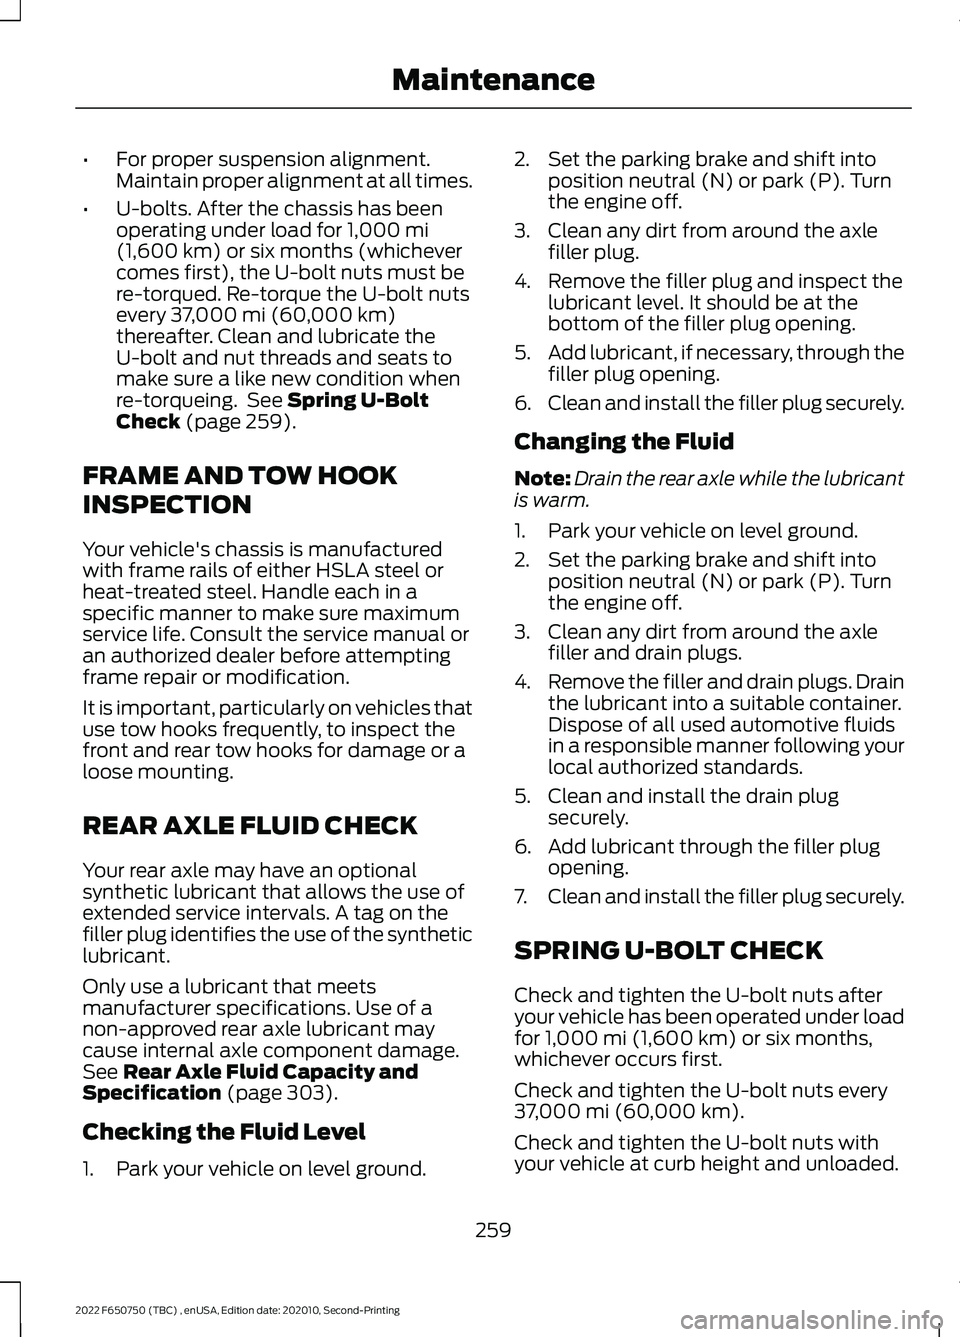
•
For proper suspension alignment.
Maintain proper alignment at all times.
• U-bolts. After the chassis has been
operating under load for 1,000 mi
(1,600 km) or six months (whichever
comes first), the U-bolt nuts must be
re-torqued. Re-torque the U-bolt nuts
every
37,000 mi (60,000 km)
thereafter. Clean and lubricate the
U-bolt and nut threads and seats to
make sure a like new condition when
re-torqueing. See
Spring U-Bolt
Check (page 259).
FRAME AND TOW HOOK
INSPECTION
Your vehicle's chassis is manufactured
with frame rails of either HSLA steel or
heat-treated steel. Handle each in a
specific manner to make sure maximum
service life. Consult the service manual or
an authorized dealer before attempting
frame repair or modification.
It is important, particularly on vehicles that
use tow hooks frequently, to inspect the
front and rear tow hooks for damage or a
loose mounting.
REAR AXLE FLUID CHECK
Your rear axle may have an optional
synthetic lubricant that allows the use of
extended service intervals. A tag on the
filler plug identifies the use of the synthetic
lubricant.
Only use a lubricant that meets
manufacturer specifications. Use of a
non-approved rear axle lubricant may
cause internal axle component damage.
See
Rear Axle Fluid Capacity and
Specification (page 303).
Checking the Fluid Level
1. Park your vehicle on level ground. 2. Set the parking brake and shift into
position neutral (N) or park (P). Turn
the engine off.
3. Clean any dirt from around the axle filler plug.
4. Remove the filler plug and inspect the lubricant level. It should be at the
bottom of the filler plug opening.
5. Add lubricant, if necessary, through the
filler plug opening.
6. Clean and install the filler plug securely.
Changing the Fluid
Note: Drain the rear axle while the lubricant
is warm.
1. Park your vehicle on level ground.
2. Set the parking brake and shift into position neutral (N) or park (P). Turn
the engine off.
3. Clean any dirt from around the axle filler and drain plugs.
4. Remove the filler and drain plugs. Drain
the lubricant into a suitable container.
Dispose of all used automotive fluids
in a responsible manner following your
local authorized standards.
5. Clean and install the drain plug securely.
6. Add lubricant through the filler plug opening.
7. Clean and install the filler plug securely.
SPRING U-BOLT CHECK
Check and tighten the U-bolt nuts after
your vehicle has been operated under load
for
1,000 mi (1,600 km) or six months,
whichever occurs first.
Check and tighten the U-bolt nuts every
37,000 mi (60,000 km)
.
Check and tighten the U-bolt nuts with
your vehicle at curb height and unloaded.
259
2022 F650750 (TBC) , enUSA, Edition date: 202010, Second-Printing Maintenance
Page 284 of 379
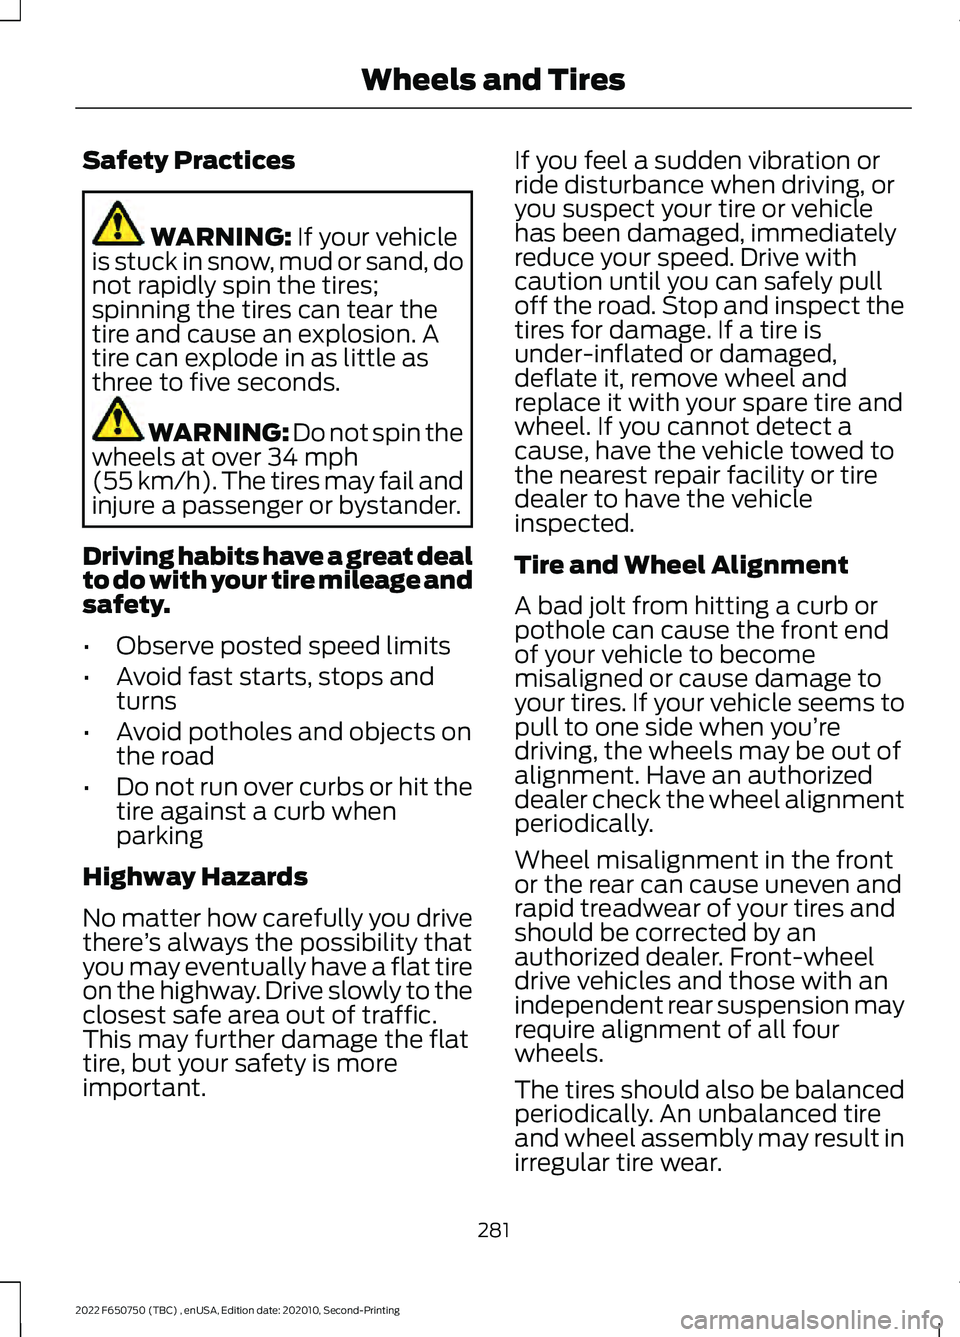
Safety Practices
WARNING: If your vehicle
is stuck in snow, mud or sand, do
not rapidly spin the tires;
spinning the tires can tear the
tire and cause an explosion. A
tire can explode in as little as
three to five seconds. WARNING:
Do not spin the
wheels at over 34 mph
(55 km/h). The tires may fail and
injure a passenger or bystander.
Driving habits have a great deal
to do with your tire mileage and
safety.
• Observe posted speed limits
• Avoid fast starts, stops and
turns
• Avoid potholes and objects on
the road
• Do not run over curbs or hit the
tire against a curb when
parking
Highway Hazards
No matter how carefully you drive
there ’s always the possibility that
you may eventually have a flat tire
on the highway. Drive slowly to the
closest safe area out of traffic.
This may further damage the flat
tire, but your safety is more
important. If you feel a sudden vibration or
ride disturbance when driving, or
you suspect your tire or vehicle
has been damaged, immediately
reduce your speed. Drive with
caution until you can safely pull
off the road. Stop and inspect the
tires for damage. If a tire is
under-inflated or damaged,
deflate it, remove wheel and
replace it with your spare tire and
wheel. If you cannot detect a
cause, have the vehicle towed to
the nearest repair facility or tire
dealer to have the vehicle
inspected.
Tire and Wheel Alignment
A bad jolt from hitting a curb or
pothole can cause the front end
of your vehicle to become
misaligned or cause damage to
your tires. If your vehicle seems to
pull to one side when you’re
driving, the wheels may be out of
alignment. Have an authorized
dealer check the wheel alignment
periodically.
Wheel misalignment in the front
or the rear can cause uneven and
rapid treadwear of your tires and
should be corrected by an
authorized dealer. Front-wheel
drive vehicles and those with an
independent rear suspension may
require alignment of all four
wheels.
The tires should also be balanced
periodically. An unbalanced tire
and wheel assembly may result in
irregular tire wear.
281
2022 F650750 (TBC) , enUSA, Edition date: 202010, Second-Printing Wheels and Tires
Page 328 of 379
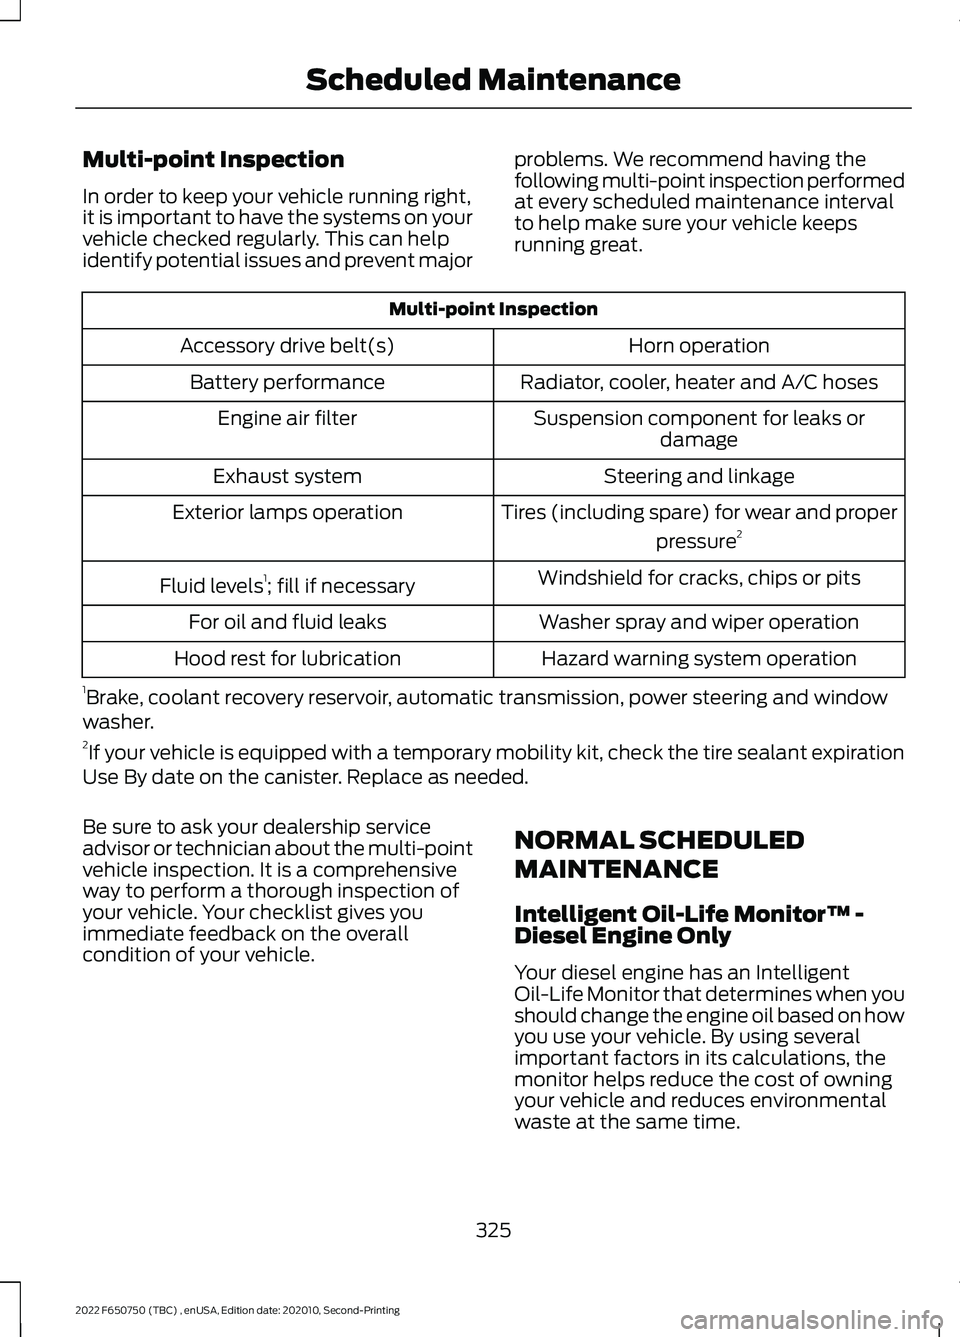
Multi-point Inspection
In order to keep your vehicle running right,
it is important to have the systems on your
vehicle checked regularly. This can help
identify potential issues and prevent major
problems. We recommend having the
following multi-point inspection performed
at every scheduled maintenance interval
to help make sure your vehicle keeps
running great.Multi-point Inspection
Horn operation
Accessory drive belt(s)
Radiator, cooler, heater and A/C hoses
Battery performance
Suspension component for leaks ordamage
Engine air filter
Steering and linkage
Exhaust system
Tires (including spare) for wear and properpressure2
Exterior lamps operation
Windshield for cracks, chips or pits
Fluid levels 1
; fill if necessary
Washer spray and wiper operation
For oil and fluid leaks
Hazard warning system operation
Hood rest for lubrication
1 Brake, coolant recovery reservoir, automatic transmission, power steering and window
washer.
2 If your vehicle is equipped with a temporary mobility kit, check the tire sealant expiration
Use By date on the canister. Replace as needed.
Be sure to ask your dealership service
advisor or technician about the multi-point
vehicle inspection. It is a comprehensive
way to perform a thorough inspection of
your vehicle. Your checklist gives you
immediate feedback on the overall
condition of your vehicle. NORMAL SCHEDULED
MAINTENANCE
Intelligent Oil-Life Monitor™ -
Diesel Engine Only
Your diesel engine has an Intelligent
Oil-Life Monitor that determines when you
should change the engine oil based on how
you use your vehicle. By using several
important factors in its calculations, the
monitor helps reduce the cost of owning
your vehicle and reduces environmental
waste at the same time.
325
2022 F650750 (TBC) , enUSA, Edition date: 202010, Second-Printing Scheduled Maintenance
Page 332 of 379

At Every Oil Change Interval as Indicated by the Information Display
1
Perform a multi-point inspection, recommended.
Inspect the air filter restriction gauge. Replace the filter if necessary.
Inspect the automatic transmission fluid level. Consult an authorized dealer for
requirements.
Inspect the brake pads, shoes, rotors, drums, brake linings, hoses and the parking brake.
Inspect the engine and secondary coolant concentration, freeze-point protection, level
and hoses.
Inspect the exhaust system and heat shields.
Inspect the steering linkage, ball joints, suspension, tie-rod ends, driveshaft and the U-
joints. Lubricate any components that have grease fittings.
Inspect front oil hubs for leaks and check fluid level through hub cap sight glass.
1 Do not exceed one year/10,000 mi (16,000 km) or 350 engine hours between service
intervals.
2 Reset the Intelligent Oil-Life Monitor after engine oil and filter changes. See Oil Change
Indicator Reset
(page 226).
3 Rotate the front wheels on vehicles with dual rear wheels when specified. Only rotate
the rear wheels if you notice unusual wear. Brake Fluid Maintenance
1
Change the brake fluid. 2
Every 3 Years
1 Perform this maintenance item every 3 years. Do not exceed the designated time for
the interval.
2 Brake fluid servicing requires special equipment available at your authorized dealer. Other Maintenance Items
1
Replace the engine-mounted and frame-mounted fuel
filters. 2
Every
22,000 mi
(36,000 km)
Inspect the engine and secondary cooling system coolant
concentration, freeze-point protection, additive, corrosion
inhibitor, strength, coolant level, and hoses. Add coolant
additive if necessary.3
Every
30,000 mi
(48,000 km)
329
2022 F650750 (TBC) , enUSA, Edition date: 202010, Second-Printing Scheduled Maintenance