Page 165 of 740

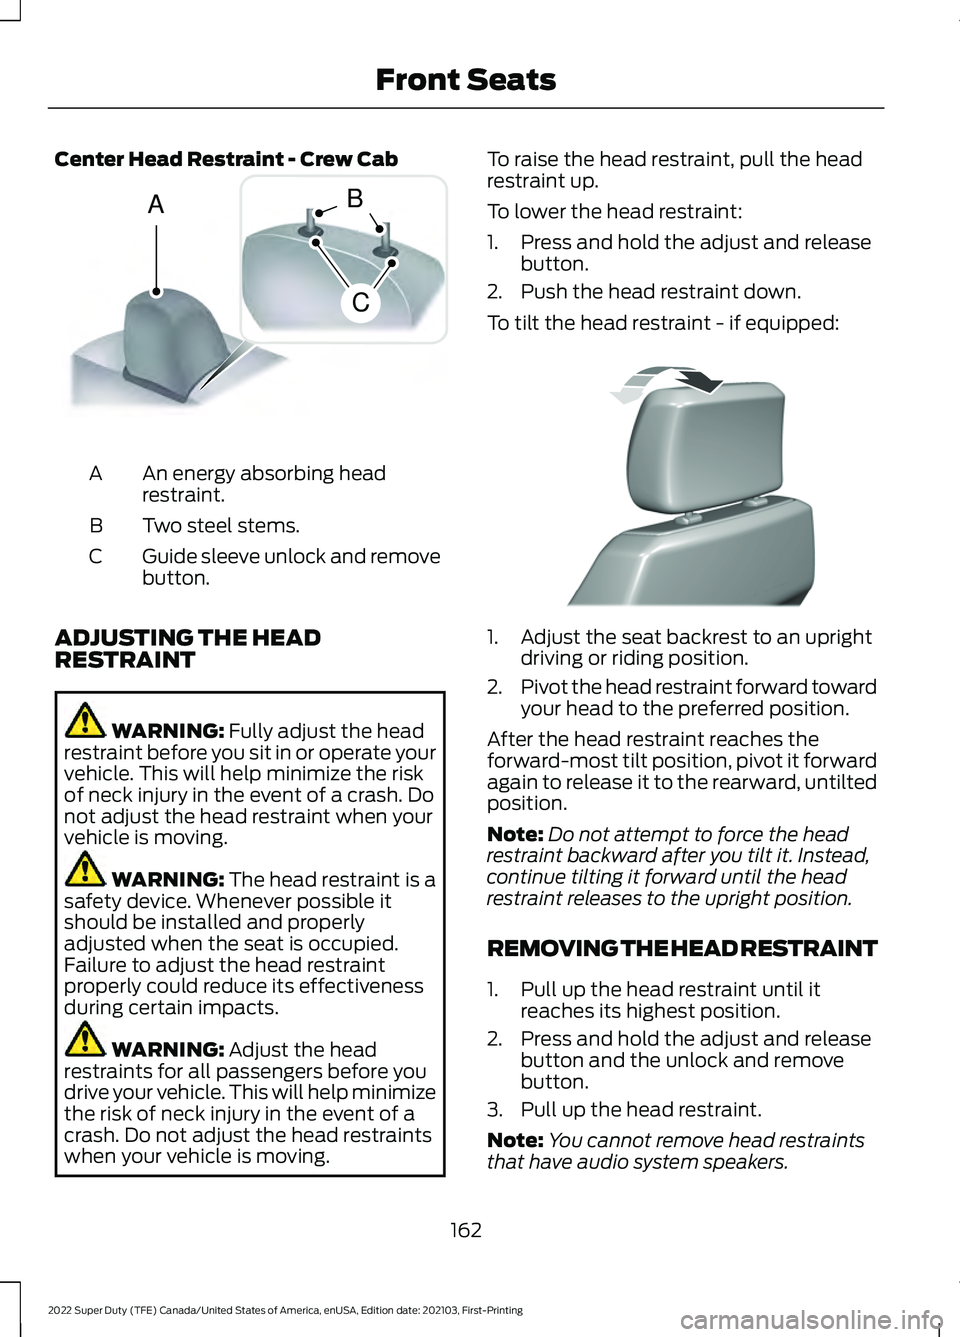
Center Head Restraint - Crew Cab
An energy absorbing head
restraint.
A
Two steel stems.
B
Guide sleeve unlock and remove
button.
C
ADJUSTING THE HEAD
RESTRAINT WARNING: Fully adjust the head
restraint before you sit in or operate your
vehicle. This will help minimize the risk
of neck injury in the event of a crash. Do
not adjust the head restraint when your
vehicle is moving. WARNING:
The head restraint is a
safety device. Whenever possible it
should be installed and properly
adjusted when the seat is occupied.
Failure to adjust the head restraint
properly could reduce its effectiveness
during certain impacts. WARNING:
Adjust the head
restraints for all passengers before you
drive your vehicle. This will help minimize
the risk of neck injury in the event of a
crash. Do not adjust the head restraints
when your vehicle is moving. To raise the head restraint, pull the head
restraint up.
To lower the head restraint:
1. Press and hold the adjust and release
button.
2. Push the head restraint down.
To tilt the head restraint - if equipped: 1. Adjust the seat backrest to an upright
driving or riding position.
2. Pivot the head restraint forward toward
your head to the preferred position.
After the head restraint reaches the
forward-most tilt position, pivot it forward
again to release it to the rearward, untilted
position.
Note: Do not attempt to force the head
restraint backward after you tilt it. Instead,
continue tilting it forward until the head
restraint releases to the upright position.
REMOVING THE HEAD RESTRAINT
1. Pull up the head restraint until it reaches its highest position.
2. Press and hold the adjust and release button and the unlock and remove
button.
3. Pull up the head restraint.
Note: You cannot remove head restraints
that have audio system speakers.
162
2022 Super Duty (TFE) Canada/United States of America, enUSA, Edition date: 202103, First-Printing Front SeatsA
C
B E162872 E327919
Page 166 of 740
INSTALLING THE HEAD
RESTRAINT
Align the steel stems into the guide sleeves
and push the head restraint down until it
locks.
MOVING THE SEAT BACKWARD
AND FORWARD
ADJUSTING THE SEAT CUSHION
ADJUSTING THE SEAT BACKREST
WARNING: Always drive and ride
with your seatback upright and the lap
belt snug and low across the hips. WARNING:
Do not place cargo or
any objects behind the seatback before
returning it to the original position. ADJUSTING THE SEAT HEIGHT
163
2022 Super Duty (TFE) Canada/United States of America, enUSA, Edition date: 202103, First-Printing Front SeatsE308339 E308336 E308338 E308337
Page 168 of 740

HEATED SEATS (IF EQUIPPED)
HEATED SEAT PRECAUTIONS WARNING: Use caution when using
the heated seat if you are unable to feel
pain to your skin because of advanced
age, chronic illness, diabetes, spinal cord
injury, medication, alcohol use,
exhaustion or other physical conditions.
The heated seat could cause burns even
at low temperatures, especially if used
for long periods of time. Failure to follow
this instruction could result in personal
injury. WARNING:
Do not poke sharp
objects into the seat cushion or seat
backrest. This could damage the heated
seat element and cause it to overheat.
Failure to follow this instruction could
result in personal injury. WARNING:
Do not place anything
on the seat that blocks the heat, for
example a seat cover or a cushion. This
could cause the seat to overheat. Failure
to follow this instruction could result in
personal injury.
Do not:
• Place heavy objects on the seat.
• Operate the heated seat if water or any
other liquid spills on the seat. Allow the
seat to dry.
SWITCHING THE HEATED SEATS
ON AND OFF
The vehicle must be running to use this
feature. Press the heated seat symbol on the
climate controls or touchscreen to cycle
through the various heat settings and off.
The more indicators that display, the
warmer the temperature of the seat.
Note:
The heated seats may remain on
after you remote start your vehicle, based
on your remote start settings. The heated
seats may also turn on when you start your
vehicle if they were on when you switched
your vehicle off.
VENTILATED SEATS
(IF EQUIPPED)
VENTILATED SEAT PRECAUTIONS
Do not:
• Spill liquid on the front seats. This may
cause the air vent holes to become
blocked and not work properly.
• Place cargo or objects under the seats.
They may block the air intake causing
the air vents to not work properly.
SWITCHING THE VENTILATED
SEATS ON AND OFF
The vehicle must be running to use this
feature. 165
2022 Super Duty (TFE) Canada/United States of America, enUSA, Edition date: 202103, First-Printing Front SeatsE146322 E224689
Page 170 of 740
MANUAL SEATS
HEAD RESTRAINT COMPONENTS
Outermost Head Restraints
The head restraints consist of:
An energy absorbing head
restraint.
A
Two steel stems.
B
Guide sleeve adjust and release
button.
C
Guide sleeve unlock and remove
button.
D Center Head Restraint - Crew Cab An energy absorbing head
restraint.
A
Two steel stems.
B
Guide sleeve unlock and remove
button.
C
ADJUSTING THE HEAD
RESTRAINT
Pull the head restraint up to raise it.
To lower the head restraint:
1. Press and hold the adjust and release button.
2. Push the head restraint down.
Your vehicle may have a rear seat center
head restraint that you cannot adjust or
remove.
REMOVING THE HEAD RESTRAINT
1. Pull up the head restraint until it reaches its highest position.
2. Press and hold the adjust and release button and the unlock and remove
button.
3. Pull up the head restraint.
167
2022 Super Duty (TFE) Canada/United States of America, enUSA, Edition date: 202103, First-Printing Rear SeatsE308301 A
C
B E162872
Page 171 of 740

INSTALLING THE HEAD
RESTRAINT
Align the steel stems into the guide sleeves
and push the head restraint down until it
locks.
FOLDING THE SEATS
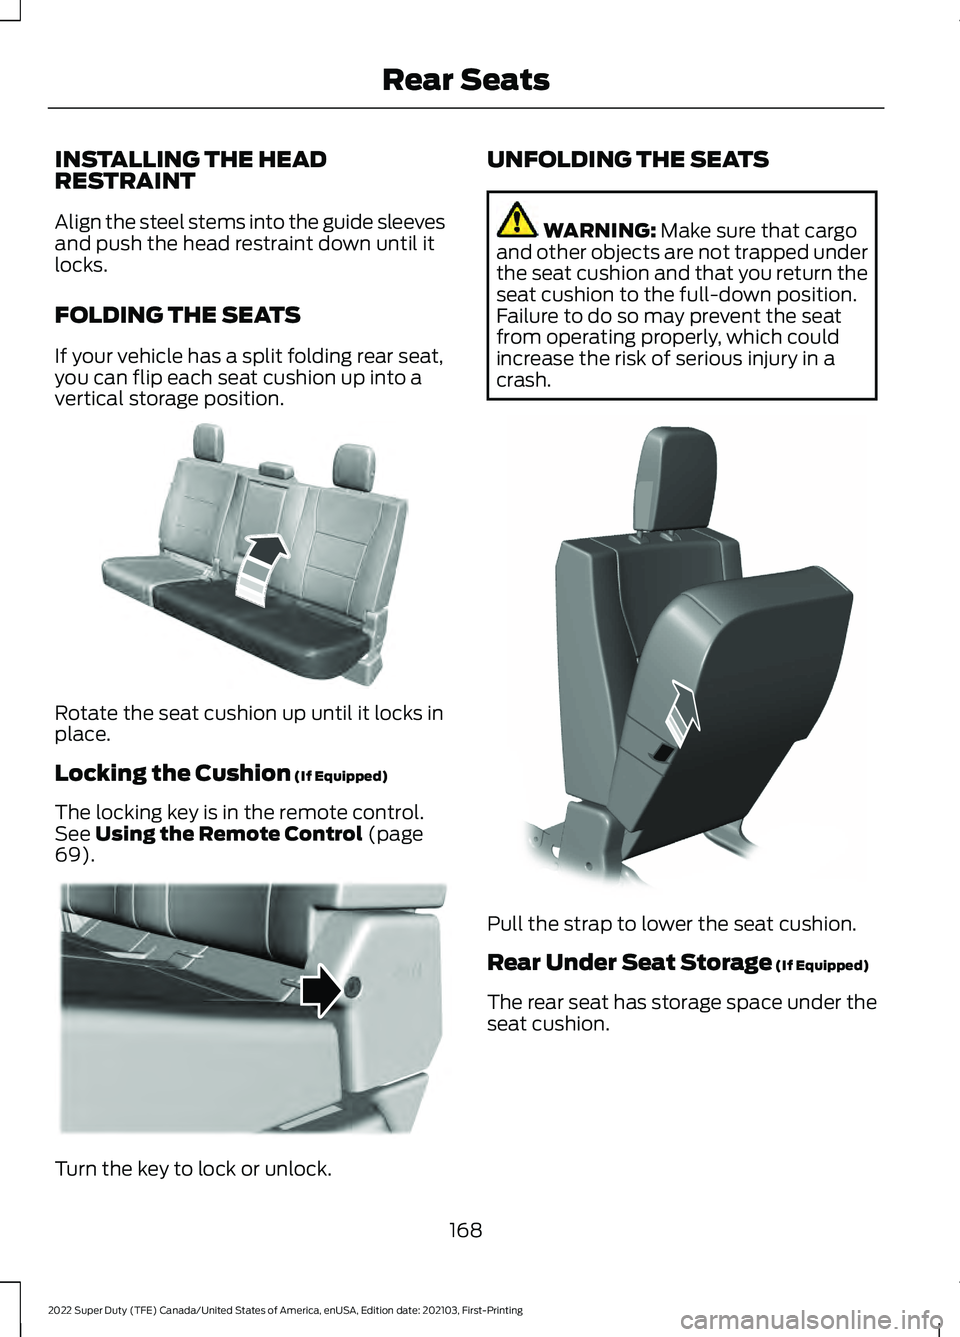
If your vehicle has a split folding rear seat,
you can flip each seat cushion up into a
vertical storage position.
Rotate the seat cushion up until it locks in
place.
Locking the Cushion (If Equipped)
The locking key is in the remote control.
See
Using the Remote Control (page
69). Turn the key to lock or unlock. UNFOLDING THE SEATS WARNING:
Make sure that cargo
and other objects are not trapped under
the seat cushion and that you return the
seat cushion to the full-down position.
Failure to do so may prevent the seat
from operating properly, which could
increase the risk of serious injury in a
crash. Pull the strap to lower the seat cushion.
Rear Under Seat Storage
(If Equipped)
The rear seat has storage space under the
seat cushion.
168
2022 Super Duty (TFE) Canada/United States of America, enUSA, Edition date: 202103, First-Printing Rear SeatsE181250 E224956 E308139
Page 172 of 740

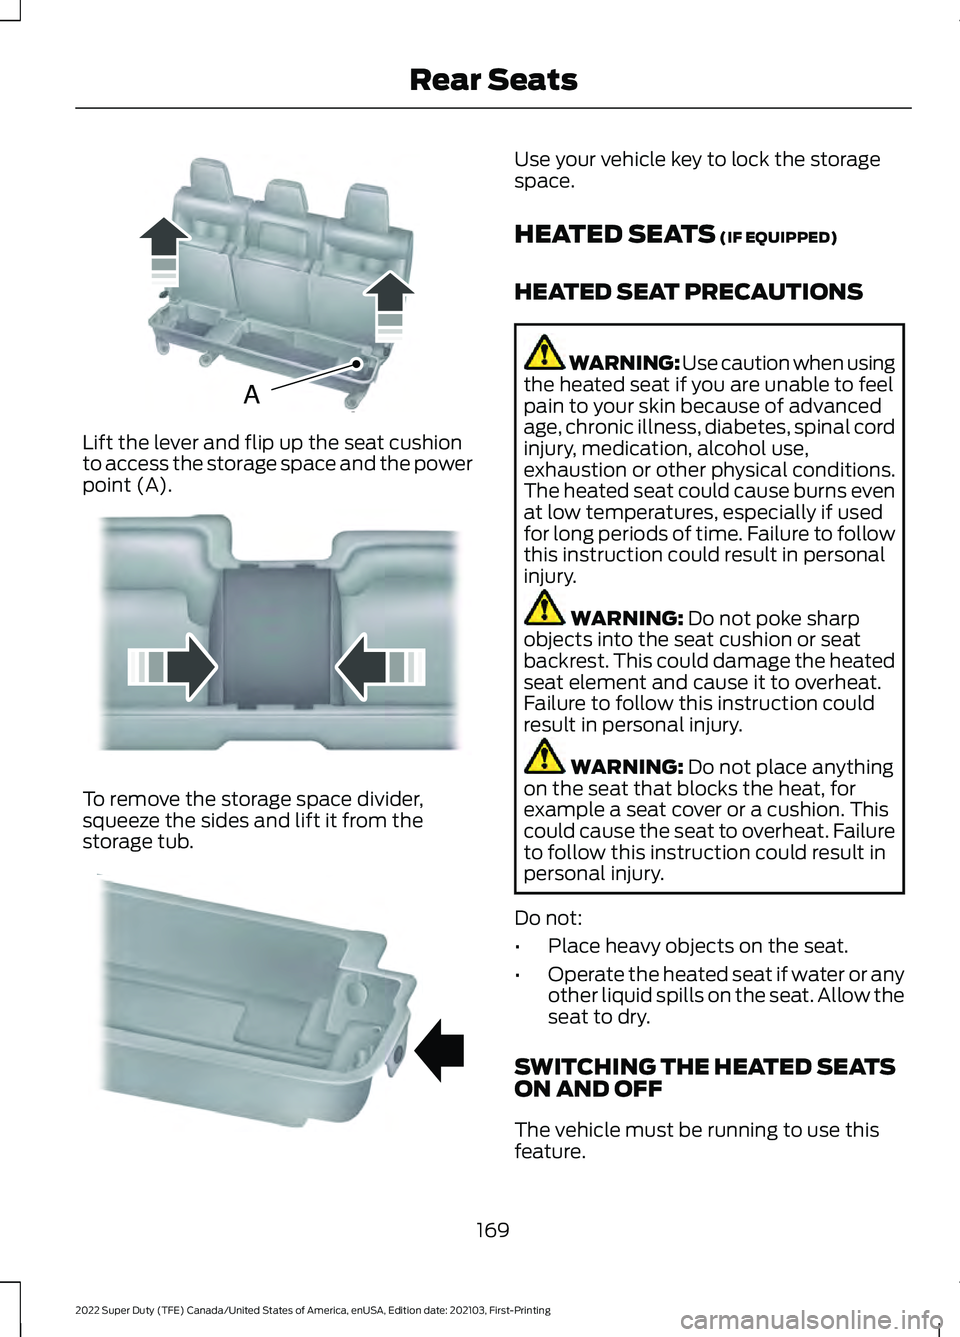
Lift the lever and flip up the seat cushion
to access the storage space and the power
point (A).
To remove the storage space divider,
squeeze the sides and lift it from the
storage tub. Use your vehicle key to lock the storage
space.
HEATED SEATS (IF EQUIPPED)
HEATED SEAT PRECAUTIONS WARNING: Use caution when using
the heated seat if you are unable to feel
pain to your skin because of advanced
age, chronic illness, diabetes, spinal cord
injury, medication, alcohol use,
exhaustion or other physical conditions.
The heated seat could cause burns even
at low temperatures, especially if used
for long periods of time. Failure to follow
this instruction could result in personal
injury. WARNING:
Do not poke sharp
objects into the seat cushion or seat
backrest. This could damage the heated
seat element and cause it to overheat.
Failure to follow this instruction could
result in personal injury. WARNING:
Do not place anything
on the seat that blocks the heat, for
example a seat cover or a cushion. This
could cause the seat to overheat. Failure
to follow this instruction could result in
personal injury.
Do not:
• Place heavy objects on the seat.
• Operate the heated seat if water or any
other liquid spills on the seat. Allow the
seat to dry.
SWITCHING THE HEATED SEATS
ON AND OFF
The vehicle must be running to use this
feature.
169
2022 Super Duty (TFE) Canada/United States of America, enUSA, Edition date: 202103, First-Printing Rear SeatsAE162739 E162740 E162741
Page 177 of 740

WHAT IS THE MEMORY
FUNCTION
The memory function recalls the position
of these features:
•
Driver seat.
• Power mirrors.
• Optional power steering column.
• Optional power adjustable pedals.
MEMORY FUNCTION
PRECAUTIONS WARNING: Before activating the
memory seat, make sure that the area
immediately surrounding the seat is clear
of obstructions and that all occupants
are clear of moving parts. WARNING:
Do not use the memory
function when your vehicle is moving.
LOCATING THE MEMORY
FUNCTION BUTTONS The memory function buttons are on the
driver door. SAVING A PRESET POSITION
1. Adjust the memory features to your
preferred position.
2. Press and hold the preferred preset button until you hear a single tone.
A confirmation message appears in the
information display.
You can save up to three preset memory
positions at any time.
RECALLING A PRESET
POSITION
Press and release a preset button.
Note: You can recall a preset memory
position when the ignition is off, or when you
place the transmission in park (P) or neutral
(N) if the ignition is on and the vehicle is not
moving.
Note: Pressing any of the preset buttons or
any memory feature control during a
memory recall cancels the operation.
You can also recall a preset memory
position by:
• Pressing the unlock button on your
remote control if you linked it to a
preset position.
• Unlocking the intelligent driver door
handle if a linked remote control is
present.
Using a linked remote control to recall your
memory position when the ignition is off
moves the seat and steering column to the
easy entry position.
Linking a Preset Position to Your
Remote Control or Passive Key
Your vehicle can save the preset memory
positions for up to two remote controls.
1. With the ignition on, move the memory
positions to the positions you prefer.
174
2022 Super Duty (TFE) Canada/United States of America, enUSA, Edition date: 202103, First-Printing Memory FunctionE307868
Page 178 of 740
2. Press and hold the preferred preset
button for about five seconds. A tone
sounds, and the instrument panel
prompts you to press the lock button
on your remote control.
3. Within ten seconds, press the lock button on the remote control you are
linking. The instrument panel indicates
a successful link.
To unlink a remote control, follow the
same procedure – except in step 3, press
the unlock button on the remote control.
Note: If more than one linked remote
control is in range, the memory function
moves to the settings of the first key to
initiate a memory recall.
175
2022 Super Duty (TFE) Canada/United States of America, enUSA, Edition date: 202103, First-Printing Memory Function