Page 185 of 308
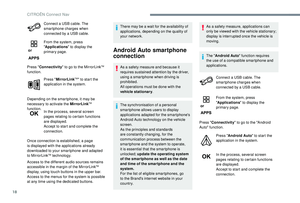
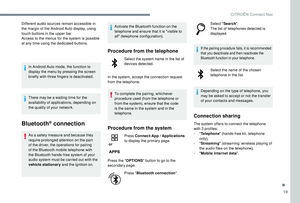
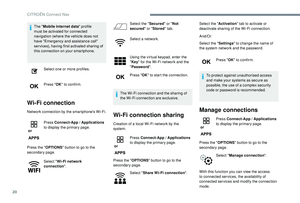
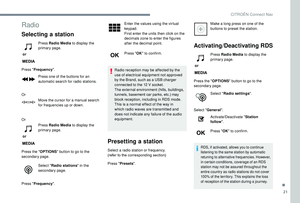
183
After refilling
F Per form the operations in reverse order.
Important: in the event of a top-up after a
breakdown because of a lack of AdBlue,
you must wait around 5 minutes before
switching on the ignition, without opening
the driver’s door, unlocking the vehicle,
introducing the key into the ignition
switch, or introducing the key of the
K
eyless Entr y and Star ting system into
the passenger compartment.
Switch on the ignition, then wait for
10
seconds before starting the engine.
7
Practical information
Page 186 of 308

184
Running out of fuel
(Diesel)
On vehicles fitted with Diesel engines, the fuel
system must be primed if you run out of fuel.
If the engine does not start first time, do not
keep trying but start the procedure again from
the beginning.For more information on Misfuel
prevention (Diesel) , refer to the
corresponding section.
BlueHDi engines
F Fill the fuel tank with at least five litres of Diesel fuel.
F
S
witch on the ignition (without starting the
engine).
F
W
ait around 6 seconds and switch off the
ignition.
F
R
epeat the operation 10 times.
F
O
perate the starter to run the engine.
Other HDi engines
(Except BlueHDi version)
F
F
ill the fuel tank with at least five litres of
Diesel fuel. F
O
perate the priming pump repeatedly until
resistance is felt (there may be resistance at
the first press).
F
O
perate the starter to start the engine (if the
engine does not start at the first attempt,
wait around 15 seconds before trying
again).
F
I
f the engine does not start after a few
attempts, operate the priming pump again,
then start the engine.
F
P
ut the cover in place and clip it in.
F
C
lose the bonnet.
Temporary puncture
repair kit
Scan the QR code on page 3 to view
explanatory videos.Comprising a compressor and a sealant
cartridge, it allows the temporary repair
of
a tyre so that you can drive to the nearest
garage.
It is designed to repair most punctures which
could affect the tyre, located on the tyre tread
or shoulder.
Only the 12 V socket at the front of
the vehicle allows the compressor to be
connected for long enough to repair or
inflate the vehicle tyre.
The other 12 V sockets of the vehicle
are not designed to be used with the
compressor.
Under-inflation detection
After repair of the tyre, the warning
lamp will remain on until the system is
reinitialised.
For more information on Under-inflation
detection , refer to the corresponding
section.
F
O
pen the bonnet.
F
I
f necessary, unclip the cover to access the
priming pump.
In the event of a breakdown
Page 187 of 308

185
Repair procedure
F Park the vehicle without obstructing any traffic and apply the parking brake.
F
F
ollow the safety instructions (hazard warning
lamps, warning triangle, wearing high visibility
vest, etc.) according to the legislation in force
in the country where you are driving.
F
S
witch off the ignition.
F Uncoil the pipe stowed under the compressor.
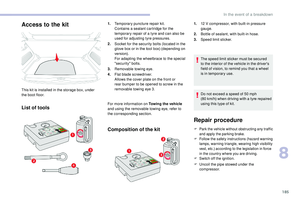
Access to the kit
This kit is installed in the storage box, under
the boot floor.
List of tools
1. Temporary puncture repair kit.
Contains a sealant cartridge for the
temporary repair of a tyre and can also be
used for adjusting tyre pressures.
2. Socket for the security bolts (located in the
glove box or in the tool box) (depending on
ve r s i o n).
For adapting the wheelbrace to the special
"security" bolts.
3. Removable towing eye.
4. Flat blade screwdriver.
Allows the cover plate on the front or
rear bumper to be opened to screw in the
removable towing eye 3.
For more information on Towing the vehicle
and using the removable towing eye, refer to
the corresponding section.
Composition of the kit
1. 12 V compressor, with built-in pressure
gauge.
2. Bottle of sealant, with built-in hose.
3. Speed limit sticker.
The speed limit sticker must be secured
to the interior of the vehicle in the driver's
field of vision, to remind you that a wheel
is in temporary use.
Do not exceed a speed of 50
mph
(80
km/h) when driving with a tyre repaired
using this type of kit.
8
In the event of a breakdown
Page 188 of 308
186
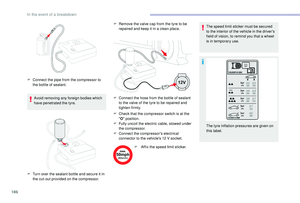
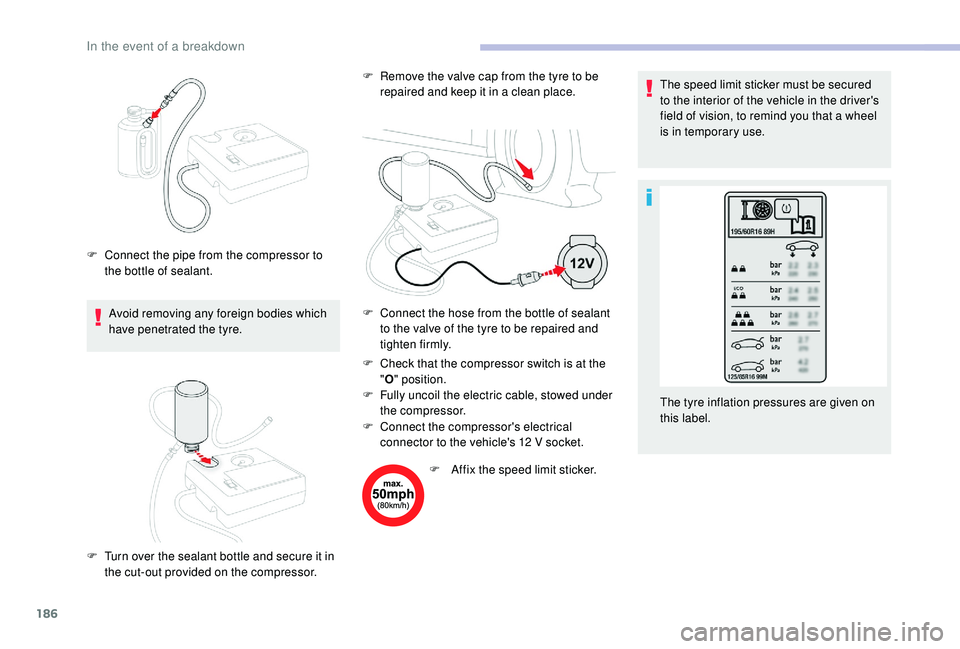
Avoid removing any foreign bodies which
have penetrated the tyre.F
C
heck that the compressor switch is at the
" O " position.
F
F
ully uncoil the electric cable, stowed under
the compressor.
F
C
onnect the pipe from the compressor to
the bottle of sealant.
F
T
urn over the sealant bottle and secure it in
the cut-out provided on the compressor. F
R
emove the valve cap from the tyre to be
repaired and keep it in a clean place.
F C onnect the hose from the bottle of sealant
to the valve of the tyre to be repaired and
tighten firmly. The speed limit sticker must be secured
to the interior of the vehicle in the driver's
field of vision, to remind you that a wheel
is in temporary use.
F
C
onnect the compressor's electrical
connector to the vehicle's 12
V socket.
F
A
ffix the speed limit sticker.The tyre inflation pressures are given on
this label.
In the event of a breakdown
Page 189 of 308

187
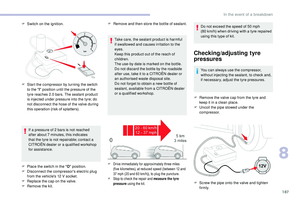
F Switch on the ignition.
Checking/adjusting tyre
pressures
You can always use the compressor,
without injecting the sealant, to check and,
if necessary, adjust the tyre pressures.
F
R
emove the valve cap from the tyre and
keep it in a clean place.
F
U
ncoil the pipe stowed under the
compressor.
F
S
crew the pipe onto the valve and tighten
f i r m l y.
F
S
tart the compressor by turning the switch
to the " l" position until the pressure of the
tyre reaches 2.0
bars. The sealant product
is injected under pressure into the tyre; do
not disconnect the hose of the valve during
this operation (risk of splatters).
If a pressure of 2
bars is not reached
after about 7
minutes, this indicates
that the tyre is not repairable; contact a
CITROËN dealer or a qualified workshop
for assistance.
F
P
lace the switch in the " O" position.
F
D
isconnect the compressor's electric plug
from the vehicle's 12
V socket.
F
R
eplace the cap on the valve.
F
R
emove the kit. F
R
emove and then store the bottle of sealant.
Take care, the sealant product is harmful
if swallowed and causes irritation to the
eyes.
Keep this product out of the reach of
children.
The use-by date is marked on the bottle.
Do not discard the bottle by the roadside
after use, take it to a CITROËN
dealer or
an authorised waste disposal site.
Do not forget to obtain a new bottle of
sealant, available from a CITROËN dealer
or a qualified workshop. Do not exceed the speed of 50
mph
(80 km/h) when driving with a tyre repaired
using this type of kit.
F Drive immediately for approximately three miles (five kilometres), at reduced speed (between 12 and
37
mph (20 and 60 km/h)), to plug the puncture.
F
S
top to check the repair and measure the tyre
pressure using the kit.
8
In the event of a breakdown
Page 190 of 308

188
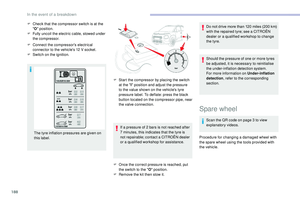
F Check that the compressor switch is at the "O " position.
F
F
ully uncoil the electric cable, stowed under
the compressor.
F
C
onnect the compressor's electrical
connector to the vehicle's 12
V socket.
F
S
witch on the ignition.
The tyre inflation pressures are given on
this label. F
S
tart the compressor by placing the switch
at the " I" position and adjust the pressure
to the value shown on the vehicle's tyre
pressure label. To deflate: press the black
button located on the compressor pipe, near
the valve connection.
If a pressure of 2
bars is not reached after
7
minutes, this indicates that the tyre is
not repairable; contact a CITROËN dealer
or a qualified workshop for assistance.
F
O
nce the correct pressure is reached, put
the switch to the " O" position.
F
R
emove the kit then stow it.Do not drive more than 120
miles (200 km)
with the repaired tyre; see a CITROËN
dealer or a qualified workshop to change
the tyre.
Should the pressure of one or more tyres
be adjusted, it is necessary to reinitialise
the under-inflation detection system.
For more information on Under-inflation
detection , refer to the corresponding
section.
Spare wheel
Scan the QR code on page 3 to view
explanatory videos.
Procedure for changing a damaged wheel with
the spare wheel using the tools provided with
the vehicle.
In the event of a breakdown
Page 191 of 308

189
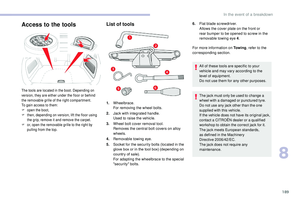
List of tools
1.Wheelbrace.
For removing the wheel bolts.
2. Jack with integrated handle.
Used to raise the vehicle.
3. Wheel bolt cover removal tool.
Removes the central bolt covers on alloy
wheels.
4. Removable towing eye.
5. Socket for the security bolts (located in the
glove box or in the tool box) (depending on
country of sale).
For adapting the wheelbrace to the special
"security" bolts. 6.
Flat blade screwdriver.
Allows the cover plate on the front or
rear bumper to be opened to screw in the
removable towing eye 4 .
For more information on To w i n g , refer to the
corresponding section.
All of these tools are specific to your
vehicle and may vary according to the
level of equipment.
Do not use them for any other purposes.
The jack must only be used to change a
wheel with a damaged or punctured tyre.
Do not use any jack other than the one
supplied with this vehicle.
If the vehicle does not have its original jack,
contact a CITROËN dealer or a qualified
workshop to obtain the correct jack for it.
The jack meets European standards,
as defined in the Machinery
Directive
2006/42/EC.
The jack does not require any
maintenance.
Access to the tools
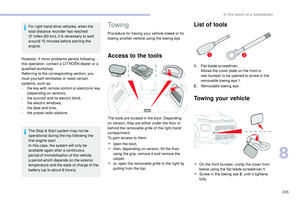
The tools are located in the boot. Depending on
version, they are either under the floor or behind
the removable grille of the right compartment.
To gain access to them:
F
o
pen the boot,
F
t
hen, depending on version, lift the floor using
the grip, remove it and remove the carpet.
F
o
r, open the removable grille to the right by
pulling from the top.
8
In the event of a breakdown
Page 192 of 308

190
Access to the spare wheel
Removing the wheel
The spare wheel is installed in the boot, under
t h e f l o o r.
F
U
nclip and remove the tool storage box
or pull out the polystyrene cover plate
(depending on version).
F
U
nscrew the central nut. F
R
emove the fastening device (nut and bolt).
F
R
aise the spare wheel towards you from the
r e a r.
F
T
ake the wheel out of the boot.
Putting the wheel back in place
F Put the wheel back in its housing.
F
S lacken the nut on the bolt by a few turns. If there is no wheel in the well, the
fastening device (nut and bolt) cannot be
refitted.
Removing a wheel
* Position
P for the automatic gearbox
Parking the vehicle
Stop the vehicle where it does not block
traffic: the ground must be level, stable
and non-slippery.
Apply the parking brake, switch off the
ignition and engage first gear* so as to
block the wheels.
Check that the parking brake warning
lamp comes on fixed in the instrument
panel.
The occupants must get out of the vehicle
and wait in a safe place.
Make sure that the jack is correctly
positioned at one of the vehicle's jacking
points.
Incorrect use of the jack could cause the
vehicle to collapse.
Never go underneath a vehicle raised
using a jack; use an axle stand.
F
P
osition the fastening device (nut and bolt)
in the middle of the wheel.
F
T
ighten the central nut to retain the wheel
c o r r e c t l y.
F
C
lip the tool storage box back into place
or reinsert the polystyrene cover plate
(depending on version).
In the event of a breakdown