2021 VOLKSWAGEN UP! rims
[x] Cancel search: rimsPage 158 of 211

proper facilities for disposing of the old tyres. Volkswagen recommends using a Volkswagen
dealership for this purpose.
Additional information and warnings:
•Transporting ⇒ Driving notes
•Braking, stopping and parking ⇒ Braking, stopping and parking
•Cleaning and caring for the vehicle exterior ⇒ Caring for and cleaning the vehicle exterior
•Consumer information ⇒ Consumer information
•Vehicle toolkit ⇒ Vehicle toolkit
•Hubcaps ⇒ Hubcaps
•Changing a wheel ⇒ Changing a wheel
•Breakdown set ⇒ Breakdown set
For technical reasons, it is not generally possible to use the wheels from other vehicles. This
can also apply to wheels of the same vehicle type. Refer to the vehicle documentation and ask a
Volkswagen dealership if necessary.
Handling wheels and tyres
Fig. 130 Diagram showing how to swap wheels
First read and observe the introductoryinformation and safety warnings⇒
Introduction
The tyres are the most used and most underestimated parts of a vehicle. Tyres are very important
as the narrow tyre surfaces are the only contact between the vehicle and the road.
The service life of tyres is dependent on tyre pressure, driving style handling and fitting.
New tyres or tyres which are old, worn down or damaged cannot provide full levels of vehicle
control and braking power.
•Incorrect handling of wheels and tyres can reduce vehicle safety and cause accidents and
serious injuries.
•All four wheels must be fitted with radial tyres of the same type, size (rolling
circumference) and the same tread.
•New tyres will have to be run in as they will initially have reduced grip and braking effect.
Drive particularly carefully for the first 600 km in order to prevent accidents and serious
injury.
•Check tyre pressures regularly and always keep to the specified tyre pressure value. If the
tyre pressure is too low, it is possible that the tyre temperature will increase to such an
extent that the tread peels off and the tyre bursts.
•Never drive with worn tyres or tyres that are damaged (cuts, cracks or blisters). Driving
with tyres in this condition can result in blown tyres, accidents and serious injuries. Worn
or damaged tyres must be replaced as soon as possible.
•Never exceed the top speed and load permitted for the fitted tyres.
•The effectiveness of the driver assist systems and brake assist systems depends on the
tyre grip.
•If you notice unusual vibrations or if the vehicle pulls to one side when driving, stop the car
immediately and check the wheels and tyres for damage.
•In order to reduce the risk of losing control of the vehicle, and the risk of accident and
serious injury, never loosen the bolts on rims with bolted on rim rings.
•Do not use wheels or tyres if you do not know their history. Used wheels and tyres could
be damaged, even if the damage is not visible.
•Even if they have not been used, old tyres can suddenly lose pressure or burst, especially
at high speeds, and thus cause accidents and serious injuries. Avoid using tyres that are
more than six years old. If you have no alternative, drive slowly and with extra care at all
times.
WARNING
Page 159 of 211

The tyres and wheel rims are an essential part of the vehicle's design. The tyres and rims approved
by Volkswagen are specifically matched to the characteristics of the vehicle and make a major
contribution to good road holding and safe handling.
Avoiding damage to the tyres
•If you have to drive over a kerb or similar obstacle, drive slowly and at a right angle if possible.
•Inspect the tyres regularly for damage such as cuts, cracks or blisters.
•Remove foreign objects that are in the outer tyre tread and have not penetrated the inner
tyre⇒ Tyre damage.
•Always respond to any warning messages given by the tyre monitoring system.
•Damaged or worn tyres must be replaced immediately ⇒ Tyre damage.
•Regularly check the tyres for hidden damage ⇒ Tyre damage.
•Never exceed the top speed and load permitted for the tyres that are fitted ⇒ Tyre lettering.
•Protect the wheels, including the spare wheel, from contact with corrosive substances, including
oils, lubricants, fuel and brake fluid ⇒.
•Replace missing dust caps immediately.
Tyres with directional tread pattern
Tyres with directional tread pattern have been developed to roll in one direction only. An arrow on
the tyre sidewall indicates the direction of rotation on tyres with directional tread ⇒ Tyre lettering.
The direction of rotation must be adhered to. This is the only guarantee for optimum grip and helps
to avoid aquaplaning, excessive noise and wear.
If, however, the tyre is fitted in the opposite direction to the tread pattern, you must take more care
when driving as the tyre is now no longer being used according to its designation. This is
particularly important on wet roads. The tyres must be replaced as quickly as possible or be fitted
with the tread in the correct direction.
Rotating wheels front to rear
Regularly rotating the wheels as shown in the illustration ⇒ Fig. 130 is recommended to help
ensure that tyres wear evenly. All the tyres will then last for about the same time.
Volkswagen recommends having the wheels changed by a qualified workshop.
Tyres that are older than 6 years
Tyres age through physical and chemical processes that can impair their function. Tyres that are
stored unused for an extended period will harden and become brittle more quickly than tyres which
are in constant use.
Volkswagen recommends replacing tyres that are older than 6 years with new tyres. This also
applies to tyres, including the spare wheel, which appear to still be in good condition and whose
tread depth has not yet reached the minimum value stipulated by legislation ⇒.
The age of a tyre can be determined from the manufacturing date, which is a component of the tyre
identification number () ⇒ Tyre lettering.
Storing tyres
Mark tyres before you remove them to indicate the direction of rotation. This ensures you will be
able to mount them correctly when you replace them (left, right, front, rear). When removed, the
wheels or tyres should be stored in a cool, dry and preferably dark place. Do not store tyres
mounted on the rim vertically.
Any tyres not fitted on rims should be kept in suitable sleeves to protect against dirt and should be
stored vertically (standing on the tread).
Old tyres should be disposed of as required by legislation.
Corrosive liquids and other substances can cause visible and invisible damage to the tyres,
which can cause the tyre to burst.
•Always keep chemicals, oils, lubricants, fuel, brake fluid and other corrosive substances
away from the tyres.
WARNING
Old tyres – even if they have not been used – can suddenly lose pressure or burst, especially
at high speeds, and thus cause accidents and serious injuries.
•Avoid using tyres that are more than six years old. If you have no alternative, drive slowly
and with extra care at all times.
WARNING
Page 160 of 211

Rims
First read and observe the introductoryinformation and safety warnings⇒
Introduction
The design of the wheel bolts is matched to the rims. If different rims are fitted, the correct wheel
bolts with the right length and correctly shaped bolt heads must be used. This ensures that the
wheels are fitted securely and that the brake system works properly ⇒ Changing a wheel.
For technical reasons, it is not generally possible to use the wheels from other vehicles. This can
also apply to wheels of the same vehicle type.
The tyres and rims approved by Volkswagen are specifically matched to the characteristics of the
vehicle and make a major contribution to good road holding and safe handling.
Wheel bolts
Wheel bolts must always be tightened with the correct tightening torque ⇒ Changing a wheel.
Rims with bolted-on rings
Rims with bolted-on rings consist of several components. These components are fastened using
special bolts and special fastening technology. This ensures that the wheel functions properly, does
not leak, remains safe and runs true. For this reason, damaged rims should be replaced. They may
only be repaired by a qualified workshop. Volkswagen recommends using a Volkswagen dealership
for this purpose ⇒.
Rims with bolted-on trims
Rims may have removable trims that are attached to the rim with self-locking bolts. Damaged trims
may only be repaired by a qualified workshop. Volkswagen recommends using a Volkswagen
dealership for this purpose ⇒.
Rims identification
In some countries, new rims are legally required to contain certain specifications on them.
Depending on the country the following specifications can appear on the rims:
•Seal of conformity
•Rim size
•Name of manufacturer or brand name
•Date manufactured (month / year)
•Country of origin
•Production number
•Raw materials batch number
•Product code
New wheels and tyres
First read and observe the introductoryinformation and safety warnings⇒
Introduction
New tyres
•Drive particularly carefully for the first 600 km with new tyres as the tyres have to be run in.
Tyres that have not been run in have reduced grip ⇒ and braking effect ⇒.
•All four wheels must be fitted with radial tyres of the same type, size (rolling circumference) and
the same tread.
The use of unsuitable or damaged rims can impair vehicle safety and cause accidents and
serious injury.
•Only use rims that have been approved for the vehicle.
•Check the rims regularly for damage and replace as necessary.
WARNING
Incorrect loosening and tightening of the bolts on rims with bolted-on rings can cause
accidents and serious injury.
•Never remove the bolts on rims with bolted-on rings.
•All work on rims with bolted-on rings must be carried out by a qualified workshop.
Volkswagen recommends using a Volkswagen dealership for this purpose.
WARNING
Page 163 of 211

Tyre damage
First read and observe the introductoryinformation and safety warnings⇒
Introduction
Damage to tyres and rims is often not readily visible. Any unusual vibrations or signs that the car is
pulling to one side may indicate that one of the tyres is damaged ⇒.
•Reduce your speed immediately if you suspect that a wheel is damaged.
•Check the tyres and rims for damage.
•If the tyre is damaged, do not drive on. Seek expert assistance.
•If there is no visible damage, drive slowly and cautiously to the next qualified workshop in order
to have the vehicle checked.
Foreign bodies in the tyre
•Leave the foreign body in the tyre if it has entered the inner tyre. However, foreign bodies that
are stuck between the tyre tread blocks can be removed.
•For vehicles with a spare wheel or temporary spare wheel: where appropriate, change the
damaged wheel ⇒ Changing a wheel If required, seek expert assistance when changing the
damaged wheel. Volkswagen recommends using a Volkswagen dealership for this purpose.
•For vehicles with a breakdown set: if required, seal the tyre and pump it up using the
breakdown set ⇒ Breakdown set. Proceed to a qualified workshop. Volkswagen recommends
using a Volkswagen dealership for this purpose.
•Check the pressure and adjust it as required.
Tyre wear
Tyre wear is affected by several factors. These include:
•Driving style.
•Unbalanced wheels.
•Running gear setting.
Driving style – fast cornering, heavy acceleration and hard braking all increase tyre wear. The
running gear should be checked by a qualified workshop if the tyres show excessive wear despite a
normal driving style.
Unbalanced wheels – the wheels on new vehicles are balanced. However, various factors
encountered in normal driving can cause them to become unbalanced, which results in steering
vibration. Unbalanced wheels will affect levels of wear on the steering system and the suspension.
In this case the wheels should be balanced again. A new tyre will have to be balanced after fitting.
Running gear setting – incorrect wheel alignment causes excessive tyre wear, impairing the safety
of the vehicle. The wheel alignment should be checked by a qualified workshop if tyres show
excessive wear.
Spare wheel or temporary spare wheel
Worn tyres are a safety risk and can lead to a loss of control of the vehicle and cause serious
injury.
•Tyres must be replaced at the latest when the tread is worn down to the tread wear
indicators.
•Worn tyres have considerably less tread, particularly on wet roads, which can cause the
vehicle to glide along the road surface (aquaplaning).
•Worn tyres reduce the possibility of controlling the vehicle well in normal and difficult
driving situations and increase braking distance and the risk of sliding.
WARNING
If you notice unusual vibration or the car pulling to one side while the vehicle is in motion, this
may indicate that one of the tyres is damaged.
•Reduce speed immediately and park the vehicle without obstructing traffic.
•Check the tyres and rims for damage.
•Never drive on if wheels or tyres are damaged. Seek expert assistance instead.
•If there is no visible damage, drive slowly and cautiously to the next qualified workshop in
order to have the vehicle checked.
WARNING
Page 181 of 211

Practical tips
Frequently asked questions
If you suspect that there is a fault in the vehicle or if your vehicle has been damaged, read and
observe the following information before contacting a Volkswagen dealership or qualified
workshop. You may also find useful information in the index under the headings Things to note or
Checklist.
IrregularitySome possible causesPossible solution
Engine does not start.
Vehicle battery is discharged.
– Jump start the engine ⇒ Starting the
engine with jump leads.
– Recharge the vehicle battery
⇒ Vehicle battery.
An incorrect vehicle key is
being used.
Use a valid vehicle key ⇒ Vehicle key
set.
The fuel level is too low.Fill the tank ⇒ Filling the tank.
Vehicle cannot be locked
or unlocked with the
vehicle key.
– The battery in the vehicle
key is discharged.
– The vehicle key is too far
away from the vehicle.
– Replace battery ⇒ Vehicle key set.
– Move closer to the vehicle.
– Synchronise vehicle key ⇒ Vehicle
key set.
– Unlock or lock vehicle manually
⇒ Manual opening and closing.
Unusual noises.
Cold engine, brake assist
systems, electronic steering
column lock, auxiliary heater,
filling up with natural gas.
Refer to the index under entries for
Noises.
Unusual handling.
Assist systems are active.Refer to the index under entries for
Assist systems.
An incorrect tyre pressure is
being used.
Check tyre pressure ⇒ Wheels and
tyres.
Damage to the tyre or wheel.
Check the rims and tyres regularly for
damage ⇒ Wheels and tyres and
replace as necessary ⇒ Changing a
wheel.
The vehicle has no
vehicle jack, spare wheel
or breakdown set.
Equipment depends on type
of vehicle.
No direct solutions possible as it
depends on the equipment level.
Contact a Volkswagen dealership if
necessary ⇒ Vehicle toolkit.
The road ahead is not lit
up properly.
– Headlight has been masked
for driving on the left or on the
right.
– Headlight not adjusted
correctly.
– Bulbs have failed.
– Dipped beam headlight not
switched on.
– Mask the headlights accordingly for
driving on the left or right ⇒ Lights.
– Adjust headlight range ⇒ Lights.
– Change bulbs ⇒ Changing bulbs.
– Switch dipped headlights on
⇒ Lights.
Electrical consumers not
working.
Low vehicle battery charge.Recharge vehicle battery ⇒ Vehicle
battery.
Low fuel level.Fill the tank ⇒ Filling the tank.
Fuse blown.Check fuse and replace as necessary
⇒ Fuses.
Fuel consumption is
higher than indicated.
– Short distances driven.
– Uneven acceleration.
– Avoid driving short distances.
– Think ahead when driving.
– Accelerate evenly.
An electrical consumer is
switched on.
Switch off all consumers that are not
needed.
Fault in engine management
system.
Have the fault rectified ⇒ Engine
management system and exhaust
purification system.
Tyre pressure too low.Adjust the tyre pressure ⇒ Wheels
and tyres.
Driving in hilly regions.No direct solutions possible.
Driving with a heavy load.No direct solutions possible.
Driving at high engine speed.Select a high gear.
In an emergency
Introduction
This chapter contains information on the followingsubjects:
⇒ Making you and your vehicle safe
⇒ First aid kit, warning triangle and fire extinguisher
Additional information and warnings:
Page 188 of 211

The centre cover has to be pulled off to gain access to the wheel bolts.
Removing and installing the centre cover
•To remove: take the wire hook from the toolkit and insert it in a hole (alloy wheel) or into an
edge on the cover (steel wheel) ⇒ Fig. 148 or ⇒ Fig. 149.
•Remove the cover in the direction of the arrow.
•To replace: press the centre cover against the rim until you feel it engage.
The centre cover protects the wheel bolts and must be replaced after changing the tyre.
Wheel cover
Fig. 150 Removing the wheel covers
First read and observe the introductoryinformation and safety warnings⇒
Introduction
Removing the wheel covers
•Take the box spanner and wire hook from the vehicle toolkit ⇒ Vehicle toolkit.
•Insert the wire hook into one of the holes in the wheel cover.
•Push the box spanner through the wire hook ⇒ Fig. 150 and remove the wheel cover in the
direction of the arrow.
Fitting the wheel covers
The wheel covers must be pushed on to the rims with the hole for the valve aligned with the valve.
When fitting the wheel cover, ensure that it engages securely on the entire circumference. If using
an anti-theft wheel bolt, insert the bolt in the position opposite the valve.
Wheel bolt caps
Fig. 151 Removing the wheel bolt caps
First read and observe the introductoryinformation and safety warnings⇒
Introduction
•Take the wire hook from the vehicle toolkit ⇒ Vehicle toolkit.
•Insert the hook through the opening in the cap ⇒ Fig. 151 and pull off in the direction of the
arrow.
The caps protect the wheel bolts and must be replaced after changing the tyre.
The anti-theft wheel bolt has a separate cap. It only fits onto the anti-theft wheel bolts and not onto
conventional wheel bolts.
Changing a wheel
Introduction
This chapter contains information on the followingsubjects:
⇒ Preparation for changing a wheel
⇒ Wheel bolts
Page 190 of 211
Wheel bolts
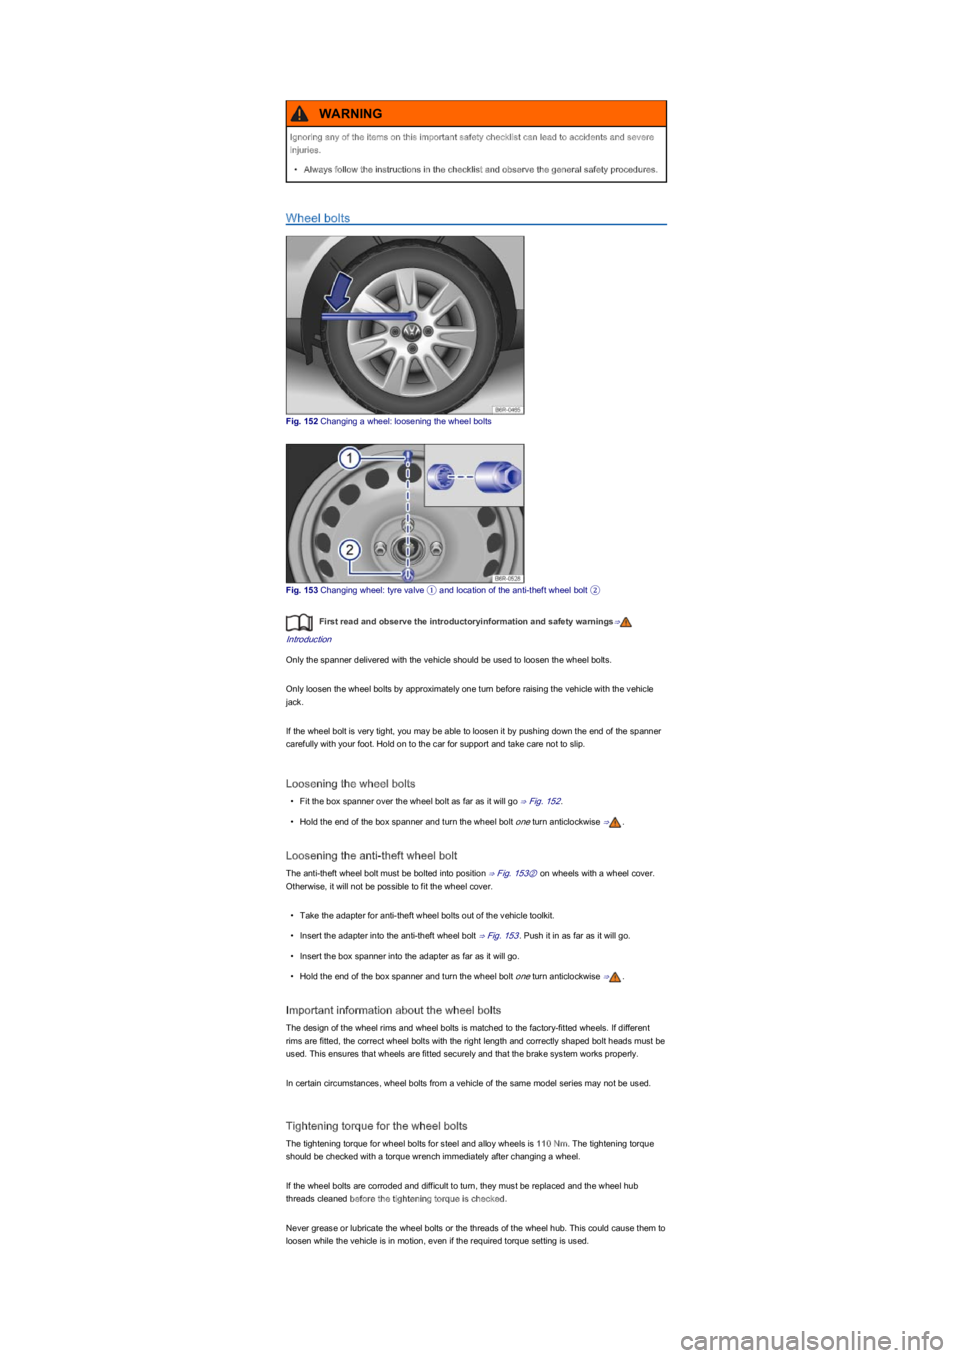
Fig. 152 Changing a wheel: loosening the wheel bolts
Fig. 153 Changing wheel: tyre valve ① and location of the anti-theft wheel bolt ②
First read and observe the introductoryinformation and safety warnings⇒
Introduction
Only the spanner delivered with the vehicle should be used to loosen the wheel bolts.
Only loosen the wheel bolts by approximately one turn before raising the vehicle with the vehicle
jack.
If the wheel bolt is very tight, you may be able to loosen it by pushing down the end of the spanner
carefully with your foot. Hold on to the car for support and take care not to slip.
Loosening the wheel bolts
•Fit the box spanner over the wheel bolt as far as it will go ⇒ Fig. 152.
•Hold the end of the box spanner and turn the wheel bolt one turn anticlockwise ⇒.
Loosening the anti-theft wheel bolt
The anti-theft wheel bolt must be bolted into position ⇒ Fig. 153② on wheels with a wheel cover.
Otherwise, it will not be possible to fit the wheel cover.
•Take the adapter for anti-theft wheel bolts out of the vehicle toolkit.
•Insert the adapter into the anti-theft wheel bolt ⇒ Fig. 153. Push it in as far as it will go.
•Insert the box spanner into the adapter as far as it will go.
•Hold the end of the box spanner and turn the wheel bolt one turn anticlockwise ⇒.
Important information about the wheel bolts
The design of the wheel rims and wheel bolts is matched to the factory-fitted wheels. If different
rims are fitted, the correct wheel bolts with the right length and correctly shaped bolt heads must be
used. This ensures that wheels are fitted securely and that the brake system works properly.
In certain circumstances, wheel bolts from a vehicle of the same model series may not be used.
Tightening torque for the wheel bolts
The tightening torque for wheel bolts for steel and alloy wheels is 110 Nm. The tightening torque
should be checked with a torque wrench immediately after changing a wheel.
If the wheel bolts are corroded and difficult to turn, they must be replaced and the wheel hub
threads cleaned before the tightening torque is checked.
Never grease or lubricate the wheel bolts or the threads of the wheel hub. This could cause them to
loosen while the vehicle is in motion, even if the required torque setting is used.
Ignoring any of the items on this important safety checklist can lead to accidents and severe
injuries.
•Always follow the instructions in the checklist and observe the general safety procedures.
WARNING
Page 191 of 211

Find a firm and level surface suitable for lifting the vehicle.
Stop the engine, select a gear on a manual gearbox or with an automated manual
gearbox, move the selector lever to D or R with the ignition switched onChanging gear
then apply the handbrake firmly Braking, stopping and parking.
Chock the wheel diagonally opposite using the collapsible chocks or other suitable objects.
Loosen the wheel bolts on the wheel that is being changed Wheel bolts.
Find the jacking point under the vehicle which is closest to the wheel that is being
changed.
Raise the vehicle jack until it just fits under the jacking point of the vehicle.
Ensure that the foot of the jack is resting securely on the ground with its whole surface and
that the foot of the jack is positioned precisely, i.e. vertically beneath the point of
application .
Position the vehicle jack. At the same time, continue to crank the claw up until it is in
position around the vertical rib underneath the vehicle .
Lifting the vehicle with the jack
Fig. 154 Jacking points for the vehicle jack (mirrored on the right-hand side of the vehicle)
Fig. 155 Vehicle jack at the rear left-hand side of the vehicle
First read and observe the introductoryinformation and safety warnings⇒
Introduction
The jack may be applied only at the jacking points shown (markings on the body) ⇒ Fig. 154.
Always use the jacking point closest to the wheel you are working on ⇒.
Raise the vehicle using only the designated jacking points.
Checklist
To ensure your own safety and that of your passengers, observe the following actions in the
specified order ⇒:
Incorrectly tightened wheel bolts can loosen while the vehicle is in motion and cause
accidents, serious injury, and loss of control of the vehicle.
•Only use wheel bolts that belong to the wheel.
•Never use different wheel bolts.
•The wheel bolts and threads of the wheel hubs must be clean, free from oil and grease,
and turn easily.
•Always use the box spanner placed in the vehicle at the factory to loosen and tighten the
wheel bolts.
•Only loosen the wheel bolts by approximately one turn before raising the vehicle with the
vehicle jack.
•Never grease or lubricate the wheel bolts or the threads of the wheel hub. This could
cause them to loosen while the vehicle is in motion, even if the required torque setting is
used.
•Never remove the bolts on rims with bolted-on rings.
•If the tightening torque of the wheel bolts is too low, the wheel bolts and rims can loosen
while the vehicle is in motion. The wheel bolts and threads can be damaged if the
tightening torque is too high.
WARNING