2021 TOYOTA PROACE CITY VERSO bottom
[x] Cancel search: bottomPage 33 of 272
33
Access
2
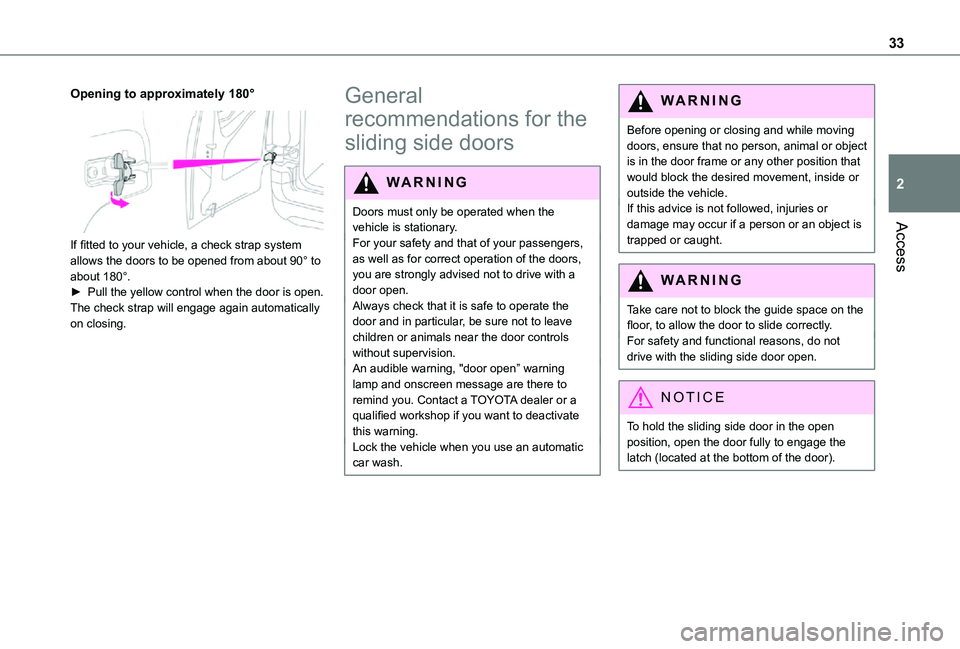
Opening to approximately 180°
If fitted to your vehicle, a check strap system allows the doors to be opened from about 90° to about 180°.► Pull the yellow control when the door is open.The check strap will engage again automatically on closing.
General
recommendations for the
sliding side doors
WARNI NG
Doors must only be operated when the vehicle is stationary.For your safety and that of your passengers, as well as for correct operation of the doors, you are strongly advised not to drive with a door open.Always check that it is safe to operate the door and in particular, be sure not to leave children or animals near the door controls without supervision.An audible warning, "door open” warning lamp and onscreen message are there to remind you. Contact a TOYOTA dealer or a qualified workshop if you want to deactivate this warning.
Lock the vehicle when you use an automatic car wash.
WARNI NG
Before opening or closing and while moving doors, ensure that no person, animal or object is in the door frame or any other position that would block the desired movement, inside or outside the vehicle.If this advice is not followed, injuries or damage may occur if a person or an object is trapped or caught.
WARNI NG
Take care not to block the guide space on the floor, to allow the door to slide correctly.For safety and functional reasons, do not drive with the sliding side door open.
NOTIC E
To hold the sliding side door in the open position, open the door fully to engage the latch (located at the bottom of the door).
Page 70 of 272
70
indicator lamps come on on the instrument panel.The function is deactivated if the fog lamps are switched on or the system detects dense fog.When the fog lamps are switched off or the vehicle leaves the area of dense fog, the function is automatically reactivated.This indicator lamp goes out when the function is deactivated.
Pause
If the situation requires a change of headlamp beam, the driver can take over at any time.► A "headlamp flash" pauses the function and the system changes to "automatic illumination of headlamps" mode:– if the "AUTO" and "Dipped beam" indicator lamps were on, the system changes to main beam,– if the "AUTO" and "Main beam" indicator lamps were on, the system changes to dipped beam.To reactivate the system, flash the headlamps
again.
NOTIC E
The system may suffer interference or not work correctly:– under conditions of poor visibility (snow, heavy rain, etc.),
– if the windscreen in front of the camera is dirty, misted or obscured (for example, by a sticker, etc.),– if the vehicle is facing highly reflective signs.When the system detects thick fog, it temporarily deactivates the function.The system is not able to detect:– road users that do not have their own lighting, such as pedestrians,– vehicles whose lighting is obscured (for example: vehicles running behind a safety barrier on a motorway),– vehicles at the top or bottom of a steep slope, on winding roads, on crossroads.
WARNI NG
Clean the windscreen regularly, particularly the area in front of the camera.The internal surface of the windscreen can also become misted around the camera. In humid and cold weather, demist the windscreen regularly.Do not allow snow to accumulate on the bonnet or roof of the vehicle as this could obstruct the detection camera.
Headlamp beam height
adjustment
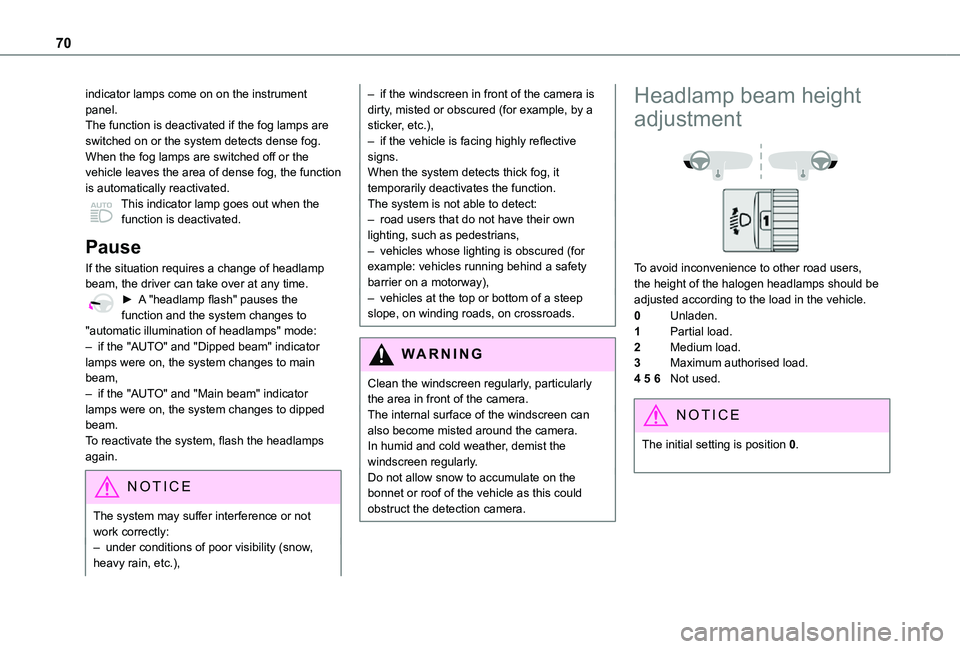
To avoid inconvenience to other road users, the height of the halogen headlamps should be adjusted according to the load in the vehicle.
0Unladen.
1Partial load.
2Medium load.
3Maximum authorised load.
4 5 6Not used.
NOTIC E
The initial setting is position 0.
Page 155 of 272
155
Practical information
7
Towing devices
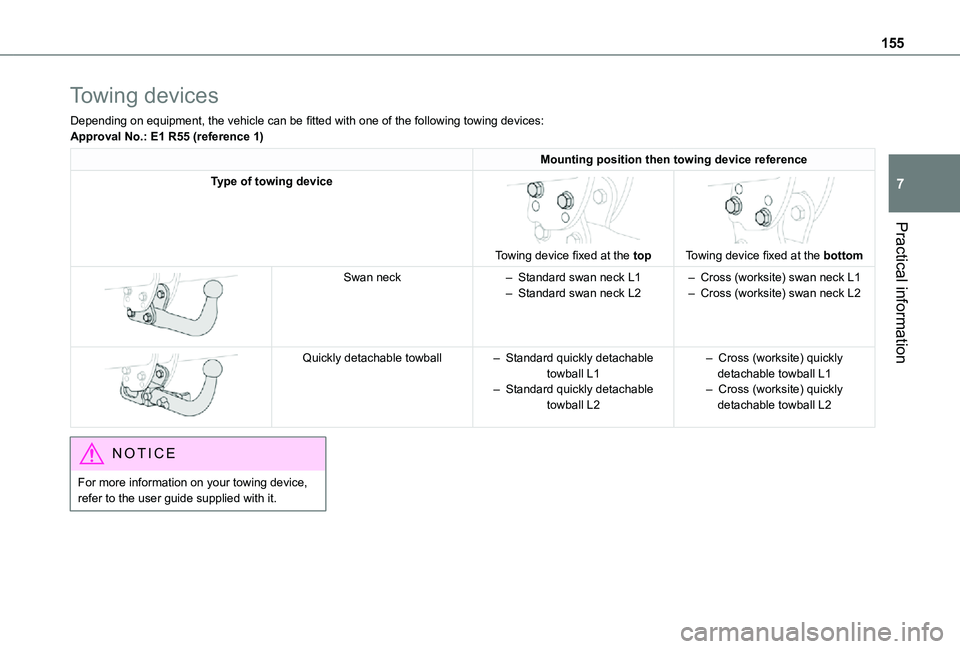
Depending on equipment, the vehicle can be fitted with one of the following towing devices:Approval No.: E1 R55 (reference 1)
Mounting position then towing device reference
Type of towing device
Towing device fixed at the top
Towing device fixed at the bottom
Swan neck– Standard swan neck L1– Standard swan neck L2– Cross (worksite) swan neck L1– Cross (worksite) swan neck L2
Quickly detachable towball– Standard quickly detachable towball L1– Standard quickly detachable towball L2
– Cross (worksite) quickly detachable towball L1– Cross (worksite) quickly detachable towball L2
NOTIC E
For more information on your towing device, refer to the user guide supplied with it.
Page 159 of 272
159
Practical information
7
WARNI NG
Cooling of the engine when stoppedThe engine cooling fan may start after the engine has been switched off.Take care with objects or clothing that could be caught in the blades of the fan!
Opening
► Open the left-hand front door.
► Pull the release lever, located at the bottom of the door frame, towards you.► Lift the safety catch and raise the bonnet.
► Unclip the stay from its housing and place it in the support slot to hold the bonnet open.
Closing
► Take the stay out of the support slot.► Clip the stay in its housing.► Lower the bonnet and release it near the end of its travel.► Pull on the bonnet to check that it is locked correctly.
WARNI NG
Because of the presence of electrical equipment under the bonnet, it is recommended that exposure to water (rain, washing, etc.) be limited.
Engine compartment
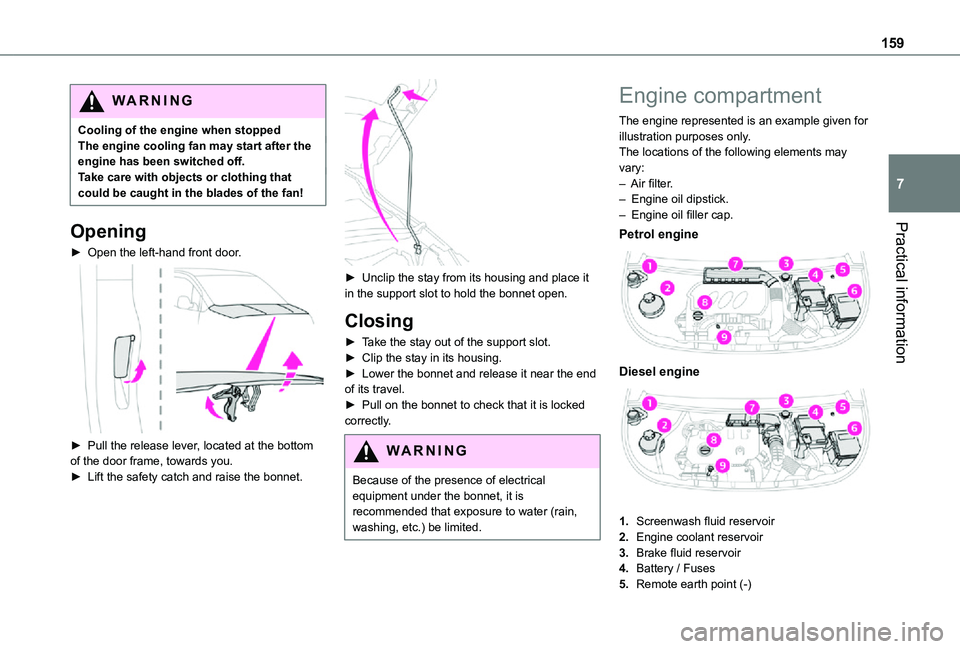
The engine represented is an example given for illustration purposes only.The locations of the following elements may vary:– Air filter.– Engine oil dipstick.– Engine oil filler cap.
Petrol engine
Diesel engine
1.Screenwash fluid reservoir
2.Engine coolant reservoir
3.Brake fluid reservoir
4.Battery / Fuses
5.Remote earth point (-)
Page 208 of 272
208
TOYOTA Connect Radio
Multimedia audio system -
Applications - Bluetooth®
telephone
NOTIC E
The functions and settings described vary
according to the vehicle version and configuration.
WARNI NG
For safety reasons and because they require sustained attention by the driver, the following operations must be carried out with the vehicle stationary and the ignition on:– Pairing the smartphone with the system in Bluetooth mode.– Using the smartphone.– Connection to the CarPlay®, MirrorLinkTM or Android Auto applications (certain applications interrupt their display while the vehicle is moving).– Changing the system settings and configuration.
NOTIC E
The system is protected in such a way that it will only operate in the vehicle.The Energy Economy Mode message is displayed when the system is about to enter the corresponding mode.
First steps
With the engine running, a press mutes the sound.With the ignition off, a press turns the system on.Increase or decrease the volume using the wheel or the "plus" or "minus" buttons (depending on the equipment).Use the buttons on either side of or below the touch screen for access to the menus, then press the virtual buttons in the touch screen.Depending on the model, use the "Source" or "Menu" buttons on the left of the touch screen for access to the menus, then press the virtual
buttons in the touch screen.At all times it is possible to display the rolling menus by pressing the screen briefly with three fingers.All of the touch areas of the screen are white.For pages with multiple tabs at the bottom of the screen, it is possible to switch between pages either by tapping the tab for the desired page, or by using a finger, sliding the pages to the left or to the right.
Press in the grey zone to go back up a level or to confirm.Press the back arrow to go back a level or confirm.
WARNI NG
The touch screen is of the "capacitive" type.To clean the screen, use a soft, non-abrasive cloth (e.g. spectacles cloth) with no additional
product.Do not use sharp objects on the screen.Do not touch the screen with wet hands.
Certain information is displayed permanently in the upper bar of the touch screen:– Air conditioning status information (depending on version), and direct access to the corresponding menu.– Radio Media and Telephone menu status information.– Privacy status information.– Access to the touch screen and digital instrument panel settings.Audio source selection (depending on equipment):– FM/DAB/AM radio stations (depending on equipment).– Telephone connected via Bluetooth and Bluetooth multimedia broadcast (streaming).– USB Memory stick.– Media player connected via the auxiliary socket (depending on equipment).
Page 231 of 272
231
TOYOTA Connect Nav
12
Select "Home".
OrSelect "My work".
OrSelect a preset favourite destination.
To a contact
Press Navigation to display the main page.Press the "MENU" button to access the secondary page.Select "My destinations".
Select the "Contact” tab.Select a contact in the list to start guided navigation.
To points of interest (POI)
Guided method:Points of interest (POI) are listed in different categories.
Press Navigation to display the main page.Press the "MENU" button to access the secondary page.Select "Points of interest".
Select the "Travel", "leisure", "Commercial", "Public" or "Geographic” tab.
Or
Select "Search" to enter the name and address of a POI.Press "OK" to calculate the route.
OrIntuitive method:
NOTIC E
You can only select this method in order to
use the service if a network connection is provided by the user via a smartphone.In that case, the system is automatically connected to the Internet, if network coverage permits.
Press Navigation to display the main page.Press the "MENU" button to access the secondary page.Select "Search".
Press on the mode shown in the bottom right of the screen (On-Board or Connected) to change "Database".Select the "Database" in "On-Board" mode (integrated into the map), or in "Connected" mode (connected to the Internet).Press the back arrow to confirm.
Enter an address or key words for your destination (POI).
Press "OK" to start the search.
Select the "On the route", "Around the vehicle" or "At destination" tab to refine your search.Select the desired address to calculate the route.
To a point on the map
Press Navigation to display the main page.Explore the map by sliding a finger on the screen.Select the destination by pressing on the map.Tap the screen to place a marker and display the sub-menu.Press this button to start guided navigation.OrPress this button to save the displayed address.
NOTIC E
A long press on a point opens a list of nearby POIs.
Page 247 of 272
247
TOYOTA Connect Nav
12
Select "Color schemes".
Select a colour scheme in the list then press "OK" to confirm.
NOTIC E
Whenever the colour scheme is changed, the system restarts, temporarily displaying a black screen.
Frequently asked
questions
The following information groups together the answers to the most frequently asked questions concerning the system.
Navigation
I cannot enter the navigation address.The address is not recognised.► Use the "intuitive method" by pressing the "Search…" button at the bottom of the "Navigation” page.The route calculation is not successful.The route settings may conflict with the current location (for example, if toll roads are excluded but the vehicle is on a toll road).► Check the route settings in the "Navigation" menu.I do not receive "Danger zone” alerts.
You have not subscribed to the online services option.► If you have subscribed to the option:- a few days may elapse before the service is activated,- services may not be selected in the system menu,- online services are not active ("TOMTOM TRAFFIC" not shown on the map).The POIs do not appear.The POIs have not been selected.► Set the zoom level to 600 ft (200 m) or select POIs in the POI list.The "Danger zone" audible warning feature is not working.The audible warning is not active or the volume is too low.► Activate the audible warning in the "Navigation" menu and check the voice volume in the sound settings.The system does not suggest a detour around an incident on the route.The route settings do not take account of TMC
messages.► Configure the "Traffic info " function in the route settings list (Without, Manual or Automatic).I receive a warning about a "Danger area" that is not on my route.As well as providing guided navigation, the system announces all "Danger areas" positioned in a cone located in front of the vehicle. It may
provide an alert for "Danger areas" located on nearby or parallel roads.► Zoom the map to show the exact location of the "Danger area". You can select "On the route" to stop receiving warnings or decrease the warning duration.Certain traffic jams along the route are not indicated in real time.On starting, a few minutes may elapse before the system begins to receive traffic information.► Wait until traffic information is being received correctly (traffic information icons shown on the map).In certain countries, only major routes (motorways, etc.) are listed for the traffic information.This is perfectly normal. The system is dependent on the traffic information available.The altitude is not displayed.On starting, GPS initialisation may take up to 3 minutes to receive more than 4 satellites correctly.► Wait until the system has started up
completely so that there is GPS coverage by at least 4 satellites.Depending on the geographical environment (tunnel, etc.) or the weather, the conditions of reception of the GPS signal may vary.This behaviour is normal. The system is dependent on the GPS signal reception conditions.My navigation is no longer connected.