Page 18 of 344
181-1. Basic function
Press the “MENU” button, then
select “Setup” to display the
“Setup” screen. The items
shown on the “Setup” screen
can be set.Select to change the selected
language, operation sound
settings, etc. ( P.62)
Select to set Bluetooth
®
device and Bluetooth
® sys-
tem settings. ( P.43)
(Gray)
While in this condition,
sound quality during
phone calls may dete-
riorate.
Indicates that the cel-
lular phone is not con-
nected via Bluetooth
®.
IndicatorsConditions“Setup” screen
“Setup” screen
A
B
Page 62 of 344

622-4. Other settings
2-4.Other settings
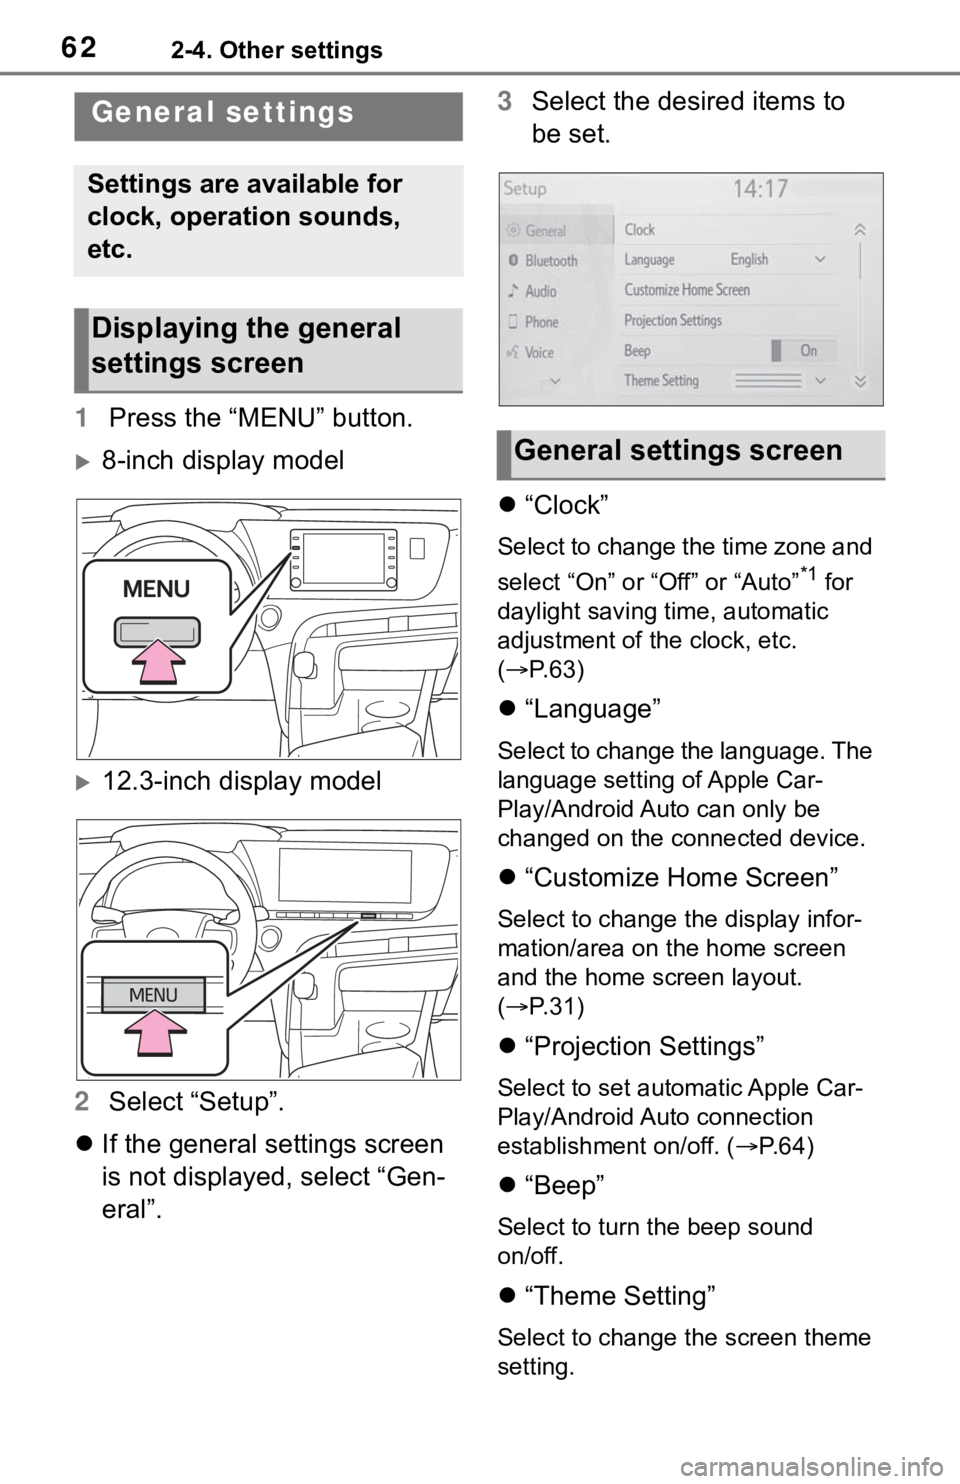
1Press the “MENU” button.
8-inch display model
12.3-inch display model
2 Select “Setup”.
If the general settings screen
is not displayed, select “Gen-
eral”. 3
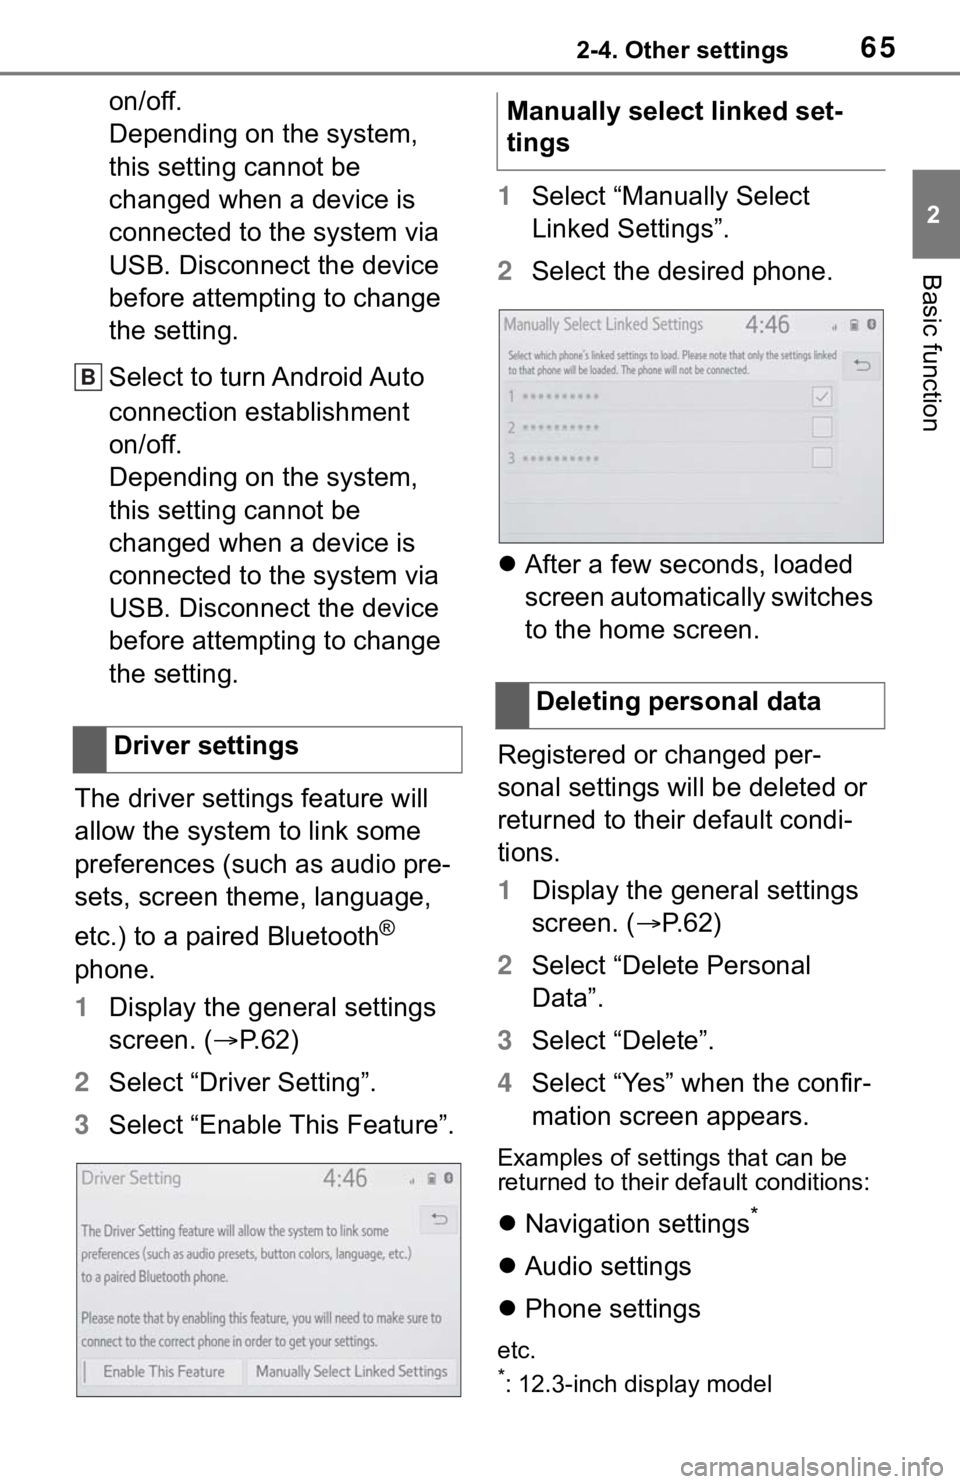
Select the desired items to
be set.
“Clock”
Select to change the time zone and
select “On” or “Off” or “Auto”
*1 for
daylight saving time, automatic
adjustment of the clock, etc.
( P. 6 3 )
“Language”
Select to change the language. The
language setting of Apple Car-
Play/Android Auto can only be
changed on the connected device.
“Customize Home Screen”
Select to change the display infor-
mation/area on the home screen
and the home screen layout.
( P. 3 1 )
“Projection Settings”
Select to set automatic Apple Car-
Play/Android Auto connection
establishment on/off. ( P.64)
“Beep”
Select to turn the beep sound
on/off.
“Theme Setting”
Select to change the screen theme
setting.
General settings
Settings are available for
clock, operation sounds,
etc.
Displaying the general
settings screen
General settings screen
Page 65 of 344

652-4. Other settings
2
Basic function
on/off.
Depending on the system,
this setting cannot be
changed when a device is
connected to the system via
USB. Disconnect the device
before attempting to change
the setting.
Select to turn Android Auto
connection establishment
on/off.
Depending on the system,
this setting cannot be
changed when a device is
connected to the system via
USB. Disconnect the device
before attempting to change
the setting.
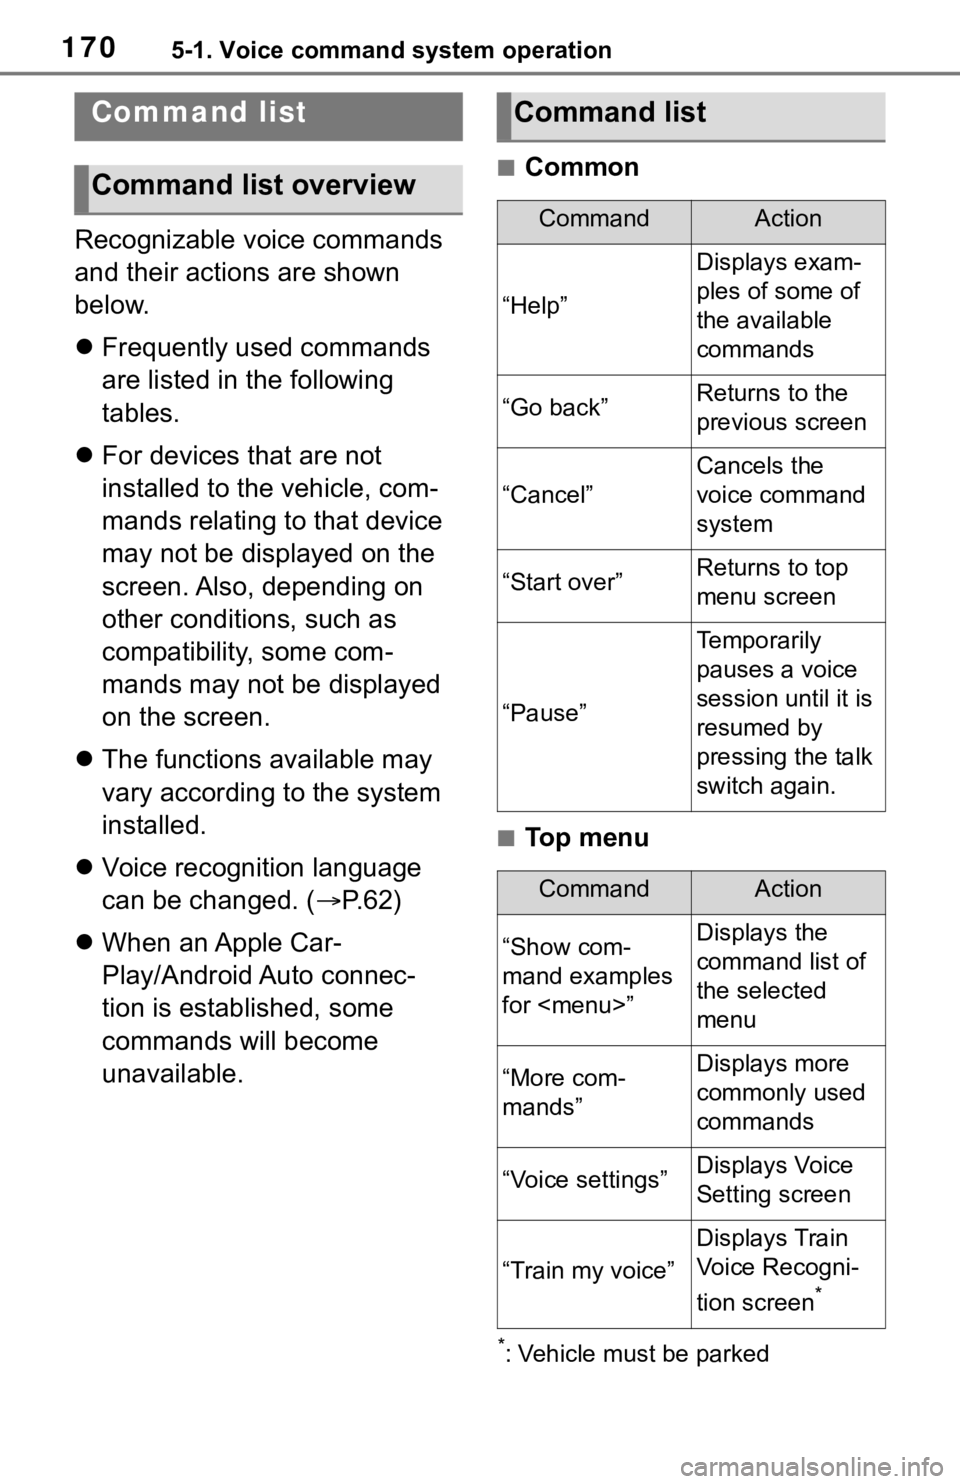
The driver settings feature will
allow the system to link some
preferences (such as audio pre-
sets, screen theme, language,
etc.) to a paired Bluetooth
®
phone.
1 Display the general settings
screen. ( P.62)
2 Select “Driver Setting”.
3 Select “Enable This Feature”. 1
Select “Manually Select
Linked Settings”.
2 Select the desired phone.
After a few seconds, loaded
screen automatically switches
to the home screen.
Registered or changed per-
sonal settings will be deleted or
returned to their default condi-
tions.
1 Display the general settings
screen. ( P. 6 2 )
2 Select “Delete Personal
Data”.
3 Select “Delete”.
4 Select “Yes” when the confir-
mation screen appears.
Examples of settings that can be
returned to their default conditions:
Navigation settings*
Audio settings
Phone settings
etc.
*: 12.3-inch display model
Driver settings
B
�0�D�Q�X�D�O�O�\���V�H�O�H�F�W���O�L�Q�N�H�G���V�H�W��
�W�L�Q�J�V
�'�H�O�H�W�L�Q�J���S�H�U�V�R�Q�D�O���G�D�W�D
Page 166 of 344

1705-1. Voice command system operation
Recognizable voice commands
and their actions are shown
below.
Frequently used commands
are listed in the following
tables.
For devices that are not
installed to the vehicle, com-
mands relating to that device
may not be displayed on the
screen. Also, depending on
other conditions, such as
compatibility, some com-
mands may not be displayed
on the screen.
The functions available may
vary according to the system
installed.
Voice recognition language
can be changed. ( P.62)
When an Apple Car-
Play/Android Auto connec-
tion is established, some
commands will become
unavailable.
■Common
■Top menu
*: Vehicle must be parked
Command list
Command list overview
Command list
CommandAction
“Help”
Displays exam-
ples of some of
the available
commands
“Go back”Returns to the
previous screen
“Cancel”
Cancels the
voice command
system
“Start over”Returns to top
menu screen
“Pause”
Temporarily
pauses a voice
session until it is
resumed by
pressing the talk
switch again.
CommandAction
“Show com-
mand examples
for
Page 297 of 344

3018-2. Setup
8
Phone
(P.301)
■Registering a voice tag
Up to 50 voice tags can be reg-
istered.
1 Select “New”.
2 Select the desired contact to
register a voice tag for.
3 Select “REC” and record a
voice tag.
When recording a voice tag,
do so in a quiet area.
“Play”: Select to play the voice tag.
4 Select “OK” when voice tag
registration is complete.
■Editing a voice tag
1 Select “Edit”.
2 Select the desired contact to
edit.
3 Follow the steps in “Register-
ing a voice tag” from step 3 .
( P.301)
■Deleting the voice tag
1 Select “Delete”.
2 Select the desired contact
and select “Delete”.
3 Select “Yes” when the confir-
mation screen appears.
●Multiple data can be selected and
deleted at the same time.
●Voice tags are deleted when the
set language of the system is
changed. ( P. 6 2 )
1 Display the phone settings
screen. ( P.293)
2 Select “Messaging”.
3 Select the desired item to be
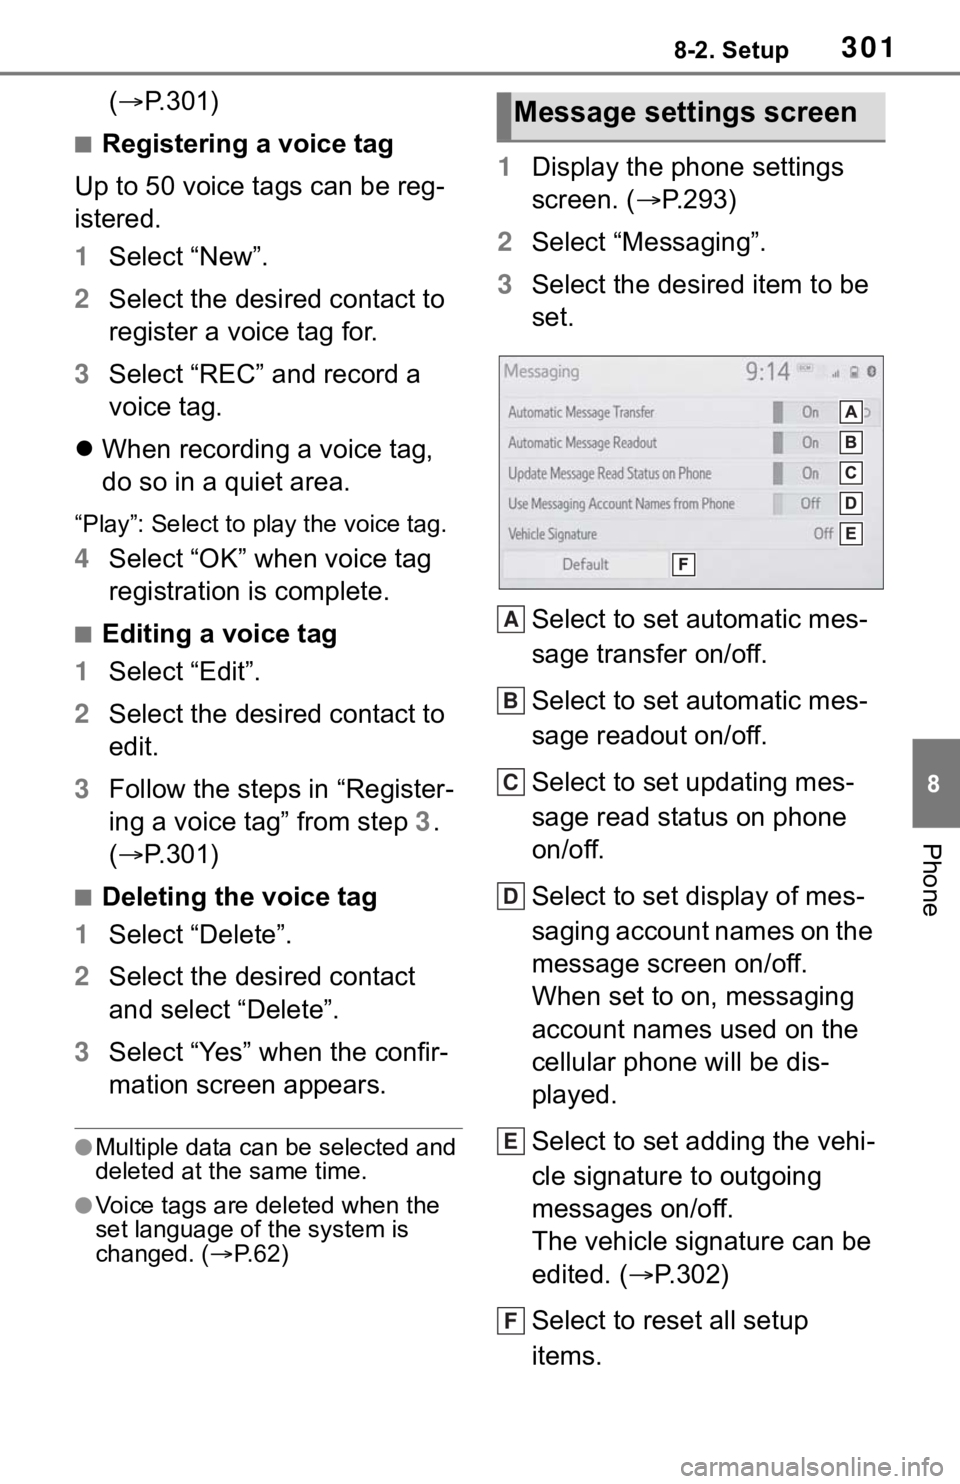
set.
Select to set automatic mes-
sage transfer on/off.
Select to set automatic mes-
sage readout on/off.
Select to set updating mes-
sage read status on phone
on/off.
Select to set display of mes-
saging account names on the
message screen on/off.
When set to on, messaging
account names used on the
cellular phone will be dis-
played.
Select to set adding the vehi-
cle signature to outgoing
messages on/off.
The vehicle signature can be
edited. ( P.302)
Select to reset all setup
items.
Message settings screen
A
B
C
D
E
F