Page 89 of 164

SETTINGS AND UPDATES OVERVIEW
Many settings can be customized for different features in your Subaru. In this section you
will find examples and instructions for some of the settings you can tailor to fit your
preferences, as well as ways to keep your system updated.
Connect to Home Wi-Fi
Connecting to your Wi-Fi network can allow you
to update the software and maps. Wi-Fi can be
found from the Home Screen by selecting
“Settings”. To access Wi-Fi settings and
available networks:
1In the “General” menu, select “Wi-Fi”.
For step by step instructions on connecting
to Wi-Fi, please refer to page 130 or your
STARLINK
®Owner’s Manual.
Performing Software Updates
Software updates provide enhancements to the system, such as new features, added
security, and upgraded functions. You can ask your preferred Subaru retailer to check for
and perform a full update to the system software. Please ask your preferred Subaru retailer
for specific details on update content.
For the 11.6-inch Multimedia Plus and the 11.6-inch Multimedia Navigation systems, some
system software can be updated via a Wi-Fi network. The update process involves
downloading and installing the software update.
NOTE: System functionality will be restricted during installation, and you may need to
reset radio station presets and volume settings after the update process.
For step-by-step instructions and more information, please refer to page 152 or your
STARLINK®Owner’s Manual.
SETTINGS AND UPDATES
87
Page 90 of 164

SOUND
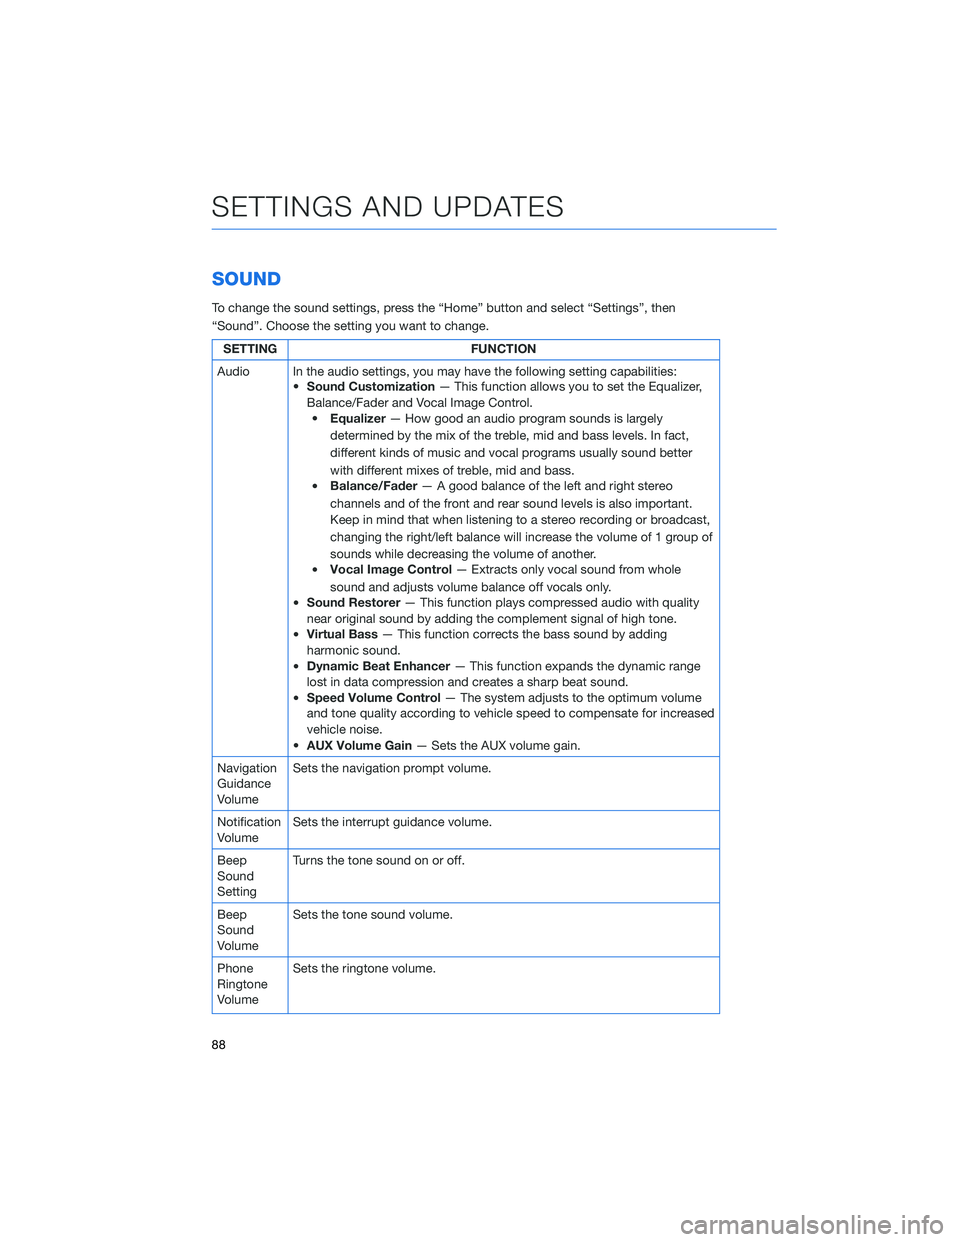
To change the sound settings, press the “Home” button and select “Settings”, then
“Sound”. Choose the setting you want to change.
SETTING FUNCTION
Audio In the audio settings, you may have the following setting capabilities:
•Sound Customization— This function allows you to set the Equalizer,
Balance/Fader and Vocal Image Control.
•Equalizer— How good an audio program sounds is largely
determined by the mix of the treble, mid and bass levels. In fact,
different kinds of music and vocal programs usually sound better
with different mixes of treble, mid and bass.
•Balance/Fader— A good balance of the left and right stereo
channels and of the front and rear sound levels is also important.
Keep in mind that when listening to a stereo recording or broadcast,
changing the right/left balance will increase the volume of 1 group of
sounds while decreasing the volume of another.
•Vocal Image Control— Extracts only vocal sound from whole
sound and adjusts volume balance off vocals only.
•Sound Restorer— This function plays compressed audio with quality
near original sound by adding the complement signal of high tone.
•Virtual Bass— This function corrects the bass sound by adding
harmonic sound.
•Dynamic Beat Enhancer— This function expands the dynamic range
lost in data compression and creates a sharp beat sound.
•Speed Volume Control— The system adjusts to the optimum volume
and tone quality according to vehicle speed to compensate for increased
vehicle noise.
•AUX Volume Gain— Sets the AUX volume gain.
Navigation
Guidance
VolumeSets the navigation prompt volume.
Notification
VolumeSets the interrupt guidance volume.
Beep
Sound
SettingTurns the tone sound on or off.
Beep
Sound
VolumeSets the tone sound volume.
Phone
Ringtone
VolumeSets the ringtone volume.
SETTINGS AND UPDATES
88
Page 91 of 164
SETTING FUNCTION
Incoming
Call
VolumeSets the volume of the received call.
Call
VolumeSets the call volume.
SMS/MMS
Ringtone
VolumeSets the SMS/MMS ringtone volume.
SMS/MMS
Read Out
VolumeSets the SMS/MMS read out volume.
Voice
VolumeSets the voice recognition prompts volume.
PHONE
This system supports Bluetooth®, a wireless data system, allowing you to make and
receive calls without taking your hands off the steering wheel.
In the settings menu, you will be able to manage devices, adjust phone book and message
settings, and adjust other phone/Bluetooth
®settings.
To access the phone settings screen, press the “Home” button, select “Settings”, then
select the “Phone” menu.
SETTINGS AND UPDATES
89
Page 92 of 164

MAPS/NAVIGATION
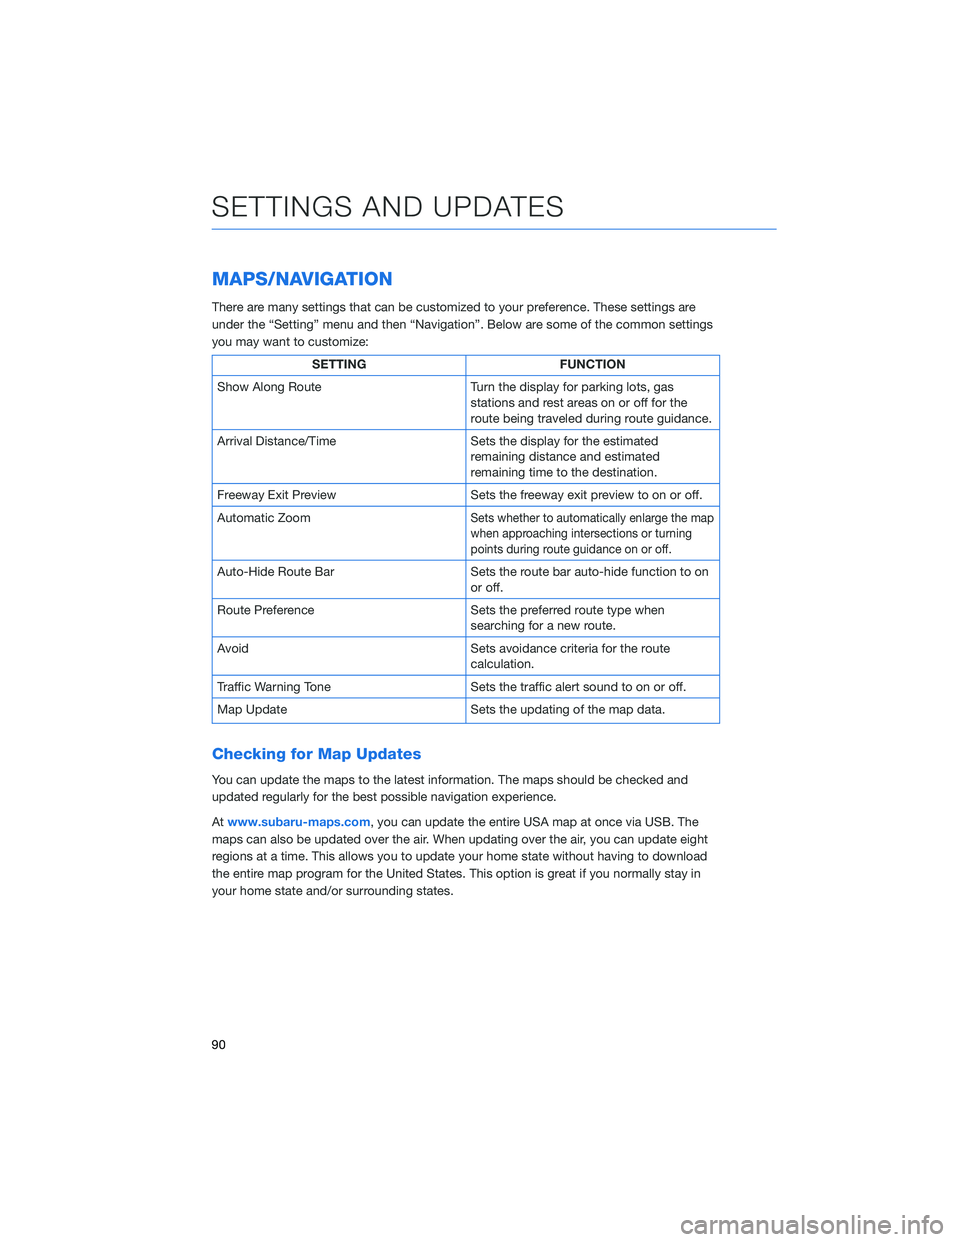
There are many settings that can be customized to your preference. These settings are
under the “Setting” menu and then “Navigation”. Below are some of the common settings
you may want to customize:
SETTING FUNCTION
Show Along Route Turn the display for parking lots, gas
stations and rest areas on or off for the
route being traveled during route guidance.
Arrival Distance/Time Sets the display for the estimated
remaining distance and estimated
remaining time to the destination.
Freeway Exit Preview Sets the freeway exit preview to on or off.
Automatic Zoom
Sets whether to automatically enlarge the map
when approaching intersections or turning
points during route guidance on or off.
Auto-Hide Route Bar Sets the route bar auto-hide function to on
or off.
Route Preference Sets the preferred route type when
searching for a new route.
Avoid Sets avoidance criteria for the route
calculation.
Traffic Warning Tone Sets the traffic alert sound to on or off.
Map Update Sets the updating of the map data.
Checking for Map Updates
You can update the maps to the latest information. The maps should be checked and
updated regularly for the best possible navigation experience.
Atwww.subaru-maps.com, you can update the entire USA map at once via USB. The
maps can also be updated over the air. When updating over the air, you can update eight
regions at a time. This allows you to update your home state without having to download
the entire map program for the United States. This option is great if you normally stay in
your home state and/or surrounding states.
SETTINGS AND UPDATES
90
Page 93 of 164

Updating Over-the-Air
To check for available updates over-the-air, first connect to a Wi-Fi network (see page
130). Map updates can be found by selecting “Settings”, then “Navigation” on the
Touchscreen.
For step by step directions for updating your maps through Wi-Fi, please refer to
page 150.
Updating Maps Using Your PC/MAC
Maps can also be updated using a USB memory device, which will
allow the entire map program to be updated at one time. This is a
great option if you are going to take a cross-country trip and your
maps have not been updated in a while.
To update the map using a USB memory device, start by going to
www.subaru-maps.com.
CLOCK
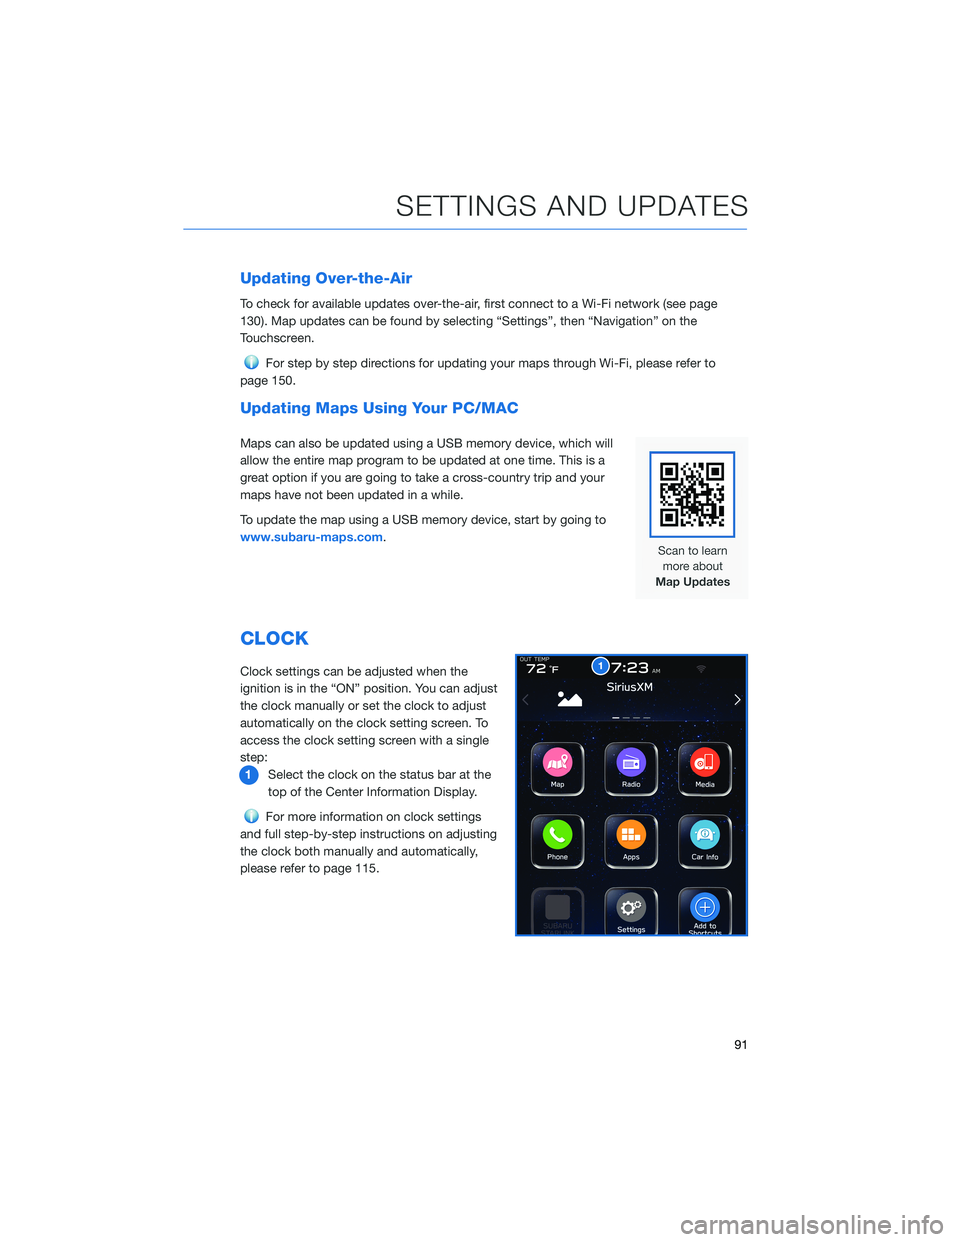
Clock settings can be adjusted when the
ignition is in the “ON” position. You can adjust
the clock manually or set the clock to adjust
automatically on the clock setting screen. To
access the clock setting screen with a single
step:
1Select the clock on the status bar at the
top of the Center Information Display.
For more information on clock settings
and full step-by-step instructions on adjusting
the clock both manually and automatically,
please refer to page 115.
1
SETTINGS AND UPDATES
91
Page 94 of 164
EYESIGHT®OVERVIEW
Your Subaru features a variety of safety
systems that are the culmination of everything
Subaru Engineers know about safety. These
systems are referred to as “Driver Assist
Technologies” and add confidence to every
trip you and your passengers take. Working
together, these systems provide enhanced
awareness, safety, and convenience in front,
to the sides, and behind your Subaru. Subaru
Driver Assist Technologies include:
• EyeSight
®Driver Assist Technology
• Rear-Vision Camera
• Pre-Collision Braking
• Front View Monitor
• Blind-Spot Detection (BSD)
• Rear Cross-Traffic Alert (RCTA)
• Reverse Automatic Braking (RAB)
• High Beam Assist (HBA)
• Lane Departure Prevention
• Steering Responsive Headlights (SRH)
EYESIGHT
92
Page 95 of 164

OPERATION
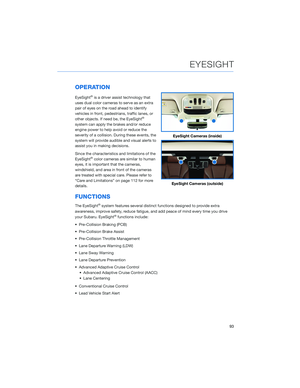
EyeSight®is a driver assist technology that
uses dual color cameras to serve as an extra
pair of eyes on the road ahead to identify
vehicles in front, pedestrians, traffic lanes, or
other objects. If need be, the EyeSight
®
system can apply the brakes and/or reduce
engine power to help avoid or reduce the
severity of a collision. During these events, the
system will provide audible and visual alerts to
assist you in making decisions.
Since the characteristics and limitations of the
EyeSight
®color cameras are similar to human
eyes, it is important that the cameras,
windshield, and area in front of the cameras
are treated with special care. Please refer to
“Care and Limitations” on page 112 for more
details.
FUNCTIONS
The EyeSight®system features several distinct functions designed to provide extra
awareness, improve safety, reduce fatigue, and add peace of mind every time you drive
your Subaru. EyeSight
®functions include:
• Pre-Collision Braking (PCB)
• Pre-Collision Brake Assist
• Pre-Collision Throttle Management
• Lane Departure Warning (LDW)
• Lane Sway Warning
• Lane Departure Prevention
• Advanced Adaptive Cruise Control
• Advanced Adaptive Cruise Control (AACC)
• Lane Centering
• Conventional Cruise Control
• Lead Vehicle Start Alert
EyeSight Cameras (inside)
EyeSight Cameras (outside)
EYESIGHT
93
Page 96 of 164

Pre-Collision Braking
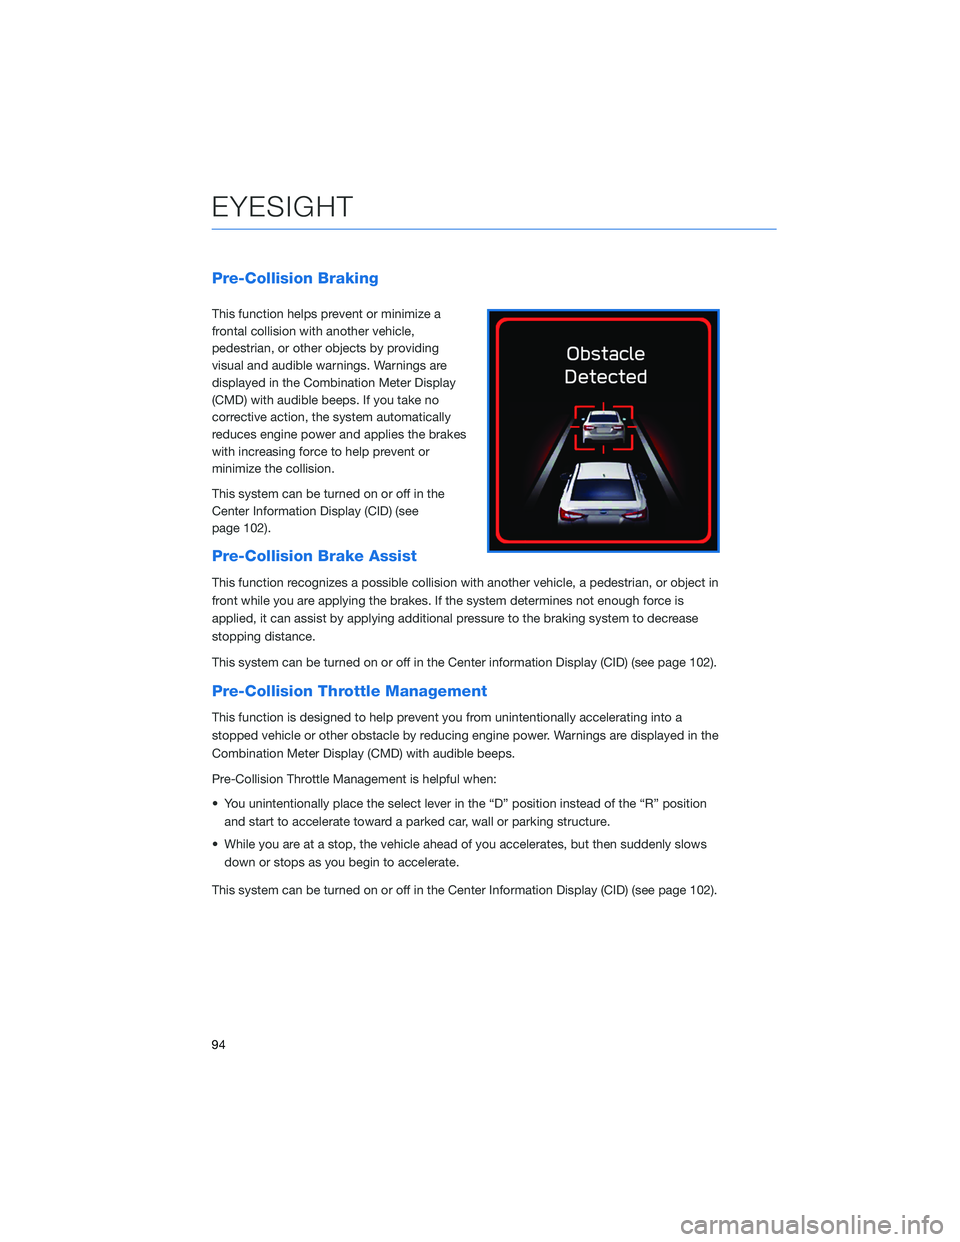
This function helps prevent or minimize a
frontal collision with another vehicle,
pedestrian, or other objects by providing
visual and audible warnings. Warnings are
displayed in the Combination Meter Display
(CMD) with audible beeps. If you take no
corrective action, the system automatically
reduces engine power and applies the brakes
with increasing force to help prevent or
minimize the collision.
This system can be turned on or off in the
Center Information Display (CID) (see
page 102).
Pre-Collision Brake Assist
This function recognizes a possible collision with another vehicle, a pedestrian, or object in
front while you are applying the brakes. If the system determines not enough force is
applied, it can assist by applying additional pressure to the braking system to decrease
stopping distance.
This system can be turned on or off in the Center information Display (CID) (see page 102).
Pre-Collision Throttle Management
This function is designed to help prevent you from unintentionally accelerating into a
stopped vehicle or other obstacle by reducing engine power. Warnings are displayed in the
Combination Meter Display (CMD) with audible beeps.
Pre-Collision Throttle Management is helpful when:
• You unintentionally place the select lever in the “D” position instead of the “R” position
and start to accelerate toward a parked car, wall or parking structure.
• While you are at a stop, the vehicle ahead of you accelerates, but then suddenly slows
down or stops as you begin to accelerate.
This system can be turned on or off in the Center Information Display (CID) (see page 102).
EYESIGHT
94