2021 RAM PROMASTER CITY phone
[x] Cancel search: phonePage 2 of 280

WARNING: Operating, servicing and maintaining a passenger vehicle or off-highway
motor vehicle can expose you to chemicals including engine exhaust, carbon monoxide,
phthalates, and lead, which are known to the State of California to cause cancer and birth defects
or other reproductive harm. To minimize exposure, avoid breathing exhaust, do not idle the
engine except as necessary, service your vehicle in a well-ventilated area and wear gloves or wash
your hands frequently when servicing your vehicle. For more information go to
www.P65Warnings.ca.gov/passenger-vehicle.
This Owner’s Manual illustrates and describes the operation of features and equipment that are either standard or optional on this vehicle. This manual may
also include a description of features and equipment that are no longer available or were not ordered on this vehicle. Please disregard any features and
equipment that are no longer available or were not ordered on this vehicle. FCA US LLC reserves the right to make changes in design and specifications, and/or
make additions to or improvements to its products without imposing any obligation upon itself to install them on products previously manufactured.
With respect to vehicles sold in Canada, the name FCA US LLC shall be deemed to be deleted and the name FCA Canada Inc. used in substitution therefore.
If you are the first registered retail owner of your vehicle, you may obtain a complimentary printed copy of the Warranty Booklet by calling
1-866-726-4636 (U.S.) or 1-800-387-1143 (Canada), or by contacting your dealer.
This Owner’s Manual is intended to familiarize you with the important features of your vehicle. Your most up-to-date Owner’s Manual, Navigation/Uconnect
manuals and Warranty Booklet can be found by visiting the website on the back cover. U.S. residents can purchase replacement kits by visiting
www.techauthority.com and Canadian residents can purchase replacement kits by calling 1-800-387-1143.
The driver’s primary responsibility is the safe operation of the vehicle. Driving while distracted can result in loss of vehicle control, resulting in an accident and
personal injury. FCA US LLC strongly recommends that the driver use extreme caution when using any device or feature that may take their attention off the
road. Use of any electrical devices, such as cellular telephones, computers, portable radios, vehicle navigation or other devices, by the driver while the vehicle
is moving is dangerous and could lead to a serious accident. Texting while driving is also dangerous and should never be done while the vehicle is moving. If you
find yourself unable to devote your full attention to vehicle operation, pull off the road to a safe location and stop your vehicle. Some states or provinces prohibit
the use of cellular telephones or texting while driving. It is always the driver’s responsibility to comply with all local laws.
This Owner’s Manual has been prepared to help you get acquainted with your new Ram brand vehicle and to provide a convenient reference for common
questions.
Not all features shown in this manual may apply to your vehicle. For additional information on accessories to help personalize your vehicle, visit
www.mopar.com/en-us/care/owners-manual.html (U.S.), www.owners.mopar.ca (Canada) or your local Ram brand dealer.
DRIVING AND ALCOHOL
Drunk driving is one of the most frequent causes of accidents. Your driving ability can be seriously
impaired with blood alcohol levels far below the legal minimum. If you are drinking, don’t drive. Ride with
a designated non-drinking driver, call a cab, a friend or use public transportation.
WARNING
Driving after drinking can lead to an accident. Your perceptions are less sharp, your reflexes are slower
and your judgment is impaired when you have been drinking. Never drink and then drive.
Page 6 of 280

4
MULTIMEDIA
UCONNECT SYSTEMS ..........................................86
CYBERSECURITY ..................................................86
UCONNECT SETTINGS .........................................87 Uconnect 3/3 NAV Settings ........................ 87
UCONNECT INTRODUCTION.................................97
Identifying Your Radio ................................. 97
Safety And General Information ................. 99
UCONNECT MODES ........................................... 100
Radio Mode ................................................100
Media Mode ...............................................107Phone Mode ..............................................109
NAVIGATION MODE — IF EQUIPPED ................ 121
Operating Navigation Mode —
If Equipped .................................................121
STEERING WHEEL AUDIO CONTROLS — IF
EQUIPPED ........................................................... 142
Radio Operation .........................................142
Media Mode ...............................................142
RAM TELEMATICS - IF EQUIPPED .................... 142
Ram Telematics General Information ......143
RADIO OPERATION AND MOBILE PHONES.... 143
Regulatory And Safety Information........... 144
SAFETY
SAFETY FEATURES ............................................ 145 Four-Wheel Anti-Lock Brake
System (ABS) ..............................................145 Electronic Brake Control (EBC) System ...146 AUXILIARY DRIVING SYSTEMS.........................149
Tire Pressure Monitoring
System (TPMS) ........................................... 149
OCCUPANT RESTRAINT SYSTEMS .................. 153
Occupant Restraint Systems .................... 153
Important Safety Precautions ................... 153
Seat Belt Systems ..................................... 154
Supplemental Restraint Systems (SRS)... 161
Child Restraints ......................................... 170
Transporting Pets ...................................... 184
SAFETY TIPS ....................................................... 185
Transporting Passengers .......................... 185Exhaust Gas .............................................. 185
Safety Checks You Should Make Inside
The Vehicle ................................................ 185 Periodic Safety Checks You Should Make
Outside The Vehicle ................................... 187
IN CASE OF EMERGENCY
HAZARD WARNING FLASHERS........................188
FUSES ..................................................................188
General Information .................................. 188Underhood Fuses ...................................... 189
Interior Fuses ............................................. 192
Central Unit Fuse Panel............................. 193 JACKING AND TIRE CHANGING ...................... 194
Jack Location — If Equipped ..................... 194
Removing The Spare Tire — If Equipped .. 194Preparations For Jacking ......................... 196
Jacking Instructions................................... 197
Vehicles With Alloy Wheels ....................... 200Vehicles Equipped With Wheel Covers .... 201
TIRE SERVICE KIT — IF EQUIPPED .................. 202
Tire Service Kit Storage............................. 202
Tire Service Kit Usage ............................... 202
JUMP STARTING ................................................ 204
Preparations For Jump Starting ................ 205
Jump Starting Procedure .......................... 206
IF YOUR ENGINE OVERHEATS ......................... 207
IGNITION KEY REMOVAL OVERRIDE ............... 208
GEAR SELECTOR OVERRIDE ............................ 209
FREEING A STUCK VEHICLE ............................ 209
TOWING A DISABLED VEHICLE ........................ 211
ENHANCED ACCIDENT RESPONSE SYSTEM
(EARS) ................................................................ 212
EVENT DATA RECORDER (EDR) ....................... 212
BULB REPLACEMENT ........................................ 213 Replacement Bulbs ................................... 213
Replacing Exterior Bulbs ........................... 214
Replacing Interior Bulbs ............................ 215
21_VM_OM_EN_USC_t.book Page 4
Page 12 of 280
10
GETTING TO KNOW YOUR VEHICLE
KEYS
Key Fob
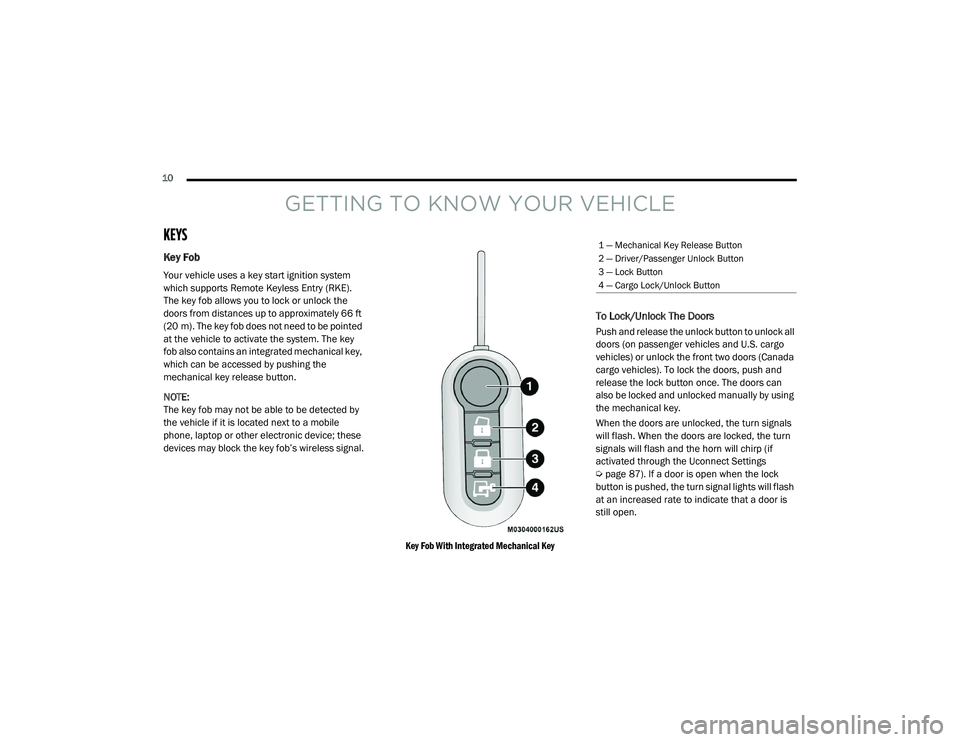
Your vehicle uses a key start ignition system
which supports Remote Keyless Entry (RKE).
The key fob allows you to lock or unlock the
doors from distances up to approximately 66 ft
(20 m). The key fob does not need to be pointed
at the vehicle to activate the system. The key
fob also contains an integrated mechanical key,
which can be accessed by pushing the
mechanical key release button.
NOTE:
The key fob may not be able to be detected by
the vehicle if it is located next to a mobile
phone, laptop or other electronic device; these
devices may block the key fob’s wireless signal.
Key Fob With Integrated Mechanical Key
To Lock/Unlock The Doors
Push and release the unlock button to unlock all
doors (on passenger vehicles and U.S. cargo
vehicles) or unlock the front two doors (Canada
cargo vehicles). To lock the doors, push and
release the lock button once. The doors can
also be locked and unlocked manually by using
the mechanical key.
When the doors are unlocked, the turn signals
will flash. When the doors are locked, the turn
signals will flash and the horn will chirp (if
activated through the Uconnect Settings
Úpage 87). If a door is open when the lock
button is pushed, the turn signal lights will flash
at an increased rate to indicate that a door is
still open.
1 — Mechanical Key Release Button
2 — Driver/Passenger Unlock Button
3 — Lock Button
4 — Cargo Lock/Unlock Button
21_VM_OM_EN_USC_t.book Page 10
Page 42 of 280
40GETTING TO KNOW YOUR VEHICLE
USB Control — If Equipped
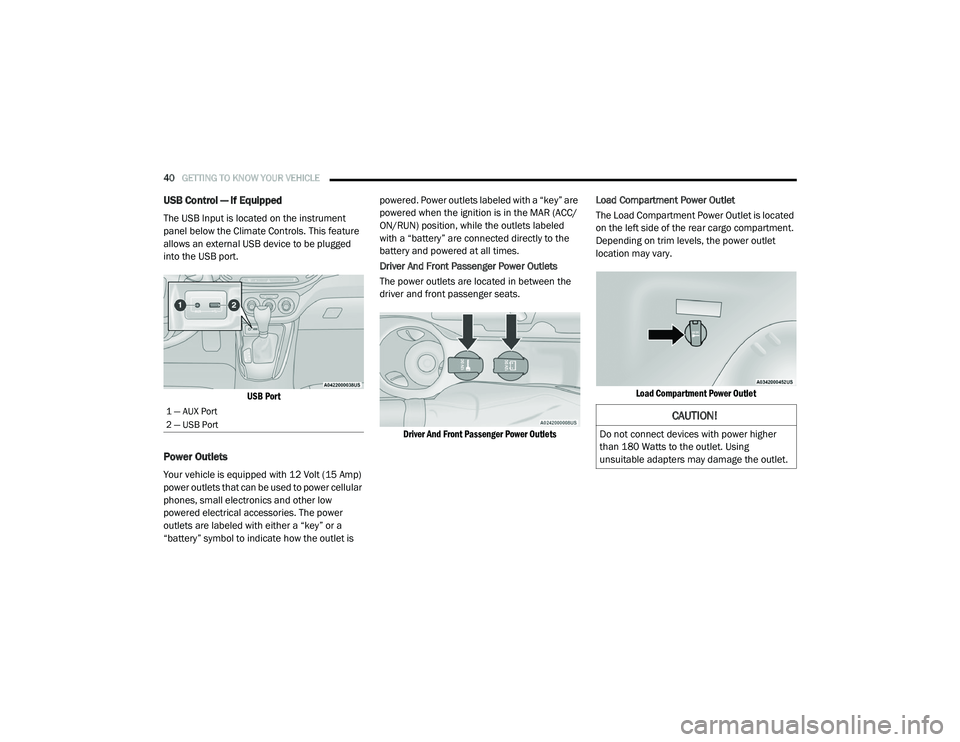
The USB Input is located on the instrument
panel below the Climate Controls. This feature
allows an external USB device to be plugged
into the USB port.
USB Port
Power Outlets
Your vehicle is equipped with 12 Volt (15 Amp)
power outlets that can be used to power cellular
phones, small electronics and other low
powered electrical accessories. The power
outlets are labeled with either a “key” or a
“battery” symbol to indicate how the outlet is powered. Power outlets labeled with a “key” are
powered when the ignition is in the MAR (ACC/
ON/RUN) position, while the outlets labeled
with a “battery” are connected directly to the
battery and powered at all times.
Driver And Front Passenger Power Outlets
The power outlets are located in between the
driver and front passenger seats.
Driver And Front Passenger Power Outlets
Load Compartment Power Outlet
The Load Compartment Power Outlet is located
on the left side of the rear cargo compartment.
Depending on trim levels, the power outlet
location may vary.
Load Compartment Power Outlet
1 — AUX Port
2 — USB Port CAUTION!
Do not connect devices with power higher
than 180 Watts to the outlet. Using
unsuitable adapters may damage the outlet.
21_VM_OM_EN_USC_t.book Page 40
Page 43 of 280
GETTING TO KNOW YOUR VEHICLE41
(Continued)
(Continued)
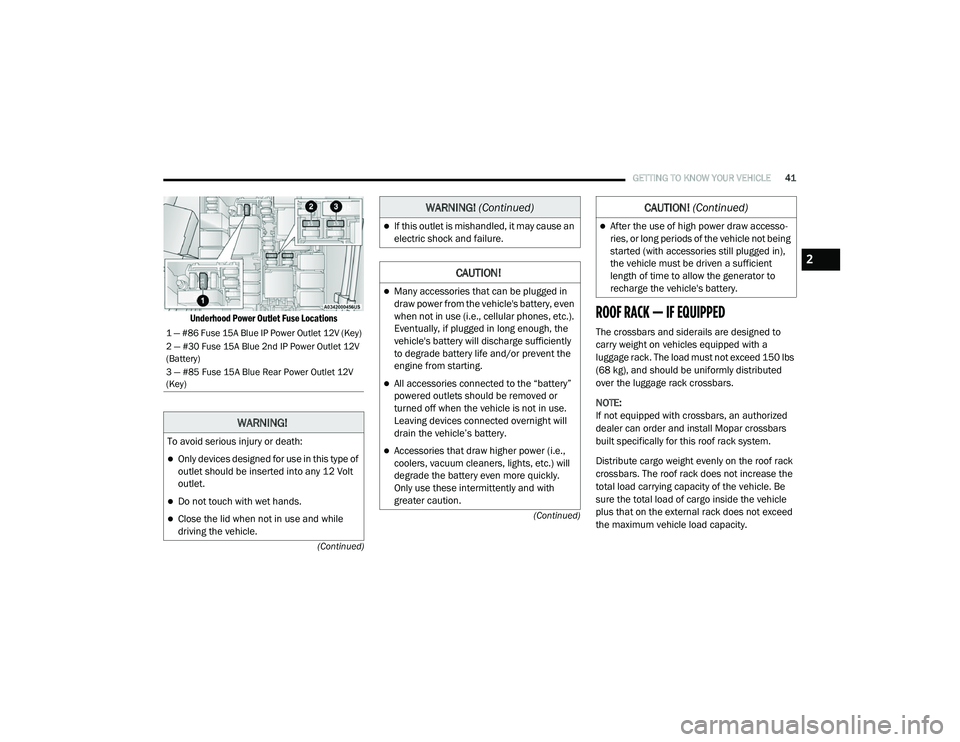
Underhood Power Outlet Fuse Locations
ROOF RACK — IF EQUIPPED
The crossbars and siderails are designed to
carry weight on vehicles equipped with a
luggage rack. The load must not exceed 150 lbs
(68 kg), and should be uniformly distributed
over the luggage rack crossbars.
NOTE:
If not equipped with crossbars, an authorized
dealer can order and install Mopar crossbars
built specifically for this roof rack system.
Distribute cargo weight evenly on the roof rack
crossbars. The roof rack does not increase the
total load carrying capacity of the vehicle. Be
sure the total load of cargo inside the vehicle
plus that on the external rack does not exceed
the maximum vehicle load capacity.1 — #86 Fuse 15A Blue IP Power Outlet 12V (Key)
2 — #30 Fuse 15A Blue 2nd IP Power Outlet 12V
(Battery)
3 — #85 Fuse 15A Blue Rear Power Outlet 12V
(Key)
WARNING!
To avoid serious injury or death:
Only devices designed for use in this type of
outlet should be inserted into any 12 Volt
outlet.
Do not touch with wet hands.
Close the lid when not in use and while
driving the vehicle.
If this outlet is mishandled, it may cause an
electric shock and failure.
CAUTION!
Many accessories that can be plugged in
draw power from the vehicle's battery, even
when not in use (i.e., cellular phones, etc.).
Eventually, if plugged in long enough, the
vehicle's battery will discharge sufficiently
to degrade battery life and/or prevent the
engine from starting.
All accessories connected to the “battery”
powered outlets should be removed or
turned off when the vehicle is not in use.
Leaving devices connected overnight will
drain the vehicle’s battery.
Accessories that draw higher power (i.e.,
coolers, vacuum cleaners, lights, etc.) will
degrade the battery even more quickly.
Only use these intermittently and with
greater caution.
WARNING! (Continued)
After the use of high power draw accesso -
ries, or long periods of the vehicle not being
started (with accessories still plugged in),
the vehicle must be driven a sufficient
length of time to allow the generator to
recharge the vehicle's battery.
CAUTION! (Continued)
2
21_VM_OM_EN_USC_t.book Page 41
Page 89 of 280
MULTIMEDIA87
NOTE:
FCA US LLC or your dealer may contact you
directly regarding software updates.
To help further improve vehicle security and
minimize the potential risk of a security
breach, vehicle owners should:
Routinely check www.driveucon -
nect.com/support/soft -
ware-update.html (US Residents) or
www.driveuconnect.ca (Canadian Resi -
dents) to learn about available Uconnect
software updates.
Only connect and use trusted media
devices (e.g. personal mobile phones,
USBs, CDs).
Privacy of any wireless and wired
communications cannot be assured. Third
parties may unlawfully intercept information
and private communications without your
consent Ú page 56.
UCONNECT SETTINGS
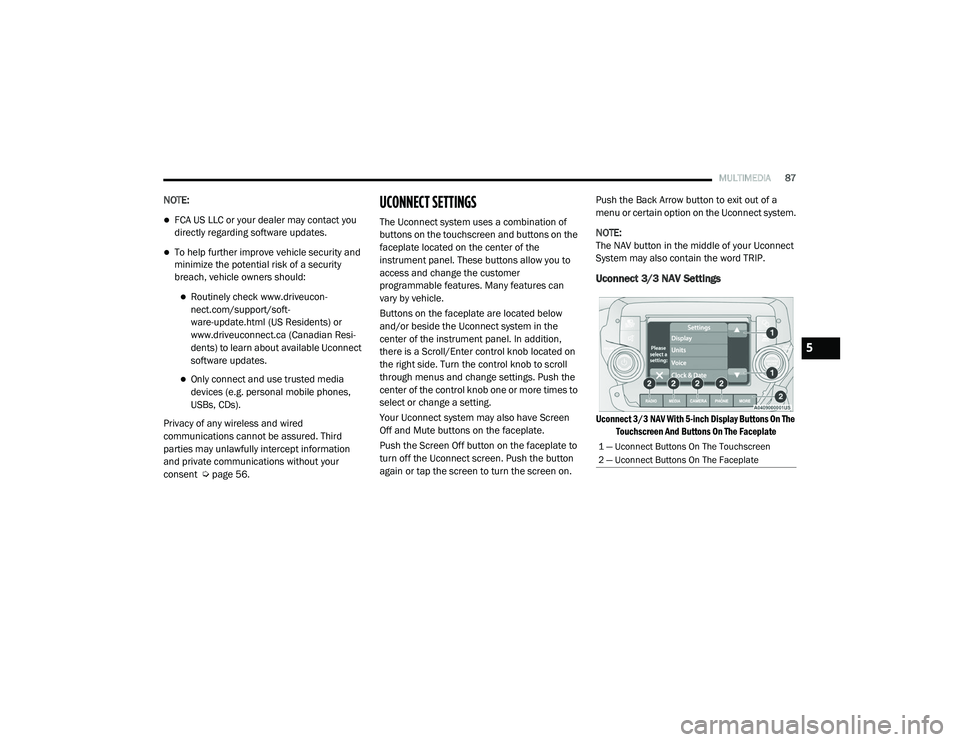
The Uconnect system uses a combination of
buttons on the touchscreen and buttons on the
faceplate located on the center of the
instrument panel. These buttons allow you to
access and change the customer
programmable features. Many features can
vary by vehicle.
Buttons on the faceplate are located below
and/or beside the Uconnect system in the
center of the instrument panel. In addition,
there is a Scroll/Enter control knob located on
the right side. Turn the control knob to scroll
through menus and change settings. Push the
center of the control knob one or more times to
select or change a setting.
Your Uconnect system may also have Screen
Off and Mute buttons on the faceplate.
Push the Screen Off button on the faceplate to
turn off the Uconnect screen. Push the button
again or tap the screen to turn the screen on. Push the Back Arrow button to exit out of a
menu or certain option on the Uconnect system.
NOTE:
The NAV button in the middle of your Uconnect
System may also contain the word TRIP.
Uconnect 3/3 NAV Settings
Uconnect 3/3 NAV With 5-inch Display Buttons On The
Touchscreen And Buttons On The Faceplate
1 — Uconnect Buttons On The Touchscreen
2 — Uconnect Buttons On The Faceplate
5
21_VM_OM_EN_USC_t.book Page 87
Page 96 of 280
94MULTIMEDIA
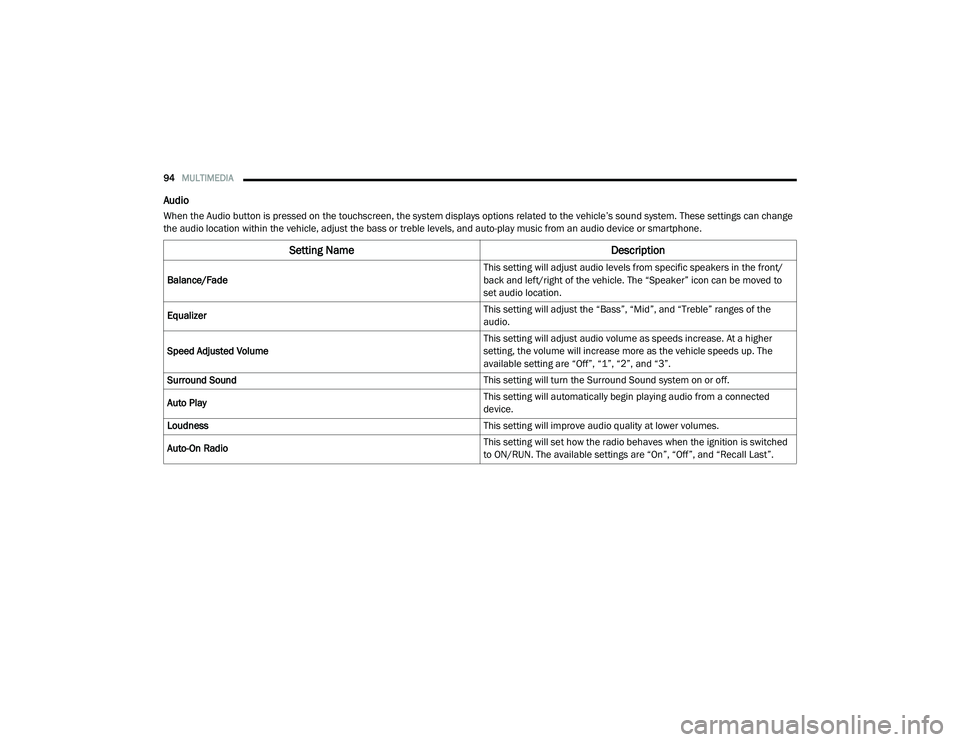
Audio
When the Audio button is pressed on the touchscreen, the system displays options related to the vehicle’s sound system. These settings can change
the audio location within the vehicle, adjust the bass or treble levels, and auto-play music from an audio device or smartphone.
Setting Name Description
Balance/Fade This setting will adjust audio levels from specific speakers in the front/
back and left/right of the vehicle. The “Speaker” icon can be moved to
set audio location.
Equalizer This setting will adjust the “Bass”, “Mid”, and “Treble” ranges of the
audio.
Speed Adjusted Volume This setting will adjust audio volume as speeds increase. At a higher
setting, the volume will increase more as the vehicle speeds up. The
available setting are “Off”, “1”, “2”, and “3”.
Surround Sound This setting will turn the Surround Sound system on or off.
Auto Play This setting will automatically begin playing audio from a connected
device.
Loudness This setting will improve audio quality at lower volumes.
Auto-On Radio This setting will set how the radio behaves when the ignition is switched
to ON/RUN. The available settings are “On”, “Off”, and “Recall Last”.
21_VM_OM_EN_USC_t.book Page 94
Page 97 of 280
MULTIMEDIA95
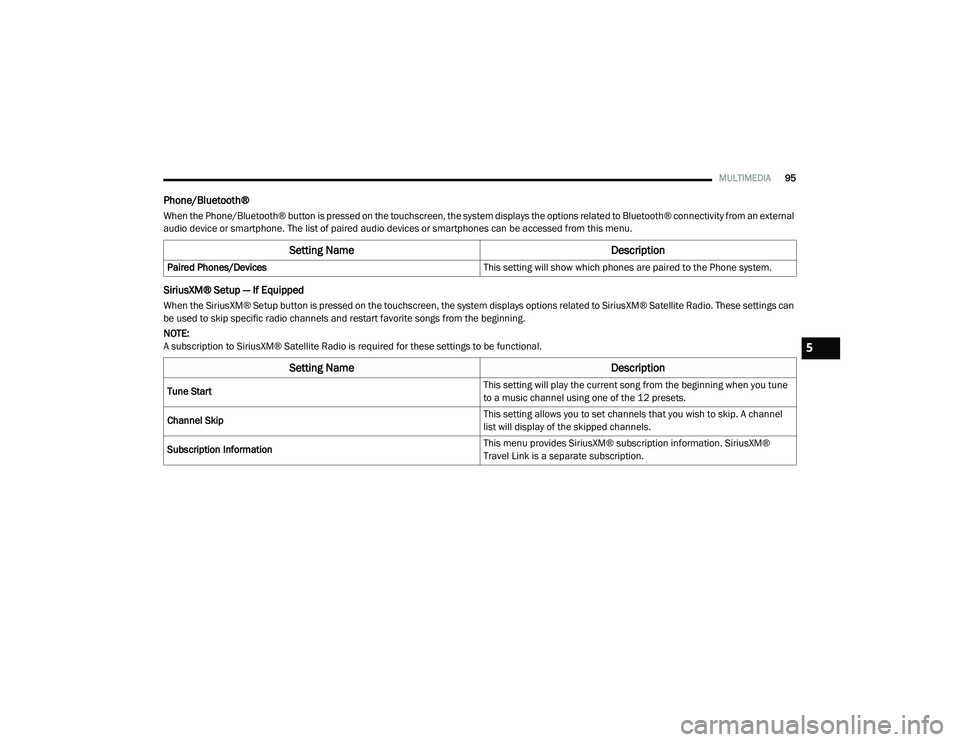
Phone/Bluetooth®
When the Phone/Bluetooth® button is pressed on the touchscreen, the system displays the options related to Bluetooth® connectivity from an external
audio device or smartphone. The list of paired audio devices or smartphones can be accessed from this menu.
SiriusXM® Setup — If Equipped
When the SiriusXM® Setup button is pressed on the touchscreen, the system displays options related to SiriusXM® Satellite Radio. These settings can
be used to skip specific radio channels and restart favorite songs from the beginning.
NOTE:
A subscription to SiriusXM® Satellite Radio is required for these settings to be functional.
Setting Name Description
Paired Phones/Devices This setting will show which phones are paired to the Phone system.
Setting NameDescription
Tune Start This setting will play the current song from the beginning when you tune
to a music channel using one of the 12 presets.
Channel Skip This setting allows you to set channels that you wish to skip. A channel
list will display of the skipped channels.
Subscription Information This menu provides SiriusXM® subscription information. SiriusXM®
Travel Link is a separate subscription.
5
21_VM_OM_EN_USC_t.book Page 95