2021 RAM PROMASTER CITY service
[x] Cancel search: servicePage 209 of 280

IN CASE OF EMERGENCY207
Disconnecting The Jumper Cables
1. Disconnect the negative
(-)
end of the
jumper cable from the engine ground of
the vehicle with the discharged battery.
2. Disconnect the opposite end of the negative (-) jumper cable from the
negative (-) post of the booster battery.
3. Disconnect the positive (+) end of the
jumper cable from the positive (+) post of
the booster battery.
4. Disconnect the opposite end of the positive (+) jumper cable from the
positive (+) post of the vehicle with the
discharged battery.
If frequent jump starting is required to start your
vehicle you should have the battery and
charging system inspected at an authorized
dealer.
IF YOUR ENGINE OVERHEATS
If the vehicle is overheating, it will need to be
serviced by an authorized dealer.
In any of the following situations, you can
reduce the potential for overheating by taking
the appropriate action.
On the highways — slow down.
In city traffic — while stopped, place the trans -
mission in NEUTRAL (N), but do not increase
the engine idle speed while preventing
vehicle motion with the brakes. NOTE:
There are steps that you can take to slow down
an impending overheat condition:
If your Air Conditioner (A/C) is on, turn it off.
The A/C system adds heat to the engine
cooling system and turning the A/C off can
help remove this heat.
You can also turn the temperature control to
maximum heat, the mode control to floor and
the blower control to high. This allows the
heater core to act as a supplement to the
radiator and aids in removing heat from the
engine cooling system.
CAUTION!
Accessories plugged into the vehicle power
outlets draw power from the vehicle’s battery,
even when not in use (i.e., cellular devices,
etc.). Eventually, if plugged in long enough
without engine operation, the vehicle’s
battery will discharge sufficiently to degrade
battery life and/or prevent the engine from
starting.
WARNING!
You or others can be badly burned by hot
engine coolant (antifreeze) or steam from
your radiator. If you see or hear steam coming
from under the hood, do not open the hood
until the radiator has had time to cool. Never
try to open a cooling system pressure cap
when the radiator or coolant bottle is hot.7
21_VM_OM_EN_USC_t.book Page 207
Page 210 of 280
208IN CASE OF EMERGENCY
IGNITION KEY REMOVAL OVERRIDE
This vehicle is equipped with a Key Ignition Park
Interlock which requires the transmission to be
in PARK (P) before the ignition switch can be
turned to the OFF/LOCK (key removal) position.
To remove the key manually, proceed as
follows:
1. Firmly apply the parking brake.
2. Remove the Allen Key located in the rear
cargo area, in the tool bag (if equipped) or
on the left side in the cargo box.
3. Unlock the steering column, pull the tilt/ telescoping control handle down. 4. Pull the steering wheel outward until it is in
the end of the travel position, then lock the
steering column in position, push the
control handle up until fully engaged.
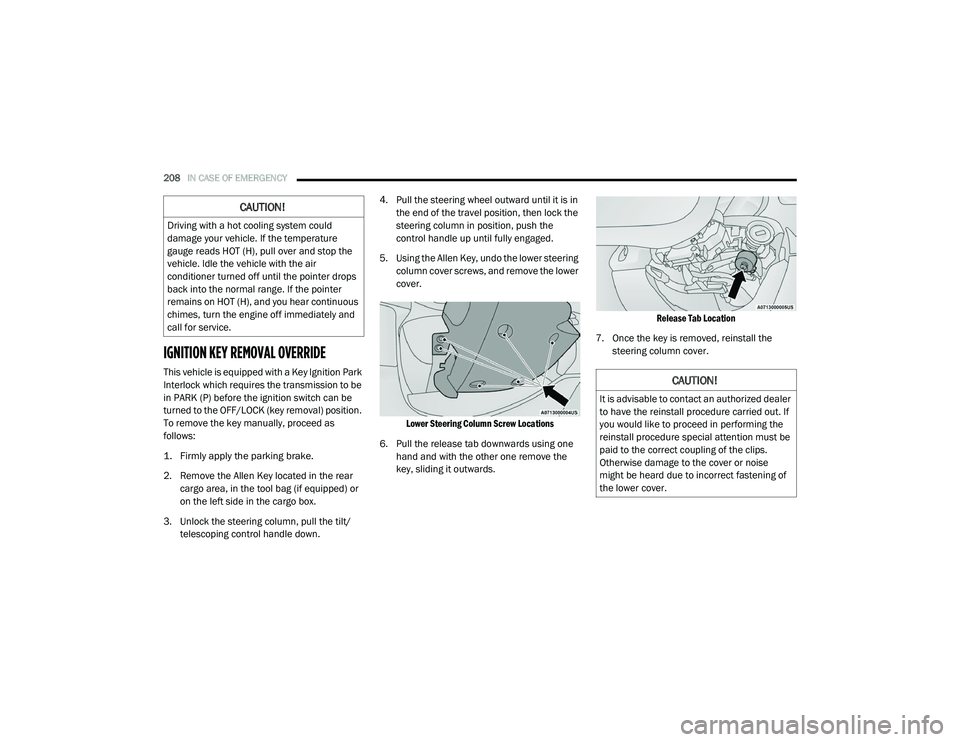
5. Using the Allen Key, undo the lower steering column cover screws, and remove the lower
cover.
Lower Steering Column Screw Locations
6. Pull the release tab downwards using one hand and with the other one remove the
key, sliding it outwards.
Release Tab Location
7. Once the key is removed, reinstall the steering column cover.
CAUTION!
Driving with a hot cooling system could
damage your vehicle. If the temperature
gauge reads HOT (H), pull over and stop the
vehicle. Idle the vehicle with the air
conditioner turned off until the pointer drops
back into the normal range. If the pointer
remains on HOT (H), and you hear continuous
chimes, turn the engine off immediately and
call for service.
CAUTION!
It is advisable to contact an authorized dealer
to have the reinstall procedure carried out. If
you would like to proceed in performing the
reinstall procedure special attention must be
paid to the correct coupling of the clips.
Otherwise damage to the cover or noise
might be heard due to incorrect fastening of
the lower cover.
21_VM_OM_EN_USC_t.book Page 208
Page 213 of 280
IN CASE OF EMERGENCY211
TOWING A DISABLED VEHICLE
This section describes procedures for towing a disabled vehicle using a commercial towing service.
Proper towing or lifting equipment is required to
prevent damage to your vehicle. Use only tow
bars and other equipment designed for this
purpose, following equipment manufacturer’s
instructions. Use of safety chains is mandatory.
Attach a tow bar or other towing device to main
structural members of the vehicle, not to
fascia/bumpers or associated brackets. State
and local laws regarding vehicles under tow
must be observed. If you must use the accessories (wipers,
defrosters, etc.) while being towed, the ignition
must be in the ON/RUN mode.
If the ignition key is unavailable, or the vehicle's
battery is discharged, for instructions on
shifting the transmission out of PARK (P) for
towing Ú
page 209.
Towing Condition
Wheel OFF The Ground ALL MODELS
Flat Tow NONENOT ALLOWED
Wheel Lift Or Dolly Tow Front
OK
Rear NOT ALLOWED
Flatbed ALLBEST METHOD
CAUTION!
Do not use sling type equipment when
towing. Vehicle damage may occur.
When securing the vehicle to a flat bed
truck, do not attach to front or rear suspen-
sion components. Damage to your vehicle
may result from improper towing.
7
21_VM_OM_EN_USC_t.book Page 211
Page 215 of 280

IN CASE OF EMERGENCY213
BULB REPLACEMENT
Replacement Bulbs
NOTE:
See an Authorized Dealer for LED bulb replacement.
Interior Bulbs
Lamps Bulb Number
Front Courtesy Lamps C10W
Rear Courtesy Lamps C10W
Luggage Lamp C5W
Exterior Bulbs
Lamps Bulb Number
Front Low Beam Headlamp H11
Front High Beam Headlamps HB3
Front Side Marker Lamps LED (Serviced at an Authorized Dealer)
Front Parking/Daytime Running Lamps W21W
Front Turn Signal Lamps WY21W
Rear Stop Lamp P21W
Rear Turn Signal Lamps PY21W
Rear Tail Lamps P21/5W
7
21_VM_OM_EN_USC_t.book Page 213
Page 216 of 280
214IN CASE OF EMERGENCY
Replacing Exterior Bulbs
Headlamps
See below steps to replace:
1. Remove the plastic cap from the back of
the headlamp housing.
2. Rotate the bulb counterclockwise.
3. Remove the bulb and replace as needed.
4. Install the bulb and rotate clockwise to lock in place.
5. Reinstall the plastic cap.
Front Turn Signal Lamps
See below steps to replace:
1. Remove the cap from the back of the outer upper headlamp housing.
2. Rotate the bulb counterclockwise and remove.
3. Install the bulb into socket.
4. Rotate the bulb/socket clockwise into the lamp locking it in place.
5. Reinstall the plastic cap.
Parking And Daytime Running Lights
See below steps to replace:
1. Remove the cap from the back of the outer lower headlamp housing.
2. Rotate the bulb counterclockwise and remove.
3. Install the bulb into socket, and rotate bulb/ socket clockwise into lamp locking it in
place.
4. Reinstall the plastic cap.
Rear Side Marker Lamps
LED (Serviced at an Authorized Dealer)
Center Mount Brake Lamp W5W
Reverse Light W16W
Front Fog Lamps H11
NOTE:
Numbers refer to commercial bulb types that can be purchased from an authorized dealer. If a bulb needs to be replaced visit an authorized dealer
or refer to the applicable Service Manual.
Exterior Bulbs
Lamps Bulb Number
21_VM_OM_EN_USC_t.book Page 214
Page 217 of 280
IN CASE OF EMERGENCY215
Front/Rear Side Marker Lamps
See below steps to replace:
The front/rear side marker lamps are LED and
not serviced separately. See an authorized
dealer for replacement of these lights.
Rear Tail, Stop, Backup And Turn Signal
Lamps
The rear light clusters contain taillight, brake
light, direction indicator and reverse/rear fog
light bulbs. To access the light clusters, see
below steps to replace:
1. Open the rear doors.
2. Remove the screws and remove the tail
lamp assembly.
3. Remove the screws and separate the backplate from the lamp housing.
4. Remove the tail, stop, or turn signal bulbs by pushing them slightly and turning counter -
clockwise.
5. Remove the backup lamp bulb by pulling straight out.
6. Replace lamps as required and reinstall lamp. The bulbs are arranged inside the light cluster
as follows:
Third Brake Light (Center Mount)
See below steps to replace:
1. For versions with tailgate, loosen the two
fastening screws and extract the cluster.
2. For versions with swing doors, remove rubber plugs, remove retaining tabs and
extract the cluster.
3. For versions with high roof and swing doors, remove the pressure-fit plastic guard and
rubber cap using a screwdriver, release the
retaining tags as shown in the figure and
remove the unit.
4. Remove the appropriate tabs and remove the bulb holder.
5. Remove the snap-fitted bulb and replace it.
License Plate Lights
See below steps to replace:
1. Disengage the holding tabs and remove the lens by lifting to the left.
2. Remove the bulbs by releasing them from the side contacts; insert the new bulbs and
make sure they are correctly clamped
between these contacts.
Replacing Interior Bulbs
Dome Lamp With Spot Lights
See below steps to replace:
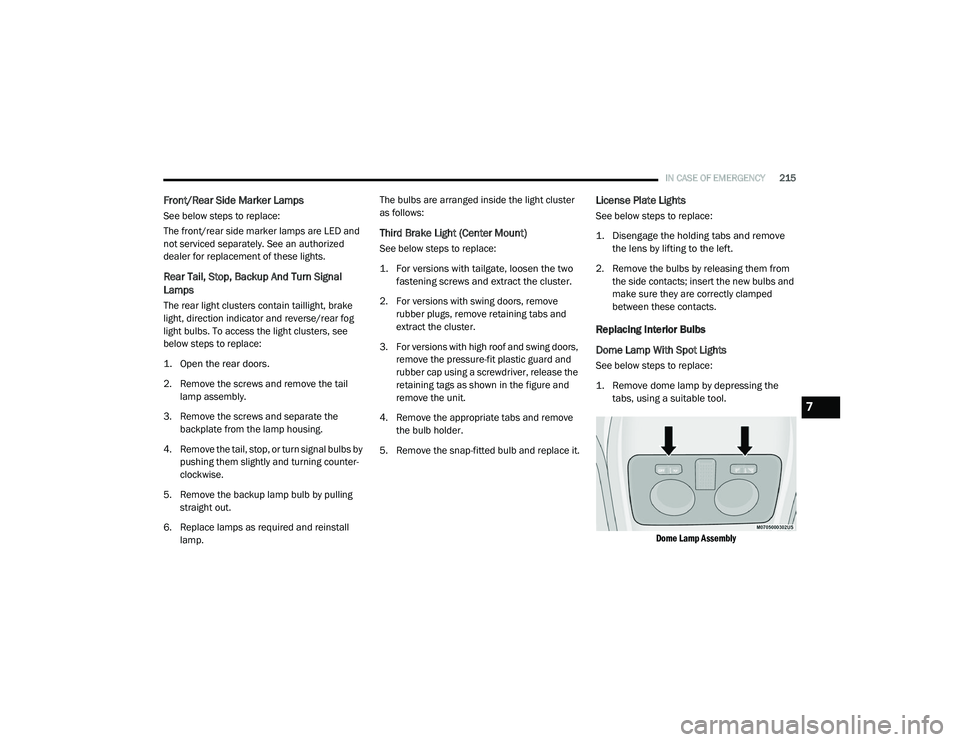
1. Remove dome lamp by depressing the tabs, using a suitable tool.
Dome Lamp Assembly
7
21_VM_OM_EN_USC_t.book Page 215
Page 219 of 280

217
SERVICING AND MAINTENANCE
SCHEDULED SERVICING
Your vehicle is equipped with an automatic oil
change indicator system. The oil change
indicator system will remind you that it is time to
take your vehicle in for scheduled maintenance.
Based on engine operation conditions, the oil
change indicator message will illuminate. This
means that service is required for your vehicle.
Operating conditions such as frequent
short-trips, trailer tow, extended engine idle
time, extremely hot or cold ambient
temperatures will influence when the “Oil
Change Required” message is displayed.
Severe Operating Conditions can cause the
change oil message to illuminate as early as
3,500 miles (5,600 km) since last reset. Have
your vehicle serviced as soon as possible,
within the next 500 miles (805 km).
An authorized dealer will reset the oil change
indicator message after completing the
scheduled oil change. If a scheduled oil change
is performed by someone other than an
authorized dealer, to reset the message
Úpage 46. NOTE:
Under no circumstances should oil change
intervals exceed 10,000 miles (16,000 km),
350 hours of engine run time or 12 months,
whichever comes first. The 350 hours of engine
run or idle time is generally only a concern for
fleet customers.
Severe Duty All Models
Vehicles that are operated in a dusty and
off-road environment, or predominately at idle
or very low engine RPM are known as Severe
Duty vehicles. It is recommended that you
change Engine Oil at 4,000 miles (6,500 km) or
350 hours of engine run time.
Once A Month Or Before A Long Trip:
Check engine oil level.
Check windshield washer fluid level.
Check tire pressure and look for unusual
wear or damage. Rotate tires at the first sign
of irregular wear, even if it occurs before the
oil indicator system turns on.
Check the fluid levels of the coolant reservoir
and brake master cylinder, fill as needed.
Check function of all interior and exterior
lights.
Maintenance Plan
Refer to the maintenance schedule for the
required maintenance intervals. More frequent
maintenance may be needed in severe
conditions, such as dusty areas and very short
trip driving. In some extreme conditions,
additional maintenance not specified in the
maintenance schedule may be required.
8
21_VM_OM_EN_USC_t.book Page 217
Page 222 of 280
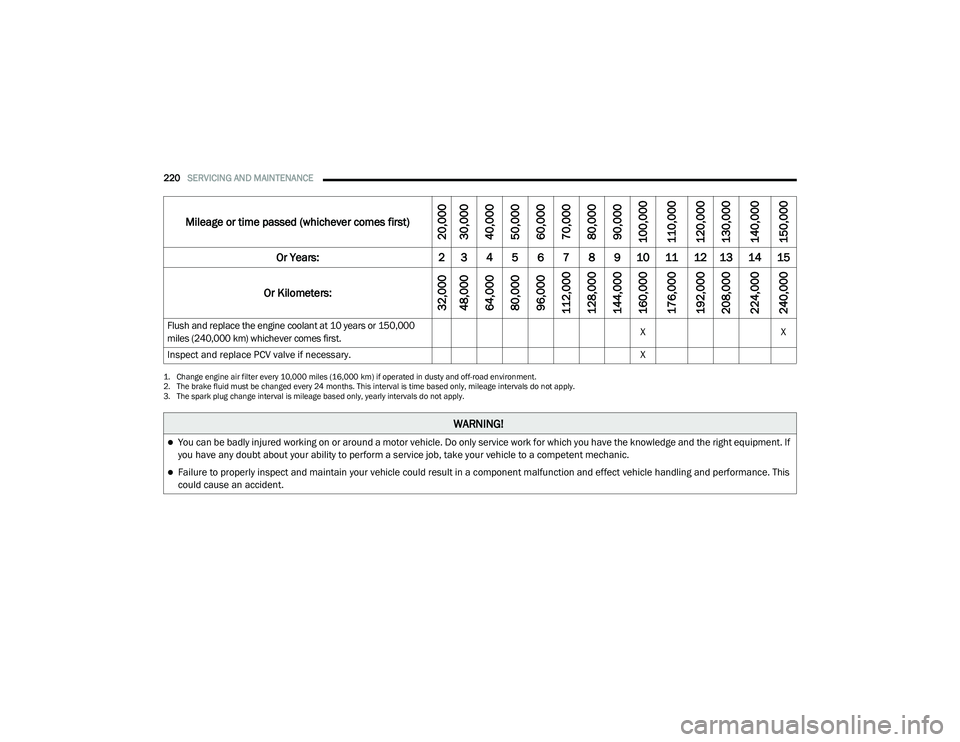
220SERVICING AND MAINTENANCE
Flush and replace the engine coolant at 10 years or 150,000
miles (240,000 km) whichever comes first. X
X
Inspect and replace PCV valve if necessary. X
1. Change engine air filter every 10,000 miles (16,000 km) if operated in dusty and off-road environment.
2. The brake fluid must be changed every 24 months. This interval is time based only, mileage intervals do not apply.
3. The spark plug change interval is mileage based only, yearly intervals do not apply.
Mileage or time passed (whichever comes first)
20,000
30,000
40,000
50,000
60,000
70,000
80,000
90,000
100,000
110,000
120,000
130,000
140,000
150,000
Or Years: 2 3 4 5 6 7 8 9 10 11 12 13 14 15
Or Kilometers:
32,000
48,000
64,000
80,000
96,000
112,000
128,000
144,000
160,000
176,000
192,000
208,000
224,000
240,000
WARNING!
You can be badly injured working on or around a motor vehicle. Do only service work for which you have the knowledge and the right equipment. If
you have any doubt about your ability to perform a service job, take your vehicle to a competent mechanic.
Failure to properly inspect and maintain your vehicle could result in a component malfunction and effect vehicle handling and performance. This
could cause an accident.
21_VM_OM_EN_USC_t.book Page 220