2021 RAM PROMASTER CITY ECU
[x] Cancel search: ECUPage 66 of 280
![RAM PROMASTER CITY 2021 Owners Manual
64STARTING AND OPERATING
(Continued)
(Continued)
gear selector to the right (into the DRIVE [D]
position) for access to PARK, REVERSE, and
NEUTRAL.
Gear Selector
Gear Ranges
Do not press the ac RAM PROMASTER CITY 2021 Owners Manual
64STARTING AND OPERATING
(Continued)
(Continued)
gear selector to the right (into the DRIVE [D]
position) for access to PARK, REVERSE, and
NEUTRAL.
Gear Selector
Gear Ranges
Do not press the ac](/manual-img/34/59212/w960_59212-65.png)
64STARTING AND OPERATING
(Continued)
(Continued)
gear selector to the right (into the DRIVE [D]
position) for access to PARK, REVERSE, and
NEUTRAL.
Gear Selector
Gear Ranges
Do not press the accelerator pedal when
shifting out of PARK or NEUTRAL.
NOTE:
After selecting any gear range, wait a moment
to allow the selected gear to engage before
accelerating. This is especially important when
the engine is cold.
PARK (P)
The engine can be started in this range. Never
attempt to use PARK while the vehicle is in
motion. If necessary, apply the parking brake
prior to placing the vehicle in PARK.
When parking on a hill, apply the parking brake
before shifting the transmission to PARK,
otherwise the load on the transmission locking
mechanism may make it difficult to move the
gear selector out of PARK. As an added
precaution, turn the front wheels toward the
curb on a downhill grade and away from the
curb on an uphill grade.
When exiting the vehicle, always:
Apply the parking brake.
Shift the transmission into PARK.
Turn the engine off.
Remove the ignition key.
WARNING!
Never use the PARK position as a substi -
tute for the parking brake. Always apply the
parking brake fully when exiting the vehicle
to guard against vehicle movement and
possible injury or damage.
Your vehicle could move and injure you and
others if it is not in PARK. Check by trying to
move the gear selector out of PARK with the
brake pedal released. Make sure the trans -
mission is in PARK before exiting the vehicle.
It is dangerous to shift out of PARK or
NEUTRAL if the engine speed is higher than
idle speed. If your foot is not firmly pressing
the brake pedal, the vehicle could accel -
erate quickly forward or in reverse. You
could lose control of the vehicle and hit
someone or something. Only shift into gear
when the engine is idling normally and your
foot is firmly pressing the brake pedal.
Unintended movement of a vehicle could
injure those in or near the vehicle. As with
all vehicles, you should never exit a vehicle
while the engine is running. Before exiting a
vehicle always come to a complete stop,
then apply the parking brake, shift the
transmission into PARK, turn the engine off,
and remove the ignition key. Once the key is
removed, the transmission is locked in
PARK, securing the vehicle against
unwanted movement.
WARNING! (Continued)
21_VM_OM_EN_USC_t.book Page 64
Page 78 of 280
76STARTING AND OPERATING
Gross Vehicle Weight Rating (GVWR)
The GVWR is the total allowable weight of your
vehicle. This includes driver, passengers, and
cargo. The total load must be limited so that you
do not exceed the GVWR.
Gross Axle Weight Rating (GAWR)
The GAWR is the maximum capacity of the front
and rear axles. Distribute the load over the front
and rear axles evenly. Make sure that you do
not exceed either front or rear GAWR.
Tire Size
The tire size on the Vehicle Certification Label
represents the actual tire size on your vehicle.
Replacement tires must be equal to the load
capacity of this tire size.
Rim Size
This is the rim size that is appropriate for the tire
size listed.
Inflation Pressure
This is the cold tire inflation pressure for your
vehicle for all loading conditions up to full GAWR.
Curb Weight
The curb weight of a vehicle is defined as the
total weight of the vehicle with all fluids,
including vehicle fuel, at full capacity
conditions, and with no occupants or cargo
loaded into the vehicle. The front and rear curb
weight values are determined by weighing your
vehicle on a commercial scale before any
occupants or cargo are added.
Overloading
The load carrying components (axle, springs,
tires, wheels, etc.) of your vehicle will provide
satisfactory service as long as you do not
exceed the GVWR and the front and rear GAWR.
The best way to figure out the total weight of
your vehicle is to weigh it when it is fully loaded
and ready for operation. Weigh it on a
commercial scale to ensure that it is not over
the GVWR. Figure out the weight on the front and rear of
the vehicle separately. It is important that you
distribute the load evenly over the front and rear
axles.
Overloading can cause potential safety hazards
and shorten useful service life. Heavier axles or
suspension components do not necessarily
increase the vehicle's GVWR.
Loading
To load your vehicle properly, first figure out its
empty weight, axle-by-axle and side-by-side.
Store heavier items down low and be sure you
distribute their weight as evenly as possible.
Stow all loose items securely before driving. If
weighing the loaded vehicle shows that you
have exceeded either GAWR, but the total load
is within the specified GVWR, you must
redistribute the weight. Improper weight
distribution can have an adverse effect on the
way your vehicle steers and handles and the
way the brakes operate.
NOTE:
Refer to the “Vehicle Certification Label” affixed
to the B-Pillar or the rear of the driver's door for
your vehicle's GVWR and GAWRs.
WARNING!
Because the front wheels steer the vehicle, it
is important that you do not exceed the
maximum front or rear GAWR. A dangerous
driving condition can result if either rating is
exceeded. You could lose control of the
vehicle and have a collision.
21_VM_OM_EN_USC_t.book Page 76
Page 82 of 280
80STARTING AND OPERATING
(Continued)
Towing Requirements — Tires
Do not attempt to tow a trailer while using a
compact spare tire.
Do not drive more than 50 mph (80 km/h) when towing while using a full size spare tire.
Proper tire inflation pressures are essential
to the safe and satisfactory operation of your
vehicle.
Check the trailer tires for proper tire inflation
pressures before trailer usage.
Check for signs of tire wear or visible tire
damage before towing a trailer.
When replacing tires with a higher load
carrying capacity they will not increase the
vehicle's GVWR and GAWR limits.
For further information Ú page 234.
WARNING!
Make certain that the load is secured in the
trailer and will not shift during travel. When
trailering cargo that is not fully secured,
dynamic load shifts can occur that may be
difficult for the driver to control. You could
lose control of your vehicle and have a colli -
sion.
When hauling cargo or towing a trailer, do
not overload your vehicle or trailer. Over -
loading can cause a loss of control, poor
performance or damage to brakes, axle,
engine, transmission, steering, suspension,
chassis structure or tires.
Safety chains must always be used
between your vehicle and trailer. Always
connect the chains to the hook retainers of
the vehicle hitch. Cross the chains under
the trailer tongue and allow enough slack
for turning corners.
Vehicles with trailers should not be parked
on a grade. When parking, apply the
parking brake on the tow vehicle. Put the
tow vehicle transmission in PARK. For
four-wheel drive vehicles, make sure the
transfer case is not in NEUTRAL. Always,
block or "chock" the trailer wheels.
GCWR must not be exceeded.
Total weight must be distributed between
the tow vehicle and the trailer such that the
following four ratings are not exceeded :
GVWR
GTW
GAWR
Tongue weight rating for the trailer
hitch utilized.
WARNING! (Continued)
21_VM_OM_EN_USC_t.book Page 80
Page 85 of 280
STARTING AND OPERATING83
RECREATIONAL TOWING (BEHIND MOTORHOME)
Towing This Vehicle Behind Another Vehicle
NOTE:
When towing your vehicle, always follow appli -
cable state and provincial laws. Contact state
and provincial Highway Safety offices for addi -
tional details.
Recreational Towing — Automatic
Transmission
Recreational towing is allowed ONLY if the front
wheels are OFF the ground. This may be
accomplished using a tow dolly or vehicle
trailer. If using a tow dolly, follow this procedure:
1. Properly secure the dolly to the tow vehicle,
following the dolly manufacturer's
instructions.
2. Drive the front wheels onto the tow dolly.
3. Firmly apply the parking brake. Place the transmission in PARK.
4. Properly secure the front wheels to the dolly, following the dolly manufacturer's
instructions.
5. Release the parking brake.
Towing Condition Wheels OFF The Ground Automatic Transmission
Flat Tow NONENOT ALLOWED
Dolly Tow Front
OK
Rear NOT ALLOWED
On Trailer ALLOK
CAUTION!
DO NOT flat tow this vehicle. Damage to the
drivetrain will result. If this vehicle requires
towing, make sure the drive wheels are OFF
the ground.
Towing this vehicle in violation of the above
requirements can cause severe transmis-
sion damage. Damage from improper
towing is not covered under the New
Vehicle Limited Warranty.
4
21_VM_OM_EN_USC_t.book Page 83
Page 88 of 280
86
MULTIMEDIA
UCONNECT SYSTEMS
For detailed information about your Uconnect
system, refer to Úpage 97.
NOTE:
Uconnect screen images are for illustration
purposes only and may not reflect exact soft -
ware for your vehicle.
CYBERSECURITY
Your vehicle may be a connected vehicle and
may be equipped with both wired and wireless
networks. These networks allow your vehicle to
send and receive information. This information
allows systems and features in your vehicle to
function properly. Your vehicle may be equipped with certain
security features to reduce the risk of
unauthorized and unlawful access to vehicle
systems and wireless communications. Vehicle
software technology continues to evolve over
time and FCA US LLC, working with its suppliers,
evaluates and takes appropriate steps as
needed. Similar to a computer or other devices,
your vehicle may require software updates to
improve the usability and performance of your
systems or to reduce the potential risk of
unauthorized and unlawful access to your
vehicle systems.
The risk of unauthorized and unlawful access to
your vehicle systems may still exist, even if the
most recent version of vehicle software (such as
Uconnect software) is installed.
WARNING!
It is not possible to know or to predict all of the
possible outcomes if your vehicle’s systems
are breached. It may be possible that vehicle
systems, including safety related systems,
could be impaired or a loss of vehicle control
could occur that may result in an accident
involving serious injury or death.
ONLY insert media (e.g., USB, SD card, or
CD) into your vehicle if it came from a
trusted source. Media of unknown origin
could possibly contain malicious software,
and if installed in your vehicle, it may
increase the possibility for vehicle systems
to be breached.
As always, if you experience unusual
vehicle behavior, take your vehicle to your
nearest authorized dealer immediately.
21_VM_OM_EN_USC_t.book Page 86
Page 89 of 280
MULTIMEDIA87
NOTE:
FCA US LLC or your dealer may contact you
directly regarding software updates.
To help further improve vehicle security and
minimize the potential risk of a security
breach, vehicle owners should:
Routinely check www.driveucon -
nect.com/support/soft -
ware-update.html (US Residents) or
www.driveuconnect.ca (Canadian Resi -
dents) to learn about available Uconnect
software updates.
Only connect and use trusted media
devices (e.g. personal mobile phones,
USBs, CDs).
Privacy of any wireless and wired
communications cannot be assured. Third
parties may unlawfully intercept information
and private communications without your
consent Ú page 56.
UCONNECT SETTINGS
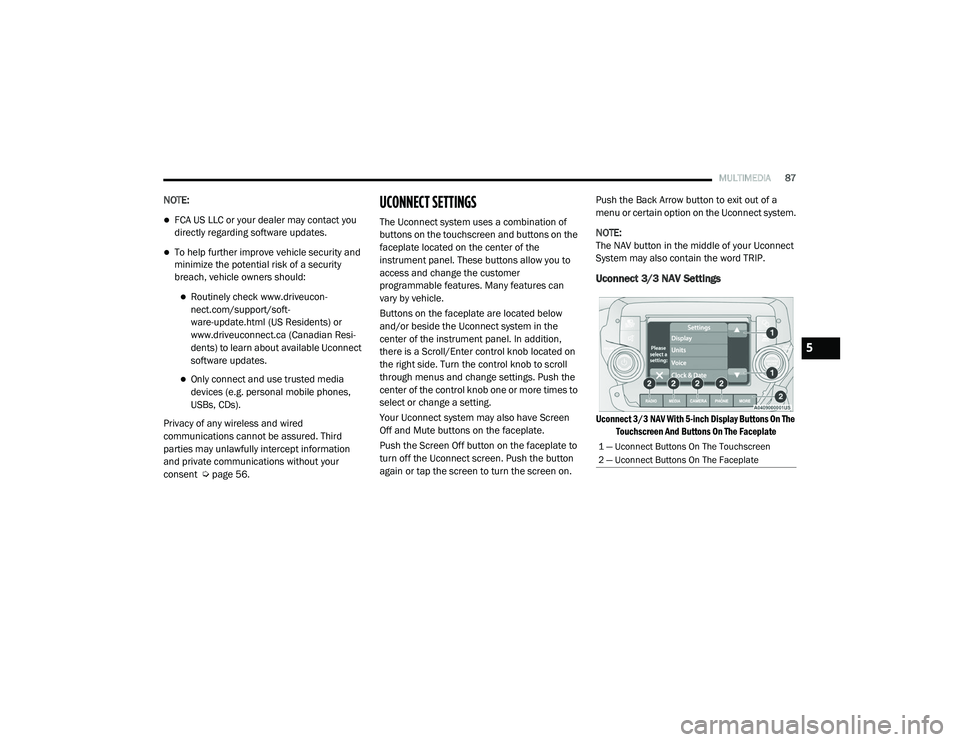
The Uconnect system uses a combination of
buttons on the touchscreen and buttons on the
faceplate located on the center of the
instrument panel. These buttons allow you to
access and change the customer
programmable features. Many features can
vary by vehicle.
Buttons on the faceplate are located below
and/or beside the Uconnect system in the
center of the instrument panel. In addition,
there is a Scroll/Enter control knob located on
the right side. Turn the control knob to scroll
through menus and change settings. Push the
center of the control knob one or more times to
select or change a setting.
Your Uconnect system may also have Screen
Off and Mute buttons on the faceplate.
Push the Screen Off button on the faceplate to
turn off the Uconnect screen. Push the button
again or tap the screen to turn the screen on. Push the Back Arrow button to exit out of a
menu or certain option on the Uconnect system.
NOTE:
The NAV button in the middle of your Uconnect
System may also contain the word TRIP.
Uconnect 3/3 NAV Settings
Uconnect 3/3 NAV With 5-inch Display Buttons On The
Touchscreen And Buttons On The Faceplate
1 — Uconnect Buttons On The Touchscreen
2 — Uconnect Buttons On The Faceplate
5
21_VM_OM_EN_USC_t.book Page 87
Page 130 of 280
128MULTIMEDIA
Avoid Toll Roads And More Select the button to avoid some types of route features that are on
your currently planned route. These include ferries, toll roads and
unpaved roads.
Show Instructions Press the button to see a list of turn-by-turn instructions for the
planned route.
The instructions include the following information:
Current location
Street names
Up to two road numbers shown in road signs (if available)
An instruction arrow
An instruction description
The distance between two consecutive instructions
Exit number
The full addresses of stops on your route
Add Stop To Route Press the button to add a stop to the route.
You can add a stop by selecting a point on the map. In map view, zoom in
on the map and press and hold to select a location. Then, select the
pop-up menu button and press “Add to Current Route”.
You route will be recalculated to include your stop.
Route Option
Description
21_VM_OM_EN_USC_t.book Page 128
Page 155 of 280
SAFETY153
OCCUPANT RESTRAINT SYSTEMS
Some of the most important safety features in
your vehicle are the restraint systems:
Occupant Restraint Systems
Seat Belt Systems
Supplemental Restraint Systems (SRS) Air
Bags
Child Restraints
Some of the safety features described in this
section may be standard equipment on some
models, or may be optional equipment on
others. If you are not sure, ask an authorized
dealer.
Important Safety Precautions
Please pay close attention to the information in
this section. It tells you how to use your restraint
system properly, to keep you and your
passengers as safe as possible.
Here are some simple steps you can take to
minimize the risk of harm from a deploying air
bag:
1. Children 12 years old and under should
always ride buckled up in the rear seat of a
vehicle with a rear seat.
2. A child who is not big enough to wear the vehicle seat belt properly must be secured
in the appropriate child restraint or
belt-positioning booster seat in a rear
seating position Ú page 182.
3. If a child from 2 to 12 years old (not in a rear-facing child restraint) must ride in the
front passenger seat, move the seat as far
back as possible and use the proper child
restraint Ú page 182.
4. Never allow children to slide the shoulder belt behind them or under their arm.
5. You should read the instructions provided with your child restraint to make sure that
you are using it properly.
6. All occupants should always wear their lap and shoulder belts properly.
7. The driver and front passenger seats should be moved back as far as practical to allow
the front air bags room to inflate. 8. Do not lean against the door or window. If
your vehicle has side air bags, and
deployment occurs, the side air bags will
inflate forcefully into the space between
occupants and the door and occupants
could be injured.
9. If the air bag system in this vehicle needs to be modified to accommodate a disabled
person, see Ú page 262 for customer
service contact information.
WARNING!
Never place a rear-facing child restraint in
front of an air bag. A deploying passenger
front air bag can cause death or serious
injury to a child 12 years or younger,
including a child in a rear-facing child
restraint.
Never install a rear-facing child restraint in
the front seat of a vehicle. Only use a
rear-facing child restraint in the rear seat. If
the vehicle does not have a rear seat, do
not transport a rear-facing child restraint in
that vehicle.
6
21_VM_OM_EN_USC_t.book Page 153