Page 122 of 212
120
In the event of a breakdown
1 - Getting the tools
They are stored in a box under the front
passenger seat.
► Turn the button a quarter turn, then pull the
tool box.
►
After use, press the button, then turn a
quarter turn to lock the tool box.
A. Extended socket
B. Wheel bar
C. Jack
D. Wheelbrace
E. Screwdriver (handle and bits)
F. Removable towing eye
2 - Removing the spare
wheel from its housing
To facilitate this, lift the rear of the
vehicle.
The spare wheel is specific to your vehicle, do not use it on vehicles of
different models.
Also, do not use spare wheels of a different
model to your vehicle.
These indications also apply to bolts.
With steel wheels:
H. Handle I.
Caliper
With alloy wheels:
H. Handle
I. Caliper
J. Bracket
K. Bolt
The spare wheel retaining bolt is located under
the rear bumper, on the right-hand side.
Page 123 of 212

121
In the event of a breakdown
8
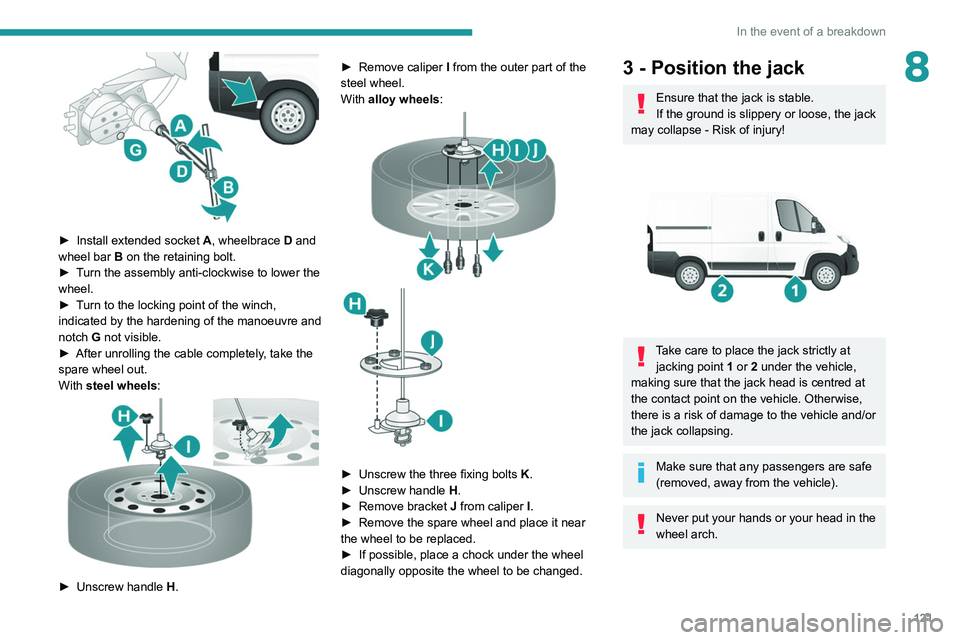
► Install extended socket A , wheelbrace D and
wheel bar B on the retaining bolt.
►
T
urn the assembly anti-clockwise to lower the
wheel.
►
T
urn to the locking point of the winch,
indicated by the hardening of the manoeuvre and
notch G not visible.
►
After unrolling the cable completely
, take the
spare wheel out.
With steel wheels:
► Unscrew handle H . ►
Remove caliper
I
from the outer part of the
steel wheel.
With alloy wheels:
► Unscrew the three fixing bolts K .
► Unscrew handle H
.
►
Remove bracket J
from caliper I.
►
Remove the spare wheel and place it near
the wheel to be replaced.
►
If possible, place a chock under the wheel
diagonally opposite the wheel to be changed.
3 - Position the jack
Ensure that the jack is stable.
If the ground is slippery or loose, the jack
may collapse - Risk of injury!
Take care to place the jack strictly at jacking point 1 or 2 under the vehicle,
making sure that the jack head is centred at
the contact point on the vehicle. Otherwise,
there is a risk of damage to the vehicle and/or
the jack collapsing.
Make sure that any passengers are safe
(removed, away from the vehicle).
Never put your hands or your head in the
wheel arch.
Page 125 of 212

123
In the event of a breakdown
84 - Replacing the wheel to
be repaired
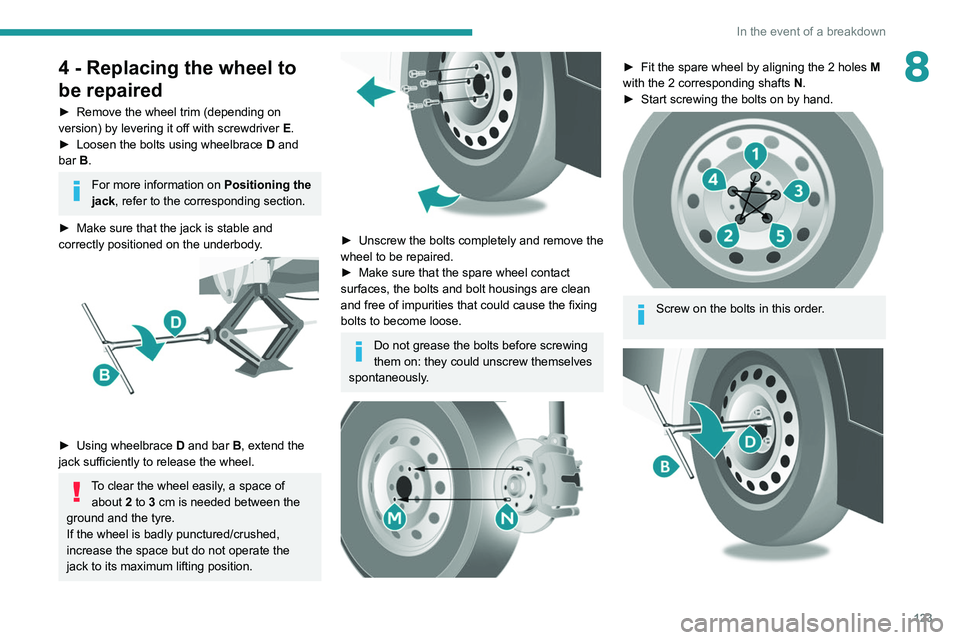
► Remove the wheel trim (depending on
version) by levering it off with screwdriver E
.
►
Loosen the bolts using wheelbrace D
and
bar B.
For more information on Positioning the
jack, refer to the corresponding section.
►
Make sure that the jack is stable and
correctly positioned on the underbody
.
► Using wheelbrace D and bar B, extend the
jack sufficiently to release the wheel.
To clear the wheel easily, a space of about 2 to 3 cm is needed between the
ground and the tyre.
If the wheel is badly punctured/crushed,
increase the space but do not operate the
jack to its maximum lifting position.
► Unscrew the bolts completely and remove the
wheel to be repaired.
►
Make sure that the spare wheel contact
surfaces, the bolts and bolt housings are clean
and free of impurities that could cause the fixing
bolts to become loose.
Do not grease the bolts before screwing
them on: they could unscrew themselves
spontaneously.
► Fit the spare wheel by aligning the 2 holes M
with the 2 corresponding shafts N.
►
Start screwing the bolts on by hand.
Screw on the bolts in this order.
Page 126 of 212

124
In the event of a breakdown
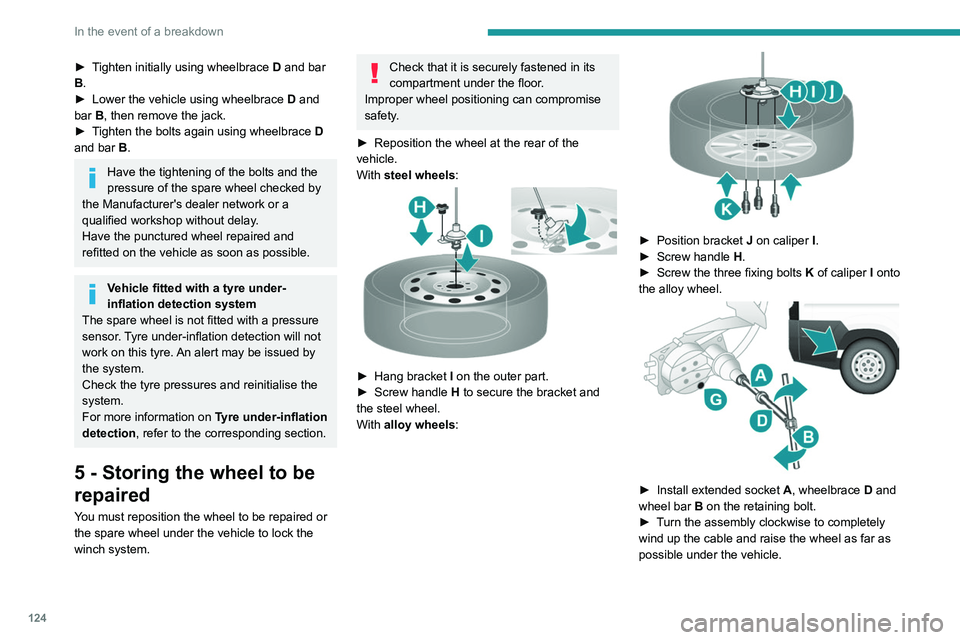
► Tighten initially using wheelbrace D and bar
B.
►
Lower the vehicle using wheelbrace D
and
bar B, then remove the jack.
►
T
ighten the bolts again using wheelbrace D
and bar B.
Have the tightening of the bolts and the
pressure of the spare wheel checked by
the Manufacturer's dealer network or a
qualified workshop without delay.
Have the punctured wheel repaired and
refitted on the vehicle as soon as possible.
Vehicle fitted with a tyre under-
inflation detection system
The spare wheel is not fitted with a pressure
sensor. Tyre under-inflation detection will not
work on this tyre. An alert may be issued by
the system.
Check the tyre pressures and reinitialise the
system.
For more information on Tyre under-inflation
detection, refer to the corresponding section.
5 - Storing the wheel to be
repaired
You must reposition the wheel to be repaired or
the spare wheel under the vehicle to lock the
winch system.
Check that it is securely fastened in its
compartment under the floor.
Improper wheel positioning can compromise
safety.
►
Reposition the wheel at the rear of the
vehicle.
With
steel wheels:
► Hang bracket I on the outer part.
► Screw handle H
to secure the bracket and
the steel wheel.
With alloy wheels:
► Position bracket J on caliper I .
► Screw handle H
.
►
Screw the three fixing bolts
K
of caliper I onto
the alloy wheel.
► Install extended socket A , wheelbrace D and
wheel bar B on the retaining bolt.
►
T
urn the assembly clockwise to completely
wind up the cable and raise the wheel as far as
possible under the vehicle.