2021 PEUGEOT BOXER remote start
[x] Cancel search: remote startPage 4 of 212

2
Contents
■
Overview
■
Eco-driving
1InstrumentsInstrument panel 8
Warning and indicator lamps 9
Indicators 13
Vehicle configuration (MODE) 15
Touch screen audio and multimedia system 21
Setting the date and time 21
Trip computer 22
Trip computer 22
2AccessKey 23
Remote control 23
Front doors 26
Sliding side door 26
Rear doors 27
Alarm 27
Electric windows 28
3Ease of use and comfortFront seats 30
Front bench seat 31
Rear seats 32
Rear bench seat 32
Steering wheel adjustment 33
Mirrors 34
Heating and Ventilation 35
Heating/Manual air conditioning 35
Automatic air conditioning 36
Heating (Electric) 37
Additional heating systems 39
Rear heating/air conditioning 39
Additional programmable heating 40
Front demist - defrost 42
Rear screen de-icing 42
Cab layout 43
Rear fittings 47
Exterior fittings 49
4Lighting and visibilityLighting control stalk 51
Direction indicators 51
LED daytime running lamps 51
Automatic headlamp dipping 52
Headlamp beam height adjustment 54
Wiper control stalk 54
Changing a wiper blade 55
5SafetyGeneral safety recommendations 56
Hazard warning lamps 56
Horn 56
Pedestrian horn (Electric) 57
Electronic stability control (ESC) 57
Seat belts 60
Airbags 62
Child seats 63
Deactivating the front passenger airbag 65
ISOFIX seats 66
Child lock 68
6DrivingDriving recommendations 69
Starting-switching off the engine 72
Battery standby system 73
Parking brake 74
Gearbox 74
Drive selector (Electric) 75
Gear shift indicator 75
Stop & Start 76
Hill start assist 77
Tyre under-inflation detection 78
Pneumatic suspension 79
Driving and manoeuvring aids - General
recommendations
80
Road signs recognition 82
Speed limiter 83
Cruise control - Specific recommendations 85
Cruise control 85
Lane departure warning system 86
Blind spot monitoring with trailer detection 89
Active Safety Brake with Collision Risk Alert and
Intelligent emergency braking assistance
90
Rear parking sensors 93
Reversing camera 94
7Practical informationFuel 96
Compatibility of fuels 97
Charging system (Electric) 97
Charging the traction battery (Electric) 101
Snow chains 103
Towing a trailer 104
Towbar with quickly detachable towball 104
Roof-mounted carrying system 107
Bonnet 107
Page 28 of 212
26
Access
Anti-intrusion security
When the vehicle is started, the system locks the
cab and load space doors automatically when
you reach approximately 12 mph (20 km/h).
If none of the doors is opened during the journey,
the locking remains active.
Activation/deactivation of the function
This function can be set using the MODE
button: select "ON" or "OFF" in the
"Autoclose" menu.
For more information on Vehicle
configuration (MODE) , refer to the
corresponding section.
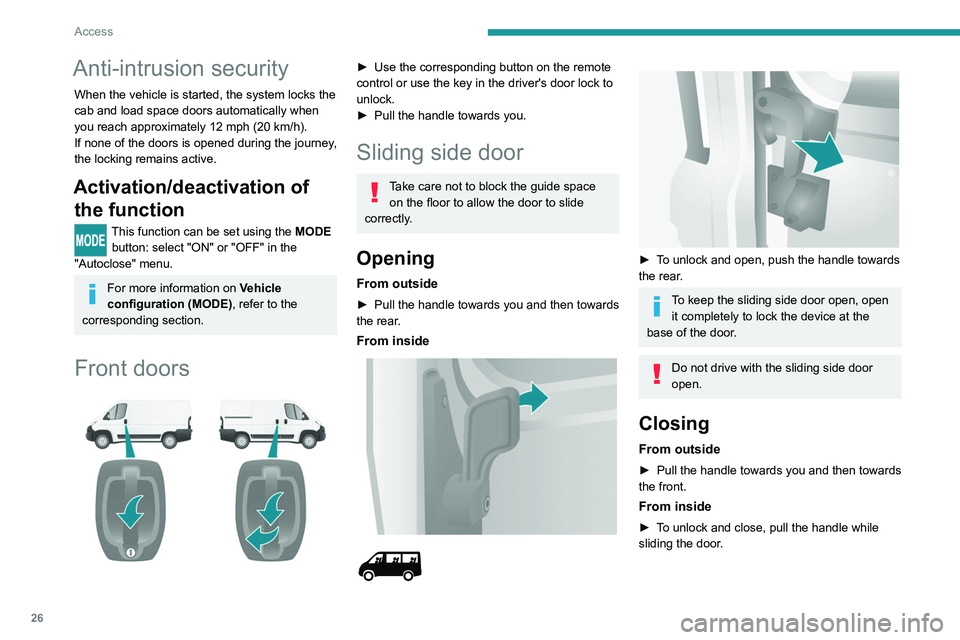
Front doors
► Use the corresponding button on the remote
control or use the key in the driver's door lock to
unlock.
►
Pull the handle towards you.
Sliding side door
Take care not to block the guide space on the floor to allow the door to slide
correctly.
Opening
From outside
► Pull the handle towards you and then towards
the rear .
From inside
► To unlock and open, push the handle towards
the rear.
To keep the sliding side door open, open it completely to lock the device at the
base of the door.
Do not drive with the sliding side door
open.
Closing
From outside
► Pull the handle towards you and then towards
the front.
From inside
► To unlock and close, pull the handle while
sliding the door.
Page 73 of 212

71
Driving
6If the outside temperature is high, let the
engine idle for 1 to 2 minutes after the
vehicle comes to a stop, to help it to cool.
Before setting off
Nose weight
► Distribute the load in the trailer so that the
heaviest items are located as close as possible
to the axle, and the nose weight (at the point
where it joins your vehicle) approaches the
maximum permitted, without exceeding it.
Tyres
► Check the tyre pressures of the towing
vehicle and of the trailer , observing the
recommended pressures.
Lighting
► Check the electrical signalling on the trailer
and the headlamp beam height of your vehicle.
If a genuine PEUGEOT towing device is
used, the rear parking sensors will be
deactivated automatically to avoid activating
the audible signal.
When driving
Cooling
Towing a trailer uphill causes the coolant
temperature to increase. The maximum towable
load depends on the gradient and the exterior temperature. The fan’s cooling capacity does not
increase with engine speed.
►
Reduce speed and lower the engine speed to
limit the amount of heating produced.
►
Pay constant attention to the coolant
temperature.
If this warning lamp and the STOP
warning lamp come on, stop the vehicle
and switch off the engine as soon as possible.
Brakes
Using the engine brake is recommended to limit
the overheating of the brakes. Braking distances
are increased when towing a trailer.
Side wind
Bear in mind that the vehicle will be more
susceptible to wind when towing.
Anti-theft protection
Electronic immobiliser
The keys contain an electronic immobiliser
device.
This device locks the engine supply system. It
activates automatically when the key is removed
from the ignition.
When the ignition switch is turned on, a dialogue
is set up between the key and the electronic
immobiliser.
This warning lamp goes off after the key has been recognised, the ignition is
switched on and the engine can be started.
If the key is not recognised, the engine
cannot be started. Use another key and
have the faulty key checked by a PEUGEOT
dealer.
Carefully note the key number. In case of
loss, the intervention of a PEUGEOT
dealer will be faster and more efficient if you
provide this number and the confidential card.
Do not make any modifications to the
electronic immobiliser system.
Operating the remote control, even in your
pocket, may cause the doors to be unlocked
accidentally.
The simultaneous use of other high-frequency
devices (mobile phones, home alarms, etc.),
may temporarily disturb the operation of the
remote control.
Except for reinitialisation, the remote control
cannot operate while the key is in the ignition
switch, even when the ignition is off.
Driving with the doors locked could make
it more difficult for the emergency
services to enter the vehicle in an emergency.
As a safety precaution (with children on
board), remove the key from the ignition when
leaving the vehicle, even for a short time.
Page 74 of 212
72
Driving
When purchasing a second-hand
vehicle:
–
check that you are in possession of the
confidential card,
–
have the keys memorised by a PEUGEOT
dealer, to be sure that the keys in your
possession are the only ones that allow the
vehicle to be started.
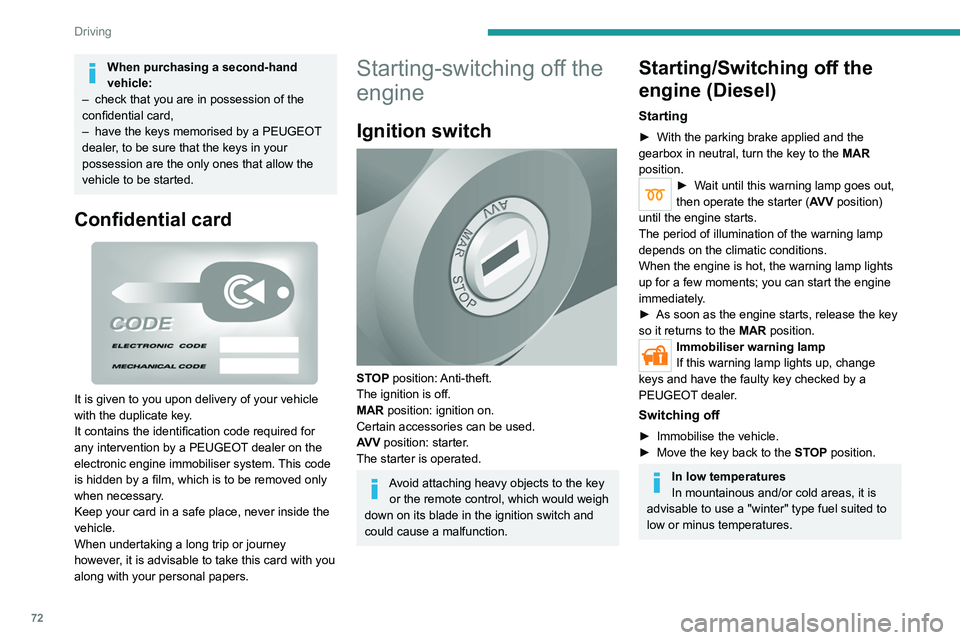
Confidential card
It is given to you upon delivery of your vehicle
with the duplicate key.
It contains the identification code required for
any intervention by a PEUGEOT dealer on the
electronic engine immobiliser system. This code
is hidden by a film, which is to be removed only
when necessary.
Keep your card in a safe place, never inside the
vehicle.
When undertaking a long trip or journey
however, it is advisable to take this card with you
along with your personal papers.
Starting-switching off the
engine
Ignition switch
STOP position: Anti-theft.
The ignition is off.
MAR position: ignition on.
Certain accessories can be used.
AV V position: starter.
The starter is operated.
Avoid attaching heavy objects to the key or the remote control, which would weigh
down on its blade in the ignition switch and
could cause a malfunction.
Starting/Switching off the
engine (Diesel)
Starting
► With the parking brake applied and the
gearbox in neutral, turn the key to the MAR
position.
► Wait until this warning lamp goes out,
then operate the starter (AV V position)
until the engine starts.
The period of illumination of the warning lamp
depends on the climatic conditions.
When the engine is hot, the warning lamp lights
up for a few moments; you can start the engine
immediately.
►
As soon as the engine starts, release the key
so it returns to the
MAR position.
Immobiliser warning lamp
If this warning lamp lights up, change
keys and have the faulty key checked by a
PEUGEOT dealer.
Switching off
► Immobilise the vehicle.
► Move the key back to the STOP position.
In low temperatures
In mountainous and/or cold areas, it is
advisable to use a "winter" type fuel suited to
low or minus temperatures.
Page 75 of 212
73
Driving
6Starting/Switching off the
motor (Electric)
Starting
► With the parking brake applied, turn the key
to the AV V position and then release it so it
returns to the MAR position.
The message "Go green" appears in the display
integrated into the rear view mirror.
►
Depress the brake pedal fully
, then press
button D (Drive) or R (Reverse) on the drive
selector.
The pedestrian horn comes on.
►
Release the parking brake.
If the electric motor does not start first time, turn
the key to the
STOP position and repeat the
procedure.
Do not depress the accelerator pedal
when switching on the ignition.
Switching off
► Press button N (Neutral) on the drive selector
and then apply the parking brake.
►
Move the key back to the
STOP position.
The parking brake must be applied each time the ignition is switched off.
If the parking brake is not applied, the
message "ENGAGE HANDBRAKE " appears
in the rear view mirror accompanied by an
audible signal lasting 10 seconds.
If the driver's door is opened with mode
D or R selected, the drive selector
automatically switches to mode N. The
message "DRIVE ACTIVE" is displayed in the
rear view mirror accompanied by an audible
signal.
Always remove the key from the ignition switch when the vehicle is parked in
order to avoid discharging the 12
V accessory
battery.
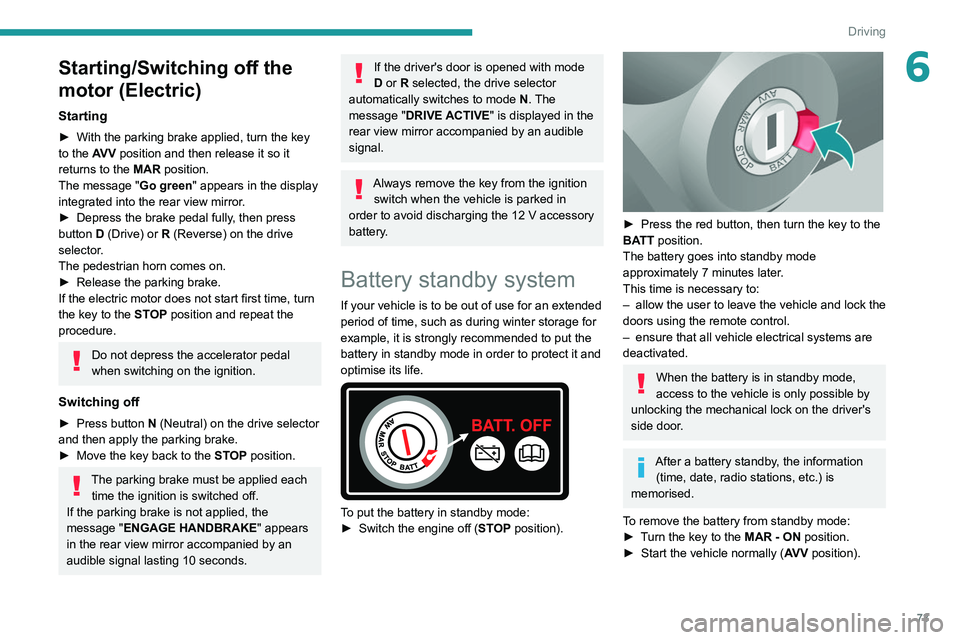
Battery standby system
If your vehicle is to be out of use for an extended
period of time, such as during winter storage for
example, it is strongly recommended to put the
battery in standby mode in order to protect it and
optimise its life.
To put the battery in standby mode:
► Switch the engine off ( ST
OP position).
► Press the red button, then turn the key to the
BA TT position.
The battery goes into standby mode
approximately 7 minutes later.
This time is necessary to:
–
allow the user to leave the vehicle and lock the
doors using the remote control.
–
ensure that all vehicle electrical systems are
deactivated.
When the battery is in standby mode,
access to the vehicle is only possible by
unlocking the mechanical lock on the driver's
side door.
After a battery standby, the information (time, date, radio stations, etc.) is
memorised.
To remove the battery from standby mode:
►
T
urn the key to the MAR - ON position.
►
Start the vehicle normally ( AV
V position).
Page 103 of 212
101
Practical information
7Charging the traction
battery (Electric)
To charge, connect the vehicle to a domestic
charging unit or a fast public charger (superfast
charging).
For a full charge, follow the desired charging
procedure without interrupting it, until it ends
automatically.
To stop charging at any time, press the locking
button on the remote control for 5 seconds
and remove the charging nozzle. For superfast
charging, also refer to the fast public charger.
The display of information linked to the charging
is integrated into the rear view mirror. For more
information on the Display integrated into the
rear view mirror , refer to the corresponding
section.
As a safety measure, the engine will not start if the charging cable is plugged into
the vehicle's charging connector.
Cooling the traction battery
The cooling fan in the engine
compartment comes on during charging to
cool the on-board charger and the traction
battery.
Balancing the traction battery voltage
After carrying out a full charge (100%)
at least once per week, we recommend not
using the vehicle for about 4 hours.
This time allows the voltage to balance across
all of the traction battery's cells (ensuring a
level voltage across all of its cells).
This process helps keep the traction battery in
good condition and aids in the calculation of
its charging level.
Completely discharged traction
battery
T
o preserve the lifespan of the traction battery
and avoid damaging it, make sure that it is
never completely discharged (0%).
When the charge level drops to 15%, the
message "LOW POWER MODE" appears
on the display integrated into the rear view
mirror. If this message appears while driving,
avoid heavy acceleration and charge the
vehicle as soon as possible.
Long-term parking
Before parking the vehicle for an
extended period, carry out a full charge of the
traction battery.
Park the vehicle in a place where the
temperature will be between 0°C and 45°C
(parking in a place which will experience
extreme temperatures can damage the
traction battery).
Disconnect the cable from the (-) terminal of
the 12
V accessory battery.
Check the level of charge in the traction
battery periodically and charge it if necessary.
When parking the vehicle for more than one
month, keep the level of charge above 50%.
When parking the vehicle for a very long
period, charge the vehicle every 2 months.
Do not leave the charging cable connected.
Lack of use of the traction battery temporarily
affects its performance. At the end of the
parking period, carry out several charge/
discharge cycles to restore the normal
operation of the traction battery.
Precautions
Our electric vehicles have been developed in
accordance with the recommendations on the
maximum limits for electromagnetic fields, as
issued by the International Commission on Non-
Ionizing Radiation Protection
(ICNIRP - 1998
Guidelines).
Wearers of pacemakers or equivalent
devices
Ask your doctor about what precautions you should take, or ask the manufacturer
of your implanted electro-medical device about
whether its operation is guaranteed in an
environment which complies with the ICNIRP
recommendations.
If in doubt
Accelerated charging: do not remain
inside or near the vehicle, or near the
charging cable or charging unit, even for a
short time.
Page 105 of 212
103
Practical information
7
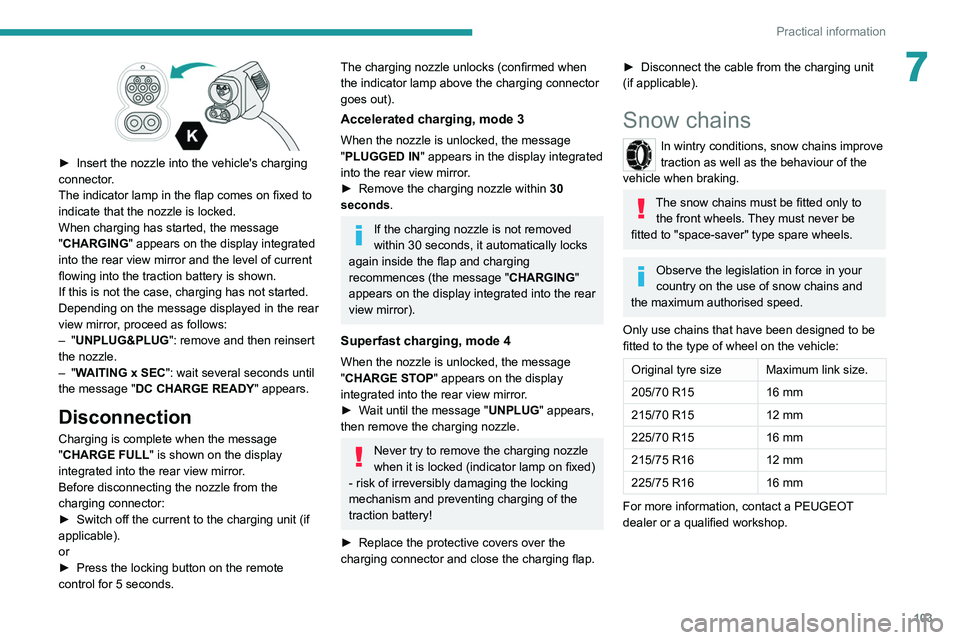
► Insert the nozzle into the vehicle's charging
connector .
The indicator lamp in the flap comes on fixed to
indicate that the nozzle is locked.
When charging has started, the message
"CHARGING" appears on the display integrated
into the rear view mirror and the level of current
flowing into the traction battery is shown.
If this is not the case, charging has not started.
Depending on the message displayed in the rear
view mirror, proceed as follows:
–
"UNPLUG&PLUG": remove and then reinsert
the nozzle.
–
"WAITING x SEC": wait several seconds until
the message "DC CHARGE READY " appears.
Disconnection
Charging is complete when the message
"CHARGE FULL" is shown on the display
integrated into the rear view mirror.
Before disconnecting the nozzle from the
charging connector:
►
Switch off the current to the charging unit (if
applicable).
or
►
Press the locking button on the remote
control for 5 seconds.
The charging nozzle unlocks (confirmed when
the indicator lamp above the charging connector
goes out).
Accelerated charging, mode 3
When the nozzle is unlocked, the message
"PLUGGED IN" appears in the display integrated
into the rear view mirror.
►
Remove the charging nozzle within 30
seconds
.
If the charging nozzle is not removed
within 30 seconds, it automatically locks
again inside the flap and charging
recommences (the message " CHARGING"
appears on the display integrated into the rear
view mirror).
Superfast charging, mode 4
When the nozzle is unlocked, the message
"CHARGE STOP" appears on the display
integrated into the rear view mirror.
►
W
ait until the message "UNPLUG" appears,
then remove the charging nozzle.
Never try to remove the charging nozzle
when it is locked (indicator lamp on fixed)
- risk of irreversibly damaging the locking
mechanism and preventing charging of the
traction battery!
►
Replace the protective covers over the
charging connector and close the charging flap.
► Disconnect the cable from the charging unit
(if applicable).
Snow chains
In wintry conditions, snow chains improve
traction as well as the behaviour of the
vehicle when braking.
The snow chains must be fitted only to the front wheels. They must never be
fitted to "space-saver" type spare wheels.
Observe the legislation in force in your
country on the use of snow chains and
the maximum authorised speed.
Only use chains that have been designed to be
fitted to the type of wheel on the vehicle:
Original tyre size Maximum link size.
205/70 R15 16 mm
215/70 R15 12 mm
225/70 R15 16 mm
215/75 R16 12 mm
225/75 R16 16 mm
For more information, contact a PEUGEOT
dealer or a qualified workshop.