2021 PEUGEOT BOXER fuel consumption
[x] Cancel search: fuel consumptionPage 8 of 212

6
Eco-driving
Eco-driving
Eco-driving refers to a range of everyday
practices that allow the motorist to optimise
the vehicle's energy consumption (fuel and/or
electricity) and CO
2 emissions.
Optimise your use of the gearbox
With a manual gearbox, move off gently and
change up promptly. While accelerating, change
up early.
The gear shift indicator prompts you to engage
the most suitable gear. Whenever this indication
is displayed on the instrument panel, follow it
straight away.
Drive smoothly
Maintain a safe distance between vehicles, use
engine braking rather than the brake pedal and
press the accelerator gradually. These practices
help to save on energy consumption, reduce
CO
2 emissions and decrease general traffic
noise.
If the vehicle has the steering-mounted
"CRUISE" control, use cruise control at speeds
above 19 mph (30
km/h) when the traffic is
flowing smoothly.
Control the use of electrical equipment
Before moving off, if the passenger compartment
is too warm, ventilate it by opening the windows
and air vents before using the air conditioning.
At speeds above 31
mph (50 km/h), close the
windows and leave the air vents open. Consider using equipment that can help keep
the temperature in the passenger compartment
down.
Unless automatically regulated, switch off the air
conditioning as soon as the desired temperature
has been reached.
Switch off the demisting and defrosting functions,
if they are not managed automatically.
Switch off the heated seat as soon as possible.
Adapt your use of the headlamps and/or
foglamps to the level of visibility, in accordance
with current legislation in the country in which
you are driving.
Avoid running the engine before moving off,
particularly in winter (other than in severe wintry
conditions: temperature below -23°C). The
vehicle will warm up much faster while driving.
As a passenger, avoid connecting your
multimedia devices (e.g.
film, music, video
game) to help reduce the consumption of energy.
Disconnect all portable devices before leaving
the vehicle.
Limit the causes of excess consumption
Spread loads throughout the vehicle.
Limit the loads carried in the vehicle and
minimise wind resistance (e.g.
roof bars, roof
rack, bicycle carrier, trailer). Preferably, use a
roof box.
Remove roof bars and roof racks after use.
At the end of winter, remove snow tyres and refit
summer tyres.
Comply with the servicing instructions
Check tyre pressures regularly, with the tyres
cold, referring to the label in the door aperture on
the driver's side.
Carry out this check in particular:
–
before a long journey
.
–
at each change of season.
–
after a long period out of use.
Do not forget the spare wheel and, where
applicable, the tyres on your trailer or caravan.
Have your vehicle serviced regularly (e.g.
engine
oil, oil filter, air filter, passenger compartment
filter, etc.). Observe the schedule of operations in
the manufacturer's service schedule.
With a BlueHDi Diesel engine, if the SCR system
has a fault, your vehicle will emit pollution. Visit
a PEUGEOT dealer or a qualified workshop
as soon as possible to restore your vehicle's
nitrogen oxide emissions to legal levels.
When filling the fuel tank, do not continue after
the third cut-out of the nozzle, to avoid overflow.
You will only see the fuel consumption of your
new vehicle settle down to a consistent average
after the first 1,900 miles (3,000 kilometres).
Optimising the driving range (Electric)
The vehicle’s electrical consumption depends
heavily on the route, the vehicle speed and your
driving style.
Drive smoothly and maintain a steady speed.
Anticipate the need to slow down and brake
smoothly, whenever possible using engine
braking.
Page 10 of 212

8
Instruments
Instrument panel
1.Speedometer (mph or km/h)
2. Display screen
3. Fuel gauge (Diesel)
4. Coolant temperature (Diesel)
5. Rev counter (rpm x 1,000) (Diesel)
Electric vehicles
The fuel gauge, coolant temperature
gauge and rev counter are inactive.
Level 1 display screen
In the lower part:
– Time.
–
Outside temperature.
–
Miles/Kilometres travelled. –
T
rip computer (range, consumption, etc.)
(Diesel).
–
Headlamp beam height.
–
Programmable overspeed alert.
–
Speed limiter or cruise control (Diesel).
–
Gear shift indicator (Diesel).
–
Stop & Start (Diesel).
In the upper part:
–
Date.
–
Service indicator
.
–
Alert messages.
–
Function status messages.
–
V
ehicle configuration.
Level 2 display screen
In the left-hand part:
–
Time.
–
Outside temperature,
–
W
arning or status lamps.
–
Speed limiter or cruise control (Diesel).
In the right-hand part:
–
Date.
–
Service indicator
.
–
T
rip computer (range, consumption, etc.)
(Diesel). –
Alert messages.
–
Function status messages.
–
V
ehicle configuration.
–
Headlamp beam height.
–
Miles/Kilometres travelled.
Brightness of the
instruments and controls
The brightness of the instruments and
controls can be adjusted using the MODE
button, with the sidelamps on.
For more information on Vehicle configuration
(MODE), refer to the corresponding section.
Display integrated into the
rear view mirror (Electric)
The interior rear view mirror contains a
dedicated display showing information about the
electrical system. It comes on when the ignition
is switched on and when the vehicle is being
charged.
Page 24 of 212
22
Instruments
► Select the "Time setting" menu to set the time
and the clock format (24h or 12h) or select the
"Date setting" menu to set the day, month and
year.
For more information on Vehicle configuration
(MODE), refer to the corresponding section.
Using the touch screen audio and
telematics system
From the "Clock and Date" sub-menu:
► Select "T ime setting and format" to set the
hour, minutes and seconds and choose the
format (24h, 12h with am or pm).
►
Select "Date setting" to set the day
, month
and year.
To set the time manually, "Time Synchro" must be deactivated (Off).
Trip computer
Information displayed about the current journey
(range, current fuel consumption, average fuel
consumption, etc.).
This function is not available on electric vehicles.
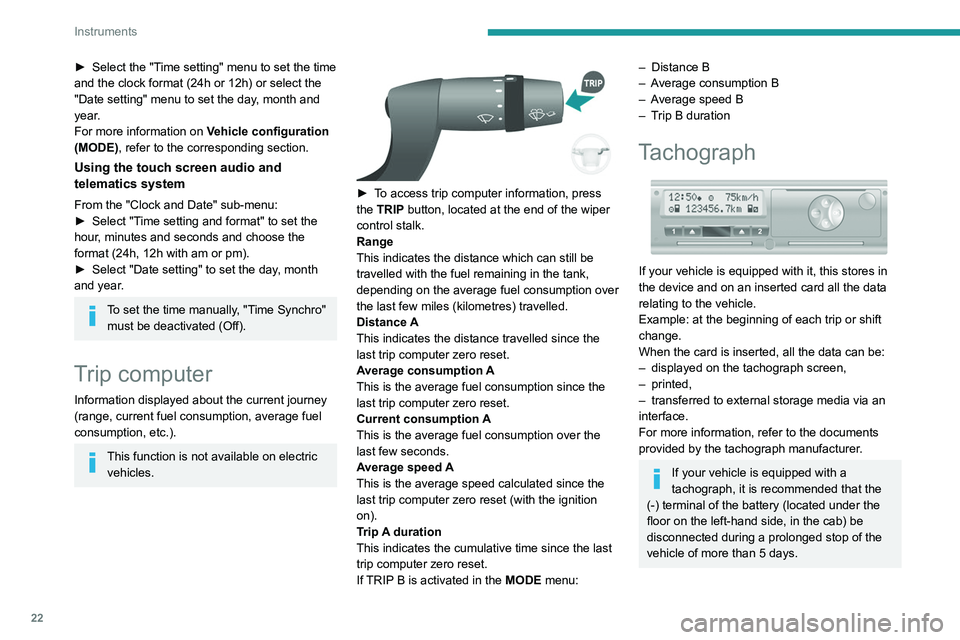
► To access trip computer information, press
the TRIP button, located at the end of the wiper
control stalk.
Range
This indicates the distance which can still be
travelled with the fuel remaining in the tank,
depending on the average fuel consumption over
the last few miles (kilometres) travelled.
Distance A
This
indicates the distance travelled since the
last trip computer zero reset.
Average consumption A
This is the average fuel consumption since the
last trip computer zero reset.
Current consumption A
This is the average fuel consumption over the
last few seconds.
Average speed A
This is the average speed calculated since the
last trip computer zero reset (with the ignition
on).
Trip A duration
This
indicates the cumulative time since the last
trip computer zero reset.
If TRIP B is activated in the MODE menu:
– Distance B
– A verage consumption B
–
A
verage speed B
–
T
rip B duration
Tachograph
If your vehicle is equipped with it, this stores in
the device and on an inserted card all the data
relating to the vehicle.
Example: at the beginning of each trip or shift
change.
When the card is inserted, all the data can be:
–
displayed on the tachograph screen,
–
printed,
–
transferred to external storage media via an
interface.
For more information, refer to the documents
provided by the tachograph manufacturer
.
If your vehicle is equipped with a
tachograph, it is recommended that the
(-) terminal of the battery (located under the
floor on the left-hand side, in the cab) be
disconnected
during a prolonged stop of the
vehicle of more than 5 days.
Page 44 of 212
42
Ease of use and comfort
The memorisation is confirmed by the
disappearance of the duration on the screen or
by pressing button 3 again.
Switching the heating off
In the event of a delayed start, the heating
switches off automatically at the end of the
programmed duration.
►
In the event of an immediate start, press
button
2 again to switch it off manually.
The heating cycle indicator lamp and the screen
switch off.
Have the additional heating checked at
least once a year at the beginning of
winter.
For maintenance and repairs, contact a
PEUGEOT dealer or a qualified workshop
only.
Only use approved replacement parts.
To avoid the risks of poisoning or asphyxia, the programmable heating
must not be used, even for short periods, in a
closed environment such as a garage or
workshop which is not equipped with an
exhaust gas extraction system.
The additional heating turns off when the
battery voltage is low, to allow the vehicle to
start.
The additional heating is supplied by the
vehicle fuel tank. Make sure the fuel gauge
level indicator is not in the reserve.
Always switch off the additional heating when
refuelling to avoid any risk of fire or explosion!
The temperature in the vicinity of the heater
must not exceed 120°C. A higher temperature
(e.g. in the case of oven painting) could
damage electronic circuits components.
The additional heating is equipped with a
thermal limiter which cuts off combustion in
case of engine overheating due to lack of
coolant. Check the level and top-up with fluid,
if necessary.
For more information on Checking levels,
refer to the corresponding section.
Then press the programme selection button
before turning on the heating again.
Front demist - defrost
These markings on the control panel indicate the control positions for rapid
demisting or defrosting of the windscreen and
side windows.
With manual air
conditioning
► Set the air flow and air distribution
controls to the appropriately marked
positions.
T
o make the windscreen de-icing and demisting
more efficient and faster:
►
increase the air flow setting,
► momentarily swi tch the exterior air
intake control to air recirculation.
With automatic air
conditioning
► Press this button. The indicator lamp
lights up.
The system manages the air conditioning, the air
flow and intake, the de-icing of the rear screen
and distributes air optimally to the windscreen
and front side windows.
If the vehicle is equipped with an additional
heating system, deactivate it to ensure fast and
efficient demisting / de-icing.
De-icing the rear screen
and/or door mirrors
► Press this button to activate/deactivate
demisting/de-icing of the rear screen and
door mirrors.
The indicator lamp illuminates
when the fonction is activated.
This function turns off automatically to prevent
excessive power consumption.
Rear screen demisting/de-icing can only
operate when the engine is running.
Page 77 of 212
75
Driving
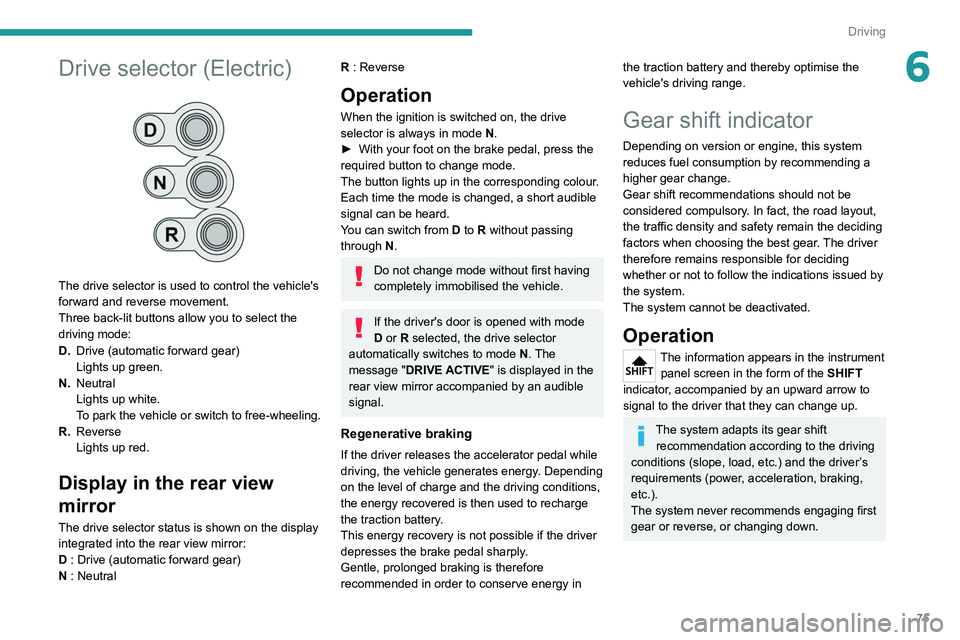
6Drive selector (Electric)
The drive selector is used to control the vehicle's
forward and reverse movement.
Three back-lit buttons allow you to select the
driving mode:
D.Drive (automatic forward gear)
Lights up green.
N. Neutral
Lights up white.
To park the vehicle or switch to free-wheeling.
R. Reverse
Lights up red.
Display in the rear view
mirror
The drive selector status is shown on the display
integrated into the rear view mirror:
D : Drive (automatic forward gear)
N : Neutral
R : Reverse
Operation
When the ignition is switched on, the drive
selector is always in mode N.
►
With your foot on the brake pedal, press the
required button to change mode.
The button lights up in the corresponding colour
.
Each time the mode is changed, a short audible
signal can be heard.
You can switch from D to R without passing
through N.
Do not change mode without first having
completely immobilised the vehicle.
If the driver's door is opened with mode
D or R selected, the drive selector
automatically switches to mode N. The
message "DRIVE ACTIVE" is displayed in the
rear view mirror accompanied by an audible
signal.
Regenerative braking
If the driver releases the accelerator pedal while
driving, the vehicle generates energy. Depending
on the level of charge and the driving conditions,
the energy recovered is then used to recharge
the traction battery.
This energy recovery is not possible if the driver
depresses the brake pedal sharply.
Gentle, prolonged braking is therefore
recommended in order to conserve energy in
the traction battery and thereby optimise the
vehicle's driving range.
Gear shift indicator
Depending on version or engine, this system
reduces fuel consumption by recommending a
higher gear change.
Gear shift recommendations should not be
considered compulsory. In fact, the road layout,
the traffic density and safety remain the deciding
factors when choosing the best gear. The driver
therefore remains responsible for deciding
whether or not to follow the indications issued by
the system.
The system cannot be deactivated.
Operation
The information appears in the instrument panel screen in the form of the SHIFT
indicator, accompanied by an upward arrow to
signal to the driver that they can change up.
The system adapts its gear shift recommendation according to the driving
conditions (slope, load, etc.) and the driver’s
requirements (power, acceleration, braking,
etc.).
The system never recommends engaging first
gear or reverse, or changing down.
Page 78 of 212

76
Driving
Stop & Start
The Stop & Start function puts the engine temporarily into standby - STOP mode - during
phases when the vehicle is stopped (red lights,
queues, etc.). The engine restarts automatically
- START mode - as soon as the driver wishes to
move off again.
Primarily designed for urban use, the function
is intended to reduce fuel consumption and
exhaust emissions as well as the noise level
when stationary.
The function does not affect the functionalities of
the vehicle, in particular the braking.
Deactivation/Reactivation
The function is activated by default when the
ignition is switched on.
To deactivate/reactivate the function:
► Press the button.
A message in the instrument panel confirms the
change of status.
When the function is deactivated, the indicator
lamp is lit; if the engine was in standby, it restarts
immediately.
To allow continuous operation of the air conditioning, deactivate the Stop & Start.
Opening the bonnet
Before doing anything under the bonnet,
deactivate the Stop & Start system to avoid
any risk of injury caused by the engine
restarting automatically.
Driving on flooded roads
Before entering into a flooded area, it is
strongly recommended that you deactivate
the Stop & Start system.
For more information on Driving
recommendations, particularly on flooded
roads, refer to the corresponding section.
Going into engine STOP
mode
With the vehicle stationary, place the gear lever
in neutral and release the clutch pedal.
This indicator lamp comes on in the instrument panel and the engine goes into
standby.
Automatic engine shutdown is only possible when the speed of the vehicle
has exceeded 6 mph (10 km/h), to avoid
repeated engine shutdowns when driving
slowly.
Never leave the vehicle without first
switching the ignition off with the key.
Never refuel with the engine in STOP
mode; you must switch off the ignition
using the key.
Special cases: STOP mode
not available
STOP mode is not activated when:
– the system is initialising,
–
the driver's door is open,
–
the driver's seat belt is not fastened,
–
the air conditioning is on,
–
the rear screen demisting is on,
–
the windscreen wipers are on fast wipe,
–
the reverse gear is engaged for the parking
manoeuvre,
–
some special conditions (battery charge,
engine temperature, particle filter regeneration,
braking assistance, exterior temperature, etc.)
Page 115 of 212
11 3
Practical information
7Manual gearbox
The gearbox does not require any maintenance (no oil change).
Brake pads
Brake wear depends on the style of
driving, particularly in the case of vehicles
used in town, over short distances. It may be
necessary to have the condition of the brakes
checked, even between vehicle services.
Unless there is a leak in the circuit, a drop in the
brake fluid level indicates that the brake pads
are worn.
If this warning lamp comes on, have the
brake pads checked by a PEUGEOT
dealer or a qualified workshop.
After washing the vehicle, moisture, or in wintry conditions, ice can form on the
brake discs and pads: braking efficiency may
be reduced. Gently dab the brakes to dry and
defrost them.
Brake disc wear
For information on checking brake disc
wear, contact a PEUGEOT dealer or a
qualified workshop.
Manual parking brake
If you notice excessive brake lever travel
or decreased effectiveness, the parking brake must be adjusted, even between two
services.
This system must be checked by a PEUGEOT
dealer or a qualified workshop.
Diesel fuel filter
The Diesel fuel filter is located in the engine
compartment near the brake fluid reservoir.
If this warning lamp comes on, bleed the
filter.
You can also bleed it regularly at each engine oil
change.
Bleeding the water in the filter
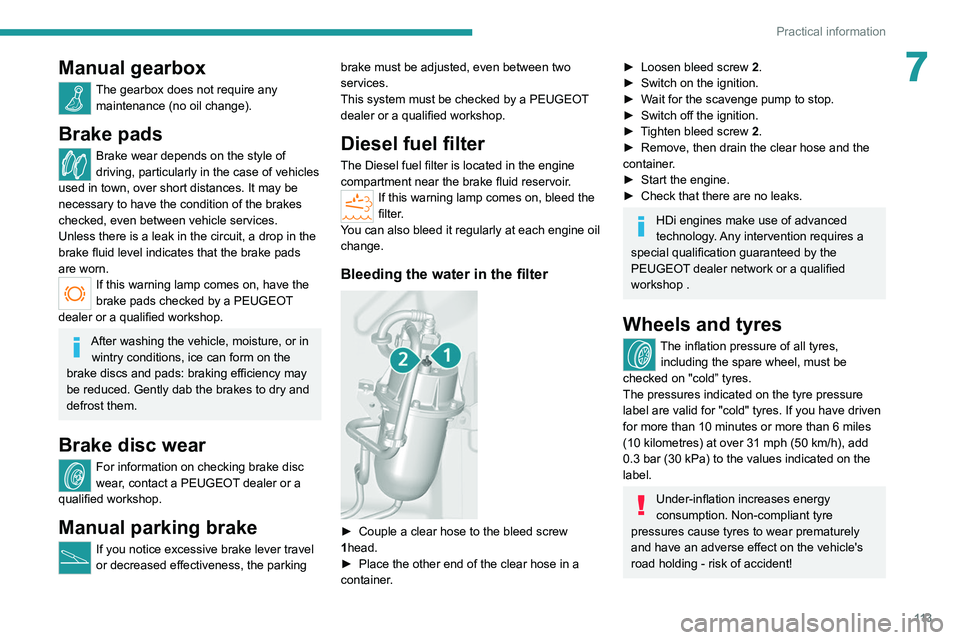
► Couple a clear hose to the bleed screw
1 head.
►
Place the other end of the clear hose in a
container
.
► Loosen bleed screw 2 .
► Switch on the ignition.
►
W
ait for the scavenge pump to stop.
►
Switch off the ignition.
►
T
ighten bleed screw 2.
►
Remove, then drain the clear hose and the
container
.
►
Start the engine.
►
Check that there are no leaks.
HDi engines make use of advanced
technology. Any intervention requires a
special qualification guaranteed by the
PEUGEOT
dealer network or a qualified
workshop .
Wheels and tyres
The inflation pressure of all tyres, including the spare wheel, must be
checked on "cold” tyres.
The pressures indicated on the tyre pressure
label are valid for "cold" tyres. If you have driven
for more than 10 minutes or more than 6 miles
(10 kilometres) at over 31 mph (50
km/h), add
0.3 bar (30 kPa) to the values indicated on the
label.
Under-inflation increases energy
consumption. Non-compliant tyre
pressures cause tyres to wear prematurely
and have an adverse effect on the vehicle's
road holding - risk of accident!
Page 116 of 212
11 4
Practical information
Driving with worn or damaged tyres reduces the
braking and road holding performance of the
vehicle. Regularly check the condition of the
tyres (tread and sidewalls) and rims as well as
the presence of the valve caps.
When the wear indicators no longer appear set
back from the tread, the depth of the grooves is
less than 1.6 mm; replace the tyres as soon as
possible.
Using different size wheels and tyres from those
specified can affect the lifetime of tyres, wheel
rotation, ground clearance, the speedometer
reading and have an adverse effect on road
holding.
Fitting different tyres on the front and rear axles
can cause the ESC to mistime.
Always mark the direction of rotation on the tyres
that will be stored when fitting winter or summer
tyres. Store them in a cool, dry place and away
from direct exposure to the sun's rays.
Winter or 4-seasons tyres can be
identified by this symbol on their
sidewalls.
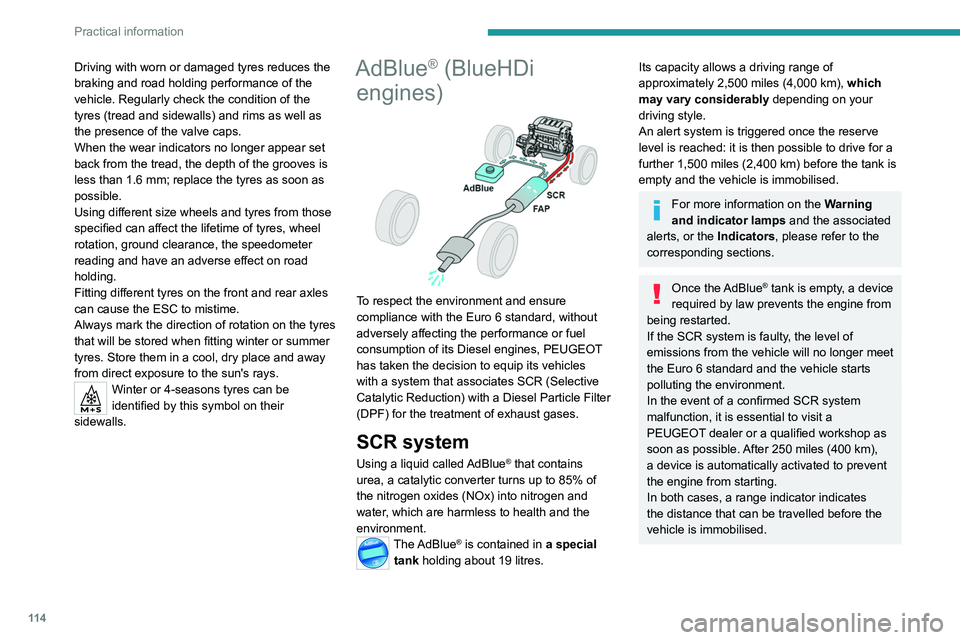
AdBlue® (BlueHDi
engines)
To respect the environment and ensure
compliance with the Euro 6 standard, without
adversely affecting the performance or fuel
consumption of its Diesel engines, PEUGEOT
has taken the decision to equip its vehicles
with a system that associates SCR (Selective
Catalytic Reduction) with a Diesel Particle Filter
(DPF) for the treatment of exhaust gases.
SCR system
Using a liquid called AdBlue® that contains
urea, a catalytic converter turns up to 85% of
the nitrogen oxides (NOx) into nitrogen and
water, which are harmless to health and the
environment.
The AdBlue® is contained in a special
tank holding about 19 litres.
Its capacity allows a driving range of
approximately 2,500 miles (4,000 km), which
may vary considerably depending on your
driving style.
An alert system is triggered once the reserve
level is reached: it is then possible to drive for a
further 1,500 miles (2,400
km) before the tank is
empty and the vehicle is immobilised.
For more information on the Warning
and indicator lamps and the associated
alerts, or the Indicators, please refer to the
corresponding sections.
Once the AdBlue® tank is empty, a device
required by law prevents the engine from
being restarted.
If the SCR system is faulty, the level of
emissions from the vehicle will no longer meet
the Euro 6 standard and the vehicle starts
polluting the environment.
In the event of a confirmed SCR system
malfunction, it is essential to visit a
PEUGEOT dealer or a qualified workshop as
soon as possible. After 250 miles (400 km),
a device is automatically activated to prevent
the engine from starting.
In both cases, a range indicator indicates
the distance that can be travelled before the
vehicle is immobilised.