Page 126 of 212
124
In the event of a breakdown
► Tighten initially using wheelbrace D and bar
B.
►
Lower the vehicle using wheelbrace D
and
bar B, then remove the jack.
►
T
ighten the bolts again using wheelbrace D
and bar B.
Have the tightening of the bolts and the
pressure of the spare wheel checked by
the Manufacturer's dealer network or a
qualified workshop without delay.
Have the punctured wheel repaired and
refitted on the vehicle as soon as possible.
Vehicle fitted with a tyre under-
inflation detection system
The spare wheel is not fitted with a pressure
sensor. Tyre under-inflation detection will not
work on this tyre. An alert may be issued by
the system.
Check the tyre pressures and reinitialise the
system.
For more information on Tyre under-inflation
detection, refer to the corresponding section.
5 - Storing the wheel to be
repaired
You must reposition the wheel to be repaired or
the spare wheel under the vehicle to lock the
winch system.
Check that it is securely fastened in its
compartment under the floor.
Improper wheel positioning can compromise
safety.
►
Reposition the wheel at the rear of the
vehicle.
With
steel wheels:
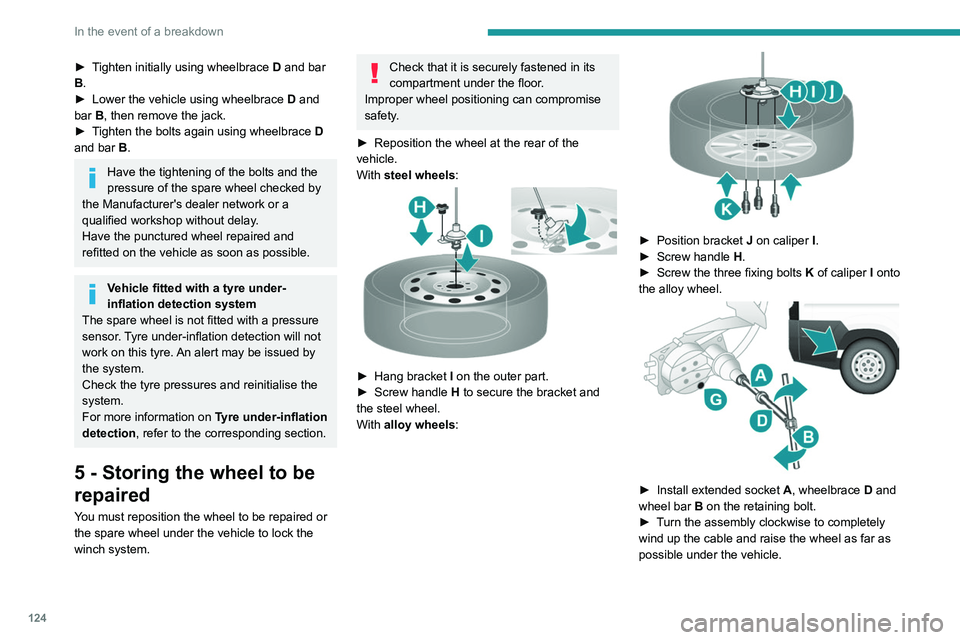
► Hang bracket I on the outer part.
► Screw handle H
to secure the bracket and
the steel wheel.
With alloy wheels:
► Position bracket J on caliper I .
► Screw handle H
.
►
Screw the three fixing bolts
K
of caliper I onto
the alloy wheel.
► Install extended socket A , wheelbrace D and
wheel bar B on the retaining bolt.
►
T
urn the assembly clockwise to completely
wind up the cable and raise the wheel as far as
possible under the vehicle.
Page 127 of 212
125
In the event of a breakdown
8► Check that the wheel is flat against the floor
of the vehicle and that the notch G
of the winch
is visible.
►
Store the tools and the wheel trim (depending
on version).
For more information on
the Identification markings of the
vehicle, and in particular the tyre pressure
label, refer to the corresponding section.
Changing a bulb
The headlamps have polycarbonate lenses with a protective coating:
►
do not clean them using a dry or
abrasive cloth, nor with a detergent or
solvent product,
►
use a sponge and soapy water or a pH
neutral product,
►
when using a high pressure washer on
persistent marks, do not keep the lance
directed towards the lamps or their edges for
too long, so as not to damage their protective
coating and seals.
Changing a bulb must only be done with
the ignition off and after the lamp has
been switched off for several minutes - Risk
of serious burns!
►
Do not touch the bulb directly with your
fingers, use a lint-free cloth.
It is essential only to use anti-ultraviolet
(UV) type bulbs, so as not to damage the
headlamp.
Always replace a failed bulb with a new bulb
with the same type and specification.
In some weather conditions (e.g. low
temperature or humidity), the presence
of misting on the internal surface of the glass
of the headlamps and rear lamps is normal; it
disappears after the lamps have been on for a
few minutes.
Types of bulb
Various types of bulb are fitted on the vehicle. To
remove them:
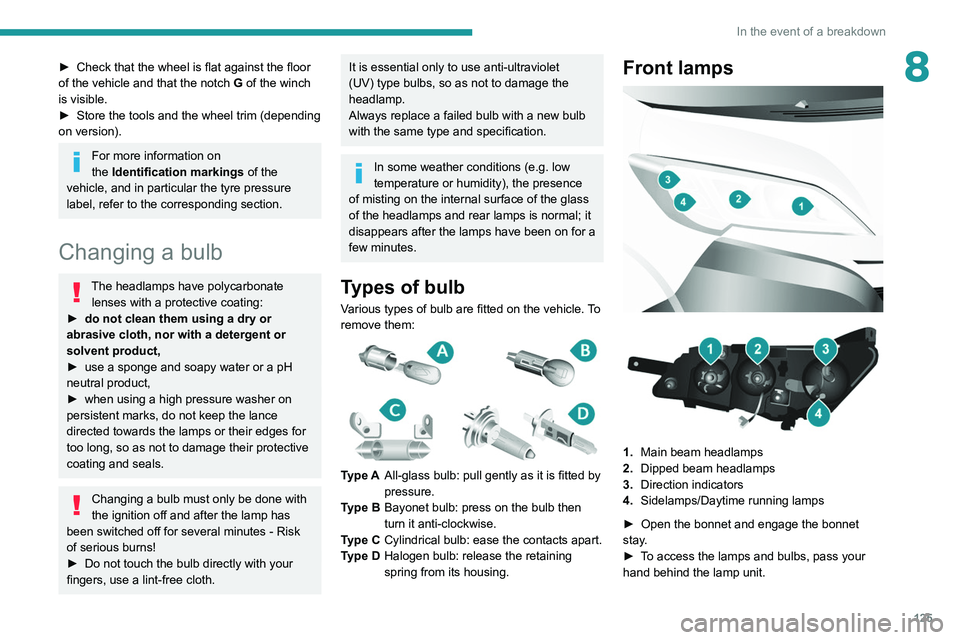
Type A All-glass bulb: pull gently as it is fitted by
pressure.
Type B Bayonet bulb: press on the bulb then
turn it anti-clockwise.
Type C Cylindrical bulb: ease the contacts apart.
Type D Halogen bulb: release the retaining
spring from its housing.
Front lamps
1. Main beam headlamps
2. Dipped beam headlamps
3. Direction indicators
4. Sidelamps/Daytime running lamps
►
Open the bonnet and engage the bonnet
stay
.
►
T
o access the lamps and bulbs, pass your
hand behind the lamp unit.
Page 128 of 212
126
In the event of a breakdown
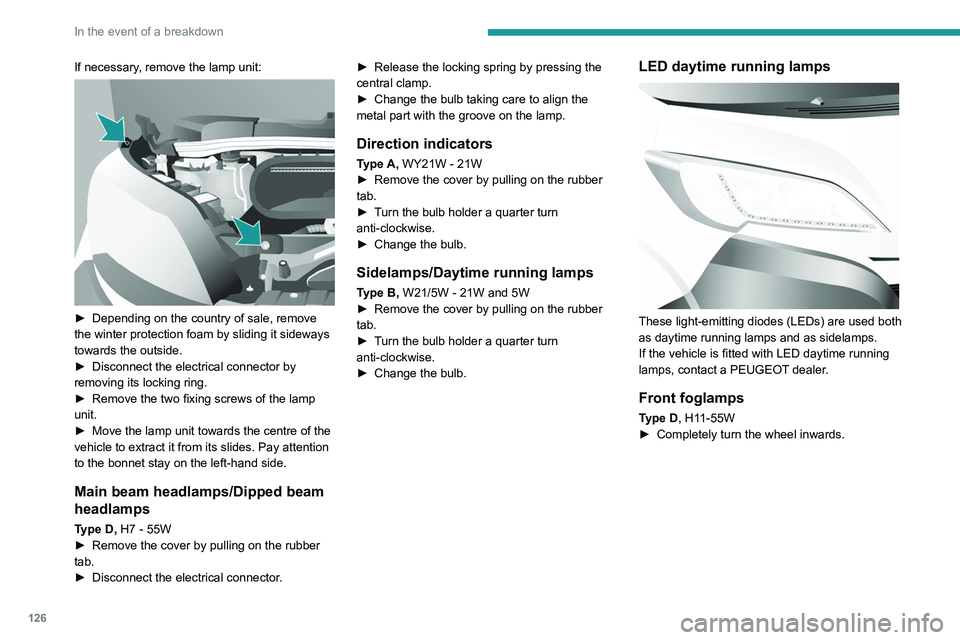
If necessary, remove the lamp unit:
► Depending on the country of sale, remove
the winter protection foam by sliding it sideways
towards the outside.
►
Disconnect the electrical connector by
removing its locking ring.
►
Remove the two fixing screws of the lamp
unit.
►
Move the lamp unit towards the centre of the
vehicle to extract it from its slides. Pay attention
to the bonnet stay on the left-hand side.
Main beam headlamps/Dipped beam
headlamps
Type D, H7 - 55W
► Remove the cover by pulling on the rubber
tab.
►
Disconnect the electrical connector
.►
Release the locking spring by pressing the
central clamp.
►
Change the bulb taking care to align the
metal part with the groove on the lamp.
Direction indicators
Type A, WY21W - 21W
► Remove the cover by pulling on the rubber
tab.
►
T
urn the bulb holder a quarter turn
anti-clockwise.
►
Change the bulb.
Sidelamps/Daytime running lamps
Type B, W21/5W - 21W and 5W
► Remove the cover by pulling on the rubber
tab.
►
T
urn the bulb holder a quarter turn
anti-clockwise.
►
Change the bulb.
LED daytime running lamps
These light-emitting diodes (LEDs) are used both
as daytime running lamps and as sidelamps.
If the vehicle is fitted with LED daytime running
lamps, contact a PEUGEOT dealer.
Front foglamps
Type D, H11-55W
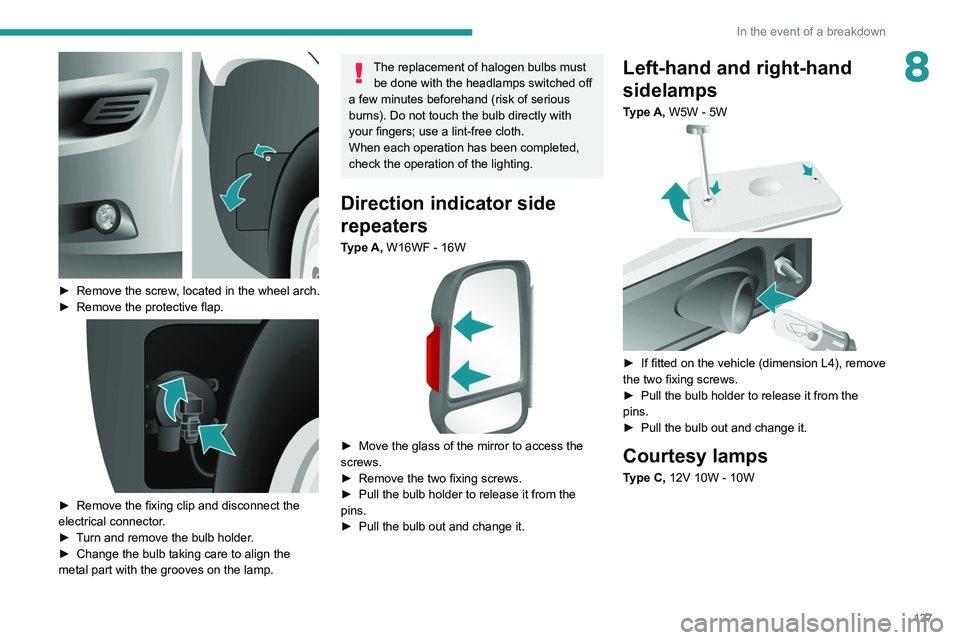
► Completely turn the wheel inwards.
Page 129 of 212
127
In the event of a breakdown
8
► Remove the screw, located in the wheel arch.
► Remove the protective flap.
► Remove the fixing clip and disconnect the
electrical connector .
►
T
urn and remove the bulb holder.
►
Change the bulb taking care to align the
metal part with the grooves on the lamp.
The replacement of halogen bulbs must be done with the headlamps switched off
a few minutes beforehand (risk of serious
burns). Do not touch the bulb directly with
your fingers; use a lint-free cloth.
When each operation has been completed,
check the operation of the lighting.
Direction indicator side
repeaters
Type A, W16WF - 16W
► Move the glass of the mirror to access the
screws.
►
Remove the two fixing screws.
►
Pull the bulb holder to release it from the
pins.
►
Pull the bulb out and change it.
Left-hand and right-hand
sidelamps
Type A, W5W - 5W
► If fitted on the vehicle (dimension L4), remove
the two fixing screws.
►
Pull the bulb holder to release it from the
pins.
►
Pull the bulb out and change it.
Courtesy lamps
Type C, 12V 10W - 10W
Page 135 of 212
133
In the event of a breakdown
8Ensure that the weight of the towing vehicle is
higher than that of the towed vehicle.
The driver must remain at the wheel of the
towed vehicle and must have a valid driving
licence.
When towing a vehicle with all four wheels on
the ground, always use an approved towing
arm; rope and straps are prohibited.
The towing vehicle must move off gently.
When the vehicle is towed with its engine
off, there is no longer braking and steering
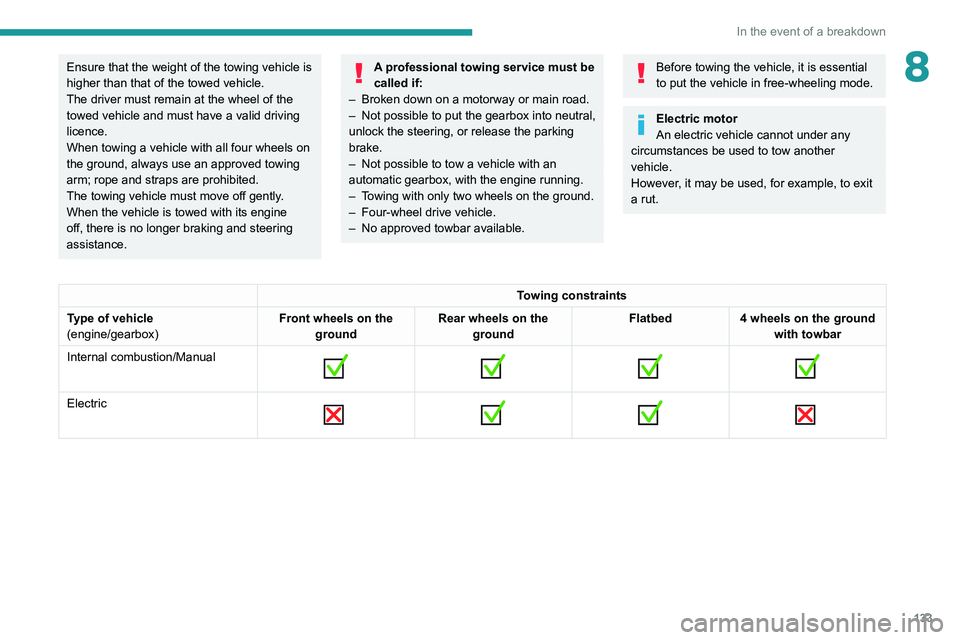
assistance.A professional towing service must be
called if:
–
Broken down on a motorway or main road.
–
Not possible to put
the gearbox into neutral,
unlock the steering, or release the parking
brake.
–
Not possible to tow a vehicle with an
automatic gearbox, with the engine running.
–
T
owing with only two wheels on the ground.
–
Four-wheel drive vehicle.
–
No approved towbar available.
Before towing the vehicle, it is essential
to put the vehicle in free-wheeling mode.
Electric motor
An electric vehicle cannot under any
circumstances be used to tow another
vehicle.
However, it may be used, for example, to exit
a rut.
Towing constraints
Type of vehicle
(engine/gearbox) Front wheels on the
ground Rear wheels on the
ground Flatbed
4 wheels on the ground
with towbar
Internal combustion/Manual
Electric
Page 143 of 212
141
Technical data
9Dimensions
Dimension values are given in millimetres.
Va n
Your vehicle comes in 4 lengths (L1, etc.) and 3 heights (H1, etc.):
L1 L2L3L4
H1 H2 H1 H2 H2 H3 H2 H3
L Overall length 4,9635,4135,9986,363
H Overall height 2,254 2,524 2,254 2,524 2,524 2,764 2,524 2,764
A Wheelbase 3,0003,450 4,035
Page 144 of 212
142
Technical data
L1L2L3L4
H1 H2 H1 H2 H2 H3 H2 H3
B Front overhang 948
C Rear overhang 1,0151,380
D Width (with/without mirrors) 2,508/2,050
E Front track width 1,810
F Rear track
width 1,790
G Loading sill height 535 to 565
I Interior floor length 2,6703,1203,7054,070
J Maximum interior load height 1,662 1,932 1,662 1,932 1,932 2,172 1,932 2,172
K Maximum interior width 1,870
M Interior width between wheel arches 1,422
Volume (m
3) 8 9.510 11.5 13 15 15 17
Page 153 of 212
151
Special features
10L1L2L2S L3L4
A Wheelbase 3,000 3,450 3,800 4,035 4,035
B Front overhang 948
C Rear overhang 9601,325
D Width (with/without mirrors) 2,508/2,050
- Buildable width 2,207
- Maximum buildable width 2,350
E Front track width 1,810
- Rear track
width 1,790
- Increased rear track width 1,980
F Overall height 2,254
- Maximum buildable height 3,500