2021 PEUGEOT BOXER door lock
[x] Cancel search: door lockPage 118 of 212

11 6
Practical information
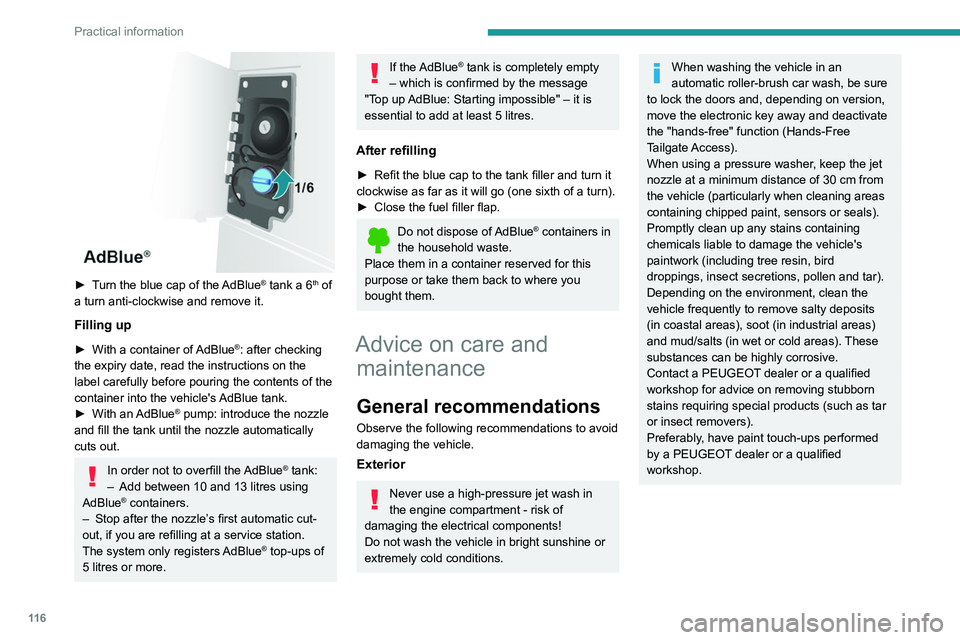
► Turn the blue cap of the AdBlue® tank a 6th of
a turn anti-clockwise and remove it.
Filling up
► With a container of AdBlue®: after checking
the expiry date, read the instructions on the
label carefully before pouring the contents of the
container
into the vehicle's AdBlue tank.
►
With an
AdBlue® pump: introduce the nozzle
and fill the tank until the nozzle automatically
cuts out.
In order not to overfill the AdBlue® tank:
–
Add between 10 and 13 litres using
AdBlue® containers.
–
Stop after the nozzle’ s first automatic cut-
out, if you are refilling at a service station.
The system only registers AdBlue
® top-ups of
5
litres or more.
If the AdBlue® tank is completely empty
– which is confirmed by the message
"Top up
AdBlue: Starting impossible" – it is
essential to add at least 5 litres.
After refilling
► Refit the blue cap to the tank filler and turn it
clockwise as far as it will go (one sixth of a turn).
►
Close the fuel filler flap.
Do not dispose of AdBlue® containers in
the household waste.
Place them in a container reserved for this
purpose or take them back to where you
bought them.
Advice on care and maintenance
General recommendations
Observe the following recommendations to avoid
damaging the vehicle.
Exterior
Never use a high-pressure jet wash in
the engine compartment - risk of
damaging the electrical components!
Do not wash the vehicle in bright sunshine or
extremely cold conditions.
When washing the vehicle in an
automatic roller-brush car wash, be sure
to lock the doors and, depending on version,
move the electronic key away and deactivate
the "hands-free" function (Hands-Free
Tailgate Access).
When using a pressure washer, keep the jet
nozzle at a minimum distance of 30 cm from
the vehicle (particularly when cleaning areas
containing chipped paint, sensors or seals).
Promptly clean up any stains containing
chemicals liable to damage the vehicle's
paintwork (including tree resin, bird
droppings, insect secretions, pollen and tar).
Depending on the environment, clean the
vehicle frequently to remove salty deposits
(in coastal areas), soot (in industrial areas)
and mud/salts (in wet or cold areas). These
substances can be highly corrosive.
Contact a PEUGEOT dealer or a qualified
workshop for advice on removing stubborn
stains requiring special products (such as tar
or insect removers).
Preferably, have paint touch-ups performed
by a PEUGEOT dealer or a qualified
workshop.
Page 130 of 212

128
In the event of a breakdown
Front/Rear
► Press the points indicated by the arrows, then
remove the courtesy lamp.
►
Open the protective flap.
►
Remove the bulb by separating the two
contacts.
►
Check that the new bulbs are securely held
between the two contacts.
►
Close the protective flap.
►
Fix the courtesy lamp in its housing and
make sure it is locked.
Rear lamps
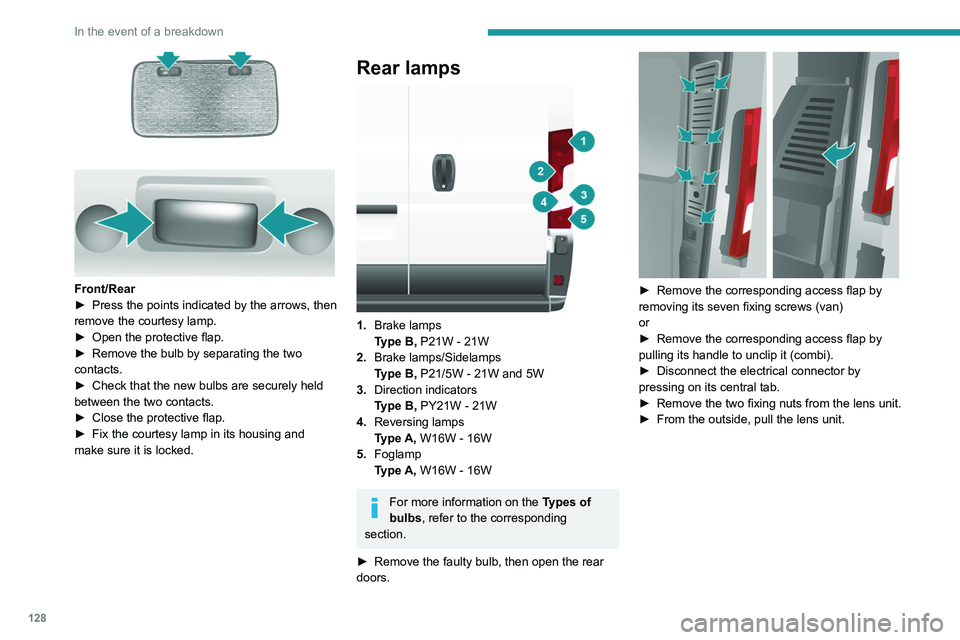
1. Brake lamps
Type B, P21W - 21W
2. Brake lamps/Sidelamps
Type B, P21/5W - 21W and 5W
3. Direction indicators
Type B, PY21W - 21W
4. Reversing lamps
Type A, W16W - 16W
5. Foglamp
Type A, W16W - 16W
For more information on the Types of
bulbs, refer to the corresponding
section.
►
Remove the faulty bulb, then open the rear
doors.
► Remove the corresponding access flap by
removing its seven fixing screws (van)
or
►
Remove the corresponding access flap by
pulling its handle to unclip it (combi).
►
Disconnect the electrical connector by
pressing on its central tab.
►
Remove the two fixing nuts from the lens unit.
►
From the outside, pull the lens unit.
Page 133 of 212

131
In the event of a breakdown
8Disconnecting the battery
► Tilt lever 1 downwards to release the
terminals.
►
Remove terminals
2
from the negative (-)
terminal.
Wait approximately 6 minutes after
switching off the ignition before
disconnecting the battery.
Do not disconnect the terminals while the
engine is running.
Do not charge a battery without disconnecting
the terminals first.
Close the windows and the doors before
disconnecting the battery.
After reconnecting the battery, turn on the
ignition and wait 1 minute before starting the
engine, to enable the electronic systems to
initialise. If minor problems nevertheless persist
following this operation, contact a PEUGEOT
dealer or a qualified workshop.
It is recommended to disconnect the (-)
terminal of the battery if the vehicle is to
be left unused for more than one month.
The description of the battery charging
procedure is only indicative.
After prolonged battery disconnection, it may be
necessary to reinitialise the following functions:
–
the display parameters (date, time, language,
distance and temperature units),
–
the stations of the audio system,
–
the central locking.
Some settings are cancelled and must be
entered once again; contact a PEUGEOT
dealer.
If the vehicle is equipped with a tachograph or
an alarm,
it is recommended that the (-) terminal
of the battery (located under the floor on the
left-hand side, in the cab) be disconnected if the
vehicle is not going to be used for more than 5
days.
Starting using another
battery
Never start the engine by connecting a
battery charger.
Never use a 24 V or higher battery booster.
Check beforehand that the backup battery
has a nominal voltage of 12 V and a capacity
at least equal to that of the discharged
battery.
The two vehicles must not be in contact with
each other.
Switch off all electricity-consuming equipment
on both vehicles (audio system, wipers,
lighting, etc.).
Make sure that the jump leads are well away
from the engine’s moving parts (fan, belt,
etc.).
Do not disconnect the (+) terminal while the
engine is running.
Starting the engine using another battery is to be
performed inside the engine compartment.
►
Open the bonnet.
A. Positive metallic terminal on the vehicle
B. Backup battery
C. Vehicle earth point
The positive metallic terminal A is accessible
through a flap located on the side of the fuse
box.
Page 181 of 212

179
Touch screen audio and telematics system
12Press the "Contacts" button or the
"Recent calls" button.
Select the desired contact from the list offered to
start the call.
Vehicle information
Press "MORE" to display the vehicle
information menus:
Exterior temp.
Display the exterior temperature.
Clock
Display
the clock.
Compass
Display
the direction that you are travelling in.
Trip
–
Current info., T
rip A, Trip B.
Display the trip computer.
Press and hold the "Trip A" or "Trip B" button to
reset the trip concerned.
Settings
Press this button to display the settings
menus:
Display
–
Brightness
.
–
Set the brightness of the screen.
–
Display mode
.
–
Set the display mode.
–
Language
.
–
Choose the desired language.
–
Unit of measurement
. –
Set the display units for consumption,
distance
and temperature.
–
T
ouch screen beep.
–
Activate or deactivate the audible signal when
touching a button on the screen.
–
Display T
rip B.
–
Display
Trip B on the driver's screen.
Voice commands
–
V
oice response time.
–
Set the length of the voice system response.
–
Display list of commands
.
–
Display suggestions with the different options
during a voice session.
Clock and Date
–
T
ime setting and format.
–
Setting the time.
–
Display time mode
.
–
Activate or deactivate the display of the digital
clock on the status bar
.
–
Synchro time
.
–
Activate or deactivate the automatic time
display
.
– Date setting .
– Set the date.
Safety/Assistance
–
Reversing camera.
–
Display the reversing camera in reverse.
–
Camera delay.
–
Maintain the on-screen display of the
reversing camera for a maximum of 10 seconds
or up to 1
1 mph (18 km/h).
Lighting
–
Daytime running lamps
.–
Activate or deactivate the automatic
illumination of the headlamps when starting.
Doors & locking
–
Autoclose
.
–
Activate or deactivate the automatic locking of
the doors
when the vehicle is moving.
Audio
–
Equalizer
.
–
Adjust the bass, medium and treble.
–
Balance/Fade
.
–
Adjust the balance of the front and rear
speakers, left and right.
–
Press the button in the centre of the arrows to
balance the settings.
–
V
olume/Speed.
–
Select the desired parameter; the option is
highlighted.
–
Loudness
.
–
Optimise the quality of low volume audio.
–
Automatic radio
.
–
Set the radio when starting up or recover the
active state when the ignition key was last turned
to ST
OP.
– Radio switch-off delay.
–
Set the parameter
.
–
AUX vol. setting.
–
Set the parameters.
T
elephone/Bluetooth
®
– Connected tels.
– Start the Bluetooth® connection of the selected
mobile device.
–
Delete the selected mobile device.