2021 PEUGEOT BOXER bonnet
[x] Cancel search: bonnetPage 127 of 212

125
In the event of a breakdown
8► Check that the wheel is flat against the floor
of the vehicle and that the notch G
of the winch
is visible.
►
Store the tools and the wheel trim (depending
on version).
For more information on
the Identification markings of the
vehicle, and in particular the tyre pressure
label, refer to the corresponding section.
Changing a bulb
The headlamps have polycarbonate lenses with a protective coating:
►
do not clean them using a dry or
abrasive cloth, nor with a detergent or
solvent product,
►
use a sponge and soapy water or a pH
neutral product,
►
when using a high pressure washer on
persistent marks, do not keep the lance
directed towards the lamps or their edges for
too long, so as not to damage their protective
coating and seals.
Changing a bulb must only be done with
the ignition off and after the lamp has
been switched off for several minutes - Risk
of serious burns!
►
Do not touch the bulb directly with your
fingers, use a lint-free cloth.
It is essential only to use anti-ultraviolet
(UV) type bulbs, so as not to damage the
headlamp.
Always replace a failed bulb with a new bulb
with the same type and specification.
In some weather conditions (e.g. low
temperature or humidity), the presence
of misting on the internal surface of the glass
of the headlamps and rear lamps is normal; it
disappears after the lamps have been on for a
few minutes.
Types of bulb
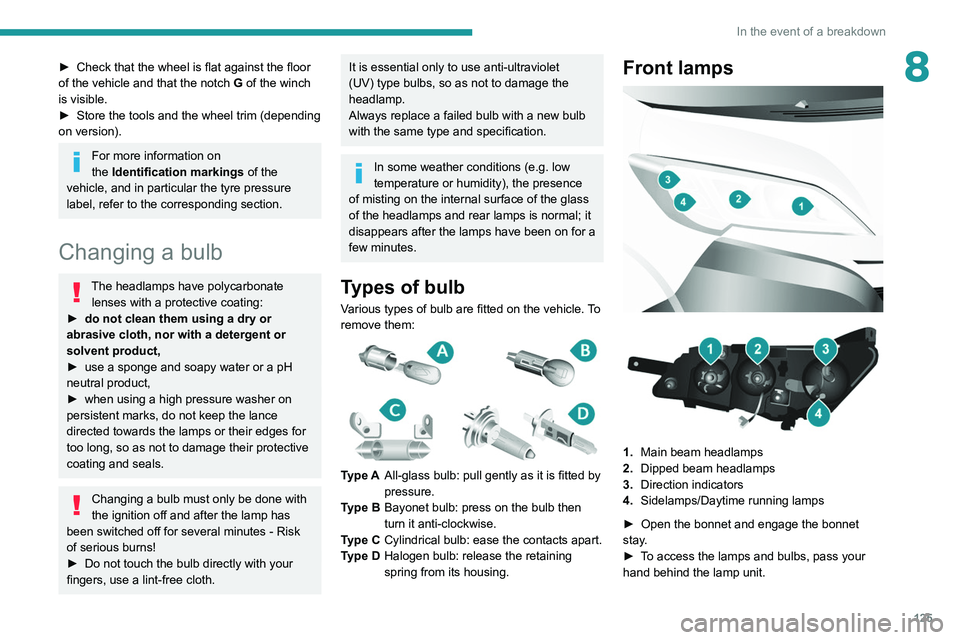
Various types of bulb are fitted on the vehicle. To
remove them:
Type A All-glass bulb: pull gently as it is fitted by
pressure.
Type B Bayonet bulb: press on the bulb then
turn it anti-clockwise.
Type C Cylindrical bulb: ease the contacts apart.
Type D Halogen bulb: release the retaining
spring from its housing.
Front lamps
1. Main beam headlamps
2. Dipped beam headlamps
3. Direction indicators
4. Sidelamps/Daytime running lamps
►
Open the bonnet and engage the bonnet
stay
.
►
T
o access the lamps and bulbs, pass your
hand behind the lamp unit.
Page 128 of 212

126
In the event of a breakdown
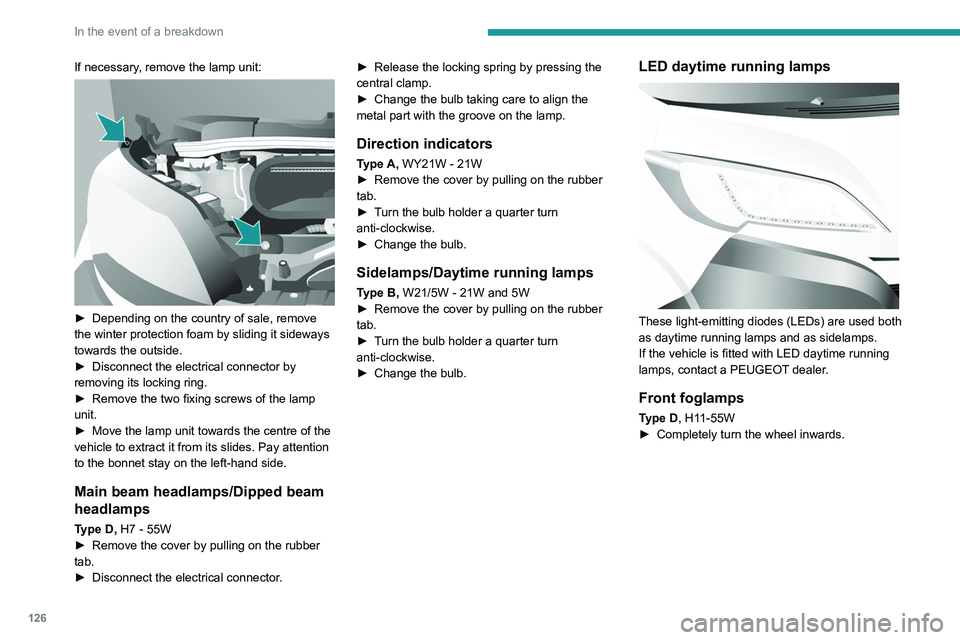
If necessary, remove the lamp unit:
► Depending on the country of sale, remove
the winter protection foam by sliding it sideways
towards the outside.
►
Disconnect the electrical connector by
removing its locking ring.
►
Remove the two fixing screws of the lamp
unit.
►
Move the lamp unit towards the centre of the
vehicle to extract it from its slides. Pay attention
to the bonnet stay on the left-hand side.
Main beam headlamps/Dipped beam
headlamps
Type D, H7 - 55W
► Remove the cover by pulling on the rubber
tab.
►
Disconnect the electrical connector
.►
Release the locking spring by pressing the
central clamp.
►
Change the bulb taking care to align the
metal part with the groove on the lamp.
Direction indicators
Type A, WY21W - 21W
► Remove the cover by pulling on the rubber
tab.
►
T
urn the bulb holder a quarter turn
anti-clockwise.
►
Change the bulb.
Sidelamps/Daytime running lamps
Type B, W21/5W - 21W and 5W
► Remove the cover by pulling on the rubber
tab.
►
T
urn the bulb holder a quarter turn
anti-clockwise.
►
Change the bulb.
LED daytime running lamps
These light-emitting diodes (LEDs) are used both
as daytime running lamps and as sidelamps.
If the vehicle is fitted with LED daytime running
lamps, contact a PEUGEOT dealer.
Front foglamps
Type D, H11-55W
► Completely turn the wheel inwards.
Page 133 of 212

131
In the event of a breakdown
8Disconnecting the battery
► Tilt lever 1 downwards to release the
terminals.
►
Remove terminals
2
from the negative (-)
terminal.
Wait approximately 6 minutes after
switching off the ignition before
disconnecting the battery.
Do not disconnect the terminals while the
engine is running.
Do not charge a battery without disconnecting
the terminals first.
Close the windows and the doors before
disconnecting the battery.
After reconnecting the battery, turn on the
ignition and wait 1 minute before starting the
engine, to enable the electronic systems to
initialise. If minor problems nevertheless persist
following this operation, contact a PEUGEOT
dealer or a qualified workshop.
It is recommended to disconnect the (-)
terminal of the battery if the vehicle is to
be left unused for more than one month.
The description of the battery charging
procedure is only indicative.
After prolonged battery disconnection, it may be
necessary to reinitialise the following functions:
–
the display parameters (date, time, language,
distance and temperature units),
–
the stations of the audio system,
–
the central locking.
Some settings are cancelled and must be
entered once again; contact a PEUGEOT
dealer.
If the vehicle is equipped with a tachograph or
an alarm,
it is recommended that the (-) terminal
of the battery (located under the floor on the
left-hand side, in the cab) be disconnected if the
vehicle is not going to be used for more than 5
days.
Starting using another
battery
Never start the engine by connecting a
battery charger.
Never use a 24 V or higher battery booster.
Check beforehand that the backup battery
has a nominal voltage of 12 V and a capacity
at least equal to that of the discharged
battery.
The two vehicles must not be in contact with
each other.
Switch off all electricity-consuming equipment
on both vehicles (audio system, wipers,
lighting, etc.).
Make sure that the jump leads are well away
from the engine’s moving parts (fan, belt,
etc.).
Do not disconnect the (+) terminal while the
engine is running.
Starting the engine using another battery is to be
performed inside the engine compartment.
►
Open the bonnet.
A. Positive metallic terminal on the vehicle
B. Backup battery
C. Vehicle earth point
The positive metallic terminal A is accessible
through a flap located on the side of the fuse
box.
Page 147 of 212

145
Technical data
9Identification markings
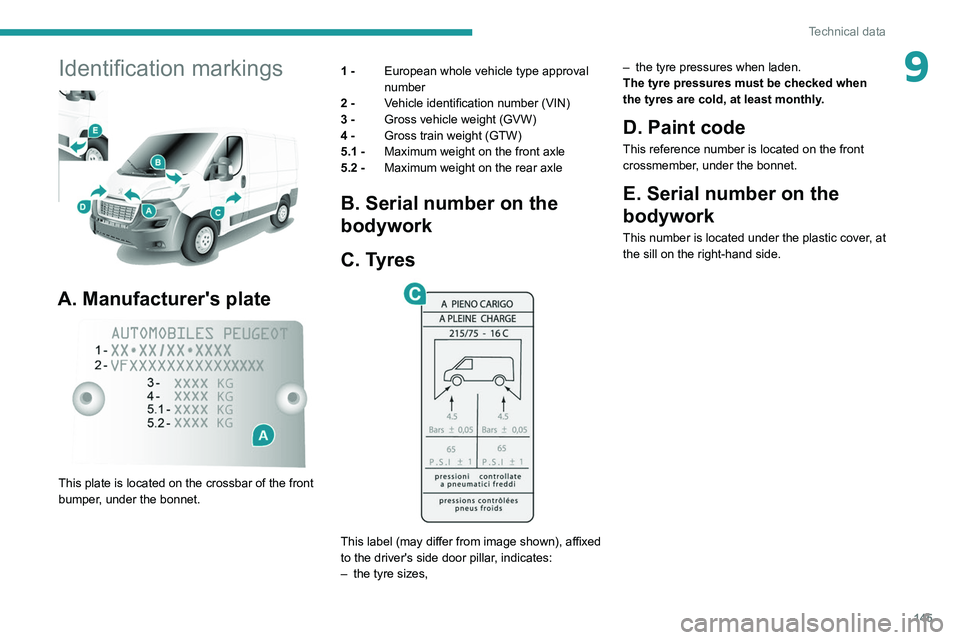
A. Manufacturer's plate
This plate is located on the crossbar of the front
bumper, under the bonnet.1 -
European whole vehicle type approval
number
2 - Vehicle identification number (VIN)
3 - Gross vehicle weight (GVW)
4 - Gross train weight (GTW)
5.1 - Maximum weight on the front axle
5.2 - Maximum weight on the rear axle
B. Serial number on the
bodywork
C. Tyres
This label (may differ from image shown), affixed
to the driver's side door pillar, indicates:
–
the tyre sizes, –
the tyre pressures when laden.
The tyre pressures must be checked when
the tyres are cold, at least monthly
.
D. Paint code
This reference number is located on the front
crossmember, under the bonnet.
E. Serial number on the
bodywork
This number is located under the plastic cover, at
the sill on the right-hand side.
Page 148 of 212

146
Technical data
Glossary of labels
This section contains all of the text written on the
labels present in the vehicle.
For the Identification markings, refer to
the corresponding section.
In the engine compartment
A
Original paintwork
Colour
Code
Varnish
B
FOR TROUBLESHOOTING ONLY.
C
DANGER
AUTOMATIC ENGINE STARTING. REMOVE
THE IGNITION KEY WHEN THE BONNET IS
OPEN. D
1 - WARNING
GENUINE LUBRICANTS AND FLUIDS
Engine oil
Transmission
Radiator Brakes
Screenwash Power steering
CONSULT THE
MAINTENANCE
AND WARRANTY
GUIDE. PROTECT YOUR
EYES.
2 - SAFETY
The use of genuine replacement parts, fluids
and lubricants, as well as observing the servicing
schedules, guarantees the reliability and safety
of your vehicle over time, so maintaining it in its
original condition. 3 - DANGER
KEEP OUT
OF THE
REACH OF
CHILDREN.
DO NOT
APPROACH
FLAMES.
DO NOT
TOUCH.
DO NOT
REMOVE
THE CAP
WHEN THE
ENGINE IS
HOT. EXPLOSION. CORROSIVE
LIQUID.
MAY START
AUTOMATICALLY EVEN
WITH THE ENGINE
SWITCHED OFF. DO NOT
OPEN GAS
UNDER HIGH
PRESSURE.
AUTOMATIC ENGINE
STARTING. REMOVE THE
IGNITION KEY WHEN THE
BONNET IS OPEN. HIGH
VOLTAGE
Page 192 of 212

190
Alphabetical index
A
ABS 29
Accelerated charging unit (Wallbox)
71
Accessories
28
Active Safety Brake
90–92
AdBlue®
86
AdBlue® tank
87
Adjusting the date
21
Adjusting the seat angle
18
Adjusting the seat belt height
60–61
Adjusting the time
21
Advice on care and maintenance
70, 88
Advice on driving
6, 69–70
Airbags
35, 37
Airbags, curtain
35
Airbags, front
62–63
Airbags, lateral
35
Air conditioning
23, 39–40
Air conditioning, additional
39–40
Air conditioning, automatic
24
Air conditioning, manual
24
Air vents
23
Alarm
27–28
Anti-lock braking system (ABS)
29
Armrest, front
19
ASR
29
Assistance, emergency braking
29, 64
Audible warning
28
Audio streaming (Bluetooth)
173–174
Audio system
134
B
Battery 45
Battery, 12 V
111–112, 102
Battery, ancillaries
102
Blind spot sensors
61
BlueHDi
14, 83
Bluetooth (hands-free)
137, 177–178
Bluetooth (telephone)
137, 177–178
Bodywork
89
Bonnet
79
Brake discs
85
Brakes
85
Braking, automatic emergency
90–92
Brightness
8
Bulbs (changing)
97
Bulbs (changing, type)
97
C
Cable, audio 136, 145
Cable, Jack
136, 145
Capacity, fuel tank
68
Care of the bodywork
89
CCS (Combined Charging System)
74
CD
145
CD, MP3
145
Centre console
4
Changing a bulb
97
Changing a fuse
101
Changing to free-wheeling
105
Charging cable (Electric) 71
Charging connector (Electric)
70, 101–103
Charging flap (Electric)
70, 101–103
Charging system (Electric)
5, 6, 69
Charging the traction battery
(Electric)
69, 101–103
Checking the levels
109–111
Checks
111 – 11 3
Checks, routine
111 – 11 3
Children
33
Child seats
33, 63–65
Cigar lighter
35
Cleaning (advice)
70, 116–117
Collision Risk Alert
90–92
Configuration, vehicle
15, 21
Container, AdBlue®
87
Control, heated seats
19
Control stalk, lighting
23
Control stalk, wipers
26
Control unit
71
Courtesy lamp, front
43–46
Courtesy lamp, rear
36
Courtesy lamps
36
Cruise control
85–86
D
DAB (Digital Audio Broadcasting) -
Digital radio
144
Dashboard
4
Daytime running lamps, LED
23
Page 194 of 212

192
Alphabetical index
K
Key with remote control 43
Kit, hands-free
137, 177–178
L
Lane Departure Warning System
(LDWS)
87–88
Level, AdBlue®
83
Level, brake fluid
82
Level, engine coolant
14, 82
Level, engine oil
81
Level, heating system fluid
83
Level, power steering fluid
82
Levels
110–111
Levels and checks
109–111
Lighting dimmer
8
Low fuel level
68
Lumbar
18
M
Mains socket (domestic network) 71
Maintenance (advice)
70, 88
Maintenance, routine
53, 83
Manoeuvring aids (recommendations)
52
Mat
53
Menu
15, 171–172, 146, 149, 151
Menus (audio)
171–172
Mirror, rear view 8
Mirrors, door
22, 61
Motor, electric
81, 109
O
Oil change 81
Oil consumption
81
OIl, engine
109–111
On-board tools
119–124
Opening the bonnet
79
Overhead storage
43–46
P
Pads, brake 85
Paint
89
Parking brake
46, 85
Pedestrian horn (Electric)
29, 42
Player, USB
163–164, 172–173
Port, USB
163–164, 172–173
Power indicator (Electric)
6
Pressures, tyres
85
Pre-tensioning seat belts
33
Protecting children
62–65
Public fast charging station
71
R
Radar (warnings) 53
Radio
135, 143, 145
Radio, digital (Digital Audio
Broadcasting - DAB)
144
Range, AdBlue®
14–15, 83
Recharging the traction battery
(Electric)
69, 101–103
Recovery
104
Regeneration of the particle filter
84
Remote control
13
Replacing bulbs
97
Replacing fuses
101
Replacing the air filter
84
Replacing the oil filter
84
Replacing the passenger compartment filter
84
Resetting the service indicator
13
Reversing camera
53
S
Safety, children 62–65
Screen, colour
143
Screen menu map
171–172, 146, 149, 151
Screenwash fluid
110–111
SCR (Selective Catalytic Reduction)
86
Seat belts
60–61
Seat belts, rear
33
Seats, heated
19
Seats, rear
36