2021 PEUGEOT BOXER sensor
[x] Cancel search: sensorPage 4 of 212

2
Contents
■
Overview
■
Eco-driving
1InstrumentsInstrument panel 8
Warning and indicator lamps 9
Indicators 13
Vehicle configuration (MODE) 15
Touch screen audio and multimedia system 21
Setting the date and time 21
Trip computer 22
Trip computer 22
2AccessKey 23
Remote control 23
Front doors 26
Sliding side door 26
Rear doors 27
Alarm 27
Electric windows 28
3Ease of use and comfortFront seats 30
Front bench seat 31
Rear seats 32
Rear bench seat 32
Steering wheel adjustment 33
Mirrors 34
Heating and Ventilation 35
Heating/Manual air conditioning 35
Automatic air conditioning 36
Heating (Electric) 37
Additional heating systems 39
Rear heating/air conditioning 39
Additional programmable heating 40
Front demist - defrost 42
Rear screen de-icing 42
Cab layout 43
Rear fittings 47
Exterior fittings 49
4Lighting and visibilityLighting control stalk 51
Direction indicators 51
LED daytime running lamps 51
Automatic headlamp dipping 52
Headlamp beam height adjustment 54
Wiper control stalk 54
Changing a wiper blade 55
5SafetyGeneral safety recommendations 56
Hazard warning lamps 56
Horn 56
Pedestrian horn (Electric) 57
Electronic stability control (ESC) 57
Seat belts 60
Airbags 62
Child seats 63
Deactivating the front passenger airbag 65
ISOFIX seats 66
Child lock 68
6DrivingDriving recommendations 69
Starting-switching off the engine 72
Battery standby system 73
Parking brake 74
Gearbox 74
Drive selector (Electric) 75
Gear shift indicator 75
Stop & Start 76
Hill start assist 77
Tyre under-inflation detection 78
Pneumatic suspension 79
Driving and manoeuvring aids - General
recommendations
80
Road signs recognition 82
Speed limiter 83
Cruise control - Specific recommendations 85
Cruise control 85
Lane departure warning system 86
Blind spot monitoring with trailer detection 89
Active Safety Brake with Collision Risk Alert and
Intelligent emergency braking assistance
90
Rear parking sensors 93
Reversing camera 94
7Practical informationFuel 96
Compatibility of fuels 97
Charging system (Electric) 97
Charging the traction battery (Electric) 101
Snow chains 103
Towing a trailer 104
Towbar with quickly detachable towball 104
Roof-mounted carrying system 107
Bonnet 107
Page 13 of 212

11
Instruments
1Fixed, accompanied by a message and
an audible signal.
The system has a fault.
Carry out (3).
Fixed.
The system has a fault.
If these warning lamps come on after the engine
is switched off and then restarted, carry out (3).
Brake padsFixed.
The front brake pads are worn.
Carry out (3) to replace the pads.
DSC / ASRFlashing.
The system is operating.
The system optimises traction and improves the
directional stability of the vehicle.
Fixed, accompanied by an audible signal
and a message in the screen.
The DSC / ASR or hill start assist system has a
fault.
Carry out (2).
Fixed.
The Intelligent Traction Control has a
fault.
Carry out (2).
Front passenger airbag (OFF)Fixed.
The front passenger airbag is deactivated.
A "rearward facing" child seat can be installed,
unless there is a fault with the airbags (Airbags
warning lamp on).
Particle filter (Diesel)Fixed.
The particle filter is regenerating itself.
Leave the engine running until the warning lamp
goes off so that regeneration can be completed.
Engine self-diagnostic systemFixed.
A fault with the engine or the EOBD
emissions control system has been detected.
EOBD (European On Board Diagnosis) is a
diagnostics system which complies with, among
others, the standards on emissions limits of:
–
CO (carbon monoxide),
–
HC (unburnt hydrocarbons),
–
NOx (nitrogen oxides), detected by oxygen
sensors placed downstream of the catalytic
converters and
–
particles.
Carry out (3) quickly.
Tyre under-inflation detectionFixed.
A tyre is deflated or punctured.
Carry out (1).
Change the wheel or repair the tyre.
Fixed.
A sensor is faulty.
Carry out (3).
Lane departure warning systemFlashing, accompanied by an
audible signal.
The involuntary crossing of a line on the left or
right has been detected. Turn the steering wheel in the opposite direction
to return to the correct trajectory.
Fixed, accompanied by an audible signal.
The lane departure warning system is
faulty.
Clean the windscreen.
If the problem persists, carry out (3).
Electronic immobiliserFixed.
The ignition key inserted is not
recognised.
The engine cannot start.
Change key and carry out (3) to have the faulty
key checked.
On for about 10 seconds when the
ignition is switched on.
The alarm has been triggered.
Carry out (3) to have the locks checked.
Water in Diesel fuel filter(Diesel)Fixed.
The Diesel filter contains water.
Carry out (2) without delay - risk of damage to
the injection system!
AdBlueFixed, then flashing accompanied by a
message in the display.
The driving range is decreasing.
You must quickly top up the AdBlue.
Low fuel levelFixed, with the needle in zone E.
The fuel reserve is being used.
Refuel without delay.
Page 18 of 212

16
Instruments
The corresponding information is displayed in
the instrument panel display screen.
Languages available: Italian, English, German,
French, Spanish, Portuguese, Dutch, Brazilian,
Polish, Russian, Turkish and Arabic.
All menus are accessible if the vehicle is
equipped with the audio system.
If the vehicle is equipped with the touch screen
audio and telematics system, some menus are
only accessible via its audio system control
panel.
For safety reasons, some menus are
only accessible with the ignition off.
This MODE button allows you to:
–
access the menus and sub-menus,
–
validate your choices, within a menu,
–
exit menus.
A long press allows you to return to the home screen.
This button allows you to:
–
scroll up within a menu,
–
increase a value.This button allows you to:
–
scroll down within
a menu,
–
decrease a value.
Menu...
Press... Sub-menu... Press... Select...Validate
and exitAllows you to...
1 Brightness
IncreaseAdjust the brightness of
the instrument panel and
instruments and controls
(with sidelamps on).
Decrease
2 Speed beep
ON Increase Activate/Deactivate the
audible signal indicating that
the programmed speed has
been exceeded and select
the speed.
Decrease
OFF
3 Headlamp sensor
Increase Adjust the sensitivity of the
brightness sensor (1 to 3),
which affects the headlamps
Decrease
Page 23 of 212

21
Instruments
1Touch screen audio and telematics system
This audio system control panel, located in the
centre of the dashboard, gives access to menus
in order to customise some equipment.
The corresponding information is displayed in
the touch screen.
It is available in 9 languages: German, English,
Spanish, French, Italian, Dutch, Polish,
Portuguese and Turkish.
For safety reasons, some menus are only
accessible with the ignition off.
Provides access to the “Settings” menu.
Allows you to scroll up in a menu or
increase a value.
Allows you to scroll down in a menu or decrease a value.
"Settings" menu
1. "Display"
2. "Voice commands"
3. “Clock and Date”
4. "Safety/Assistance"
5. “Lights”
6. “Doors & locking”
7. "Audio"
8. "Telephone/Bluetooth"
9. “Radio setting”
10. "Restore Settings" to return to the
manufacturer’s default settings.
11 . “Delete pers. data“ to delete all your
personal data, related to the Bluetooth
equipment, in the audio system.
For more information on audio,
telephone, radio and navigation, refer to
the corresponding sections.
The settings in sub-menus 4, 5 and 6
vary depending on the equipment
installed on the vehicle.
From the "Display" sub-menu, it is possible to:
–
select "Languages" and choose one of the
languages mentioned above,
–
select "Unit of measurement" and set the
consumption (mpg, l/100 km), distances (miles,
km) and temperature (°F
, °C), –
select "T
rip B display" to activate or deactivate
trip B of the trip computer (On, Off).
From the "Safety/Assistance" sub-menu, it is
possible to:
–
select "Parkview Camera", then "Reversing
camera" to activate or deactivate its use (On,
Off),
–
select “Parkview Camera", then "Camera
delay" to activate or deactivate the maintaining
of the display for 10 seconds or up to 1
1 mph (18
km/h) (On, Off),
–
select "T
raffic Sign" to activate or deactivate
its use (On, Off),
–
select "Passenger airbag" to activate or
deactivate its use (On, Off).
From the "Lights" sub-menu, it is possible to:
–
select "Daytime running lamps" to activate or
deactivate their use (On, Off),
–
select "Auto. main beam headlamps" to
activate or deactivate its use (On, Off),
–
select "Headlamp sensor" to adjust its
sensitivity (1, 2, 3).
From the "Doors & locking" sub-menu, it is
possible to:
–
select "Autoclose" to activate or deactivate its
use (On, Off).
Setting the date and time
Using the MODE control panel
► Press the “MODE” button.
Page 29 of 212

27
Access
2Rear doors
With the vehicle stationary, when
opening the rear doors, the camera is
activated and transmits views to the screen
installed in the cab.
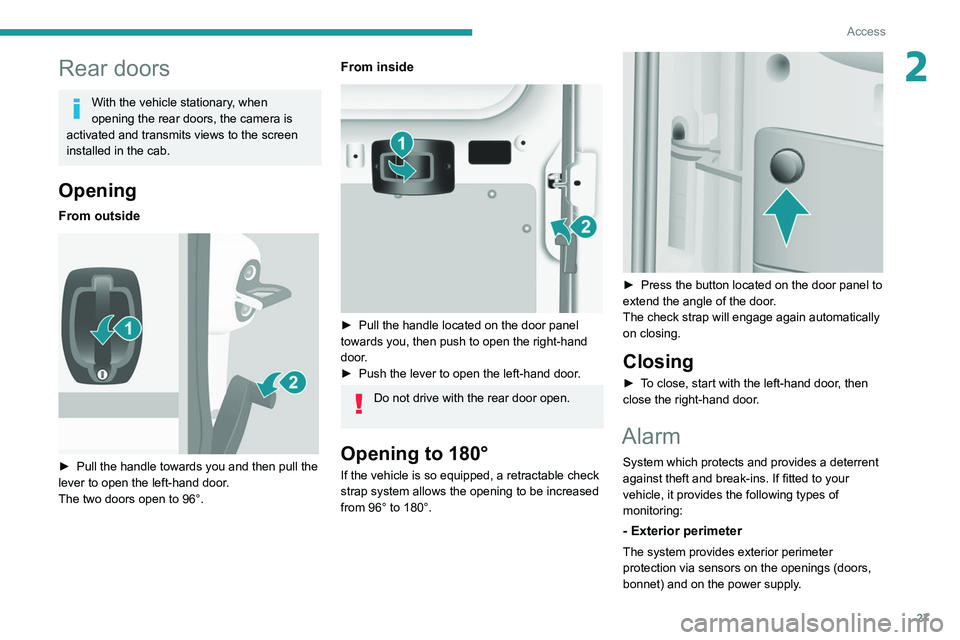
Opening
From outside
► Pull the handle towards you and then pull the
lever to open the left-hand door .
The two doors open to 96°.
From inside
► Pull the handle located on the door panel
towards you, then push to open the right-hand
door.
►
Push the lever to open the left-hand door
.
Do not drive with the rear door open.
Opening to 180°
If the vehicle is so equipped, a retractable check
strap system allows the opening to be increased
from 96° to 180°.
► Press the button located on the door panel to
extend the angle of the door .
The check strap will engage again automatically
on closing.
Closing
► To close, start with the left-hand door, then
close the right-hand door.
Alarm
System which protects and provides a deterrent
against theft and break-ins. If fitted to your
vehicle, it provides the following types of
monitoring:
- Exterior perimeter
The system provides exterior perimeter
protection via sensors on the openings (doors,
bonnet) and on the power supply.
Page 37 of 212

35
Ease of use and comfort
3The display is reactivated automatically every
time the ignition is switched on.
For more information on the Display integrated
into the rear view mirror, refer to the
corresponding section.
Heating and Ventilation
Advice
Using the ventilation and air
conditioning system
►
T
o ensure that air is distributed evenly,
keep the external air intake grilles at the base
of the windscreen, the nozzles, the vents, the
air outlets and the air extractor in the boot
free from obstructions.
►
Do not cover the sunshine sensor located
on the dashboard; this sensor is used to
regulate the automatic air conditioning
system.
►
Operate the air conditioning system for at
least 5 to 10 minutes once or twice a month to
keep it in good working order
.
►
If the system does not produce cold air
,
switch it off and contact a PEUGEOT dealer
or a qualified workshop.
When towing a large load on a steep gradient
in high temperatures, switching off the air
conditioning increases the available engine
power, enhancing the towing capacity.
Avoid driving for too long with the ventilation off or with prolonged operation
of interior air recirculation. Risk of misting and
deterioration of the air quality!
If the interior temperature is very high
after the vehicle has stood for a long
time in the sunshine, air the passenger
compartment for a few moments.
Put the air flow control at a setting high
enough to quickly change the air in the
passenger compartment.
Condensation created by the air
conditioning results in a discharge of
water underneath the vehicle. This is perfectly
normal.
Servicing the ventilation and air
conditioning system
►
Ensure that the passenger compartment
filter is in good condition and have the filter
elements replaced regularly
.
We recommend using a composite passenger
compartment filter. Its specific active additive
helps protect against polluting gases and bad
smells.
►
T
o ensure correct operation of the
air conditioning system, have it checked
according to the recommendations in the
Manufacturer’s service schedule.
Contains the fluorinated greenhouse
gas R134A
Depending on version and country of sale,
the air conditioning system may contain
fluorinated greenhouse gas R134A.
Stop & Start
The heating and air conditioning systems
only operate when the engine is running.
Temporarily deactivate the Stop & Start
system to maintain a comfortable temperature
in the passenger compartment.
For more information on the Stop & Start,
refer to the corresponding section.
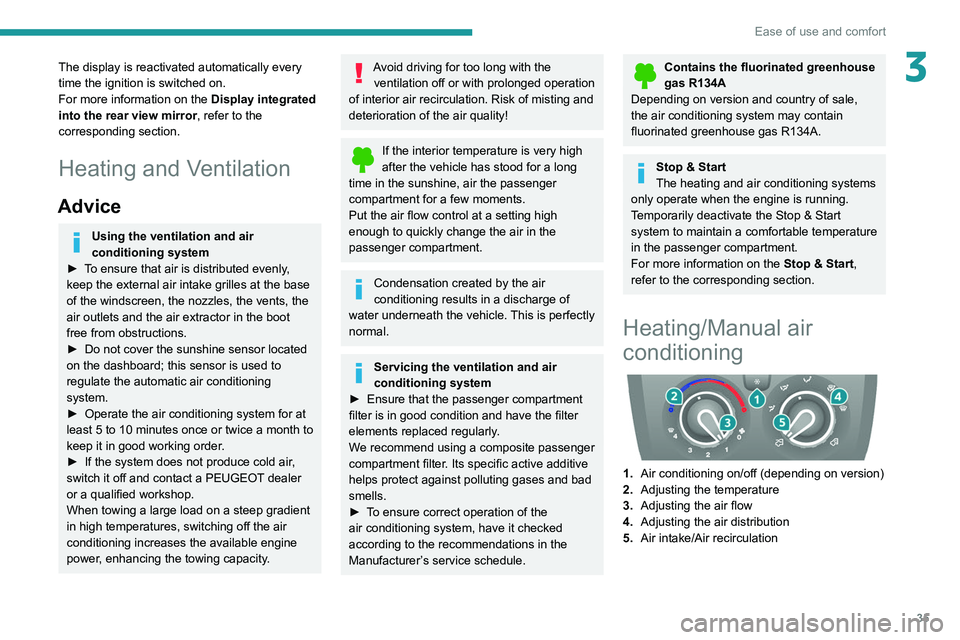
Heating/Manual air
conditioning
1. Air conditioning on/off (depending on version)
2. Adjusting the temperature
3. Adjusting the air flow
4. Adjusting the air distribution
5. Air intake/Air recirculation
Page 54 of 212

52
Lighting and visibility
Automatic illumination of headlamps
If your vehicle is fitted with this function, the
dipped beam headlamps are switched on
automatically if the light is poor.
In fog or snow, the sunshine sensor may
detect sufficient light. In this case, the
lighting will not come on automatically. If
necessary, you must switch on the dipped
beam headlamps manually.
They are switched off when the light returns
to a sufficient level.
Do not cover the sunshine sensor at the top
centre of the windscreen.
You can adjust the sensitivity of the sunshine sensor.
For more information on Vehicle
configuration , refer to the corresponding
section.
Activation
► Turn the ring to this position.
The lamps go out automatically when the ignition
is switched off.
Guide-me-home lighting
If your vehicle is equipped: when you leave your
vehicle, the dipped beam headlamps remain on
for the selected period of time (e.g. leaving a car
park).
With the ignition off or the
key in the STOP position
► Within 2 minutes of switching off the engine,
turn the ignition key to the ST OP position or
remove the key.
►
Pull the lighting control stalk towards the
steering wheel.
This indicator lamp lights up on the
dashboard.
Each action on the lighting control stalk, pulled
towards the steering wheel, extends the
guide-me-home lighting by 30 seconds up to
approximately 3 minutes. Once this time has
elapsed, the lamps go out automatically.
Deactivate this control by holding the control
stalk pulled towards the steering wheel for more
than 2 seconds.
Automatic headlamp dipping
System which automatically switches the main
beam headlamps on according to the brightness
and driving conditions, using a camera located at
the top of the windscreen.
This system is a driving aid.
The driver remains responsible for
the vehicle's lighting, its correct use for the
prevailing conditions of light, visibility and
traffic, as well as for observation of driving
and vehicle regulations.
Activation
► Turn the lighting control stalk ring to
this position.
► Set the function by pressing the
MODE button: select "ON" in the
"Automatic main beam" menu.
For more information on Vehicle
configuration , refer to the corresponding
section.
►
Flash the headlamps (going beyond the point
of resistance) to activate the function.
Page 56 of 212

54
Lighting and visibility
Headlamp beam height
adjustment
To avoid inconvenience to other road users,
the height of the halogen headlamps should be
adjusted according to the load in the vehicle.
This function can be accessed in dipped beam
and main beam headlamp positions.
Successive presses on these
controls adjust the headlamps.
An indicator lamp on the display indicates the
selected setting position (0, 1, 2, 3).
Wiper control stalk
Windscreen wipers
The wiping is active only when the ignition key is
in the ON position.
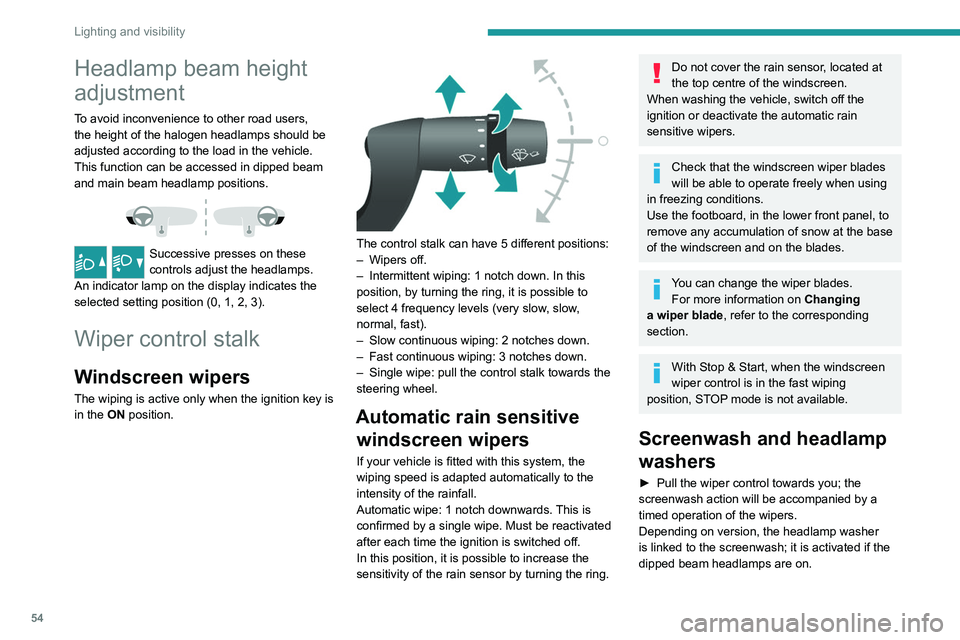
The control stalk can have 5 different positions:
– Wipers off.
–
Intermittent wiping: 1 notch down. In this
position, by turning the ring, it is possible to
select 4 frequency levels (very slow
, slow,
normal, fast).
–
Slow continuous wiping: 2 notches down.
–
Fast continuous wiping: 3 notches down.
–
Single wipe: pull the control stalk towards the
steering wheel.
Automatic rain sensitive windscreen wipers
If your vehicle is fitted with this system, the
wiping speed is adapted automatically to the
intensity of the rainfall.
Automatic wipe: 1 notch downwards. This is
confirmed by a single wipe. Must be reactivated
after each time the ignition is switched off.
In this position, it is possible to increase the
sensitivity of the rain sensor by turning the ring.
Do not cover the rain sensor, located at
the top centre of the windscreen.
When washing the vehicle, switch off the
ignition or deactivate the automatic rain
sensitive wipers.
Check that the windscreen wiper blades
will be able to operate freely when using
in freezing conditions.
Use the footboard, in the lower front panel, to
remove any accumulation of snow
at the base
of the windscreen and on the blades.
You can change the wiper blades. For more information on Changing
a wiper blade , refer to the corresponding
section.
With Stop & Start, when the windscreen
wiper control is in the fast wiping
position, STOP mode is not available.
Screenwash and headlamp
washers
► Pull the wiper control towards you; the
screenwash action will be accompanied by a
timed operation of the wipers.
Depending on version, the headlamp washer
is linked to the screenwash; it is activated if the
dipped beam headlamps are on.