2021 Peugeot 308 wheel
[x] Cancel search: wheelPage 129 of 244
127
Driving
6
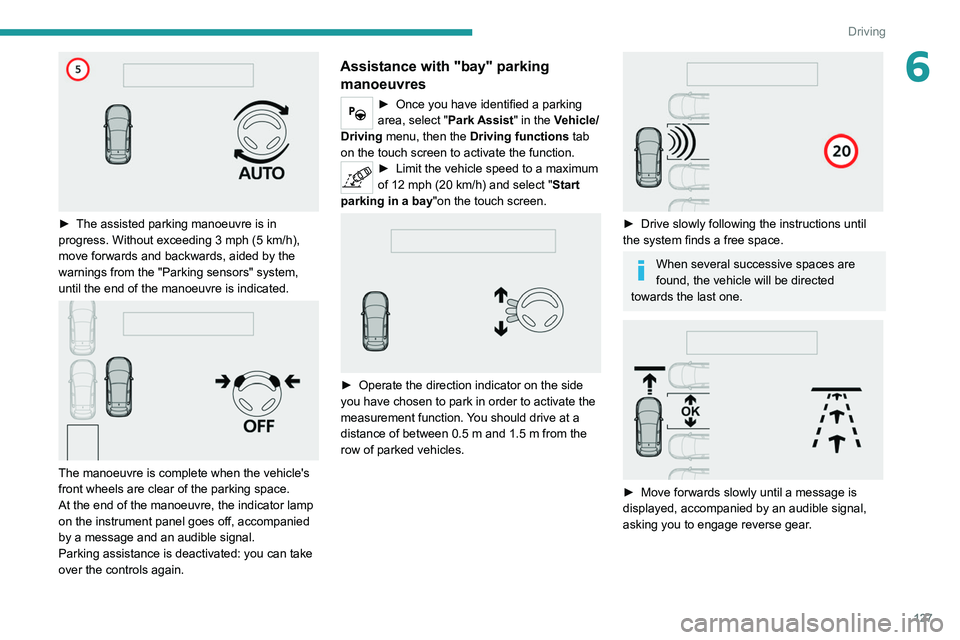
► The assisted parking manoeuvre is in
progress. Without exceeding 3 mph (5 km/h),
move forwards and backwards, aided by the
warnings from the "Parking sensors" system,
until the end of the manoeuvre is indicated.
The manoeuvre is complete when the vehicle's
front wheels are clear of the parking space.
At the end of the manoeuvre, the indicator lamp
on the instrument panel goes off, accompanied
by a message and an audible signal.
Parking assistance is deactivated: you can take
over the controls again.
Assistance with "bay" parking manoeuvres
► Once you have identified a parking
area, select " Park Assist" in the Vehicle/
Driving menu, then the Driving functions tab
on the touch screen to activate the function.
► Limit the vehicle speed to a maximum
of 12 mph (20 km/h) and select " Start
parking in a bay "on the touch screen.
► Operate the direction indicator on the side
you have chosen to park in order to activate the
measurement function.
You should drive at a
distance of between 0.5
m and 1.5 m from the
row of parked vehicles.
► Drive slowly following the instructions until
the system finds a free space.
When several successive spaces are
found, the vehicle will be directed
towards the last one.
► Move forwards slowly until a message is
displayed, accompanied by an audible signal,
asking you to engage reverse gear
.
Page 130 of 244
128
Driving
To switch the system off for a prolonged period,
contact a PEUGEOT dealer or a qualified
workshop.
Malfunctions
This warning lamp lights up on the instrument panel and a message appears,
accompanied by an audible signal.
If the lateral distance between your
vehicle and the space is too great, the
system may not be able to measure the
space.
Any object exceeding the dimensions of the
vehicle is not taken into account by the Park
Assist system during a manoeuvre.
In bad weather or in winter, ensure that
the sensors are not covered by dirt, ice
or snow.
In the event of a fault, have the system
checked by a PEUGEOT dealer or a qualified
workshop.
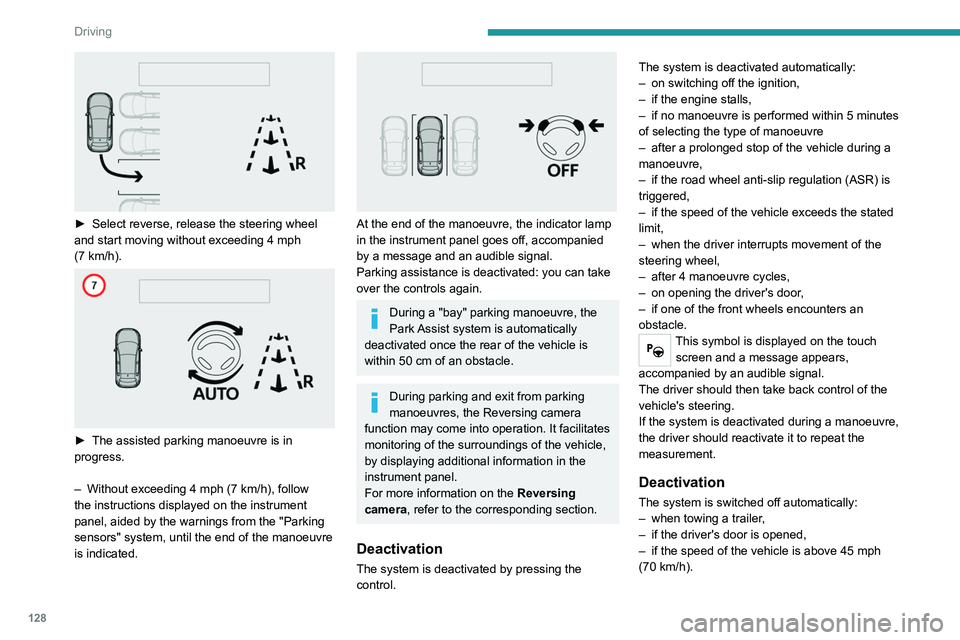
► Select reverse, release the steering wheel
and start moving without exceeding 4 mph
(7
km/h).
► The assisted parking manoeuvre is in
progress.
–
Without exceeding 4 mph (7
km/h), follow
the instructions displayed on the instrument
panel, aided by the warnings from the "Parking
sensors" system, until the end of the manoeuvre
is indicated.
At the end of the manoeuvre, the indicator lamp
in the instrument panel goes off, accompanied
by a message and an audible signal.
Parking assistance is deactivated: you can take
over the controls again.
During a "bay" parking manoeuvre, the
Park Assist system is automatically
deactivated once the rear of the vehicle is
within 50
cm of an obstacle.
During parking and exit from parking
manoeuvres, the Reversing camera
function may come into operation. It facilitates
monitoring of the surroundings of the vehicle,
by displaying additional information in the
instrument panel.
For more information on the Reversing
camera , refer to the corresponding section.
Deactivation
The system is deactivated by pressing the
control. The system is deactivated automatically:
–
on switching off the ignition,
–
if the engine stalls,
–
if no manoeuvre is performed within 5 minutes
of selecting the type of manoeuvre
–
after a prolonged stop of the vehicle during a
manoeuvre,
–
if the road wheel anti-slip regulation (ASR) is
triggered,
–
if the speed of the vehicle exceeds the stated
limit,
–
when the driver interrupts movement of the
steering wheel,
–
after 4 manoeuvre cycles,
–
on opening the driver's door
,
–
if one of the front wheels encounters an
obstacle.
This symbol is displayed on the touch screen and a message appears,
accompanied by an audible signal.
The driver should then take back control of the
vehicle's steering.
If the system is deactivated during a manoeuvre,
the driver should reactivate it to repeat the
measurement.
Deactivation
The system is switched off automatically:
– when towing a trailer ,
–
if the driver's door is opened,
–
if the speed of the vehicle is above 45 mph
(70 km/h).
Page 134 of 244

132
Practical information
► Take care to select the pump that delivers the
correct fuel type for your vehicle's engine (see a
reminder label on the inside of the filler flap).
►
Insert the key into the filler cap, if your vehicle
has a standard key
.
►
T
urn the filler cap to the left.
► Remove the filler cap and hang it on its
carrier (on the filler flap).
►
Insert the nozzle as far as it will go (pressing
against the metal non-return valve A
).
►
Fill the tank.
Do not continue past the
third nozzle cut-off, as this may cause
malfunctions.
►
Put the filler cap back in place and close it by
turning it to the right.
►
Push the fuel filler flap to close it (your
vehicle must be unlocked).
Y
our vehicle is fitted with a catalytic converter, a
device which helps to reduce the level of harmful
emissions in exhaust gases.
For petrol engines, you must use unleaded
fuel.
The filler neck is narrower, admitting petrol
nozzles only.
If you have put in the wrong fuel for
your vehicle, you must have the fuel
tank drained and filled with the correct fuel
before starting the engine.
For the THP 225 S&S EAT8 engine, the use
of RON98 unleaded petrol is recommended to
ensure optimum engine performance.
Fuel cut-off
Your vehicle is fitted with a safety system that
cuts off the supply of fuel in the event of an
impact.
Diesel misfuel prevention
Mechanical device which prevents filling the tank
of a Diesel vehicle with petrol. It avoids the risk
of engine damage that can result from filling with
the wrong fuel.
Located in the filler neck, the misfuel prevention
device appears when the filler cap is removed.
When a petrol filler nozzle is introduced into the
fuel filler neck of a Diesel vehicle, it comes into
contact with the flap. The system remains closed
and prevents filling.
Do not persist but instead insert a Diesel
filler nozzle.
It is still possible to use a fuel can to fill
the tank slowly.
In order to ensure a good flow of fuel, do
not place the nozzle of the fuel can in direct
contact with the flap of the misfuel prevention
device.
Travelling abroad
As Diesel fuel pump nozzles may be
different in other countries, the presence
of the misfuel prevention device may make
refuelling impossible.
Before travelling abroad, it is advisable to
check with a PEUGEOT dealer if the vehicle
is suitable for the distribution equipment of the
countries visited.
Snow chains
In wintry conditions, snow chains improve
traction as well as the behaviour of the vehicle
when braking.
Snow chains must be fitted only to the
front wheels. They must never be fitted to
"space-saver" type spare wheels.
Observe the legislation in force in your
country relating to the use of snow
chains and maximum authorised speeds.
Only use chains that have been designed for the
type of wheel fitted to your vehicle. Original tyre size Type of chain195/65 R15 9 mm link
205/55 R16
225/45 R17
225/40 R18 K-Summit K23
235/35 R19 Polaire Grip 70
For more information, contact a PEUGEOT
dealer or a qualified workshop.
Installation tips
► To fit the chains during a journey, stop the
vehicle on a flat surface on the side of the road.
► Apply the parking brake and position any
wheel chocks under the wheels to prevent
movement of the vehicle.
Page 135 of 244
133
Practical information
7Snow chains
In wintry conditions, snow chains improve
traction as well as the behaviour of the vehicle
when braking.
Snow chains must be fitted only to the
front wheels. They must never be fitted to
"space-saver" type spare wheels.
Observe the legislation in force in your
country relating to the use of snow
chains and maximum authorised speeds.
Only use chains that have been designed for the
type of wheel fitted to your vehicle.
Original tyre size Type of chain 195/65 R15 9 mm link
205/55 R16
225/45 R17
225/40 R18 K-Summit K23
235/35 R19 Polaire Grip 70
For more information, contact a PEUGEOT
dealer or a qualified workshop.
Installation tips
► To fit the chains during a journey, stop the
vehicle on a flat surface on the side of the road.
►
Apply the parking brake and position any
wheel chocks under the wheels to prevent
movement of the vehicle.
► Fit the chains following the instructions
provided by the manufacturer .
►
Move off gently and drive for a few moments,
without exceeding 31
mph (50 km/h).
►
Stop the vehicle and check that the snow
chains are correctly tightened.
It is strongly recommended that before
you leave, you practise fitting the snow
chains on a level and dry surface.
Avoid driving with snow chains on roads that have been cleared of snow to avoid
damaging the vehicle's tyres and the road
surface. If the vehicle is fitted with alloy
wheels, check that no part of the chain or its
fixings is in contact with the wheel rim.
Very cold climate screen
Removable protective screen which prevents the
accumulation of snow at the radiator cooling fan.
It is recommended that the screen be
fitted and removed by a PEUGEOT
dealer or a qualified workshop.
Before any operation, ensure that the
engine is off and the cooling fan has
stopped.
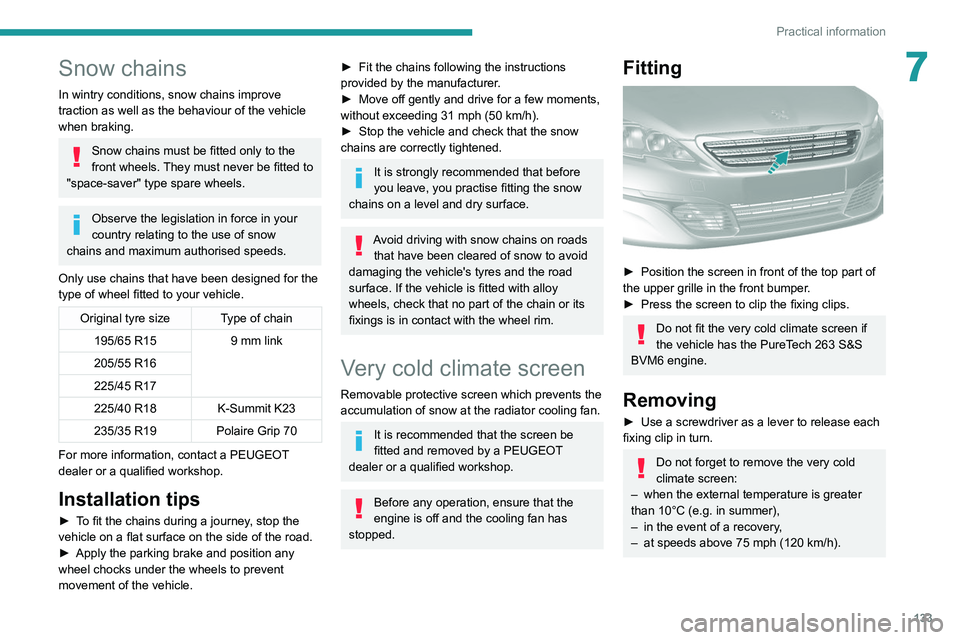
Fitting
► Position the screen in front of the top part of
the upper grille in the front bumper .
►
Press the screen to clip the fixing clips.
Do not fit the very cold climate screen if
the vehicle has the PureTech 263 S&S
BVM6 engine.
Removing
► Use a screwdriver as a lever to release each
fixing clip in turn.
Do not forget to remove the very cold
climate screen:
–
when the external temperature is greater
than 10°C (e.g. in summer),
–
in the event of a recovery
,
–
at speeds above 75 mph (120 km/h).
Page 136 of 244

134
Practical information
Towing device
Load distribution
► Distribute the load in the trailer so that the
heaviest items are as close as possible to the
axle, and the nose weight approaches the
maximum permitted without exceeding it.
Air density decreases with altitude, thus reducing
engine performance.
The maximum towable load
must be reduced by 10% per 1,000
metres of
altitude.
Use genuine towing devices and their
wiring harnesses approved by
PEUGEOT. We recommend having them
fitted by a PEUGEOT dealer or a qualified
workshop.
If not fitted by a PEUGEOT dealer, they must
still be fitted in accordance with the vehicle
manufacturer's instructions.
Certain driving or manoeuvring aid functions
are automatically deactivated while an
approved towing system is in use.
Comply with the maximum authorised
towable weight, as indicated on your
vehicle's registration certificate, on the
manufacturer's label and in the Technical
data section of this guide.
Complying with the maximum authorised
nose weight (towball weight) also includes
the use of accessories (bicycle carriers,
tow boxes, etc.).
Observe the legislation in force in the
country where you are driving.
GTi towing
Your vehicle cannot be fitted with a
tow-bar.
Towing device with towball
Before each use
To ensure the towball is correctly fitted,
check the follow points:
Saloon:
–
The green mark on the wheel is in line with
the green mark on the towball.
–
The wheel is in contact with the towball
(position A
).
–
The safety lock is on and the key removed;
the wheel can no longer be operated.
–
The towball must not be able to move in
its carrier; test by attempting to move it with
your hand.
SW :
–
The towball is correctly engaged (position
A
).
–
The safety lock is on and the key removed;
the trigger can no longer be operated.
–
The towball must not be able to move in
its carrier; test by attempting to move it with
your hand.
If the towball is not engaged, the trailer can
become detached -
Accident risk!
During use
Never release the locking system when
a trailer or load carrier is connected to the
towball.
Never exceed the maximum authorised
weight for the vehicle - Gross Train Weight
or GTW.
Always comply with the maximum authorised
load on the towing device: if it is exceeded,
this device may become detached from the
vehicle - risk of an accident!
Check that the trailer lamps work correctly.
Before setting off, check and/or adjust
headlamp beam height.
For more information on Headlamp height
adjustment, refer to the corresponding
section.
Following use
When travelling without a trailer or load
on a towbar-mounted carrier, the towball
must be removed and the protective plug
inserted in the carrier. This measure applies
particularly where the towball might obscure
visibility of the number plate or its lighting.
Blanking plug
In the event of recovery, it is essential to remove
the blanking plug if your vehicle has one.
To do this, contact a PEUGEOT dealer or a
qualified workshop.
The blanking plug behind the lower air intake grille.
Towbar with quickly detachable towball
(hatchback)
Presentation
This genuine towing device can be fitted and
removed with no need for tools.
Page 137 of 244
135
Practical information
7Blanking plug
In the event of recovery, it is essential to remove
the blanking plug if your vehicle has one.
To do this, contact a PEUGEOT dealer or a
qualified workshop.
The blanking plug behind the lower air intake grille.
Towbar with quickly detachable towball
(hatchback)
Presentation
This genuine towing device can be fitted and
removed with no need for tools.
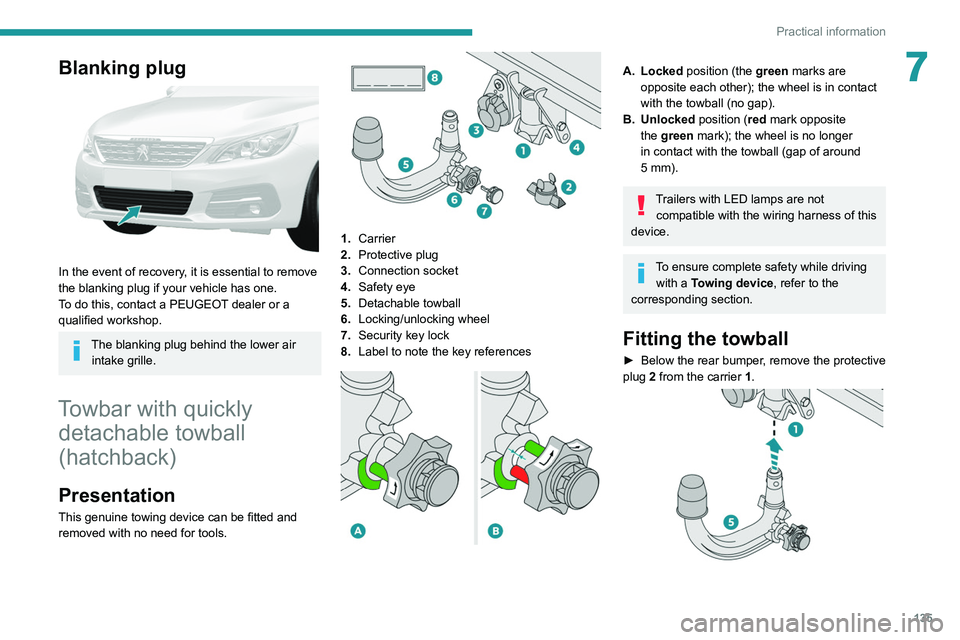
1. Carrier
2. Protective plug
3. Connection socket
4. Safety eye
5. Detachable towball
6. Locking/unlocking wheel
7. Security key lock
8. Label to note the key references
A. Locked position (the green marks are
opposite each other); the wheel is in contact
with the towball (no gap).
B. Unlocked position (red mark opposite the green mark); the wheel is no longer
in contact with the towball (gap of around
5
mm).
Trailers with LED lamps are not compatible with the wiring harness of this
device.
To ensure complete safety while driving with a Towing device , refer to the
corresponding section.
Fitting the towball
► Below the rear bumper , remove the protective
plug 2 from the carrier 1.
Page 138 of 244
136
Practical information
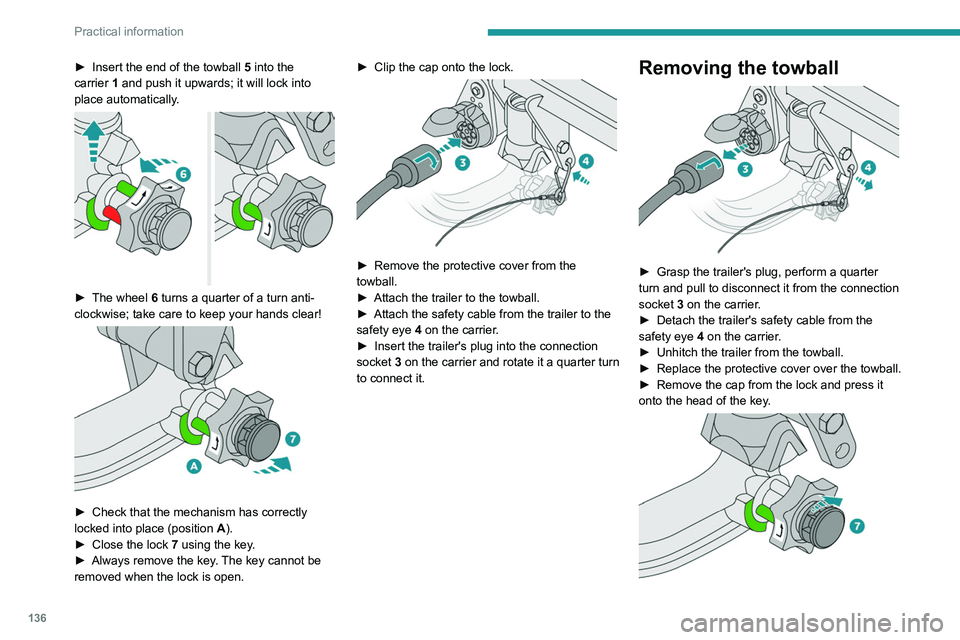
► Insert the end of the towball 5 into the
carrier 1 and push it upwards; it will lock into
place automatically.
► The wheel 6 turns a quarter of a turn anti-
clockwise; take care to keep your hands clear!
► Check that the mechanism has correctly
locked into place (position A
).
►
Close the lock 7
using the key.
►
Always remove the key
. The key cannot be
removed when the lock is open. ►
Clip the cap onto the lock.
► Remove the protective cover from the
towball.
►
Attach the trailer to the towball.
►
Attach the safety cable from the trailer to the
safety eye
4 on the carrier.
►
Insert the trailer's plug into the connection
socket
3 on the carrier and rotate it a quarter turn
to connect it.
Removing the towball
► Grasp the trailer's plug, perform a quarter
turn and pull to disconnect it from the connection
socket
3 on the carrier.
►
Detach the trailer's safety cable from the
safety eye
4 on the carrier.
►
Unhitch the trailer from the towball.
►
Replace the protective cover over the towball.
►
Remove the cap from the lock and press it
onto the head of the key
.
Page 139 of 244
137
Practical information
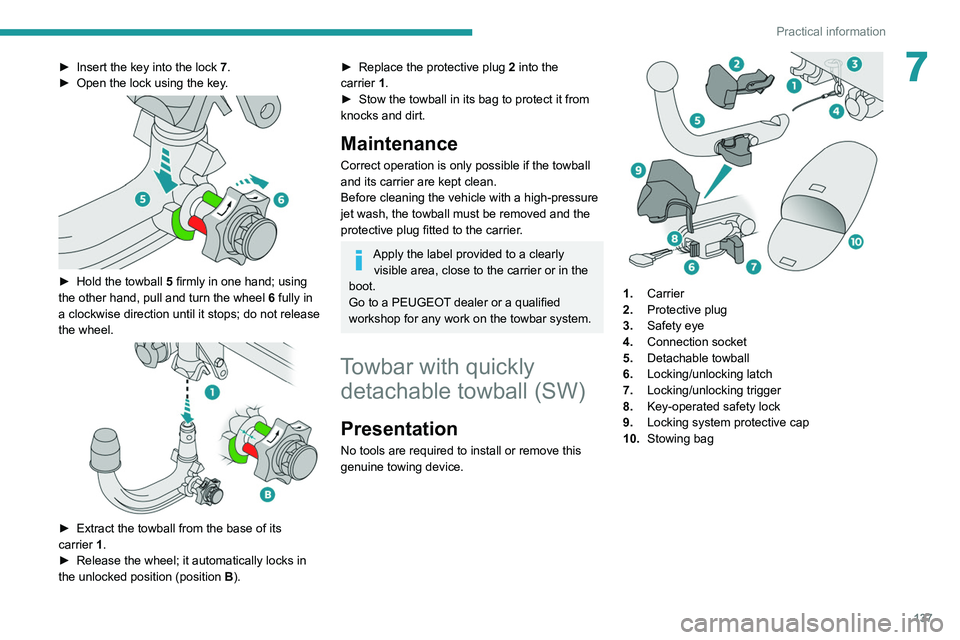
7► Insert the key into the lock 7.
► Open the lock using the key .
► Hold the towball 5 firmly in one hand; using
the other hand, pull and turn the wheel 6 fully in
a clockwise direction until it stops; do not release
the wheel.
► Extract the towball from the base of its
carrier 1.
►
Release the wheel; it automatically locks in
the unlocked position (position B
).
► Replace the protective plug 2 into the
carrier 1.
►
Stow the towball in its bag to protect it from
knocks and dirt.
Maintenance
Correct operation is only possible if the towball
and its carrier are kept clean.
Before cleaning the vehicle with a high-pressure
jet wash, the towball must be removed and the
protective plug fitted to the carrier.
Apply the label provided to a clearly visible area, close to the carrier or in the
boot.
Go to a PEUGEOT dealer or a qualified
workshop for any work on the towbar system.
Towbar with quickly detachable towball (SW)
Presentation
No tools are required to install or remove this
genuine towing device.
1. Carrier
2. Protective plug
3. Safety eye
4. Connection socket
5. Detachable towball
6. Locking/unlocking latch
7. Locking/unlocking trigger
8. Key-operated safety lock
9. Locking system protective cap
10. Stowing bag