2021 Peugeot 308 wheel
[x] Cancel search: wheelPage 161 of 244
159
In the event of a breakdown
8– a jack other than the one supplied by the
manufacturer .
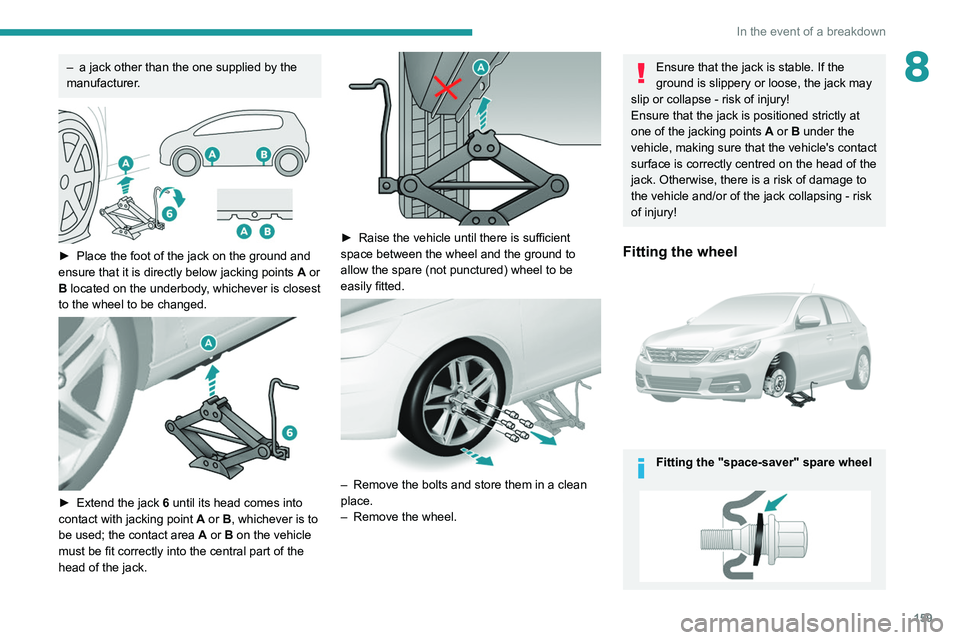
► Place the foot of the jack on the ground and
ensure that it is directly below jacking points A
or
B located on the underbody, whichever is closest
to the wheel to be changed.
► Extend the jack 6 until its head comes into
contact with jacking point A or B, whichever is to
be used; the contact area A or B on the vehicle
must be fit correctly into the central part of the
head of the jack.
► Raise the vehicle until there is sufficient
space between the wheel and the ground to
allow the spare (not punctured) wheel to be
easily fitted.
– Remove the bolts and store them in a clean
place.
–
Remove the wheel.
Ensure that the jack is stable. If the
ground is slippery or loose, the jack may
slip or collapse - risk of injury!
Ensure that the jack is positioned strictly at
one of the jacking points A or B under the
vehicle, making sure that the vehicle's contact
surface is correctly centred on the head of the
jack. Otherwise, there is a risk of damage to
the vehicle and/or of the jack collapsing - risk
of injury!
Fitting the wheel
Fitting the "space-saver" spare wheel
Page 162 of 244
160
In the event of a breakdown
If your vehicle is fitted with alloy wheels, when
tightening the bolts on fitting, it is normal to
notice that the washers do not come into
contact with the "space-saver" spare wheel.
The wheel is secured by the conical contact
of each bolt.
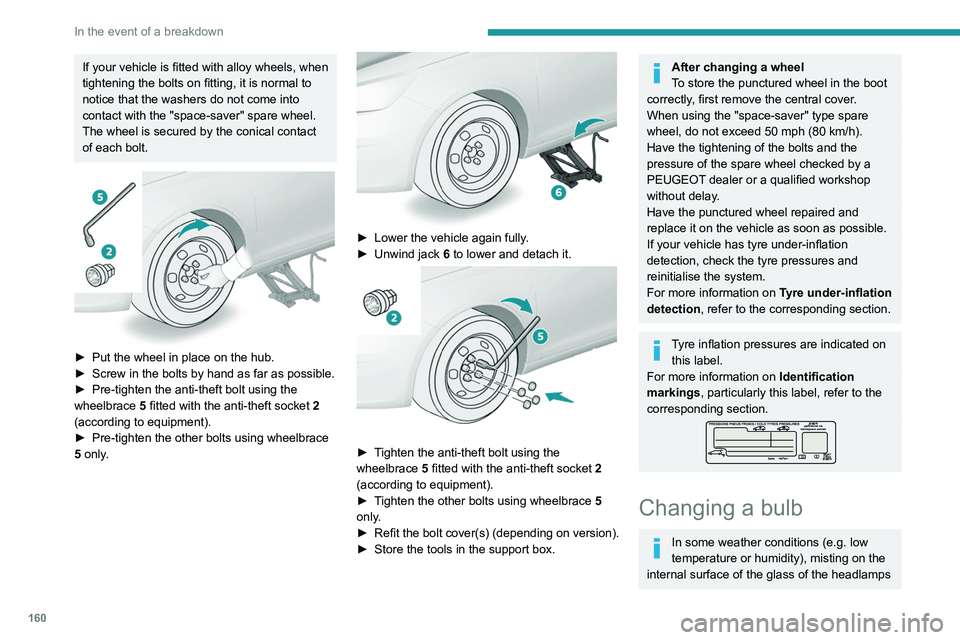
► Put the wheel in place on the hub.
► Screw in the bolts by hand as far as possible.
►
Pre-tighten the anti-theft bolt using the
wheelbrace 5
fitted with the anti-theft socket 2
(according to equipment).
►
Pre-tighten the other bolts using wheelbrace
5
only.
► Lower the vehicle again fully .
► Unwind jack 6
to lower and detach it.
► Tighten the anti-theft bolt using the
wheelbrace 5 fitted with the anti-theft socket 2
(according to equipment).
►
T
ighten the other bolts using wheelbrace 5
only.
►
Refit
the bolt cover(s) (depending on version).
►
Store the tools in the support box.
After changing a wheel
To store the punctured wheel in the boot
correctly, first remove the central cover.
When using the "space-saver" type spare
wheel, do not exceed 50 mph (80 km/h).
Have the tightening of the bolts and the
pressure of the spare wheel checked by a
PEUGEOT dealer or a qualified workshop
without delay.
Have the punctured wheel repaired and
replace it on the vehicle as soon as possible.
If your vehicle has tyre under-inflation
detection, check the tyre pressures and
reinitialise the system.
For more information on Tyre under-inflation
detection, refer to the corresponding section.
Tyre inflation pressures are indicated on this label.
For more information on Identification
markings, particularly this label, refer to the
corresponding section.
Changing a bulb
In some weather conditions (e.g. low
temperature or humidity), misting on the
internal surface of the glass of the headlamps
and rear lamps is normal, and will disappear
after the lamps have been on for a few
minutes.
The headlamps have polycarbonate lenses with a protective coating:
– Do not clean them with a dry or abrasive
cloth, nor with detergent or solvent
products.
– Use a sponge and soapy water or a pH
neutral product.
– When using a high-pressure washer on
persistent marks, do not keep the lance
directed towards the headlamps, lamps or
their edges for too long, so as not to damage
their protective coating and seals.
Changing a bulb must only be done with
the ignition off and after the headlamp /
lamp has been switched off for several
minutes - risk of serious burns!
Do not touch the bulb directly with your
fingers; use a lint-free cloth.
It is essential only to use anti-ultraviolet
(UV) type bulbs, so as not to damage the
headlamp.
Always replace a failed bulb with a new bulb
of the same type and specification. To avoid
lighting imbalance, replace the bulbs in pairs.
Page 174 of 244
172
In the event of a breakdown
Quick-release terminal clamp
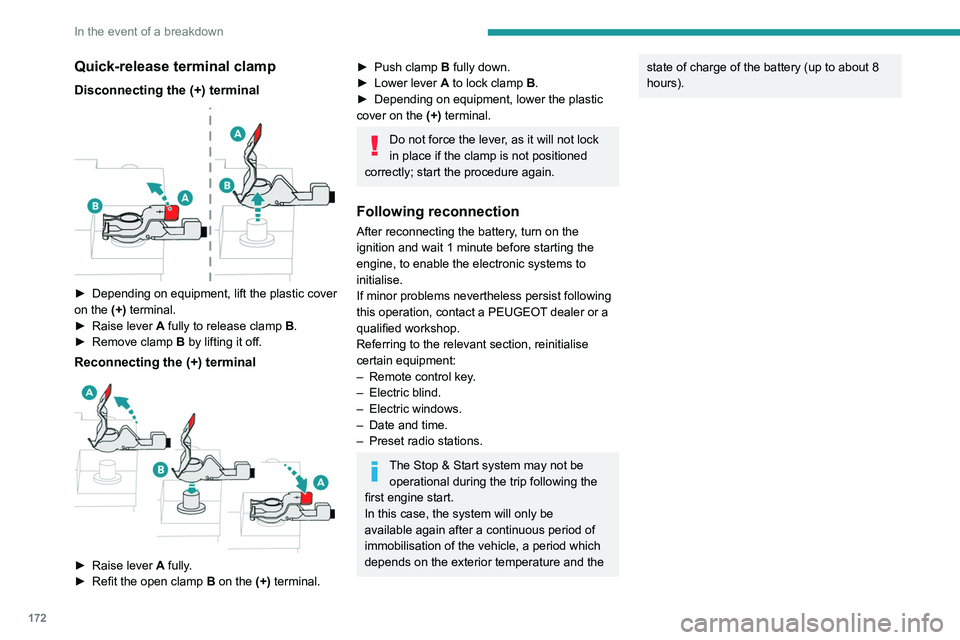
Disconnecting the (+) terminal
► Depending on equipment, lift the plastic cover
on the (+) terminal.
►
Raise lever
A
fully to release clamp
B
.
►
Remove clamp
B
by lifting it off.
Reconnecting the (+) terminal
► Raise lever A fully.
► Refit the open clamp B on the (+) terminal.
► Push clamp B fully down.
► Lower lever A to lock clamp B.
►
Depending on equipment, lower the plastic
cover on the
(+) terminal.
Do not force the lever, as it will not lock
in place if the clamp is not positioned
correctly; start the procedure again.
Following reconnection
After reconnecting the battery, turn on the
ignition and wait 1 minute before starting the
engine, to enable the electronic systems to
initialise.
If minor problems nevertheless persist following
this operation, contact a PEUGEOT dealer or a
qualified workshop.
Referring to the relevant section, reinitialise
certain equipment:
–
Remote control key
.
–
Electric blind.
–
Electric windows.
–
Date and time.
–
Preset radio stations.
The Stop & Start system may not be operational during the trip following the
first engine start.
In this case, the system will only be
available again after a continuous period of
immobilisation of the vehicle, a period which
depends on the exterior temperature and the
state of charge of the battery (up to about 8
hours).Towing the vehicle
General recommendations
Observe the legislation in force in the country where you are driving.
Ensure that the weight of the towing vehicle is higher than that of the \
towed vehicle.
The driver must remain at the wheel of the towed vehicle and must have a\
valid driving licence.
When towing a vehicle with all four wheels on the ground, always use an \
approved towbar; ropes and straps are prohibited.
The towing vehicle must move off gently.
When the vehicle is towed with its engine off, there is no longer braking and steering assistance.
A professional recovery service must be called if:
– broken down on a motorway or main road;
– not possible to put the gearbox into neutral, unlock the steering, or re\
lease the parking brake;
– not possible to tow a vehicle with an automatic gearbox, with the engine\
running;
– towing with only two wheels on the ground;
– four-wheel drive vehicle;
– no approved towbar available.
Towing constraints
Type of vehicle
(engine / gearbox) Front wheels on the
ground Rear wheels on the
ground Flatbed
4 wheels on the ground
with towbar
Internal combustion / Manual
Internal combustion / Automatic
In case of battery or electric parking brake failure, it is essential to call a p
rofessional using flatbed recovery vehicles (excluding manual gearbox).
Page 175 of 244
173
In the event of a breakdown
8Towing the vehicle
General recommendations
Observe the legislation in force in the country where you are driving.
Ensure that the weight of the towing vehicle is higher than that of the \
towed vehicle.
The driver must remain at the wheel of the towed vehicle and must have a\
valid driving licence.
When towing a vehicle with all four wheels on the ground, always use an \
approved towbar; ropes and straps are prohibited.
The towing vehicle must move off gently.
When the vehicle is towed with its engine off, there is no longer braking and steering assistance.
A professional recovery service must be called if:
– broken down on a motorway or main road;
–
not possible to put the gearbox into neutral, unlock the steering, or re\
lease the parking brake;
–
not possible to tow a vehicle with an automatic gearbox, with the engine\
running;
–
towing with only two wheels on the ground;
–
four-wheel drive vehicle;
–
no approved towbar available.
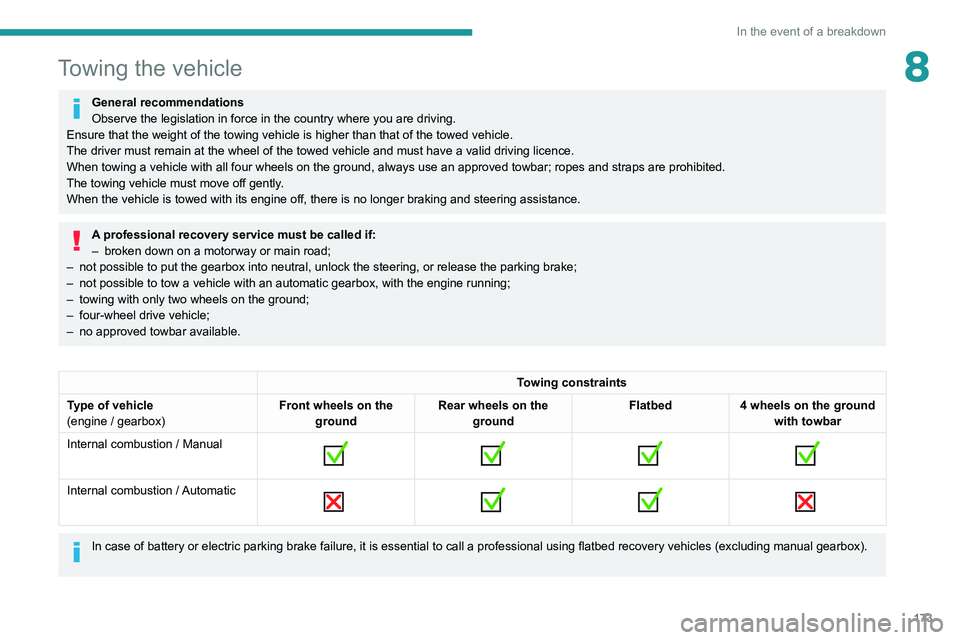
Towing constraints
Type of vehicle
(engine / gearbox) Front wheels on the
ground Rear wheels on the
ground Flatbed
4 wheels on the ground
with towbar
Internal combustion / Manual
Internal combustion / Automatic
In case of battery or electric parking brake failure, it is essential to call a p
rofessional using flatbed recovery vehicles (excluding manual gearbox).
Page 176 of 244
174
In the event of a breakdown
Accessing the tools
For more information on accessing the Tool kit,
refer to the corresponding section.
Towing your vehicle
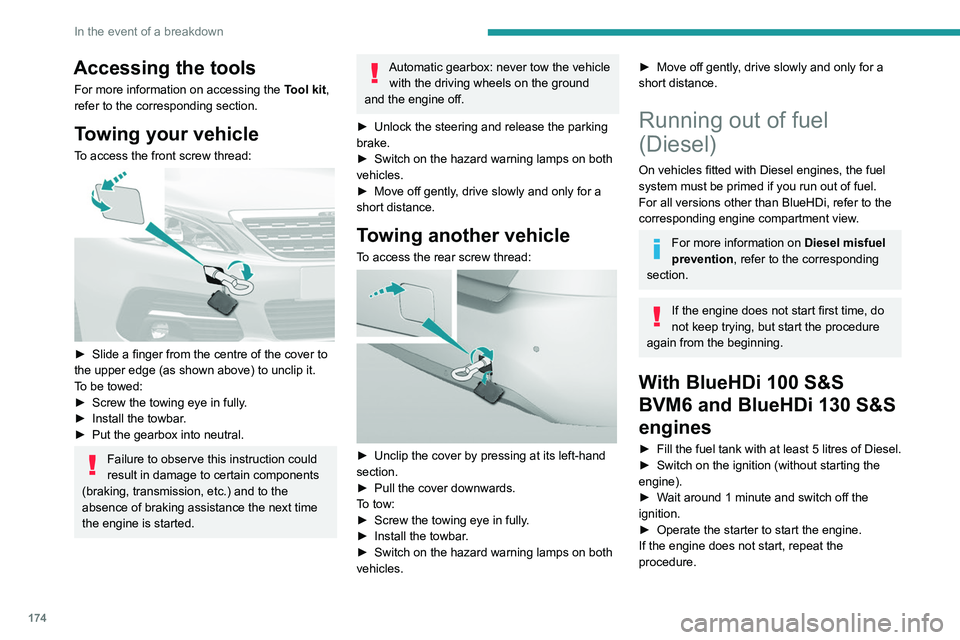
To access the front screw thread:
► Slide a finger from the centre of the cover to
the upper edge (as shown above) to unclip it.
T
o be towed:
►
Screw the towing eye in fully
.
►
Install the towbar
.
►
Put the gearbox into neutral.
Failure to observe this instruction could
result in damage to certain components
(braking, transmission, etc.) and to the
absence of braking assistance the next time
the engine is started.
Automatic gearbox: never tow the vehicle with the driving wheels on the ground
and the engine off.
►
Unlock the steering and release the parking
brake.
►
Switch on the hazard warning lamps on both
vehicles.
►
Move off gently
, drive slowly and only for a
short distance.
Towing another vehicle
To access the rear screw thread:
► Unclip the cover by pressing at its left-hand
section.
►
Pull the cover downwards.
T
o tow:
►
Screw the towing eye in fully
.
►
Install the towbar
.
►
Switch on the hazard warning lamps on both
vehicles.
► Move off gently , drive slowly and only for a
short distance.
Running out of fuel
(Diesel)
On vehicles fitted with Diesel engines, the fuel
system must be primed if you run out of fuel.
For all versions other than BlueHDi, refer to the
corresponding engine compartment view.
For more information on Diesel misfuel
prevention, refer to the corresponding
section.
If the engine does not start first time, do
not keep trying, but start the procedure
again from the beginning.
With BlueHDi 100 S&S
BVM6 and BlueHDi 130 S&S
engines
► Fill the fuel tank with at least 5 litres of Diesel.
► Switch on the ignition (without starting the
engine).
►
W
ait around 1 minute and switch off the
ignition.
►
Operate the starter to start the engine.
If the engine does not start, repeat the
procedure.
Other enginesNon-
► Fill the fuel tank with at least 5 litres of Diesel.
► Open the bonnet.
► If necessary, unclip the cover to access the
priming pump.
► Operate the priming pump repeatedly until
resistance is felt (there may be resistance on the
first press).
► Operate the starter to start the engine (if the
engine does not start at the first attempt, wait
around 15 seconds before trying again).
► If the engine does not start after a few
attempts, operate the priming pump again then
start the engine.
► Put the cover back in place and clip it in.
► Close the bonnet.
Page 184 of 244

182
Technical data
GTi hatchback
Commercial version
Number of seats: 2 people.
Effective boot volume: 1.31 m3
In metres (m)
Effective floor length 1.458
Effective
width at the
wheel arches 1.036
In metres (m)
Effective
width at the
centre 1.077
Effective height
–
at the centre 0.916
–
at the roof threshold 0.831
–
below the load space
cover 0.5
Identification markings
Various visible markings for vehicle identification
and vehicle search.
A. Vehicle Identification Number (VIN), under
the bonnet.
Stamped on the chassis, near the right-hand
front wheel arch.
B. Vehicle Identification Number (VIN), on the
dashboard.
Printed on an adhesive label visible through the
windscreen.
C. Manufacturer's label.
Affixed to the centre pillar, left-hand side or right-
hand side.
Bears the following information:
–
Manufacturer’s name.
Page 185 of 244

183
Technical data
9Identification markings
Various visible markings for vehicle identification
and vehicle search.
A. Vehicle Identification Number (VIN), under
the bonnet.
Stamped on the chassis, near the right-hand
front wheel arch.
B. Vehicle Identification Number (VIN), on the
dashboard.
Printed on an adhesive label visible through the
windscreen.
C. Manufacturer's label.
Affixed to the centre pillar, left-hand side or right-
hand side.
Bears the following information:
–
Manufacturer
’s name.
– European whole vehicle type approval
number .
–
V
ehicle Identification number (VIN).
–
Gross vehicle weight (GVW).
–
Gross train weight (GTW).
–
Maximum weight on the front axle.
–
Maximum weight on the rear axle.
D. T
yres/paint code label.
Affixed to the driver's door.
Bears the following information about the tyres:
–
T
yre pressures, unladen and laden.
–
T
yre specification, made up of the dimensions
and type as well as the load and speed indices.
–
Spare tyre inflation pressure.
Also indicates the paint colour code.
The vehicle may be originally equipped with tyres with higher load and speed
indices than those indicated on the label,
without affecting tyre pressure (on cold tyres).
Page 186 of 244

184
PEUGEOT Connect Radio
PEUGEOT Connect
Radio
Multimedia audio system -
Applications - Bluetooth
®
telephone
The functions and settings described
vary according to the vehicle version and
configuration.
For safety reasons and because they
require sustained attention by the driver,
the following operations must be carried out
with the vehicle stationary and the ignition
on:
–
Pairing the smartphone with the system in
Bluetooth mode.
–
Using the smartphone.
–
Connection to the CarPlay®, MirrorLinkTM
or Android Auto applications (certain
applications interrupt their display while the
vehicle is moving).
–
Changing the system settings and
configuration.
The system is protected in such a way that it will only operate in the vehicle.
The Energy Economy Mode message is
displayed when the system is about to enter
the corresponding mode.
The system’s Open Source Software (OSS) source codes are available at the
following addresses:
https://www.groupe-psa.com/fr/oss/
https://www.groupe-psa.com/en/oss/
First steps
With the engine running, a press mutes
the sound.
With the ignition off, a press turns the system on.
Increase or decrease the volume using
the wheel or the "plus" or "minus" buttons
(depending on the equipment).
Use the buttons on either side of or below the
touch screen for access to the menus, then
press the virtual buttons in the touch screen.
Depending on the model, use the "Source" or
"Menu" buttons on the left of the touch screen
for access to the menus, then press the virtual
buttons in the touch screen.
At all times it is possible to display the rolling
menus by pressing the screen briefly with three
fingers.
All of the touch areas of the screen are white.
For pages with multiple tabs at the bottom of the
screen, it is possible to switch between pages
either by tapping the tab for the desired page, or
by using a finger, sliding the pages to the left or
to the right.
Press in the grey zone to go back up a level or
to confirm.
Press the back arrow to go back a level or
confirm.
The touch screen is of the "capacitive" type.
To clean the screen, use a soft, non-abrasive
cloth (e.g. spectacles cloth) with no additional
product.
Do not use sharp objects on the screen.
Do not touch the screen with wet hands.
Certain information is displayed permanently in
the upper bar of the touch screen:
–
Air conditioning status information (depending
on version), and direct access to the
corresponding menu.
–
Radio Media and
Telephone menu status
information.
–
Privacy status information.
–
Access to the touch screen and digital
instrument panel settings.
Audio source selection (depending on
equipment):